Go to the Next Step

jQueryjQueryBeginner
Practice Now

Introduction

In this project, you will learn how to implement a step-by-step form with a progress bar using jQuery. This project is designed to help you understand the process of creating a dynamic and interactive form that allows users to navigate through different steps easily.

šŸ‘€ Preview

finished

šŸŽÆ Tasks

In this project, you will learn:

  • How to implement the functionality of the "Next Page" button to switch to the next step of the form.
  • How to implement the functionality of the "Previous" button to switch to the previous step of the form.
  • How to implement the functionality of the "Submit" button to display a success message.
  • How to update the progress bar to reflect the current step of the form.

šŸ† Achievements

After completing this project, you will be able to:

  • Use jQuery to manipulate the DOM and handle user interactions.
  • Control the display of form fields using the display property.
  • Update the progress bar to reflect the current step of the form.
  • Create a step-by-step form with a clean and intuitive user interface.

Skills Graph

%%%%{init: {'theme':'neutral'}}%%%% flowchart RL jquery(("`jQuery`")) -.-> jquery/EventHandlingGroup(["`Event Handling`"]) jquery(("`jQuery`")) -.-> jquery/DOMManipulationGroup(["`DOM Manipulation`"]) jquery/EventHandlingGroup -.-> jquery/event_methods("`Event Methods`") jquery/DOMManipulationGroup -.-> jquery/dom_traversal("`DOM Traversal`") jquery/DOMManipulationGroup -.-> jquery/element_management("`Element Creation and Removal`") subgraph Lab Skills jquery/event_methods -.-> lab-299879{{"`Go to the Next Step`"}} jquery/dom_traversal -.-> lab-299879{{"`Go to the Next Step`"}} jquery/element_management -.-> lab-299879{{"`Go to the Next Step`"}} end

Set Up the Project Structure

In this step, you will set up the project files and structure. Follow the steps below to complete this step:

Open the project folder. The directory structure is as follows:

ā”œā”€ā”€ css
ā”‚   ā””ā”€ā”€ style.css
ā”œā”€ā”€ js
ā”‚   ā”œā”€ā”€ index.js
ā”‚   ā””ā”€ā”€ jquery-3.6.0.min.js
ā””ā”€ā”€ index.html

Among them:

  • css/style.css is the style file.
  • js/index.js is the JavaScript file for implementing the switching of the step-by-step form.
  • js/jquery-3.6.0.min.js is the jQuery file.
  • index.html is the main page.

Click on Go Live button in the bottom right corner of WebIDE, to run the project.

Next, open "Web 8080" on the top of the VM and manually refresh it to see the page.

Implement the Next Page Button

In this step, you will learn how to implement the functionality of the "next" button in the first step of the form.

  1. Open the js/index.js file.
  2. Locate the $(".next").click code and add the code:
// Click the button on the next page
$(".next").click(function () {
  current_form = $(this).parent();
  next_form = current_form.next();
  // Control the next form to be shown and other forms to be hidden
  next_form.show().siblings("fieldset").hide();
  const index = next_form.index() - 1;
  $("#progressbar li").eq(index).addClass("active");
});
  1. This code is responsible for handling the click event of the "Next Page" button. Let's break down what it does:

    • $(".next").click(function () { ... }): This sets up a click event handler for any elements with the class "next".
    • current_form = $(this).parent();: This gets the current form field (the one containing the "Next Page" button that was clicked).
    • next_form = current_form.next();: This gets the next form field (the one that should be displayed after clicking the "Next Page" button).
    • next_form.show().siblings("fieldset").hide();: This shows the next form field and hides all other form fields (siblings of the next form field).
    • const index = next_form.index() - 1;: This calculates the index of the next form field, which will be used to update the progress bar.
    • $("#progressbar li").eq(index).addClass("active");: This adds the "active" class to the corresponding progress bar item, indicating that the user has moved to the next step.

Implement the Previous Button

In this step, you will learn how to implement the functionality of the "previous" button in the second step of the form.

  1. In the js/index.js file, locate the $(".previous").click code and add the code:
// Click the back button
$(".previous").click(function () {
  current_form = $(this).parent();
  previous_form = current_form.prev();
  previous_form.show().siblings("fieldset").hide();
  const index = previous_form.index() - 1;
  $("#progressbar li")
    .eq(index)
    .addClass("active")
    .next()
    .removeClass("active");
});
  1. This code is responsible for handling the click event of the "Previous" button. Let's break down what it does:
    • $(".previous").click(function () { ... }): This sets up a click event handler for any elements with the class "previous".
    • current_form = $(this).parent();: This gets the current form field (the one containing the "Previous" button that was clicked).
    • previous_form = current_form.prev();: This gets the previous form field (the one that should be displayed after clicking the "Previous" button).
    • previous_form.show().siblings("fieldset").hide();: This shows the previous form field and hides all other form fields (siblings of the previous form field).
    • const index = previous_form.index() - 1;: This calculates the index of the previous form field, which will be used to update the progress bar.
    • $("#progressbar li").eq(index).addClass("active").next().removeClass("active");: This adds the "active" class to the corresponding progress bar item, indicating that the user has moved to the previous step, and removes the "active" class from the next progress bar item.

Implement the Submit Button

In this step, you will learn how to implement the functionality of the "submit" button in the third step of the form.

  1. In the js/index.js file, locate the $(".submit").click code and add the code:
// Click the submit button
$(".submit").click(function () {
  alert("Submitted successfully!");
});
  1. This code is responsible for handling the click event of the "Submit" button. Let's break down what it does:
    • $(".submit").click(function () { ... }): This sets up a click event handler for any elements with the class "submit".
    • alert("Submitted successfully!");: This displays an alert message to the user, indicating that the form has been submitted successfully.

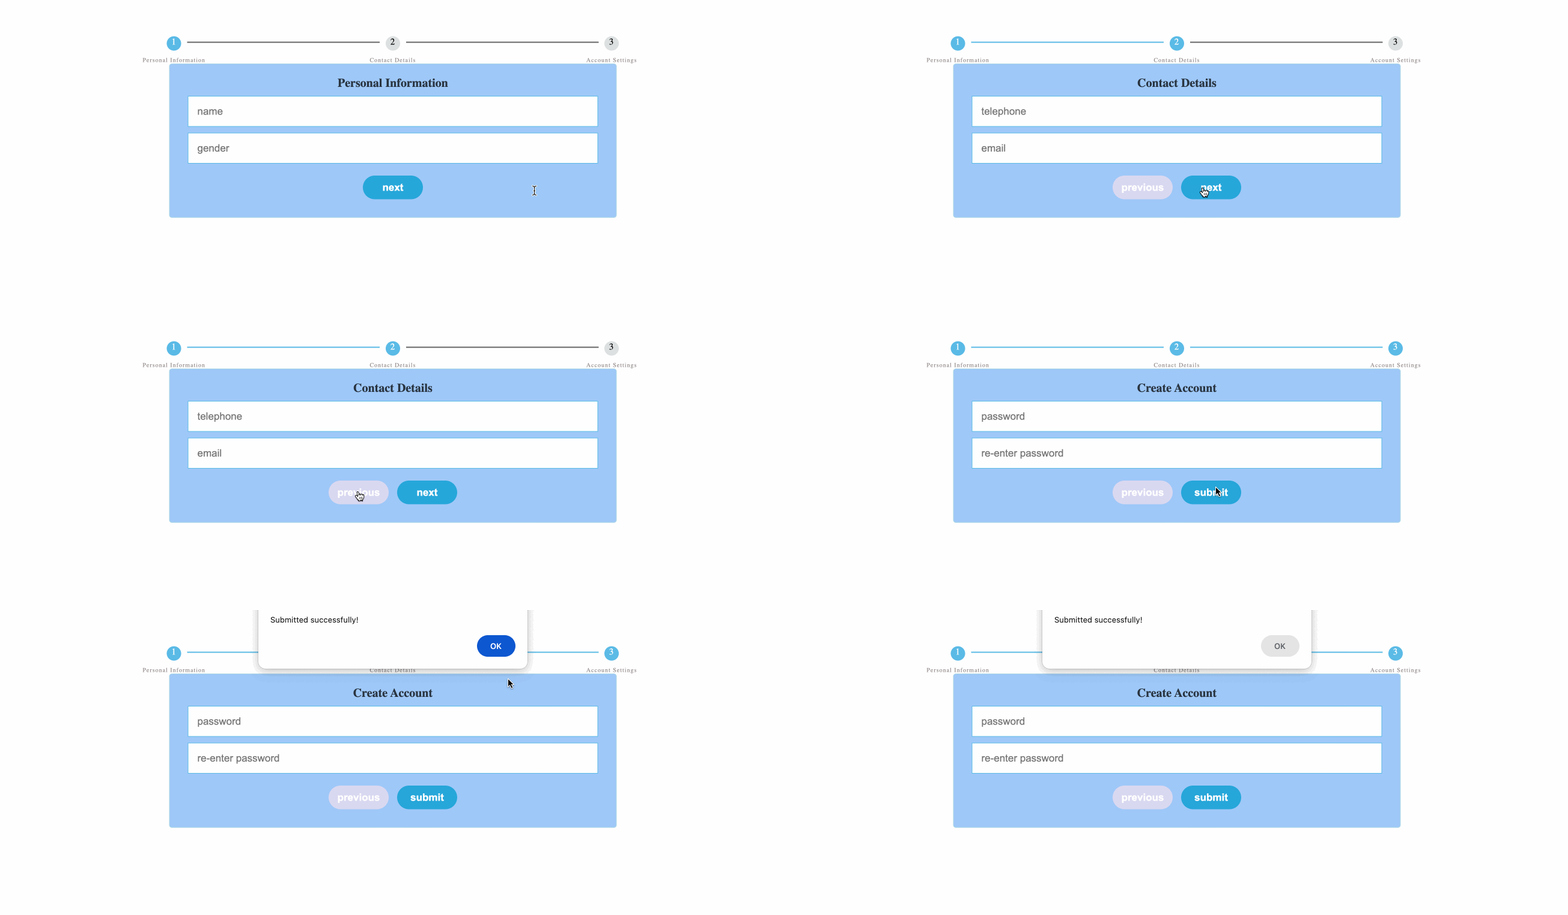
After completing these four steps, the step-by-step form functionality should be fully implemented. You can test the form by clicking the "next", "previous", and "submit" buttons to ensure that the form switching and progress bar updates are working as expected. The final page effect is as follows:

Image Description

Summary

Congratulations! You have completed this project. You can practice more labs in LabEx to improve your skills.

Other jQuery Tutorials you may like