
Introduction
This tutorial will guide you through the process of using the systemctl daemon-reload command to manage system daemons and services on your Linux system. Systemd is the default service manager for most modern Linux distributions, and understanding how to properly update service configurations is an essential skill for Linux users and administrators.
In this lab, you will learn when and why to use the systemctl daemon-reload command, create and modify service files, and apply configuration changes without disrupting your system's operations. By the end of this tutorial, you will be comfortable working with systemd services and applying configuration changes effectively.
This Lab requires an internet connection for learning, thus only Pro users can start the VM. Upgrade your account to Pro.
Understanding systemd and systemctl Basics
Systemd is the service and system manager for most modern Linux distributions, including Ubuntu 22.04 that we are using in this lab. It is responsible for starting and managing system services, and systemctl is the primary command-line tool used to interact with systemd.
What is a system daemon?
A daemon is a background process that runs continuously on your Linux system. These processes perform various tasks like serving web pages (Apache, Nginx), managing databases (MySQL, PostgreSQL), or handling system events. Systemd manages these daemons through standardized configuration files called "unit files."
Basic systemctl commands
Let's start by exploring some basic systemctl commands to understand your system's current state:
Open a terminal by clicking on the Terminal icon.
List all active system services with the following command:
systemctl list-units --type=service
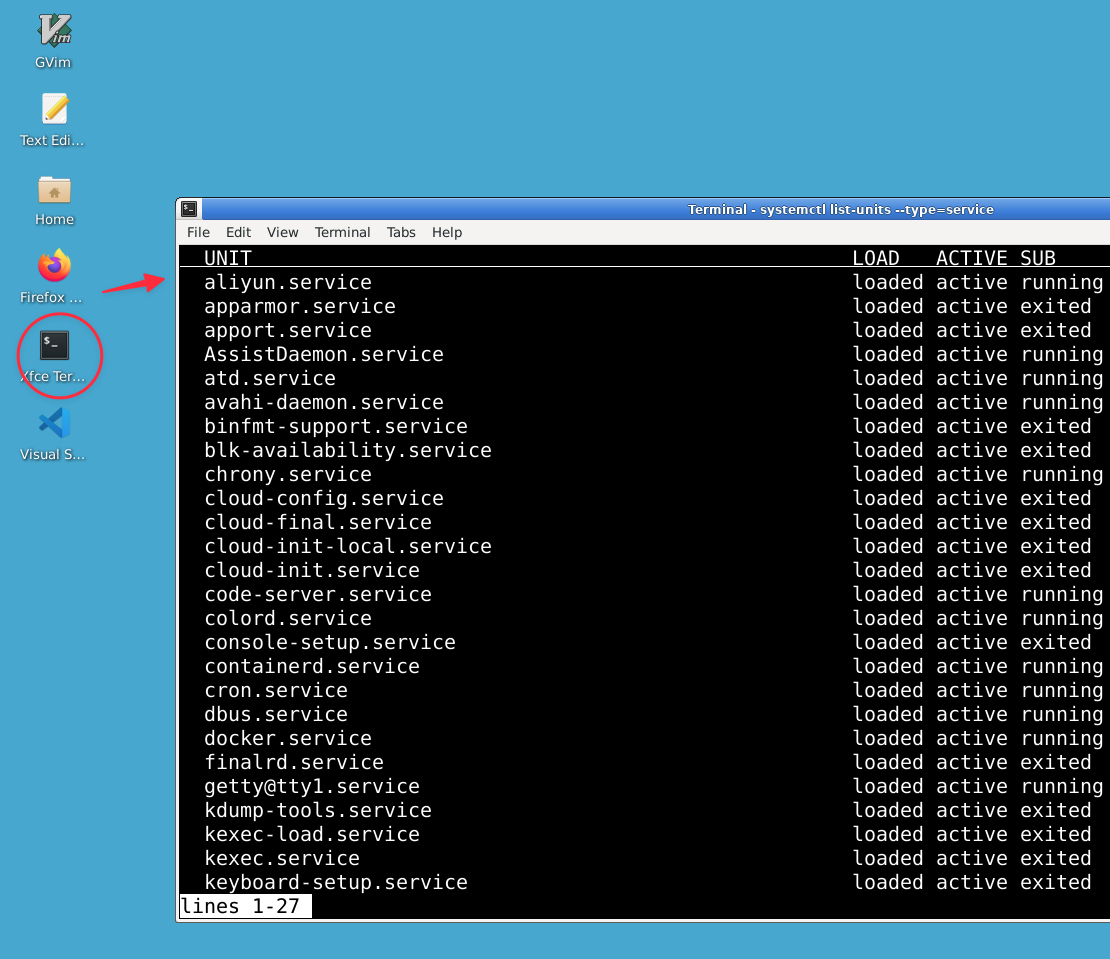
This command displays all currently active services on your system. You should see output similar to:
UNIT                                      LOAD   ACTIVE SUB     DESCRIPTION
accounts-daemon.service                   loaded active running Accounts Service
apparmor.service                          loaded active exited  AppArmor initialization
avahi-daemon.service                      loaded active running Avahi mDNS/DNS-SD Stack
...
Press Ctrl+C or Q to exit the command.
- Check the status of a specific service, for example the SSH service:
systemctl status ssh
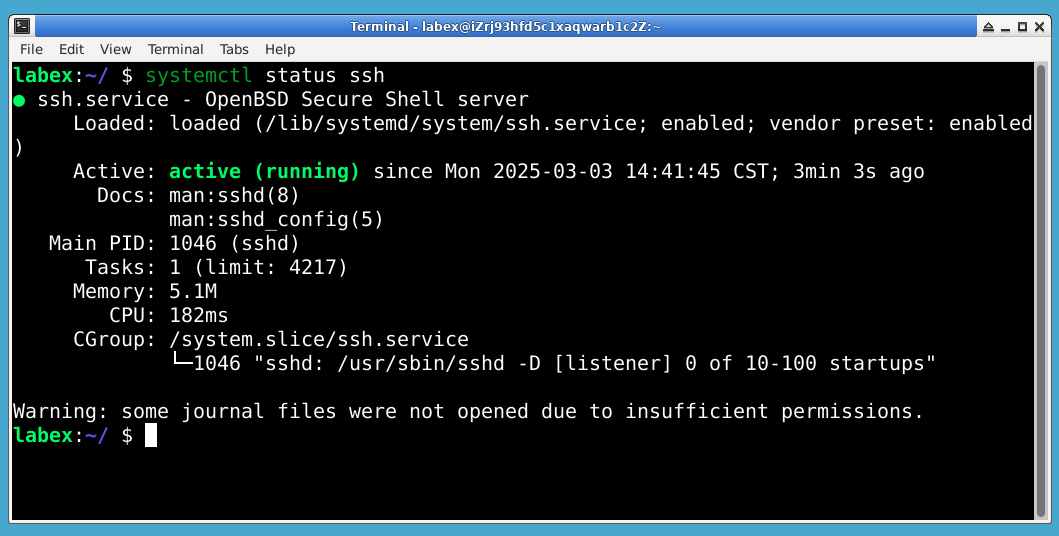
You should see detailed information about the SSH service, including whether it's active, its process ID, and recent log entries:
● ssh.service - OpenBSD Secure Shell server
     Loaded: loaded (/lib/systemd/system/ssh.service; enabled; vendor preset: enabled)
     Active: active (running) since Tue 2023-06-13 12:34:56 UTC; 3h 25min ago
       Docs: man:sshd(8)
             man:sshd_config(5)
    Process: 1234 ExecStartPre=/usr/sbin/sshd -t (code=exited, status=0/SUCCESS)
   Main PID: 1235 (sshd)
      Tasks: 1 (limit: 4915)
     Memory: 5.6M
        CPU: 236ms
     CGroup: /system.slice/ssh.service
             └─1235 "sshd: /usr/sbin/sshd -D [listener] 0 of 10-100 startups"
- Let's examine where systemd service files are stored. These are the files we'll be working with in the next steps:
ls -l /etc/systemd/system/
This directory contains service unit files that define how systemd manages services. You should see several .service files and symbolic links.
- System-provided unit files are located in a different directory. Let's examine them:
ls -l /lib/systemd/system/
This directory contains default service unit files that come with your system.
Now that you understand the basics of systemd and how to check the status of services, you're ready to create and modify service files in the next step.
Creating a Simple Systemd Service File
In this step, you will create a simple systemd service file that runs a custom script. This will help you understand how service files work and how to modify them.
Create a simple script
First, let's create a simple script that our service will run:
- Create a directory for your script:
mkdir -p ~/project/scripts
- Use the
nanotext editor to create a simple script:
nano ~/project/scripts/hello-service.sh
- Add the following content to the script:
#!/bin/bash

while true; do
  echo "Hello from custom service: $(date)" >> /tmp/hello-service.log
  sleep 10
done
Press Ctrl+X to exit the editor, then Y to save the file, then Enter to confirm the file name.
This script simply writes a message with the current date to a log file every 10 seconds.
- Make the script executable:
chmod +x ~/project/scripts/hello-service.sh
Create a systemd service unit file
Now, let's create a systemd service file that will run this script:
- Create a new service file using
sudoprivileges:
sudo nano /etc/systemd/system/hello-service.service
- Add the following content to the service file:
[Unit]
Description=Hello Service Demo
After=network.target

[Service]
Type=simple
ExecStart=/home/labex/project/scripts/hello-service.sh
Restart=on-failure
User=labex

[Install]
WantedBy=multi-user.target
Let's understand each section of this file:
[Unit]: Contains metadata and dependencies
Description: A human-readable description of the serviceAfter: Specifies that this service should start after the network is ready
[Service]: Defines how the service should be run
Type=simple: The service starts immediatelyExecStart: The command to run (our script)Restart: Automatically restart the service if it failsUser: The user account to run the service as
[Install]: Defines when and how the service should be enabled
WantedBy: Specifies when the service should be started (multi-user.target means normal system operation)
Save the file and exit the editor (press
Ctrl+X, thenY, thenEnterin nano).Let's examine our newly created service file:
cat /etc/systemd/system/hello-service.service
You should see the content you just added to the file.

In the next step, you will learn how to load and start this service using the systemctl daemon-reload command.
Using systemctl daemon-reload to Apply Changes
Now that you have created a systemd service file, you need to inform systemd about this new service. This is where the systemctl daemon-reload command comes into play.
What is systemctl daemon-reload?
The systemctl daemon-reload command instructs systemd to reload all service files and update its internal configuration. This is necessary whenever you:
- Create a new service file
- Modify an existing service file
- Delete a service file
Without running this command, systemd won't recognize your changes.
Reload systemd configuration
- Run the following command to reload the systemd configuration:
sudo systemctl daemon-reload
This command doesn't produce any output when successful, but it updates systemd's internal configuration.
- Now let's check if systemd recognizes our new service:
systemctl status hello-service
You should see output showing that the service is loaded but inactive:
● hello-service.service - Hello Service Demo
     Loaded: loaded (/etc/systemd/system/hello-service.service; disabled; vendor preset: enabled)
     Active: inactive (dead)
Start the service
- Let's start our service:
sudo systemctl start hello-service
- Check the status again to see if it's running:
systemctl status hello-service
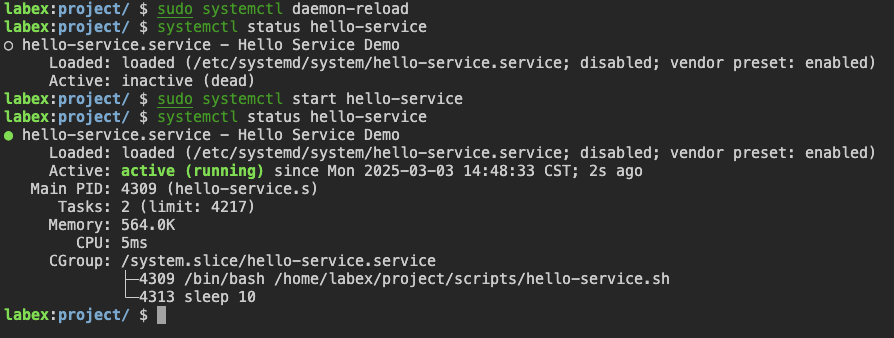
You should now see that the service is active and running:
● hello-service.service - Hello Service Demo
     Loaded: loaded (/etc/systemd/system/hello-service.service; disabled; vendor preset: enabled)
     Active: active (running) since [timestamp]; [time] ago
   Main PID: [pid number] (hello-service.sh)
      Tasks: 2 (limit: 4915)
     Memory: 592.0K
        CPU: 5ms
     CGroup: /system.slice/hello-service.service
             └─[pid number] /bin/bash /home/labex/project/scripts/hello-service.sh
- Verify that our service is actually working by checking the log file it creates:
cat /tmp/hello-service.log
You should see several lines of output similar to:
Hello from custom service: Wed Jun 14 15:30:45 UTC 2023
Hello from custom service: Wed Jun 14 15:30:55 UTC 2023
Hello from custom service: Wed Jun 14 15:31:05 UTC 2023
The log entries will show the current date and time, confirming that our service is running and executing the script as expected.
- Enable the service to start automatically at boot time:
sudo systemctl enable hello-service
You should see output similar to:
Created symlink /etc/systemd/system/multi-user.target.wants/hello-service.service → /etc/systemd/system/hello-service.service.
This means the service is now enabled and will start automatically when the system boots.
Now you've successfully created a service, used systemctl daemon-reload to inform systemd about it, and started the service. In the next step, you'll modify the service and apply the changes.
Modifying the Service Configuration
In this step, you will modify your service configuration and apply the changes using systemctl daemon-reload. This will demonstrate the importance of this command when updating service configurations.
Modify the service file
Let's modify our service to change how often it logs messages:
- Edit the service file:
sudo nano /etc/systemd/system/hello-service.service
- Add a new environment variable to the
[Service]section to control the sleep interval. Add this line after theUser=labexline:
Environment="SLEEP_INTERVAL=5"
Save and exit the file (press
Ctrl+X, thenY, thenEnterin nano).Now, edit the script to use this environment variable:
nano ~/project/scripts/hello-service.sh
- Modify the script to use the environment variable (replace the entire content with this):
#!/bin/bash

## Default to 10 seconds if environment variable is not set
INTERVAL=${SLEEP_INTERVAL:-10}

while true; do
  echo "Hello from custom service: $(date) - Interval: ${INTERVAL}s" >> /tmp/hello-service.log
  sleep $INTERVAL
done
- Save and exit the editor (press
Ctrl+X, thenY, thenEnterin nano).
Apply the changes
Now that you've made changes to both the service file and the script, you need to apply these changes:
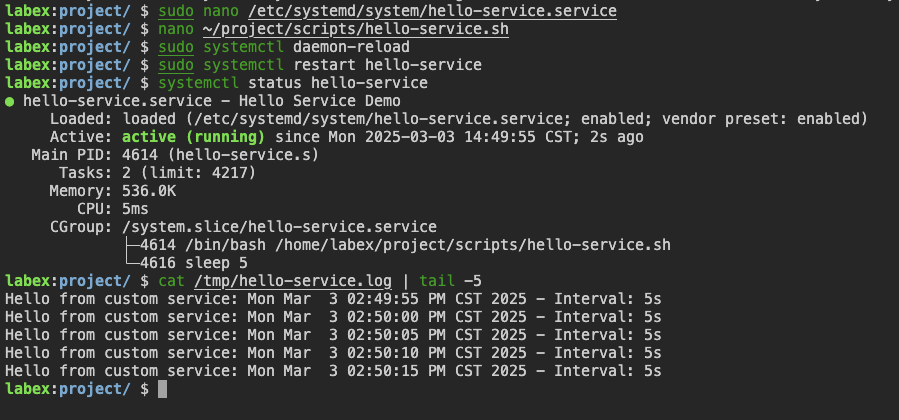
- First, reload the systemd configuration:
sudo systemctl daemon-reload
- Then, restart the service to apply the changes:
sudo systemctl restart hello-service
- Check the status of the service:
systemctl status hello-service
You should see that the service is running with the updated configuration.
- Verify that the changes took effect by checking the log file:
sleep 15 ## Wait to collect a few log entries
cat /tmp/hello-service.log | tail -5
You should now see that the service is logging messages every 5 seconds instead of 10, and the log entries should include the new interval information:
Hello from custom service: Wed Jun 14 15:45:10 UTC 2023 - Interval: 5s
Hello from custom service: Wed Jun 14 15:45:15 UTC 2023 - Interval: 5s
Hello from custom service: Wed Jun 14 15:45:20 UTC 2023 - Interval: 5s
Understanding what happened
Let's understand what just happened:
- You modified the service file to add an environment variable.
- You updated the script to use this environment variable.
- You ran
systemctl daemon-reloadto inform systemd about the changes to the service file. - You restarted the service to apply these changes.
Without the systemctl daemon-reload command, systemd would not have recognized the changes to the service file, and the environment variable would not have been passed to the script when restarting the service.
This demonstrates why systemctl daemon-reload is essential whenever you modify service files - it ensures that systemd is aware of your changes before you attempt to apply them by starting or restarting services.
Troubleshooting and Best Practices
In this final step, you will learn about common issues that can occur when working with systemd services and how to troubleshoot them. You will also learn some best practices for working with systemctl daemon-reload.
Troubleshooting common issues
1. Service fails to start
If your service fails to start, the first step is to check its status:
systemctl status hello-service
This often provides detailed error information. Let's intentionally create an error to see how to troubleshoot it:
- Edit the service file:
sudo nano /etc/systemd/system/hello-service.service
- Change the
ExecStartline to point to a non-existent script:
ExecStart=/home/labex/project/scripts/non-existent.sh
Save and exit the editor.
Reload the systemd configuration and try to restart the service:
sudo systemctl daemon-reload
sudo systemctl restart hello-service
- Check the status to see the error:
systemctl status hello-service
You should see error messages indicating that the script doesn't exist:
● hello-service.service - Hello Service Demo
     Loaded: loaded (/etc/systemd/system/hello-service.service; enabled; vendor preset: enabled)
     Active: failed (Result: exit-code) since [timestamp]; [time] ago
    Process: [pid] ExecStart=/home/labex/project/scripts/non-existent.sh (code=exited, status=203/EXEC)
   Main PID: [pid] (code=exited, status=203/EXEC)
        CPU: 5ms

[timestamp] systemd[1]: Started Hello Service Demo.
[timestamp] systemd[pid]: hello-service.service: Failed to execute command: No such file or directory
[timestamp] systemd[pid]: hello-service.service: Failed at step EXEC spawning /home/labex/project/scripts/non-existent.sh: No such file or directory
[timestamp] systemd[1]: hello-service.service: Main process exited, code=exited, status=203/EXEC
[timestamp] systemd[1]: hello-service.service: Failed with result 'exit-code'.
- Fix the service file to point back to the correct script:
sudo nano /etc/systemd/system/hello-service.service
- Change the
ExecStartline back to:
ExecStart=/home/labex/project/scripts/hello-service.sh
- Save and exit, then reload and restart:
sudo systemctl daemon-reload
sudo systemctl restart hello-service
- Verify the service is running again:
systemctl status hello-service
2. Reading journal logs for more information
When troubleshooting, you can use journalctl to view detailed logs:
sudo journalctl -u hello-service
This shows all logs for the hello-service unit, which can be invaluable for diagnosing issues.
To see only the most recent logs:
sudo journalctl -u hello-service -n 20
To follow the logs in real-time (similar to tail -f):
sudo journalctl -u hello-service -f
Press Ctrl+C to exit the log following mode.
Best practices for working with systemctl daemon-reload
Here are some best practices to follow when working with systemd and the daemon-reload command:
Always reload after changes: Always run
systemctl daemon-reloadafter modifying, adding, or removing any systemd unit files.Check syntax before applying: You can use the following command to check for syntax errors in your service files before reloading:
sudo systemd-analyze verify /etc/systemd/system/hello-service.service
If there are no errors, this command produces no output. Any syntax errors will be reported.
Use service templates: For services that require multiple instances, use service templates (files named like
service@.service) to avoid duplication.Review service dependencies: Make sure your services have the correct
After=andRequires=directives to ensure they start in the correct order.Clean up properly: When removing a service, make sure to stop and disable it before deleting the service file:
sudo systemctl stop hello-service
sudo systemctl disable hello-service
sudo rm /etc/systemd/system/hello-service.service
sudo systemctl daemon-reload
Let's clean up our example service now:
sudo systemctl stop hello-service
sudo systemctl disable hello-service
You should see output indicating that the symlink was removed:
Removed /etc/systemd/system/multi-user.target.wants/hello-service.service.
We won't delete the service file yet as we still need it for verification.
Now you understand how to create, modify, and troubleshoot systemd services, as well as the importance of the systemctl daemon-reload command in managing these services.
Summary
In this lab, you have learned how to use the systemctl daemon-reload command to manage system daemons and services on your Linux system. You have:
- Understood the basics of systemd and systemctl
- Created a custom systemd service file
- Used systemctl daemon-reload to apply changes to service configurations
- Modified service files and applied those changes
- Learned how to troubleshoot common issues and follow best practices
The systemctl daemon-reload command is essential when working with systemd services, as it ensures that the systemd manager is aware of any changes you make to service configurations. Without this command, your changes to service files would not be recognized by the system until the next reboot.
This knowledge will be valuable as you continue to work with Linux systems, allowing you to effectively manage services and ensure that your configuration changes are properly applied.


