Building Christmas Wish List App with React

JavaScriptJavaScriptIntermediate
Practice Now

Introduction

This project guides you through building a festive Christmas Wish List Builder web application using React. The app features a beautiful full-screen Christmas-themed background and a charming snowfall animation, enhancing the holiday spirit. Users can add wishes to a semi-transparent wish wall, and each wish is presented as a postcard. We'll use React for the frontend and CSS for styling and animations.

Note: This project is primarily built using Material UI and React.

👀 Preview
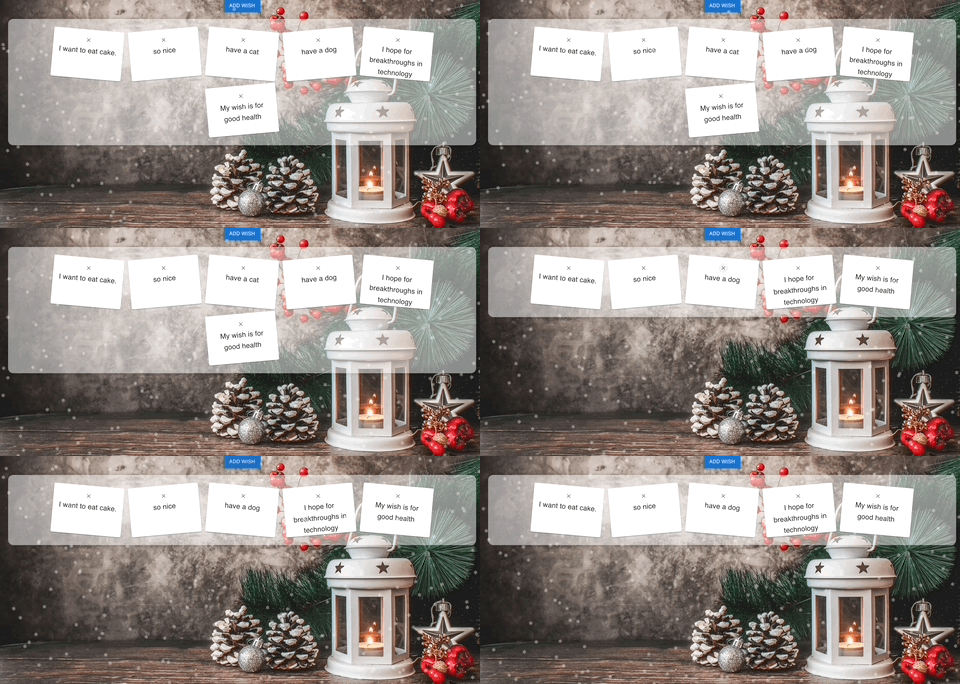
Wish List Builder Preview

🎯 Tasks

In this project, you will learn:

  • How to set up a React project and install dependencies
  • How to create functional components in React
  • How to use React hooks, such as useState, to manage state in components
  • How to pass data between parent and child components using props
  • How to handle form submissions in React
  • How to style a React application using CSS
  • How to build a visually appealing and interactive web application using React and CSS

🏆 Achievements

After completing this project, you will be able to:

  • Set up a React project and install necessary dependencies
  • Create functional components in React and manage their state using hooks
  • Pass data between parent and child components using props
  • Handle form submissions in a React application
  • Style a React application using CSS to create a visually appealing and interactive user interface
  • Build a complete web application using React and CSS, incorporating features like a Christmas-themed background, snowfall animation, and a wish list wall

Set Up Your Project

The React project files are already in your environment.

  1. Install the dependencies:
npm install
  1. Create the necessary directories and files:
mkdir src/components
touch src/components/{AddWishForm.js,WishList.js,Postcard.js,Snowflakes.js}
touch src/components/{Snowflakes.css,Postcard.css,WishList.css}

Set Up the Snowflakes Component

Create a snowflakes component to display the falling snow animation.

  1. In the src/components/Snowflakes.js file, write the following:
// Snowflakes.js - Creates falling snowflakes using CSS
import React from "react";
import "./Snowflakes.css";

const Snowflakes = () => {
  // Create an array of divs to represent snowflakes
  const snowflakes = Array.from({ length: 200 }).map((_, index) => (
    <div
      key={index}
      className="snowflake"
      style={{
        left: `${Math.random() * 100}vw`,
        animationDuration: `${Math.random() * 3 + 2}s`,
        animationDelay: `${Math.random() * 5}s`
      }}
    >
      ❅
    </div>
  ));

  return <div className="snow-container">{snowflakes}</div>;
};

export default Snowflakes;
  1. In the src/components/Snowflakes.css file, write the following:
/* Snowflakes.css - Styles for the falling snowflakes*/
.snow-container {
  position: absolute;
  top: 0;
  left: 0;
  width: 100%;
  height: 100%;
  overflow: hidden;
  z-index: 1;
  pointer-events: none;
}

.snowflake {
  position: absolute;
  top: -2vh;
  color: #fff;
  font-size: 1em;
  opacity: 0.8;
  user-select: none;
  pointer-events: none;
  /* Allows click events to pass through */
}

@keyframes snowfall {
  0% {
    transform: translateY(0);
  }

  100% {
    transform: translateY(100vh);
  }
}

.snowflake {
  animation: snowfall linear infinite;
}
✨ Check Solution and Practice

Create the Add Wish Form Component

This component allows users to input their wishes.

  1. In the src/components/AddWishForm.js file, write the following:
// AddWishForm.js - Form component for adding new wishes
import React, { useState } from "react";
import { TextField, Button, Box } from "@mui/material";

function AddWishForm({ onAddWish }) {
  const [wish, setWish] = useState("");

  const handleSubmit = (event) => {
    event.preventDefault();
    onAddWish(wish);
    setWish("");
  };

  return (
    <Box
      component="form"
      onSubmit={handleSubmit}
      sx={{
        mt: 2,
        display: "flex",
        alignItems: "center",
        justifyContent: "center"
      }}
    >
      <TextField
        label="Your Wish"
        variant="outlined"
        value={wish}
        onChange={(e) => setWish(e.target.value)}
        sx={{ mr: 2 }}
      />
      <Button variant="contained" color="secondary" type="submit">
        Submit Wish
      </Button>
    </Box>
  );
}

export default AddWishForm;
✨ Check Solution and Practice

Implement the Wish List and Postcard Components

Display added wishes on a semi-transparent wish wall in a postcard style.

  1. In the src/components/WishList.js file, write the following:
// WishList.js - Component to display wishes on the wish wall
import React from "react";
import Postcard from "./Postcard";
import "./WishList.css";

function WishList({ wishes, onRemoveWish }) {
  return (
    <div className="wish-wall">
      {wishes.map((wish, index) => (
        <Postcard key={index} wish={wish} onRemoveWish={onRemoveWish} />
      ))}
    </div>
  );
}

export default WishList;
  1. In the src/components/Postcard.js file, write the following:
// Postcard.js - Displays each wish as a postcard
import React from "react";
import { Card, CardContent, Typography, IconButton } from "@mui/material";
import CloseIcon from "@mui/icons-material/Close";
import "./Postcard.css";

function Postcard({ wish, onRemoveWish }) {
  return (
    <Card className="postcard">
      <CardContent>
        <IconButton
          className="delete-button"
          onClick={() => onRemoveWish(wish)}
          size="small"
        >
          <CloseIcon fontSize="inherit" />
        </IconButton>
        <Typography variant="h6" component="div">
          {wish}
        </Typography>
      </CardContent>
    </Card>
  );
}

export default Postcard;
✨ Check Solution and Practice

Style the Application

Ensure your application has the desired look and feel.

  1. In the src/App.css file, write the following:
/* App.css - Global styles, including the background image */
.App {
  color: #fff;
  font-family: "Your-Christmas-Theme-Font", sans-serif;
}
.app-container {
  margin-top: -4vh;
  position: relative;
  z-index: 2;
  background: url("./tijana-drndarski-1L4q_S1atmc-unsplash.jpg") no-repeat
    center center;
  background-size: cover;
  min-height: 100vh;
  min-width: 200vh;
  color: #fff;
}
  1. In the src/components/Postcard.css file, write the following:
.postcard {
  width: 200px;
  height: 140px;
  margin: 10px;
  box-shadow: 3px 3px 5px rgba(0, 0, 0, 0.2);
  transform: rotate(-5deg);
}

.postcard:nth-child(odd) {
  transform: rotate(5deg);
}

.delete-button {
  position: absolute;
  top: 0;
  right: 0;
}
  1. In the src/components/WishList.css file, write the following:
.wish-wall {
  display: flex;
  flex-wrap: wrap;
  justify-content: center;
  padding: 20px;
  background-color: rgba(255, 255, 255, 0.5);
  border-radius: 15px;
  box-shadow: 0px 0px 10px rgba(0, 0, 0, 0.2);
  margin-top: 20px;
}
✨ Check Solution and Practice

Assemble the App Component

Put together the main application component.

  1. In the src/App.js file, write the following:
// App.js - Main application component
import React, { useState } from "react";
import AddWishForm from "./components/AddWishForm";
import WishList from "./components/WishList";
import Snowflakes from "./components/Snowflakes";
import { Container, Button, Box } from "@mui/material";
import "./App.css";

function App() {
  const [wishes, setWishes] = useState([]);
  const [showForm, setShowForm] = useState(false);

  const handleAddWish = (newWish) => {
    setWishes([...wishes, newWish]);
    setShowForm(false);
  };

  const handleRemoveWish = (wish) => {
    setWishes(wishes.filter((item) => item !== wish));
  };

  return (
    <Container maxWidth="md" className="app-container">
      <Snowflakes />
      <Box sx={{ my: 4, textAlign: "center" }}>
        <Button
          variant="contained"
          color="primary"
          onClick={() => setShowForm(!showForm)}
        >
          {showForm ? "Close" : "Add Wish"}
        </Button>
        {showForm && <AddWishForm onAddWish={handleAddWish} />}
        <WishList wishes={wishes} onRemoveWish={handleRemoveWish} />
      </Box>
    </Container>
  );
}

export default App;
✨ Check Solution and Practice

Run the Project

Finally, it's time to see your Christmas Wish List Builder in action.

npm start

This command will launch the application in your default web browser. You should see your Christmas-themed wish list app with falling snowflakes, a semi-transparent wish wall, and postcard-style wishes.

✨ Check Solution and Practice

Summary

In this project, you've successfully built a Christmas Wish List Builder using React. It features a full-screen festive background, a charming snowfall effect, and a semi-transparent wish wall where users can add and view wishes as postcards. This project not only enhances your React and CSS skills but also gets you in the holiday spirit with a fun, interactive web application.

Other JavaScript Tutorials you may like