
Introduction
This tutorial guides you through using Docker Compose with a host network configuration on a LabEx cloud VM. Docker Compose is a tool that helps you manage multiple containers—think of containers as lightweight, isolated environments that run applications like a web server. Normally, Docker isolates a container’s network from the host machine (the VM you’re working on), but the host network option lets the container share the host’s network directly. This is handy when your application needs to act as if it’s running directly on the host, such as accessing the host’s ports without extra setup. By the end, you’ll set up Docker Compose, create, deploy, and test a simple web service using host networking. Docker is pre-installed in your LabEx environment, but we’ll ensure Docker Compose is ready too.
This Lab requires an internet connection for learning, thus only Pro users can start the VM. Upgrade your account to Pro.
Set Up Docker Compose
Before diving into the configuration, let’s ensure Docker Compose is available on your LabEx cloud VM. While Docker is pre-installed, Docker Compose—a separate tool for managing multi-container setups—might not be. We’ll install it quickly using the terminal.
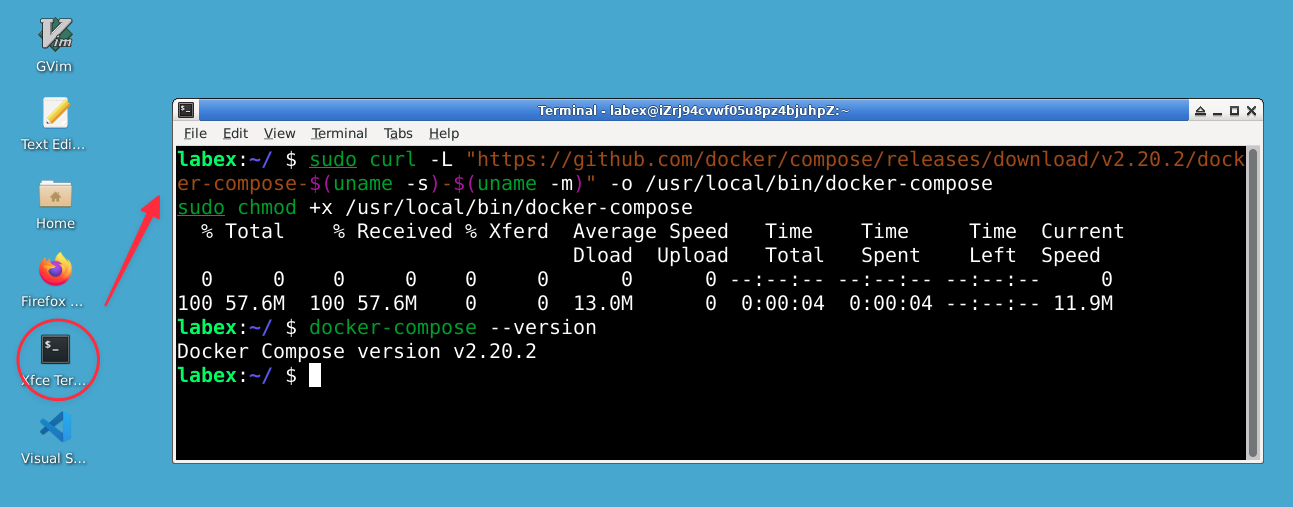
Open the terminal in your LabEx VM. The prompt should show /home/labex/project—this is your default working directory. Run these commands one by one:
sudo curl -L "https://github.com/docker/compose/releases/download/v2.20.2/docker-compose-$(uname -s)-$(uname -m)" -o /usr/local/bin/docker-compose
sudo chmod +x /usr/local/bin/docker-compose
Here’s what these do:
curl: Downloads the Docker Compose binary from its official GitHub release. The URL uses$(uname -s)-$(uname -m)to match your VM’s system (e.g., Linux-x86_64). Version 2.20.2 is stable and widely compatible.-o /usr/local/bin/docker-compose: Saves it to/usr/local/bin, a standard location for executable tools.sudoensures you have permission to write there.chmod +x: Makes the file executable, so you can run it as a command. Again,sudogrants the needed rights.
To confirm it worked, run:
docker-compose --version
You should see output like Docker Compose version v2.20.2. If you get "command not found," re-run the commands carefully—check for typos or internet issues (the VM needs web access to download). This step ensures you’re ready to use docker-compose in the next steps.
Create a Docker Compose File with Host Network
Now that Docker Compose is ready, let's create a docker-compose.yml file—your blueprint for running a web service with host networking. We'll use nano, a simple and beginner-friendly terminal text editor.
To create and edit the file, follow these steps:
In your terminal, make sure you're in the project directory:
cd /home/labex/projectCreate and open the file with nano:
nano docker-compose.ymlType or paste the following content into nano:
version: "3"
services:
  web:
    image: nginx:latest
    network_mode: host
Here's what each part means:
version: "3": Sets the Docker Compose file format. Version 3 is a common standard, like choosing a template.services: Lists the containers (or "services") to run, like workers for your project.web: Names your service—call it anything, but "web" fits a web server.image: nginx:latest: Specifies the software—Nginx, a popular web server, withlatestpulling the newest version from Docker Hub (a container image library).network_mode: host: The key setting. Normally, Docker gives containers their own private network, isolating them from the host.hostmode lets the container use the VM's network directly, so Nginx can access the host's ports (like 80) without extra steps.
- To save the file in nano:
- Press
Ctrl + Xto exit - Press
Yto confirm saving changes - Press
Enterto confirm the filename
- Press
The file is now saved in /home/labex/project, and you're ready for the next step.
Deploy the Docker Compose Application
With your docker-compose.yml file set, let’s deploy the Nginx container—telling Docker to start it based on your blueprint. Switch to the terminal for this.
In the terminal at /home/labex/project, run:
docker-compose up -d
Breaking it down:
docker-compose: The tool that readsdocker-compose.ymland manages your services.up: Starts thewebservice (Nginx) defined in the file.-d: Runs it in the background ("detached" mode), so your terminal stays free.
Docker Compose will download the nginx:latest image from Docker Hub if it’s not already on the VM (you might see download messages), then launch the container. Check it’s running with:
docker ps
This lists active containers. Look for nginx:latest under "IMAGE" and "Up" under "STATUS" (e.g., "Up 5 seconds"). You won’t see port mappings (like 0.0.0.0:80->80/tcp) because network_mode: host uses the host’s ports directly. If nothing shows, ensure you’re in /home/labex/project (pwd to check) and re-run docker-compose up -d.
Test the Nginx Service on the Host Network
Now that the container’s running with host networking, let’s test if Nginx serves web pages on the host’s port 80—the standard web port.
In the terminal at /home/labex/project, run:
curl localhost:80
What’s happening:
curl: Fetches data from a web address, like a terminal-based browser.localhost:80: Connects to the VM itself (localhost) on port 80. Withnetwork_mode: host, the container’s Nginx uses the host’s network, so its port 80 is the host’s port 80.
You should see HTML starting with <!DOCTYPE html>—Nginx’s default welcome page. Normally, Docker isolates container networks, requiring port mapping (e.g., host port 80 to container port 80). Host mode skips this, letting Nginx bind directly to the VM’s port 80.
If you get "connection refused," check Step 3—run docker ps to confirm the container’s "Up." Restart with docker-compose up -d if needed, or verify Docker with sudo service docker status. No browser here, so curl is your test tool.
Explore Logs and Clean Up
Let’s check the container’s logs to see what’s happening inside—a key troubleshooting skill—then clean up by removing it.
Check Logs
Run:
docker-compose logs web
docker-compose logs: Shows output from your services.web: Targets thewebservice fromdocker-compose.yml.
Look for lines like "nginx starting" or "listening on 0.0.0.0:80." If you used curl, you might see "GET /" logged. Errors (e.g., "port 80 failed") would show here too—useful if Nginx stops.
Clean Up
Run:
docker-compose down
docker-compose down: Stops and removes the container, freeing port 80 and tidying up.
Verify with:
docker ps
No nginx line means it’s gone. If it lingers, re-run docker-compose down. The docker-compose.yml stays, so you can restart later with docker-compose up -d. This wraps up the lifecycle: setup, deploy, test, and remove.
Troubleshooting and Best Practices
Here’s how to handle hiccups and use Docker Compose wisely.
Troubleshooting Tips
- Container Not Starting: If
docker psis empty, checkdocker-compose logs webfor errors like "port in use." Free port 80 withsudo lsof -i :80andsudo kill <PID>, thendocker-compose up -d. - No
curlResponse: Confirm the container’s up (docker ps) and Docker’s running (sudo service docker status). Restart withdocker-compose up -dorsudo service docker restart. - File Issues: If
docker-compose upcan’t find the file, verify you’re in/home/labex/project(pwd) anddocker-compose.ymlexists (ls).
Best Practices
- Limit Host Networking: It’s simple but skips isolation, risking security if other services run. Use it for labs, not production unless necessary.
- Pre-check Ports: Test with
sudo netstat -tuln | grep :80—clear port 80 first. - Keep Files: Save
docker-compose.ymlin/home/labex/projectfor reuse. - Watch Logs: Regularly check logs to spot issues early.
These habits make your Docker work reliable and teach you core skills.
Summary
You’ve installed Docker Compose, created a docker-compose.yml file with host networking, deployed an Nginx container, tested it, checked logs, and cleaned up. Host networking lets containers use the host’s network directly, skipping Docker’s isolation—a powerful trick. These steps build a foundation for managing Docker Compose apps and troubleshooting, setting you up for bigger projects.


