
Introduction
In this project, you will learn how to develop a RequestControl class that collects launch requests for spacecraft and automatically arranges the launch of the next batch of spacecraft based on the results of the spacecraft. This will help humans escape the impact of the "Dual Vector Foil" of the three-body problem, which collapses three-dimensional space into a two-dimensional plane.
👀 Preview
🎯 Tasks
In this project, you will learn:
- How to implement the
runfunction in theRequestControlclass to handle the launch of spacecraft. - How to render the launch results on the page using the
renderfunction.
🏆 Achievements
After completing this project, you will be able to:
- Use promises to simulate the spacecraft launch process.
- Manage the launch queue and control the number of spacecraft that can be launched at a time.
- Update the user interface to display the launch results.
Set Up the Project Structure
In this step, you will set up the project files and structure. Follow the steps below to complete this step:
Open the project folder. The directory structure is as follows:
├── index.html
└── main.js
Among them:
index.htmlis the main page.main.jsis the js file where the code needs to be supplemented.
In the main.js file:
- The
createRequestmethod is apromisefor launching a spacecraft request. - The
addRequestmethod of theRequestControlclass collects launch requests for spacecraft. The spacecraft launch request is placed in thethis.requestQueuelaunch queue. - The
runmethod automatically arranges the launch of the next batch of spacecraft based on the launch results. - The
rendermethod is used to render the launch results on the page.
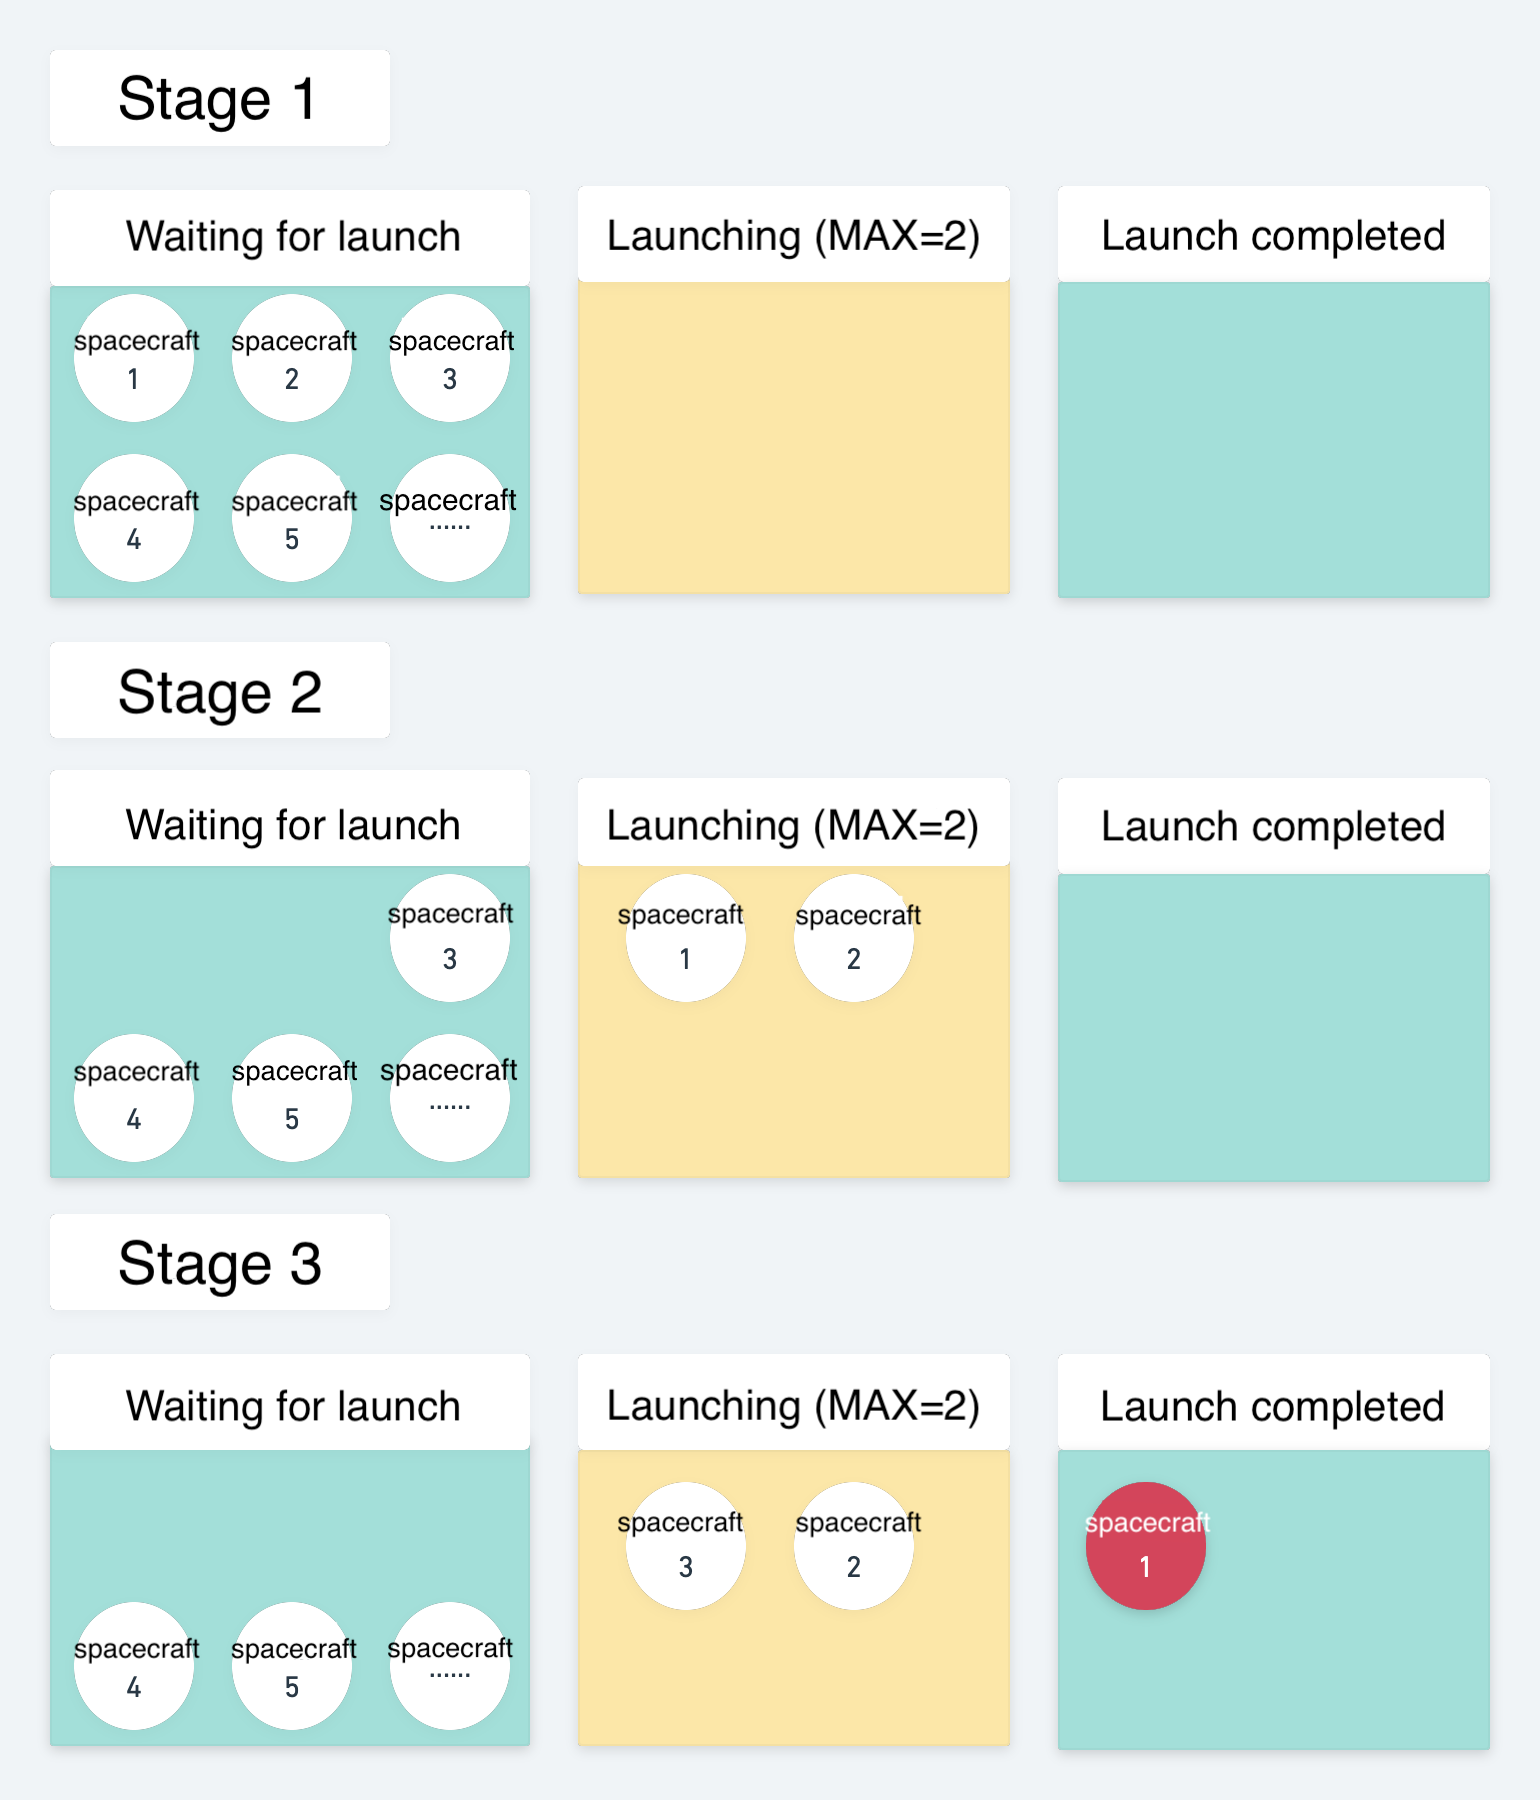
Take max = 2 as an example, the spacecraft launch process is as follows:
Click on Go Live button in the bottom right corner of WebIDE, to run the project. It has no effect initially.
Implement the run Function in the RequestControl Class
In this step, you will implement the run function in the RequestControl class to automatically arrange the launch of the next batch of spacecraft based on the launch results.
- Open the
main.jsfile in the provided project. - Locate the
runfunction in theRequestControlclass. - Inside the
runfunction, add the following code to handle the launch of the spacecraft:
run() {
  // Get the length of the request queue
  let len = this.requestQueue.length;

  // If the request queue is empty, return
  if (len === 0) return;

  // Get the minimum of the max number of spacecraft and the length of the request queue
  let min = Math.min(this.max, len);

  // Launch the spacecraft one by one
  for (let i = 0; i < min; i++) {
    // Decrement the max number of spacecraft that can be launched
    this.max--;

    // Get the next request from the queue
    let req = this.requestQueue.shift();

    // Launch the spacecraft and handle the result
    req()
      .then((res) => {
        this.render(res);
      })
      .catch((error) => {
        this.render(error);
      })
      .finally(() => {
        // Increment the max number of spacecraft that can be launched
        this.max++;
        // Recursively call the run function to launch the next batch of spacecraft
        this.run();
      });
  }
}
The key points of the implementation are:
- Get the length of the request queue (
this.requestQueue.length). - If the request queue is empty, return.
- Get the minimum of the max number of spacecraft and the length of the request queue (
Math.min(this.max, len)). - Launch the spacecraft one by one, decrementing the max number of spacecraft that can be launched (
this.max--). - Handle the result of the spacecraft launch using the
thenandcatchmethods of the promise returned byreq(). - Increment the max number of spacecraft that can be launched (
this.max++) and recursively call therunfunction to launch the next batch of spacecraft.
Test the Project
- Save the
main.jsfile. - Refresh the web page in your browser.
- Observe the launch results displayed on the page. The page should show the successful and failed launches of the spacecraft.
The final page effect is as follows:
Congratulations! You have completed the implementation of the RequestControl class to automatically arrange the launch of spacecraft. The project should now be fully functional.
Summary
Congratulations! You have completed this project. You can practice more labs in LabEx to improve your skills.


