Monty Hall Simulation Web App

JavaScriptJavaScriptBeginner
Practice Now

Introduction

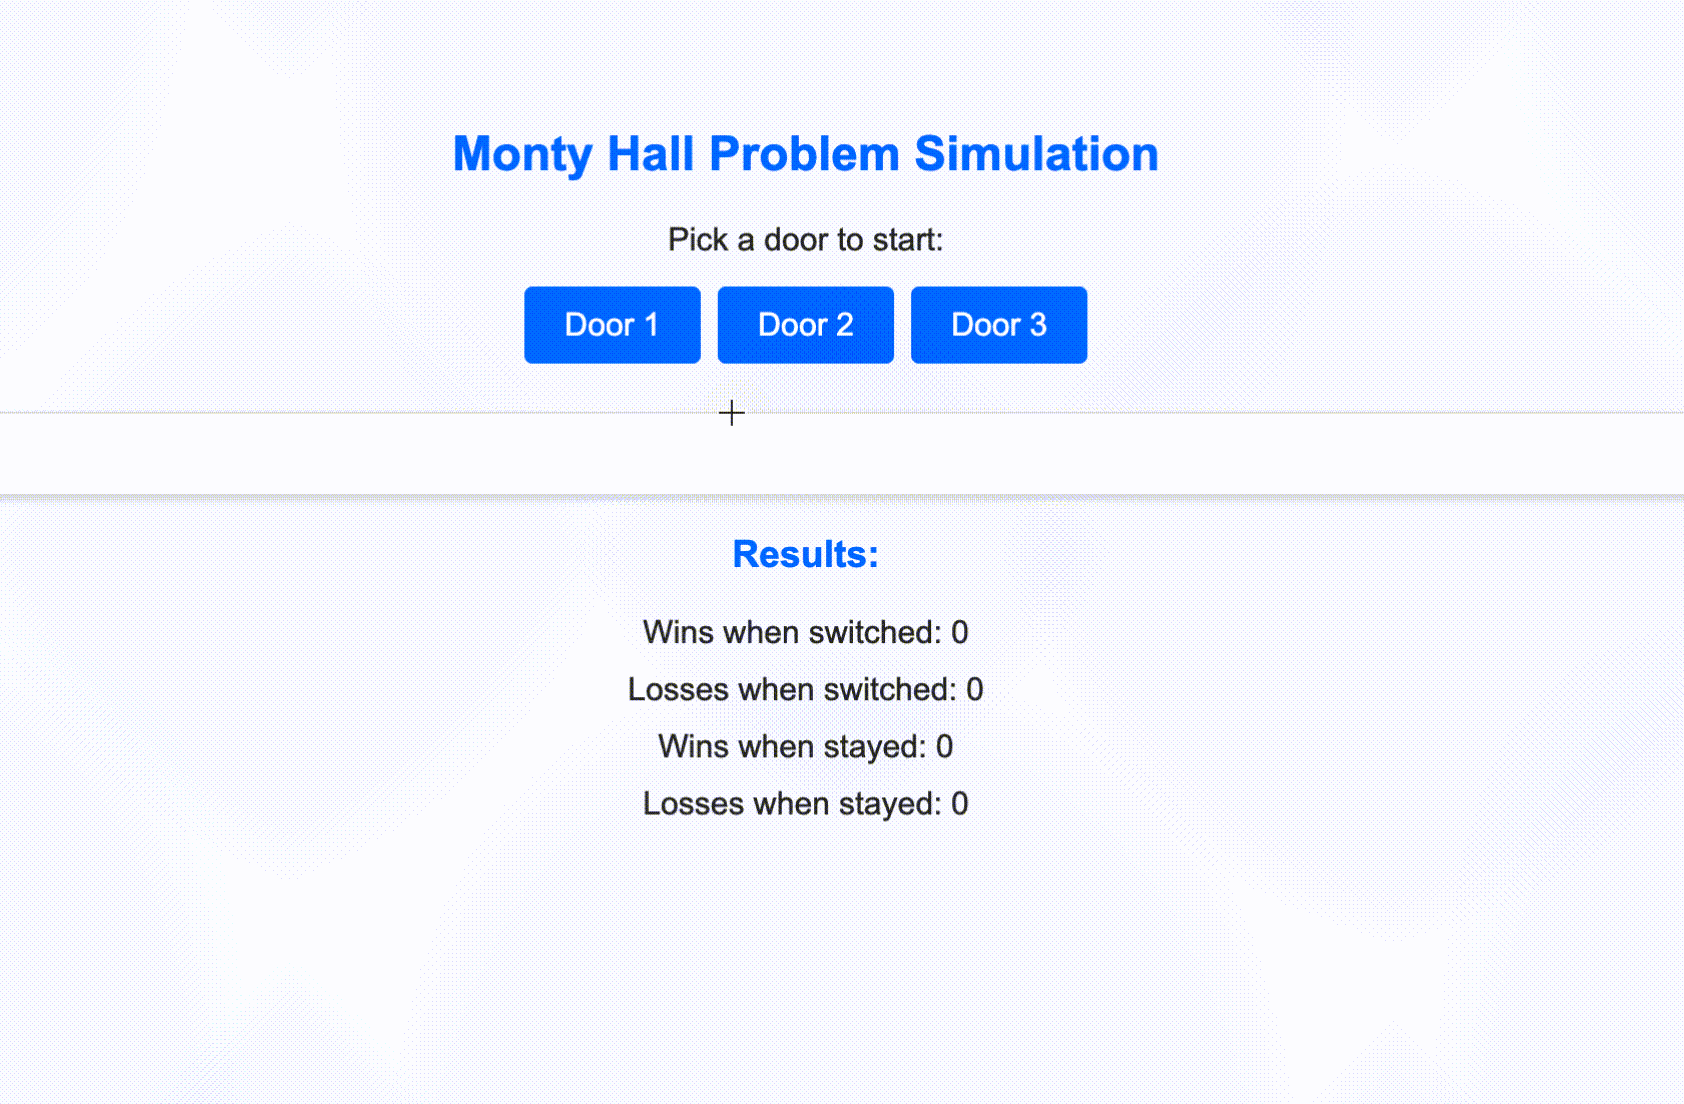
Welcome to the Monty Hall Problem Simulation project. The Monty Hall problem is a probability puzzle based on a game show scenario. In this project, we'll guide you through creating a simple web-based simulation to demonstrate the puzzle. By the end, you'll have a functional Monty Hall simulation to test out the theory for yourself.

👀 Preview

Monty Hall

🎯 Tasks

In this project, you will learn:

  • How to set up a basic project structure for a web application.
  • How to design a simple user interface with interactive elements using HTML and CSS.
  • How to implement game logic using JavaScript, simulating the Monty Hall problem.
  • How to display dynamic feedback to users based on their interactions.
  • How to understand and apply fundamental concepts of probability through a hands-on simulation.

🏆 Achievements

After completing this project, you will be able to:

  • Develop a basic web application structure.
  • Create an interactive user interface using HTML and CSS.
  • Implement game logic and conditional decision-making in JavaScript.
  • Provide dynamic feedback to users based on their actions.
  • Gain a deeper understanding of probability concepts through a practical simulation.

Skills Graph

%%%%{init: {'theme':'neutral'}}%%%% flowchart RL css(("`CSS`")) -.-> css/BasicConceptsGroup(["`Basic Concepts`"]) css(("`CSS`")) -.-> css/BasicStylingGroup(["`Basic Styling`"]) css(("`CSS`")) -.-> css/CoreLayoutGroup(["`Core Layout`"]) css(("`CSS`")) -.-> css/IntermediateStylingGroup(["`Intermediate Styling`"]) css(("`CSS`")) -.-> css/DynamicStylingGroup(["`Dynamic Styling`"]) css(("`CSS`")) -.-> css/CSSPreprocessorsGroup(["`CSS Preprocessors`"]) css(("`CSS`")) -.-> css/CodingStandardsandBestPracticesGroup(["`Coding Standards and Best Practices`"]) html(("`HTML`")) -.-> html/BasicStructureGroup(["`Basic Structure`"]) html(("`HTML`")) -.-> html/TextContentandFormattingGroup(["`Text Content and Formatting`"]) html(("`HTML`")) -.-> html/LayoutandSectioningGroup(["`Layout and Sectioning`"]) html(("`HTML`")) -.-> html/FormsandInputGroup(["`Forms and Input`"]) javascript(("`JavaScript`")) -.-> javascript/BasicConceptsGroup(["`Basic Concepts`"]) javascript(("`JavaScript`")) -.-> javascript/AdvancedConceptsGroup(["`Advanced Concepts`"]) javascript(("`JavaScript`")) -.-> javascript/DOMManipulationGroup(["`DOM Manipulation`"]) javascript(("`JavaScript`")) -.-> javascript/ToolsandEnvironmentGroup(["`Tools and Environment`"]) javascript(("`JavaScript`")) -.-> javascript/SecurityGroup(["`Security`"]) css/BasicConceptsGroup -.-> css/selectors("`Selectors`") css/BasicStylingGroup -.-> css/colors("`Colors`") css/BasicStylingGroup -.-> css/fonts("`Fonts`") css/BasicStylingGroup -.-> css/text_styling("`Text Styling`") css/CoreLayoutGroup -.-> css/box_model("`Box Model`") css/CoreLayoutGroup -.-> css/margin_and_padding("`Margin and Padding`") css/CoreLayoutGroup -.-> css/borders("`Borders`") css/CoreLayoutGroup -.-> css/width_and_height("`Width and Height`") css/CoreLayoutGroup -.-> css/display_property("`Display Property`") css/IntermediateStylingGroup -.-> css/backgrounds("`Backgrounds`") css/DynamicStylingGroup -.-> css/transitions("`Transitions`") css/DynamicStylingGroup -.-> css/transformations("`Transformations`") css/CSSPreprocessorsGroup -.-> css/nesting("`Nesting`") css/CodingStandardsandBestPracticesGroup -.-> css/comments("`Comments`") html/BasicStructureGroup -.-> html/basic_elems("`Basic Elements`") html/BasicStructureGroup -.-> html/charset("`Character Encoding`") html/BasicStructureGroup -.-> html/lang_decl("`Language Declaration`") html/BasicStructureGroup -.-> html/viewport("`Viewport Declaration`") html/BasicStructureGroup -.-> html/head_elems("`Head Elements`") html/TextContentandFormattingGroup -.-> html/text_head("`Text and Headings`") html/TextContentandFormattingGroup -.-> html/para_br("`Paragraphs and Line Breaks`") html/LayoutandSectioningGroup -.-> html/doc_flow("`Document Flow Understanding`") html/FormsandInputGroup -.-> html/forms("`Form Elements`") css/IntermediateStylingGroup -.-> css/pseudo_classes("`Pseudo-classes`") javascript/BasicConceptsGroup -.-> javascript/variables("`Variables`") javascript/BasicConceptsGroup -.-> javascript/data_types("`Data Types`") javascript/BasicConceptsGroup -.-> javascript/arith_ops("`Arithmetic Operators`") javascript/BasicConceptsGroup -.-> javascript/comp_ops("`Comparison Operators`") javascript/BasicConceptsGroup -.-> javascript/cond_stmts("`Conditional Statements`") javascript/BasicConceptsGroup -.-> javascript/loops("`Loops`") javascript/BasicConceptsGroup -.-> javascript/functions("`Functions`") javascript/AdvancedConceptsGroup -.-> javascript/template_lit("`Template Literals`") javascript/DOMManipulationGroup -.-> javascript/dom_select("`DOM Selection`") javascript/DOMManipulationGroup -.-> javascript/dom_manip("`DOM Manipulation`") javascript/ToolsandEnvironmentGroup -.-> javascript/bom("`Browser Object Model`") javascript/SecurityGroup -.-> javascript/xss("`Cross-Site Scripting`") subgraph Lab Skills css/selectors -.-> lab-298994{{"`Monty Hall Simulation Web App`"}} css/colors -.-> lab-298994{{"`Monty Hall Simulation Web App`"}} css/fonts -.-> lab-298994{{"`Monty Hall Simulation Web App`"}} css/text_styling -.-> lab-298994{{"`Monty Hall Simulation Web App`"}} css/box_model -.-> lab-298994{{"`Monty Hall Simulation Web App`"}} css/margin_and_padding -.-> lab-298994{{"`Monty Hall Simulation Web App`"}} css/borders -.-> lab-298994{{"`Monty Hall Simulation Web App`"}} css/width_and_height -.-> lab-298994{{"`Monty Hall Simulation Web App`"}} css/display_property -.-> lab-298994{{"`Monty Hall Simulation Web App`"}} css/backgrounds -.-> lab-298994{{"`Monty Hall Simulation Web App`"}} css/transitions -.-> lab-298994{{"`Monty Hall Simulation Web App`"}} css/transformations -.-> lab-298994{{"`Monty Hall Simulation Web App`"}} css/nesting -.-> lab-298994{{"`Monty Hall Simulation Web App`"}} css/comments -.-> lab-298994{{"`Monty Hall Simulation Web App`"}} html/basic_elems -.-> lab-298994{{"`Monty Hall Simulation Web App`"}} html/charset -.-> lab-298994{{"`Monty Hall Simulation Web App`"}} html/lang_decl -.-> lab-298994{{"`Monty Hall Simulation Web App`"}} html/viewport -.-> lab-298994{{"`Monty Hall Simulation Web App`"}} html/head_elems -.-> lab-298994{{"`Monty Hall Simulation Web App`"}} html/text_head -.-> lab-298994{{"`Monty Hall Simulation Web App`"}} html/para_br -.-> lab-298994{{"`Monty Hall Simulation Web App`"}} html/doc_flow -.-> lab-298994{{"`Monty Hall Simulation Web App`"}} html/forms -.-> lab-298994{{"`Monty Hall Simulation Web App`"}} css/pseudo_classes -.-> lab-298994{{"`Monty Hall Simulation Web App`"}} javascript/variables -.-> lab-298994{{"`Monty Hall Simulation Web App`"}} javascript/data_types -.-> lab-298994{{"`Monty Hall Simulation Web App`"}} javascript/arith_ops -.-> lab-298994{{"`Monty Hall Simulation Web App`"}} javascript/comp_ops -.-> lab-298994{{"`Monty Hall Simulation Web App`"}} javascript/cond_stmts -.-> lab-298994{{"`Monty Hall Simulation Web App`"}} javascript/loops -.-> lab-298994{{"`Monty Hall Simulation Web App`"}} javascript/functions -.-> lab-298994{{"`Monty Hall Simulation Web App`"}} javascript/template_lit -.-> lab-298994{{"`Monty Hall Simulation Web App`"}} javascript/dom_select -.-> lab-298994{{"`Monty Hall Simulation Web App`"}} javascript/dom_manip -.-> lab-298994{{"`Monty Hall Simulation Web App`"}} javascript/bom -.-> lab-298994{{"`Monty Hall Simulation Web App`"}} javascript/xss -.-> lab-298994{{"`Monty Hall Simulation Web App`"}} end

Set Up Project Files

Before diving into coding, let's prepare our project structure. We'll need three files:

  1. index.html - This will hold the structure of our web page.
  2. styles.css - Here, we'll define the appearance of our simulation.
  3. script.js - This file will contain the logic behind our simulation.

To start, create the three files mentioned above.

cd ~/project
## Create the required files
touch index.html styles.css script.js

In this step, we're setting up the foundational files for our web-based simulation. These files will hold the structure, style, and logic of our application.

Structure the HTML Page

In this step, we will lay out the structure of our web page. Open the index.html file and add the following content:

<!-- index.html content -->
<!doctype html>
<html lang="en">
  <head>
    <meta charset="UTF-8" />
    <meta name="viewport" content="width=device-width, initial-scale=1.0" />
    <title>Monty Hall Problem Simulation</title>
    <link rel="stylesheet" href="styles.css" />
    <script src="script.js" defer></script>
  </head>

  <body>
    <h2>Monty Hall Problem Simulation</h2>
    <!-- The rest of the content will be added in the following steps. -->
  </body>
</html>

The index.html provides the basic structure of our web page. This is where the user will interact with our simulation.

Add Interactive Elements

Now, let's add interactive elements to our HTML page for the user to interact with the simulation.

Add the following content to index.html:

<!-- Inside the body tag of index.html -->
<p>Pick a door to start:</p>
<button onclick="pickDoor(1)">Door 1</button>
<button onclick="pickDoor(2)">Door 2</button>
<button onclick="pickDoor(3)">Door 3</button>

<div id="result"></div>

<h3>Results:</h3>
<p>Wins when switched: <span id="switchWins">0</span></p>
<p>Losses when switched: <span id="switchLosses">0</span></p>
<p>Wins when stayed: <span id="stayWins">0</span></p>
<p>Losses when stayed: <span id="stayLosses">0</span></p>

We're now enhancing our web page with interactive elements. By adding buttons and a result display, the user can actively participate in the Monty Hall game and see the outcomes of their decisions.

Style the Page

For our simulation to be visually appealing, let's add some styles. Open the styles.css file and paste the following content:

/* styles.css content 
Stylesheet for a basic webpage layout:
- Sets a default light gray background, centered text alignment, and Arial font for the body.
- Styles for h2 and h3 headers with a specific blue color.
- Button styling includes:
  - Blue background color with white text.
  - Rounded corners.
  - Hover effect to darken the background and slightly enlarge the button.
- #result is a styled container with padding, border, and shadow.
- Paragraphs have a top and bottom margin of 10px.
*/

body {
  font-family: "Arial", sans-serif;
  margin: 0;
  padding: 0;
  background-color: #f8f9fa;
  color: #333;
  text-align: center;
  padding-top: 50px;
}

h2,
h3 {
  color: #007bff;
}

button {
  background-color: #007bff;
  border: none;
  color: white;
  padding: 10px 20px;
  text-align: center;
  text-decoration: none;
  display: inline-block;
  font-size: 16px;
  margin: 4px 2px;
  cursor: pointer;
  border-radius: 4px;
  transition:
    background-color 0.3s,
    transform 0.3s;
}

button:hover {
  background-color: #0056b3;
  transform: scale(1.05);
}

#result {
  margin-top: 20px;
  padding: 20px;
  border: 1px solid #e0e0e0;
  background-color: #ffffff;
  border-radius: 5px;
  box-shadow: 0 2px 4px rgba(0, 0, 0, 0.1);
}

p {
  margin: 10px 0;
}

The styles.css file is where we define the visual aspects of our simulation.

  1. Body Styles:

    • font-family: "Arial", sans-serif;: Sets the default font for the body of the webpage to Arial. If Arial isn't available, it falls back to any sans-serif font.
    • margin: 0; padding: 0;: Removes default margin and padding.
    • background-color: #f8f9fa;: Sets a light gray background color for the whole page.
    • color: #333;: Sets a dark gray color for the text.
    • text-align: center;: Aligns the text in the center of the page.
    • padding-top: 50px;: Adds a padding of 50px to the top of the body.
  2. Header Styles:

    • h2, h3 { color: #007bff; }: The h2 and h3 headers are colored with a specific shade of blue.
  3. Button Styles:

    • The button has a blue background, white text, and no border.
    • Rounded corners are given with border-radius.
    • On hovering over the button, its background color becomes a darker shade of blue and the button slightly enlarges (transform: scale(1.05);).
  4. Result Container:

    • #result: Represents an element with the id "result".
    • It has a white background, gray border, and a subtle shadow.
    • The container is styled to look like a card or a box with rounded corners.
  5. Paragraph Styles:

    • Paragraphs (p) have a margin of 10px on the top and bottom. This ensures spacing between consecutive paragraphs and other elements.

This step ensures that the user interface is pleasant and readable.

Initialize Global Variables

Now, let's implement the game logic.

Begin by setting up the global variables that we'll use to track the game's state.

Open script.js and add:

// script.js content

// Global variables to track game state
let selectedDoor;
let carBehindDoor;
let switchWins = 0;
let stayWins = 0;
let switchLosses = 0;
let stayLosses = 0;

We're defining a set of global variables in the script.js file. These variables help in managing the game's state, such as which door was chosen, where the car is located, and the count of wins and losses.

Set Up the Game Initialization Function

Now, we'll add a function to initialize the game. This function will randomize the car's location at the start of each round.

Add the following to script.js:

// Initialize the game by randomizing the car's location
function initializeGame() {
  carBehindDoor = Math.floor(Math.random() * 3) + 1;
  document.getElementById("result").innerText = "";
}

The initializeGame function sets the stage for each round. It randomizes the location of the car, ensuring that every game iteration is unpredictable.

Implement the Door Selection Logic

Once the game is initialized, we need to handle the user's door selection and the reveal of one of the goat doors by Monty.

Append to script.js:

// A function called when a door is picked
function pickDoor(doorNumber) {
  initializeGame();
  selectedDoor = doorNumber;
  let goatDoor = getGoatDoor();
  document.getElementById("result").innerHTML =
    `You selected Door ${selectedDoor}. Monty opens Door ${goatDoor} to reveal a goat.<br>` +
    `Do you want to <button onclick="revealPrize(true)">Switch</button> or ` +
    `<button onclick="revealPrize(false)">Stay</button>?`;
}

The pickDoor function captures the user's door selection. It prepares the next phase by revealing one of the goat doors, and prompting the user with the choice to switch or stay.

Determine the Goat Door

We need a separate function to determine which door Monty will open to reveal a goat. This door can't be the one the player selected or the one with the car behind it.

Continue appending to script.js:

// Find a door with a goat behind it
function getGoatDoor() {
  let goatDoor;
  do {
    goatDoor = Math.floor(Math.random() * 3) + 1;
  } while (goatDoor === selectedDoor || goatDoor === carBehindDoor);
  return goatDoor;
}

getGoatDoor is a crucial function that determines which door, other than the user-selected and the car door, will be opened to reveal a goat. It employs a randomized selection constrained by the game's rules.

Set Up Prize Reveal Logic

Lastly, we'll set up the logic to handle the final reveal based on the user's choice to switch or stay. For now, this function will be a placeholder and will be expanded upon in the subsequent steps.

Complete your script.js additions with:

// Reveal the prize behind the chosen door
function revealPrize(switchDoor) {
  if (switchDoor) {
    selectedDoor = 6 - selectedDoor - getGoatDoor();
  }
  // We'll add more logic here in the following steps.
}

initializeGame();

The revealPrize function handles the final part of the game. Based on the user's choice to switch or stay, this function will ultimately determine if the user wins a car or gets a goat.

Display Game Results

In this step, we will enhance the revealPrize function to display the results of the user's choice. Append the following code to the revealPrize function in script.js:

// Continuing the revealPrize function in script.js

if (selectedDoor === carBehindDoor) {
  if (switchDoor) {
    switchWins++;
    document.getElementById("switchWins").innerText = switchWins;
  } else {
    stayWins++;
    document.getElementById("stayWins").innerText = stayWins;
  }
  document.getElementById("result").innerText =
    "Congratulations! You won a car! Pick a door to play again.";
} else {
  if (switchDoor) {
    switchLosses++;
    document.getElementById("switchLosses").innerText = switchLosses;
  } else {
    stayLosses++;
    document.getElementById("stayLosses").innerText = stayLosses;
  }
  document.getElementById("result").innerText =
    "Sorry, you got a goat. Pick a door to play again.";
}

The enhancement of the revealPrize function here serves to communicate the game results to the user. This step is vital for feedback, allowing the user to see the consequences of their decision and encouraging repeated plays to observe the probability outcomes.

Running the Project

To see the Monty Hall simulation in action:

  1. Ensure all your files (index.html, styles.css, script.js) are saved.
  2. Open the index.html file in a web browser.
open web

Finally, this step guides the user on how to run the simulation in their browser, transforming the code into a visual and interactive experience.

Monty Hall

Summary

Congratulations! You've successfully built a Monty Hall Problem Simulation. By following this project, you've learned how to structure a simple web project, style its elements, and implement interactive JavaScript functionality. Now, you can run multiple simulations to see the probability outcomes of the Monty Hall problem for yourself!

Other JavaScript Tutorials you may like