Implement a Magnifying Glass Effect Using Canvas

JavaScriptJavaScriptBeginner
Practice Now

Introduction

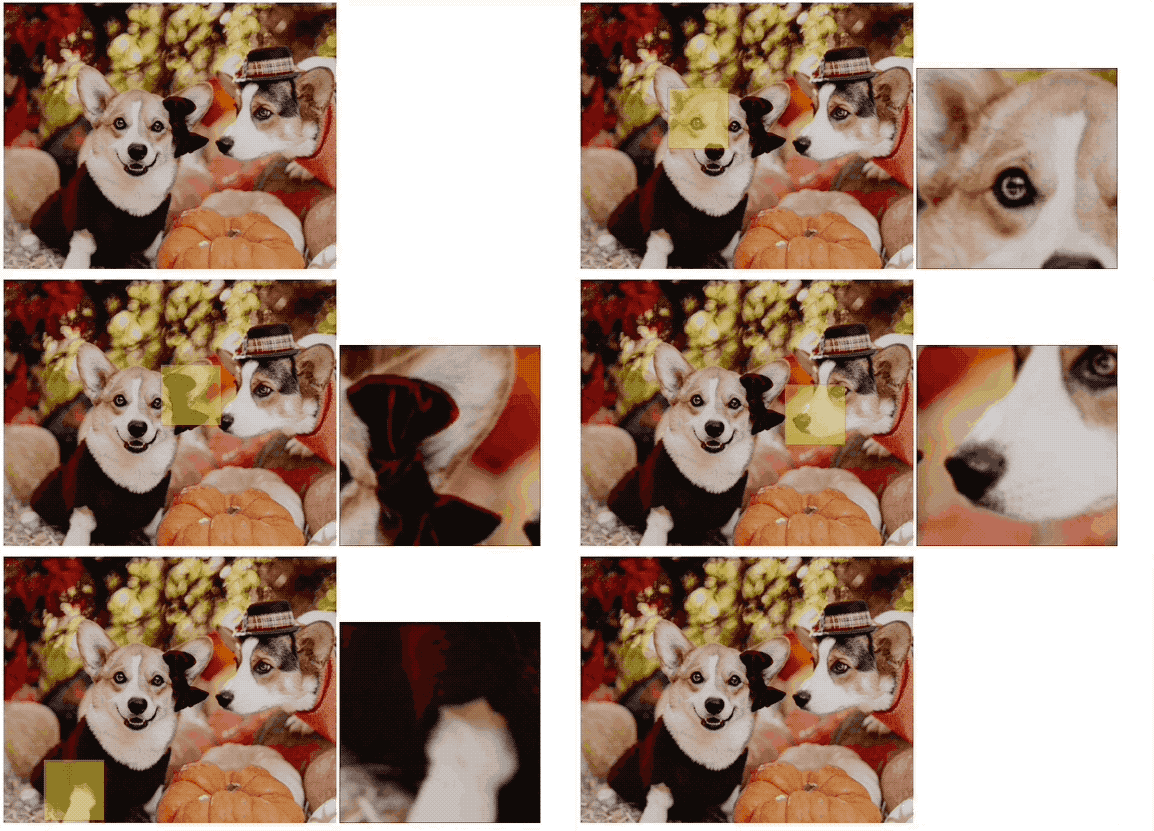
In this project, you'll learn how to create a magnifying effect on images using the HTML Canvas. This effect is often seen on image galleries or product websites, allowing users to hover over an image and get a zoomed-in view of a specific portion. The magnifying effect provides a detailed view without having to open a new window or page.

๐Ÿ‘€ Preview

magnifying glass effect demo

๐ŸŽฏ Tasks

In this project, you will learn:

  • How to initialize and set up an HTML Canvas element
  • How to load an image onto the canvas
  • How to implement event listeners for mouse movements
  • How to create helper functions for the selector and magnified display

๐Ÿ† Achievements

After completing this project, you will be able to:

  • Use the Canvas API to draw and manipulate images
  • Track mouse coordinates and respond to mouse movement events
  • Create a magnifying effect by copying and displaying a portion of an image

Skills Graph

%%%%{init: {'theme':'neutral'}}%%%% flowchart RL javascript(("`JavaScript`")) -.-> javascript/BasicConceptsGroup(["`Basic Concepts`"]) javascript(("`JavaScript`")) -.-> javascript/DOMManipulationGroup(["`DOM Manipulation`"]) javascript/BasicConceptsGroup -.-> javascript/functions("`Functions`") javascript/DOMManipulationGroup -.-> javascript/dom_select("`DOM Selection`") javascript/DOMManipulationGroup -.-> javascript/dom_manip("`DOM Manipulation`") javascript/DOMManipulationGroup -.-> javascript/event_handle("`Event Handling`") subgraph Lab Skills javascript/functions -.-> lab-445721{{"`Implement a Magnifying Glass Effect Using Canvas`"}} javascript/dom_select -.-> lab-445721{{"`Implement a Magnifying Glass Effect Using Canvas`"}} javascript/dom_manip -.-> lab-445721{{"`Implement a Magnifying Glass Effect Using Canvas`"}} javascript/event_handle -.-> lab-445721{{"`Implement a Magnifying Glass Effect Using Canvas`"}} end

Design the Web Page

We will design a simple webpage with two canvases (canvas and copycanvas) and a square div that will act as the selector for the magnification.

In index.html, add the following:

<!doctype html>
<html lang="en">
  <head>
    <title>Magnifying Effect Using Canvas</title>
    <meta http-equiv="Content-Type" content="text/html; charset=utf-8" />
    <style>
      #copycanvas {
        border: 1px solid #000;
        display: none;
      }
      #square {
        width: 90px;
        height: 90px;
        background-color: #cc3;
        border: 1px solid #f00;
        opacity: 0.5;
        position: absolute;
        z-index: 999;
        display: none;
        cursor: crosshair;
      }
    </style>
  </head>
  <body>
    <canvas id="canvas" width="500" height="400"></canvas>
    <canvas id="copycanvas" width="300" height="300"></canvas>
    <div id="square"></div>
    <script src="main.js"></script>
  </body>
</html>
โœจ Check Solution and Practice

Set Up the Canvas and Load the Image

Now, we'll initialize our canvases, create an image object, and load our image into the canvas.

  1. Initialize the canvas and its context.
// main.js
var canvas = document.getElementById("canvas");
var context = canvas.getContext("2d");

// Initialize the copy canvas and its context
var copycanvas = document.getElementById("copycanvas");
var copycontext = copycanvas.getContext("2d");

// Initialize the square selector
var square = document.getElementById("square");
var squaredata = {};
// getBoundingClientRect method can get the top, bottom, left and right coordinates of the element relative to the browser
box = canvas.getBoundingClientRect();
  1. Load the image and draw it on the canvas.
var image = new Image();
image.src = "corgi.png";
image.onload = function () {
  // Here the canvas method of drawing images is used
  context.drawImage(image, 0, 0, canvas.width, canvas.height);
};
โœจ Check Solution and Practice

Implement Event Listeners for Mouse Movements

To make our magnifying effect interactive, we'll add event listeners to detect when the mouse moves over the image.

  1. Capture mouse coordinates over the canvas.
// main.js
canvas.onmouseover = function (e) {
  var x = e.clientX;
  var y = e.clientY;
  createSquare(x, y);
};
  1. Now, we want to make sure our magnifying effect follows the mouse movement. We'll implement the function that tracks this movement and updates our effect accordingly.
// main.js
// Track the mouse movement to handle the magnifying effect
window.onmousemove = function (e) {
  var x = e.clientX;
  var y = e.clientY;
  // Determine if the mouse is over the canvas
  if (
    x >= canvas.offsetLeft &&
    x <= canvas.offsetLeft + canvas.width &&
    y >= canvas.offsetTop &&
    y <= canvas.offsetTop + canvas.height
  ) {
    createSquare(x, y); // Update the magnifying effect
  } else {
    hideSquare(); // Hide the magnifying effect when the mouse is out
    hideCanvas();
  }
};
โœจ Check Solution and Practice

Create Helper Functions for the Selector and Magnified Display

The main functionality of our script involves creating the magnifying effect and copying the necessary section of our image. Let's define these functionalities now.

  1. Define functions to show or hide the square and the copy canvas.
// main.js
function showSquare() {
  square.style.display = "block";
}

function hideSquare() {
  square.style.display = "none";
}

function showCanvas() {
  copycanvas.style.display = "inline";
}

function hideCanvas() {
  copycanvas.style.display = "none";
}
  1. Create the magnifying effect.
function createSquare(x, y) {
  // Position adjustments to keep the square within canvas boundaries
  x = x - 45 < canvas.offsetLeft ? canvas.offsetLeft : x - 45;
  y = y - 45 < canvas.offsetTop ? canvas.offsetTop : y - 45;

  x = x + 90 < box.right ? x : box.right - 90;
  y = y + 90 < box.bottom ? y : box.bottom - 90;

  squaredata.left = x; // Update global state
  squaredata.top = y;

  moveSquare(x, y); // Position the square
  copy(); // Invoke the magnifying effect
}
  1. Position the square and invoke the magnification.
// Function to move the square selector and the magnified display
function moveSquare(x, y) {
  square.style.left = x + "px";
  square.style.top = y + "px";
  showCanvas();
  showSquare();
}
  1. Create the magnified effect on the copy canvas.
function copy() {
  copycontext.drawImage(
    canvas, // Specify the source canvas
    squaredata.left - box.left, // Position to start copying from
    squaredata.top - box.top,
    90, // Width and height of the data to copy
    90,
    0, // Destination position on the copy canvas
    0,
    copycanvas.width,
    copycanvas.height
  );
}
โœจ Check Solution and Practice

Run the Project

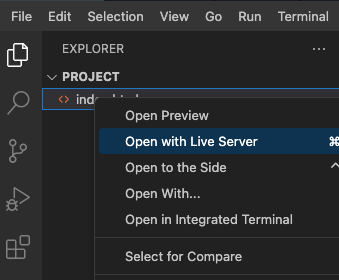
  • Open index.html in a web browser.
    open web
  • Hover over the image to see the magnifying effect.
  • The effect of the page is as follows:
    magnifying glass effect demo
โœจ Check Solution and Practice

Summary

In this project, we've successfully built a magnifying glass effect using the canvas feature in HTML5. We've learned how to interact with the drawImage() method, handle mouse events, and make our effect responsive to user actions. This is a basic version, and many enhancements can be made, such as adjusting the magnification level, adding a real-looking magnifying glass overlay, etc. Happy coding!

Other JavaScript Tutorials you may like