Introduction
The essence of Docker is to use LXC to achieve virtual machine-like functionality, thus saving hardware resources and providing users with more computational resources. This project combines C++ with Linux's Namespace and Control Group technologies to implement a simple Docker container.
Finally, we will achieve the following functionalities for the container:
- Independent file system
- Support for network access
👀 Preview
$ make
make container
make[1]: Entering directory '/home/labex/project'
gcc -c network.c nl.c
g++ -std=c++11 -o docker-run main.cpp network.o nl.o
make[1]: Leaving directory '/home/labex/project'
$ sudo ./docker-run
...start container
root@labex:/## ifconfig
eth0      Link encap:Ethernet  HWaddr 00:16:3e:da:01:72
          inet6 addr: fe80::dc15:18ff:fe43:53b9/64 Scope:Link
          UP BROADCAST RUNNING MULTICAST  MTU:1500  Metric:1
          RX packets:38 errors:0 dropped:0 overruns:0 frame:0
          TX packets:9 errors:0 dropped:0 overruns:0 carrier:0
          collisions:0 txqueuelen:1000
          RX bytes:5744 (5.7 KB)  TX bytes:726 (726.0 B)

lo        Link encap:Local Loopback
          inet addr:127.0.0.1  Mask:255.0.0.0
          inet6 addr: ::1/128 Scope:Host
          UP LOOPBACK RUNNING  MTU:65536  Metric:1
          RX packets:0 errors:0 dropped:0 overruns:0 frame:0
          TX packets:0 errors:0 dropped:0 overruns:0 carrier:0
          collisions:0 txqueuelen:1000
          RX bytes:0 (0.0 B)  TX bytes:0 (0.0 B)
🎯 Tasks
In this project, you will learn:
- How to create a simple Docker container using C++ and Linux's Namespace technology
- How to implement an independent file system for the container
- How to enable network access for the container
🏆 Achievements
After completing this project, you will be able to:
- Create a simple Docker container using C++ and Linux's Namespace technology
- Implement an independent file system for the container
- Enable network access for the container
Linux Namespace Technology
In C++, we are familiar with the keyword namespace. In C++, each namespace isolates the same names in different code, so as long as the names of the namespaces are different, the names of the code in the namespaces can be the same, thus solving the problem of name conflicts in the code.
Linux Namespace, on the other hand, is a technology provided by the Linux kernel that provides a solution for resource isolation for applications, similar to the concept of namespace in C++. We know that resources such as PID, IPC, and networking should be managed by the operating system itself, but Linux Namespace can make these resources no longer global, and assign them to specific namespaces.
In the world of Docker technology, we often hear terms like LXC and OS-level virtualization, and LXC utilizes Namespace technology to achieve resource isolation between different containers. By utilizing Namespace technology, processes within different containers belong to different namespaces and do not interfere with each other. In summary, Namespace technology provides a lightweight form of virtualization that allows us to operate system-wide properties from different perspectives.
In Linux, the most important system call related to Namespace is clone(). The purpose of clone() is to restrict threads to a specific namespace when creating processes.
Encapsulation of System Calls
Since Linux system calls are written in C, we need to write C++ code for our project. In order to maintain a consistent coding style that is purely in C++, we will first encapsulate these necessary APIs into a C++ form, which will also allow us to have a deeper understanding of how these APIs are used.
We will be using the following APIs:
clone()
Both clone and fork system calls are used for creating processes in Linux. However, fork is just a small part of clone. The difference between them lies in the fact that fork only creates a child process that is an exact copy of the parent process, while clone is more powerful as it allows selective copying of parent process resources to the child process. The resources that are not copied are shared between the processes through pointer copying (arg). The specific resources to be copied can be specified using flags, and the function returns the PID of the child process.
We know that a process consists of four main elements:
- A segment of code to be executed
- A private stack space for the process
- A process control block (PCB)
- Process-specific namespaces
The first two elements correspond to the parameters fn and child_stack in clone. The process control block is controlled by the kernel and we don't need to worry about it. Therefore, the namespaces are associated with the flags parameter. In order to achieve our goal of creating a Docker container, the main parameters we need are as follows:
Namespace Classification System Call Parameter
    UTS         CLONE_NEWUTS
   Mount        CLONE_NEWNS
    PID         CLONE_NEWPID
  Network       CLONE_NEWNET
From the names, it can be seen that CLONE_NEWNS provides file system-related mounting for copying and file system-related resources, CLONE_NEWUTS provides the ability to set the hostname, CLONE_NEWPID provides independent process space support, and CLONE_NEWNET provides network-related support.
execv()
int execv(const char *path, char *const argv[]);
execv executes the executable file specified by path. This system call allows our child process to execute /bin/bash in order to keep the container running.
sethostname()
int sethostname(const char *name, size_t len);
As the name suggests, this system call is used to set the hostname. It's worth mentioning that, since C-style strings use pointers and the length of the string cannot be determined directly from within, the len parameter is used to obtain the length of the string.
chdir()
int chdir(const char *path);
We know that any program runs in a specific directory. When we need to access resources, we can use relative paths instead of absolute paths to access the relevant resources. chdir provides us with the convenience of changing the working directory of our program, which can be used for certain undisclosed purposes.
chroot()
This system call is used to change the root directory:
int chroot(const char *path);
mount()
This system call is used to mount file systems, similar to the mount command.
int mount(const char *source, const char *target,
                 const char *filesystemtype, unsigned long mountflags,
                 const void *data);
Creating Container Subprocess
Enter the ~/project directory and create a file named docker.hpp. In this file, we will first create a namespace named docker that can be called by our external code.
//
// docker.hpp
// cpp_docker
//

// Header files for system calls
#include <sys/wait.h>   // waitpid
#include <sys/mount.h>  // mount
#include <fcntl.h>      // open
#include <unistd.h>     // execv, sethostname, chroot, fchdir
#include <sched.h>      // clone

// C Standard Library
#include <cstring>

// C++ Standard Library
#include <string>       // std::string

#define STACK_SIZE (512 * 512) // Define the size of the child process space

namespace docker {
    // .. where the docker magic starts
}
Let's start by defining some variables to enhance readability:
// Defined within the `docker` namespace
typedef int proc_status;
proc_status proc_err  = -1;
proc_status proc_exit = 0;
proc_status proc_wait = 1;
Before defining the container class, let's analyze the parameters required to create a container. We will not consider network-related configuration for now. To create a Docker container from an image, we only need to specify the hostname and the location of the image. Therefore:
// Docker container startup configuration
typedef struct container_config {
    std::string host_name;      // Hostname
    std::string root_dir;       // Root directory of the container
} container_config;
Now, let's define the container class and have it perform the necessary configuration for the container in the constructor:
class container {
private:
    // Enhances readability
    typedef int process_pid;

    // Child process stack
    char child_stack[STACK_SIZE];

    // Container configuration
    container_config config;
public:
    container(container_config &config) {
        this->config = config;
    }
};
Before thinking about the specific methods in the container class, let's first think about how we would use this container class. For this, let's create a main.cpp file in the ~/project folder:
//
// main.cpp
// cpp_docker
//

#include "docker.hpp"
#include <iostream>

int main(int argc, char** argv) {
    std::cout << "...start container" << std::endl;
    docker::container_config config;

    // Configure the container
    // ...

    docker::container container(config);// Construct the container based on the config
    container.start();                  // Start the container
    std::cout << "stop container..." << std::endl;
    return 0;
}
In main.cpp, to make the container startup concise and easy to understand, let's assume that the container is started using a start() method. This provides a foundation for writing the docker.hpp file later.
Now, let's go back to docker.hpp and implement the start() method:
void start() {
    auto setup = [](void *args) -> int {
        auto _this = reinterpret_cast<container *>(args);

        // Perform relevant configurations for the container
        // ...

        return proc_wait;
    };

    process_pid child_pid = clone(setup, child_stack+STACK_SIZE, // Move to the bottom of the stack
                        SIGCHLD,      // Send a signal to the parent process when the child process exits
                        this);
    waitpid(child_pid, nullptr, 0); // Wait for the child process to exit
}
The docker::container::start() method uses the clone() system call in Linux. To pass the docker::container instance object to the callback function setup, we can pass it using the fourth argument of clone(). Here, we pass the this pointer.
As for the setup function, we create a lambda expression for it. In C++, a lambda expression with an empty capture list can be passed as a function pointer. Therefore, setup becomes the callback function passed to clone().
You can also use a static member function defined in the class instead of a lambda expression, but that would make the code less elegant.
In the constructor of this container class, we define a child process handling function to be called by the clone() system call. We use typedef to change the return type of this function to proc_status. When this function returns proc_wait, the child process cloned by clone() will wait to exit.
However, this is not enough because we have not performed any configuration within the process. As a result, our program will exit immediately as there is nothing else to do once the process is started. As we know, in Docker, to keep a container running, we can use:
docker run -it ubuntu:14.04 /bin/bash
This binds STDIN to the container's /bin/bash. So, let's add a start_bash() method to the docker::container class:
private:
void start_bash() {
    // Safely convert C++ std::string to C-style string char *
    // Starting from C++14, this direct assignment is prohibited: `char *str = "test";`
    std::string bash = "/bin/bash";
    char *c_bash = new char[bash.length()+1];   // +1 for '\0'
    strcpy(c_bash, bash.c_str());

    char* const child_args[] = { c_bash, NULL };
    execv(child_args[0], child_args);           // Execute /bin/bash in the child process
    delete []c_bash;
}
And call it within setup:
auto setup = [](void *args) -> int {
    auto _this = reinterpret_cast<container *>(args);
    _this->start_bash();
    return proc_wait;
}
Now, we can see the following actions:
labex:project/ $ hostname
iZj6cboigynrxh4mn2oo16Z
labex:project/ $ g++ main.cpp -std=c++11
labex:project/ $ ./a.out
...start container
labex@iZj6cboigynrxh4mn2oo16Z:~/project$ mkdir test
labex@iZj6cboigynrxh4mn2oo16Z:~/project$ ls
a.out docker.hpp main.cpp test
labex@iZj6cboigynrxh4mn2oo16Z:~/project$ exit
exit
stop container...
In the steps above, we first check the current hostname, compile the code we have written so far, run it, and enter our container. We can see that after entering the container, the bash prompt changes, which is what we expected.
However, it is easy to notice that this is not the result we want, as it is exactly the same as our host system. Any operations performed within this "container" will directly affect the host system.
This is where we introduce the required namespaces in the clone API.
Enabling the Container to Have Its Own Hostname
As mentioned earlier in the section on system calls, it is quite simple to set the hostname of a child process using a system call. Therefore, we create a private method for the class docker::container:
private:
// Set the hostname of the container
void set_hostname() {
    sethostname(this->config.host_name.c_str(), this->config.host_name.length());
}
We also make changes to the start() method as follows:
void start() {
    auto setup = [](void *args) -> int {
        auto _this = reinterpret_cast<container *>(args);

        // Configure the container
        _this->set_hostname();
        _this->start_bash();

        return proc_wait;
    };

    process_pid child_pid = clone(setup, child_stack+STACK_SIZE,
                        CLONE_NEWUTS| // Add UTS namespace
                        SIGCHLD,      // Send signal to parent when child process exits
                        this);
    waitpid(child_pid, nullptr, 0); // Wait for child process to exit
}
In the main.cpp file, we configure the name of the hostname:
int main(int argc, char** argv) {
    std::cout << "...start container" << std::endl;
    docker::container_config config;
    config.host_name = "labex";
    ……
Now, let's recompile the code:
labex:project/ $ g++ main.cpp -std=c++11
labex:project/ $ ./a.out
...start container
stop container...
It is observed that our container exits immediately. This is because once we introduce the namespace, our program requires superuser privileges. Therefore, we need to execute the program with sudo:
labex:project/ $ sudo ./a.out
...start container
root@labex:/home/labex/project## hostname
labex
root@labex:/home/labex/project## exit
exit
stop container...
labex:project/ $ hostname
iZj6cboigynrxh4mn2oo16Z
However, this still does not achieve the desired effect of the container because, as we can see from the ls command, we can still access the host machine's directory.
Enabling Container with Its Own File System
In Docker technology, containers are created based on images. Since we want to implement a container, it is natural that we need to create it based on an image. Fortunately, we have prepared a Docker image for you. You can obtain it by downloading it from:
cd ~/project
wget --header="User-Agent: Mozilla/5.0" https://file.labex.io/lab/171925/docker-image.tar
Then, extract it into the ~/project/labex folder:
mkdir labex
tar -xf docker-image.tar --directory labex/
rm docker-image.tar
Here, you may encounter some extraction errors. This is because in the environment, some files are prohibited from being created externally. This does not affect our implementation of our own container, so just disregard it.
tar: dev/agpgart: Cannot mknod: Operation not permitted
tar: dev/audio: Cannot mknod: Operation not permitted
tar: dev/audio1: Cannot mknod: Operation not permitted
tar: dev/audio2: Cannot mknod: Operation not permitted
tar: dev/audio3: Cannot mknod: Operation not permitted
tar: dev/audioctl: Cannot mknod: Operation not permitted
……
After the extraction is completed, we will be able to see a Linux directory that is almost complete under labex:
labex:project/ $ ls labex
bin boot dev etc home lib lib64 media mnt opt proc root run sbin srv sys tmp usr var
Now, we want docker::container to enter this directory and use it as the root directory, masking the subprocess's external access when starting up:
private:
// Set the root directory
void set_rootdir() {

    // chdir system call, switch to a certain directory
    chdir(this->config.root_dir.c_str());

    // chroot system call, set the root directory, since we have
    // already switched to the current directory earlier
    // we can simply use the current directory as the root directory
    chroot(".");
}
Then, fill in the relevant configuration in main.cpp:
#include "docker.hpp"
#include <iostream>

int main(int argc, char** argv) {
    std::cout << "...start container" << std::endl;
    docker::container_config config;
    config.host_name = "labex";
    config.root_dir  = "./labex";
    ……
And enable CLONE_NEWNS in the clone() call to activate the Mount Namespace:
void start() {
    auto setup = [](void *args) -> int {
        auto _this = reinterpret_cast<container *>(args);
        _this->set_hostname();
        _this->set_rootdir();
        _this->start_bash();
        return proc_wait;
    };

    process_pid child_pid = clone(setup, child_stack+STACK_SIZE,
                      CLONE_NEWUTS| // UTS namespace
                      CLONE_NEWNS|  // Mount namespace
                      SIGCHLD,      // Signal is sent to the parent process when the child process exits
                      this);
    waitpid(child_pid, nullptr, 0); // Wait for the child process to exit
}
Now, let's recompile:
labex:project/ $ g++ main.cpp -std=c++11
labex:project/ $ sudo ./a.out
...start container
root@labex:/## ls
bin boot dev etc home lib lib64 media mnt opt proc root run sbin srv sys tmp usr var
root@labex:/## hostname
labex
By running ls, we can see that the child process is now living in a complete linux directory.
Enabling the Container to Have Its Own Process System
However, there is still a problem. If we use commands like ps or top, we can still observe all the processes in the parent process. This is not the desired effect. For example, we can see a.out in the output of ps, and the process ID value is also very large.
To solve this problem, we need to introduce PID Namespace to isolate the PID space of the child processes from the parent process.
private:
// Set up an independent process namespace
void set_procsys() {
    // Mount the proc file system
    mount("none", "/proc", "proc", 0, nullptr);
    mount("none", "/sys", "sysfs", 0, nullptr);
}
Similarly, we still need to add this part of the code in start(), introducing CLONE_NEWPID:
void start() {
    auto setup = [](void *args) -> int {
        auto _this = reinterpret_cast<container *>(args);
        _this->set_hostname();
        _this->set_rootdir();
        _this->set_procsys();
        _this->start_bash();
        return proc_wait;
    };

    process_pid child_pid = clone(setup, child_stack,
                      CLONE_NEWUTS| // UTS namespace
                      CLONE_NEWNS|  // Mount namespace
                      CLONE_NEWPID| // PID namespace
                      SIGCHLD,      // Signal is sent to the parent process when the child process exits
                      this);
    waitpid(child_pid, nullptr, 0); // Wait for the child process to exit
}
Now, when we compile and run again, we will see that the container has its own independent process space:
At this point, we have used the Namespace technology in Linux to isolate the resources in the child processes and give our Docker container its own process space and file system.
However, the container still cannot access the network, and we can even access the network devices of the host machine using ifconfig. This is not what we want. Next, we will further enhance the container to make it more like a complete container, providing support for network access.
Docker Networking Principles
Previously, we had a preliminary understanding of how Docker implements a closed container. However, we also discovered that the Docker container we implemented does not support network access and it is not possible for the different containers we run to have the ability to communicate with each other.
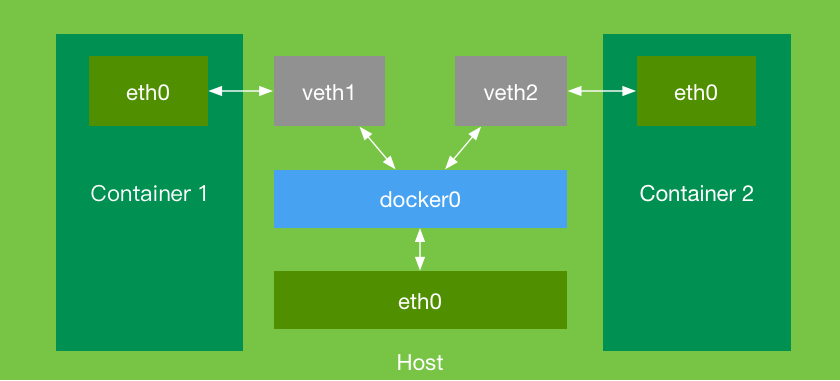
The principle of network communication between Docker containers is achieved through a bridge called 'docker0'. The two containers, 'container1' and 'container2', each have their own network device, 'eth0'. All network requests will be forwarded through 'eth0'. Since containers live in child processes, in order to enable communication between their 'eth0' interfaces, a pair of network devices, 'veth1' and 'veth2', need to be created and added to the 'docker0' bridge. This allows the bridge to unconditionally forward and route network requests generated by the 'eth0' interfaces within the container, enabling communication between the containers.
Therefore, in order for the containers we write to have network communication capabilities, we first need to create a bridge that they can use. For convenience, we will directly use the existing 'docker0' in the environment.
Preparation for Network Creation
Using the native Linux API to manipulate the network is a very complex task, which also involves many C language operations. In order to focus more on using C++ for coding, here are some "wheels" that have already been implemented for you, which will make it more convenient for you to manipulate the network.
Enter the
/tmpdirectory and we have provided you with four files:network.h,nl.h,network.c, andnl.c.
Copy these four files to the ~/project directory:
cp /tmp/network.h /tmp/nl.h /tmp/network.c /tmp/nl.c ~/project/
The code of the last three files is taken from the LXC toolset. However, this code is written in C language. Since C++ and C are no longer compatible with each other starting from C++11, in order for C++ to be able to call this code smoothly, we must have some knowledge on C/C++ mixed programming.
First, we know that transforming source code into executable files is not done directly, but through several steps: pre-processing, compilation, assembly, and linking. Usually, we use the step g++ main.cpp to complete all the above steps at once.
However, when the project becomes larger and the number of source files increases, it is not cost-effective to recompile the entire project just for a minor change. At this point, we can first compile the code into .o files and then proceed with the linking work. This also makes it possible for us to compile a C language compiled linked file and C++ related source code at the same time.
C++ and C have different compilation and handling methods, so when we want to compile a set of C language code, we need to use the __cplusplus macro and extern "C".
In network.h, the related interface declarations of network.c are stored. If we comment out the following commented parts:
// #ifdef __cplusplus
// extern "C"
// {
// #endif
#include <sys/types.h>
int netdev_set_flag(const char *name, int flag);
……
void new_hwaddr(char *hwaddr);
// #ifdef __cplusplus
// }
// #endif
Using gcc to directly compile it into .o files:
gcc -c network.c nl.c
And then using the following code:
// test.cpp
#include "network.h"
int main() {
    new_hwaddr(nullptr);
    return 0;
}
To compile and test it:
g++ test.cpp network.o nl.o -std=c++11
We will find that it fails to compile and prompts an error undefined reference to 'new_hwaddr(char*)'.
/usr/bin/ld: /tmp/ccz4DEEy.o: in function `main':
test.cpp:(.text+0xe): undefined reference to `new_hwaddr(char*)'
collect2: error: ld returned 1 exit status
In other words:
When we want to compile and link C libraries into C++, we need to wrap the relevant declaration of the interface:
#ifdef __cplusplus
extern "C"
{
#endif
// C interface functions
#ifdef __cplusplus
}
#endif
At this time, we recompile network.c and nl.c into .o files again, and then compile *.o with test.cpp to compile them successfully.
Creating Container Network
Based on the previous section on the network principle of Docker, we can summarize the following steps to enable the containers we create to support the network:
- Create a pair of virtual network devices veth1/veth2;
- Set the MAC address of veth1;
- Add veth1 to the bridge labex0;
- Activate veth1;
- Create a child process;
- Move veth2 to the network namespace of the child process and rename it to eth0;
- Wait for the child process to finish;
- Delete the network devices veth1 and veth2;
So we must further optimize the start() logic.
First, we should add network-related configuration to docker::container_config:
Include the header files:
#include <net/if.h>     // if_nametoindex
#include <arpa/inet.h>  // inet_pton
#include "network.h"
Add docker::container_config configuration:
// Docker container startup configuration
typedef struct container_config {
    std::string host_name;      // Host name
    std::string root_dir;       // Container root directory
    std::string ip;             // Container IP
    std::string bridge_name;    // Bridge name
    std::string bridge_ip;      // Bridge IP
} container_config;
Then, set the container IP, bridge name to be added docker0, and the IP of the bridge in main.cpp:
int main(int argc, char** argv) {
    std::cout << "...start container" << std::endl;
    docker::container_config config;
    config.host_name = "labex";
    config.root_dir  = "./labex";

    // Configure network parameters
    config.ip        = "192.168.0.100"; // Container IP
    config.bridge_name = "docker0";     // Host bridge
    config.bridge_ip   = "192.168.0.1"; // Host bridge IP

    docker::container container(config);
    container.start();
    std::cout << "stop container..." << std::endl;
    return 0;
}
Let's refactor the start() method based on the logic of loading network devices above:
private:
    // Save container network devices for deletion
    char *veth1;
    char *veth2;
public:
void start() {
    char veth1buf[IFNAMSIZ] = "labex0X";
    char veth2buf[IFNAMSIZ] = "labex0X";
    // Create a pair of network devices, one to be loaded onto the host, and the other to be moved to the container in the child process
    veth1 = lxc_mkifname(veth1buf); // lxc_mkifname API requires at least one "X" to be added to the virtual network device name to support random creation of virtual network devices
    veth2 = lxc_mkifname(veth2buf); // This is to ensure the correct creation of network devices. See the implementation of lxc_mkifname in network.c for details
    lxc_veth_create(veth1, veth2);

    // Set the MAC address of veth1
    setup_private_host_hw_addr(veth1);

    // Add veth1 to the bridge
    lxc_bridge_attach(config.bridge_name.c_str(), veth1);

    // Activate veth1
    lxc_netdev_up(veth1);

    // Some configuration work before container creation
    auto setup = [](void *args) -> int {
        auto _this = reinterpret_cast<container *>(args);
        _this->set_hostname();
        _this->set_rootdir();
        _this->set_procsys();

        // Configure the network inside the container
        // ...

        _this->start_bash();
        return proc_wait;
    };

    // Create the container using clone
    process_pid child_pid = clone(setup, child_stack,
                      CLONE_NEWUTS| // UTS   namespace
                      CLONE_NEWNS|  // Mount namespace
                      CLONE_NEWPID| // PID   namespace
                      CLONE_NEWNET| // Net   namespace
                      SIGCHLD,      // The child process will send a signal to the parent process when it exits
                      this);

    // Move veth2 to the container and rename it as eth0
    lxc_netdev_move_by_name(veth2, child_pid, "eth0");

    waitpid(child_pid, nullptr, 0); // Wait for the child process to exit
}
~container() {
    // Remember to delete the created virtual network devices when exiting
    lxc_netdev_delete_by_name(veth1);
    lxc_netdev_delete_by_name(veth2);
}
Note: Add
CLONE_NEWNETinclone.
From the above steps, we can see that after creating the network devices and during the creation of the child process, we need to perform related configurations inside the container in cooperation with the external network devices:
- Activate the
lodevice inside the container; - Configure the IP address of
eth0; - Activate
eth0; - Set the gateway;
- Set the MAC address of
eth0;
private:
void set_network() {

    int ifindex = if_nametoindex("eth0");
    struct in_addr ipv4;
    struct in_addr bcast;
    struct in_addr gateway;

    // IP address transformation function that converts IP addresses between dotted decimal and binary
    inet_pton(AF_INET, this->config.ip.c_str(), &ipv4);
    inet_pton(AF_INET, "255.255.255.0", &bcast);
    inet_pton(AF_INET, this->config.bridge_ip.c_str(), &gateway);

    // Configure the IP address of eth0
    lxc_ipv4_addr_add(ifindex, &ipv4, &bcast, 16);

    // Activate lo
    lxc_netdev_up("lo");

    // Activate eth0
    lxc_netdev_up("eth0");

    // Set the gateway
    lxc_ipv4_gateway_add(ifindex, &gateway);

    // Set the MAC address of eth0
    char mac[18];
    new_hwaddr(mac);
    setup_hw_addr(mac, "eth0");
}
Then, call this method in the container's setup:
……
_this->set_procsys();
_this->set_network();   // Cooperation for network configuration inside the container
_this->start_bash();
return proc_wait;
At this point, since we have started using the network.o and nl.o compiled linking files, let's write a very simple Makefile:
C = gcc
CXX = g++
C_LIB = network.c nl.c
C_LINK = network.o nl.o
MAIN = main.cpp
LD = -std=c++11
OUT = docker-run

all:
    make container
container:
    $(C) -c $(C_LIB)
    $(CXX) $(LD) -o $(OUT) $(MAIN) $(C_LINK)
clean:
    rm *.o $(OUT)
Note: The command in the Makefile should start with a Tab instead of spaces. This is caused by the fact that the Markdown interpreter converts a Tab to four spaces. When writing a Makefile, be sure to use a Tab instead of four spaces. Otherwise, the Makefile will prompt an error "Makefile:10: *** missing separator. Stop."
Compile and execute it again, and enter the container. We can use ifconfig to check the network:
labex:project/ $ make
make container
make[1]: Entering directory '/home/labex/project'
gcc -c network.c nl.c
g++ -std=c++11 -o docker-run main.cpp network.o nl.o
make[1]: Leaving directory '/home/labex/project'
labex:project/ $ sudo ./docker-run
...start container
root@labex:/## ifconfig
eth0      Link encap:Ethernet  HWaddr 00:16:3e:da:01:72
          inet6 addr: fe80::dc15:18ff:fe43:53b9/64 Scope:Link
          UP BROADCAST RUNNING MULTICAST  MTU:1500  Metric:1
          RX packets:38 errors:0 dropped:0 overruns:0 frame:0
          TX packets:9 errors:0 dropped:0 overruns:0 carrier:0
          collisions:0 txqueuelen:1000
          RX bytes:5744 (5.7 KB)  TX bytes:726 (726.0 B)

lo        Link encap:Local Loopback
          inet addr:127.0.0.1  Mask:255.0.0.0
          inet6 addr: ::1/128 Scope:Host
          UP LOOPBACK RUNNING  MTU:65536  Metric:1
          RX packets:0 errors:0 dropped:0 overruns:0 frame:0
          TX packets:0 errors:0 dropped:0 overruns:0 carrier:0
          collisions:0 txqueuelen:1000
          RX bytes:0 (0.0 B)  TX bytes:0 (0.0 B)
Summary
Through this project, we have gradually achieved the following: incorporating a file system into a container, and enabling access to external networks.
We have successfully created a basic Docker container. You can further optimize this container to achieve a more realistic emulation.