Introduction
In this project, we will create a solar system simulation using OpenGL. The simulation will include the sun, planets, and their movements and rotations. We will use GLUT (OpenGL Utility Toolkit) to handle window and input functions, and OpenGL for rendering.
By completing this project, you will learn:
- Basic concepts of graphics programming using OpenGL
- How to create 3D models and render them in a simulated environment
- How to handle user input and update the simulation accordingly
- How to implement a basic lighting system to enhance the visual quality of the simulation
- How to organize code using object-oriented programming principles
This project assumes a basic understanding of C++ programming and some familiarity with graphics programming concepts. It will provide a hands-on experience in building a simple graphics application using OpenGL.
👀 Preview
🎯 Tasks
In this project, you will learn:
- How to install the necessary libraries and set up the development environment.
- How to create the necessary classes and implement the basic functionality for planet rotation and revolution.
- How to set up the perspective and projection for the 3D scene.
- How to implement the lighting system to enhance the visual quality of the simulation.
- How to handle user input to allow the user to control the perspective of the simulation.
- How to test and refine the simulation to ensure it functions as expected.
🏆 Achievements
After completing this project, you will be able to:
- Apply basic concepts of graphics programming using OpenGL.
- Create 3D models and render them in a simulated environment.
- Implement a basic lighting system to enhance the visual quality of the simulation.
- Organize code using object-oriented programming principles.
- Demonstrate problem-solving and debugging skills.
Understanding OpenGL and GLUT
OpenGL contains a lot of rendering functions, but their design purpose is independent of any window system or operating system. Therefore, it does not include functions for creating open windows, reading events from the keyboard or mouse, or even the most basic functionality of displaying windows. Thus, it is completely impossible to create a complete graphics program using only OpenGL. Additionally, most programs need to interact with the user (respond to keyboard and mouse operations). GLUT provides this convenience.
GLUT stands for OpenGL Utility Toolkit. It is a tool library for handling OpenGL programs, mainly responsible for handling calls to the underlying operating system and I/O operations. Using GLUT can shield some of the details of the underlying operating system GUI implementation, and only the GLUT API is needed to create application windows, handle mouse and keyboard events, and so on, thus achieving cross-platform compatibility.
Let's first install GLUT in the Experiment environment:
sudo apt-get update && sudo apt-get install freeglut3 freeglut3-dev
The structure of a standard GLUT program is shown in the code below:
// Basic header file for using GLUT
#include <GL/glut.h>

// Basic macros for creating a graphical window
#define WINDOW_X_POS 50
#define WINDOW_Y_POS 50
#define WIDTH 700
#define HEIGHT 700

// Callback functions registered with GLUT
void onDisplay(void);
void onUpdate(void);
void onKeyboard(unsigned char key, int x, int y);

int main(int argc, char* argv[]) {

    // Initialize GLUT and process all command-line arguments
    glutInit(&argc, argv);
    // This function specifies whether to use the RGBA mode or the color index mode for display. It can also specify whether to use a single-buffered or double-buffered window. Here, we use the RGBA and double-buffered window.
    glutInitDisplayMode(GLUT_RGBA | GLUT_DOUBLE);
    // Set the position of the top-left corner of the window when created on the screen
    glutInitWindowPosition(WINDOW_X_POS, WINDOW_Y_POS);
    // Set the width and height of the window when created, for simplicity
    glutInitWindowSize(WIDTH, HEIGHT);
    // Create a window, and the input string is the title of the window
    glutCreateWindow("SolarSystem at LabEx");

    // The prototype of glutDisplayFunc is glutDisplayFunc(void (*func)(void))
    // This is a callback function, and it will be executed whenever GLUT determines that the contents of a window need to be updated and displayed.
    //
    // glutIdleFunc(void (*func)(void)) specifies a function to be executed when the event loop is idle. This callback function takes a function pointer as its only parameter.
    //
    // glutKeyboardFunc(void (*func)(unsigned char key, int x, int y)) associates a key on the keyboard with a function. This function is called when the key is pressed or released.
    //
    // Therefore, the three lines below are actually registering the three key callback functions with GLUT
    glutDisplayFunc(onDisplay);
    glutIdleFunc(onUpdate);
    glutKeyboardFunc(onKeyboard);

    glutMainLoop();
    return 0;

}
Create a main.cpp file in the ~/project/ directory and write the following code:
//
//  main.cpp
//  solarsystem
//
#include <GL/glut.h>
#include "solarsystem.hpp"

#define WINDOW_X_POS 50
#define WINDOW_Y_POS 50
#define WIDTH 700
#define HEIGHT 700

SolarSystem solarsystem;

void onDisplay(void) {
    solarsystem.onDisplay();
}
void onUpdate(void) {
    solarsystem.onUpdate();
}
void onKeyboard(unsigned char key, int x, int y) {
    solarsystem.onKeyboard(key, x, y);
}

int main(int argc, char* argv[]) {
    glutInit(&argc, argv);
    glutInitDisplayMode(GLUT_RGBA | GLUT_DOUBLE);
    glutInitWindowPosition(WINDOW_X_POS, WINDOW_Y_POS);
    glutCreateWindow("SolarSystem at LabEx");
    glutDisplayFunc(onDisplay);
    glutIdleFunc(onUpdate);
    glutKeyboardFunc(onKeyboard);
    glutMainLoop();
    return 0;
}
Tips
- Single buffering involves executing all the drawing commands directly on the window, which is slow. If the computer's processing power is not sufficient and single buffering is used, the screen may flicker.
- Double buffering involves executing the drawing commands in a buffer in memory, which is much faster. After the drawing commands are completed, the results are copied to the screen through a buffer swap. The advantage of this approach is that if we let the drawing operations be executed in real time with the graphics card, when the drawing tasks are complex, the I/O operations will become complex, resulting in lower performance. In contrast, with double buffering, the completed drawing results are sent directly to the graphics card for rendering when the buffer is swapped, which significantly reduces I/O.
In OpenGL, it is recommended to use GLfloat to represent floating-point numbers.
Class Design
In OOP programming, it is essential to clarify what objects we are dealing with first. Obviously, in the entire celestial system, they are all planets (Star), and the distinction between planets and stars only requires whether they have a parent node. Secondly, for different planets, they usually have their own materials, and different materials will demonstrate whether they emit light. Therefore, we have a preliminary object model. Therefore, we divide the planets into: ordinary planets that can rotate and revolve around a point (Star), planets with special materials (Planet), and planets that can emit light (LightPlanet).
In addition, for the convenience of programming implementation, we need to make some assumptions about the actual programming model in the real world:
- The orbit of the planet is circular;
- The rotation speed remains the same;
- Each time the screen is refreshed, it is assumed that a day has passed.
Firstly, we can consider the following steps to implement the logic:
- Initialize the planet objects;
- Initialize the OpenGL engine, implement onDraw and onUpdate;
- Each planet should be responsible for handling its own properties, revolving relationship, and transformation-related drawing. Therefore, when designing the planet class, a drawing method draw() should be provided;
- The planet should also handle its own updates related to rotation and revolution for display. Therefore, when designing the planet class, an update method update() should also be provided;
- Call the draw() method of the planet in onDraw();
- Call the update() method of the planet in onUpdate();
- Adjust the display of the entire solar system with the keyboard in onKeyboard().
Furthermore, for each planet, they have the following attributes:
- Color color
- Revolution radius radius
- Rotation speed selfSpeed
- Revolution speed speed
- Distance to the center of the sun distance
- Revolving parent planet parentStar
- Current rotation angle alphaSelf
- Current revolution angle alpha
In the ~/project/ directory, create a stars.hpp file. Based on the analysis above, we can design the following class code:
class Star {
public:
    // Planet's revolution radius
    GLfloat radius;
    // Planet's revolution and rotation speed
    GLfloat speed, selfSpeed;
    // Distance from the center of the planet to the parent planet's center
    GLfloat distance;
    // Planet's color
    GLfloat rgbaColor[4];

    // Parent planet
    Star* parentStar;

    // Constructor, when constructing a planet, the rotation radius, rotation speed, rotation speed, and revolving (parent planet) should be provided
    Star(GLfloat radius, GLfloat distance,
         GLfloat speed,  GLfloat selfSpeed,
         Star* parentStar);
    // Draw common planet's movement, rotation, and other activities
    void drawStar();
    // Provide default implementation to call drawStar()
    virtual void draw() { drawStar(); }
    // The parameter is the time span for each screen refresh
    virtual void update(long timeSpan);
protected:
    GLfloat alphaSelf, alpha;
};
class Planet : public Star {
public:
    // Constructor
    Planet(GLfloat radius, GLfloat distance,
           GLfloat speed,  GLfloat selfSpeed,
           Star* parentStar, GLfloat rgbColor[3]);
    // Add materials to planets with their own materials
    void drawPlanet();
    // Continue to open the rewrite function to its subclasses
    virtual void draw() { drawPlanet(); drawStar(); }
};
class LightPlanet : public Planet {
public:
    LightPlanet(GLfloat Radius, GLfloat Distance,
                GLfloat Speed,  GLfloat SelfSpeed,
                Star* ParentStar, GLfloat rgbColor[]);
    // Add lighting to stars that provide light sources
    void drawLight();
    virtual void draw() { drawLight(); drawPlanet(); drawStar(); }
};
In addition, we also need to consider the design of SolarSystem class. In the solar system, it is obvious that the solar system consists of various planets. For the solar system, the view refresh after the planet's movement should be handled by the solar system. Therefore, the member variables of SolarSystem should include variables containing the planets, and the member functions should handle the view refresh and keyboard response events inside the solar system. Therefore, in the ~/project/ directory, create a solarsystem.hpp file, and in it, we can design the SolarSystem class:
class SolarSystem {

public:

    SolarSystem();
    ~SolarSystem();

    void onDisplay();
    void onUpdate();
    void onKeyboard(unsigned char key, int x, int y);

private:
    Star *stars[STARS_NUM];

    // Define the parameters of the viewing angle
    GLdouble viewX, viewY, viewZ;
    GLdouble centerX, centerY, centerZ;
    GLdouble upX, upY, upZ;
};
Tips
- Here we use traditional form of array to manage all the planets instead of using the vector in C++, because traditional form of array is sufficient.
- Defining the viewing angle in OpenGL is a complex concept that requires a certain length to explain. We will briefly mention that defining the viewing angle requires at least nine parameters here. We will explain their functions in detail when we implement them later in the next section.
Finally, we also need to consider the basic parameter and variable settings.
In SolarSystem, including the sun, there are a total of nine planets (excluding Pluto), but in the Star class we designed, each Star object has the attributes of a Star, so we can additionally implement the satellites of these planets, such as the moon revolving around the earth. Therefore, we consider implementing a total of ten planets. Therefore, we can set the following enum to index the planets in an array:
#define STARS_NUM 10
enum STARS {
    Sun,        // Sun
    Mercury,    // Mercury
    Venus,      // Venus
    Earth,      // Earth
    Moon,       // Moon
    Mars,       // Mars
    Jupiter,    // Jupiter
    Saturn,     // Saturn
    Uranus,     // Uranus
    Neptune     // Neptune
};
Star * stars[STARS_NUM];
We also assumed that the rotation speeds are the same, so we set their speed using a macro:
#define TIMEPAST 1
#define SELFROTATE 3
At this point, move the unimplemented member functions to the corresponding .cpp file, and we have completed the experiment in this section.
Summary of Code
Let's summarize the code that needs to be completed in above experiments:
First, in main.cpp, we create a SolarSystem object and then delegate the display refresh, idle refresh, and keyboard event handling to glut:
Click to see the full code
//
//  main.cpp
//  solarsystem
//
#include <GL/glut.h>
#include "solarsystem.hpp"

#define WINDOW_X_POS 50
#define WINDOW_Y_POS 50
#define WIDTH 700
#define HEIGHT 700

SolarSystem solarsystem;

void onDisplay(void) {
    solarsystem.onDisplay();
}
void onUpdate(void) {
    solarsystem.onUpdate();
}
void onKeyboard(unsigned char key, int x, int y) {
    solarsystem.onKeyboard(key, x, y);
}

int main(int argc, char* argv[]) {
    glutInit(&argc, argv);
    glutInitDisplayMode(GLUT_RGBA | GLUT_DOUBLE);
    glutInitWindowPosition(WINDOW_X_POS, WINDOW_Y_POS);
    glutCreateWindow("SolarSystem at LabEx");
    glutDisplayFunc(onDisplay);
    glutIdleFunc(onUpdate);
    glutKeyboardFunc(onKeyboard);
    glutMainLoop();
    return 0;
}
Secondly, in stars.hpp, we create the Star, Planet, and LightPlanet classes:
Click to see the full code
//
//  stars.hpp
//  solarsystem
//
#ifndef stars_hpp
#define stars_hpp

#include <GL/glut.h>

class Star {
public:
    GLfloat radius;
    GLfloat speed, selfSpeed;
    GLfloat distance;
    GLfloat rgbaColor[4];

    Star* parentStar;

    Star(GLfloat radius, GLfloat distance,
         GLfloat speed, GLfloat selfSpeed,
         Star* parentStar);
    void drawStar();
    virtual void draw() { drawStar(); }
    virtual void update(long timeSpan);
protected:
    GLfloat alphaSelf, alpha;
};

class Planet : public Star {
public:
    Planet(GLfloat radius, GLfloat distance,
           GLfloat speed, GLfloat selfSpeed,
           Star* parentStar, GLfloat rgbColor[3]);
    void drawPlanet();
    virtual void draw() { drawPlanet(); drawStar(); }
};

class LightPlanet : public Planet {
public:
    LightPlanet(GLfloat Radius, GLfloat Distance,
                GLfloat Speed, GLfloat SelfSpeed,
                Star* parentStar, GLfloat rgbColor[]);
    void drawLight();
    virtual void draw() { drawLight(); drawPlanet(); drawStar(); }
};

#endif /* star_hpp */
In the ~/project/ directory, create a stars.cpp file and fill in the corresponding member function implementations from stars.hpp:
Click to see the full code
//
//  stars.cpp
//  solarsystem
//
#include "stars.hpp"

#define PI 3.1415926535

Star::Star(GLfloat radius, GLfloat distance,
           GLfloat speed, GLfloat selfSpeed,
           Star* parentStar) {
    // TODO:
}

void Star::drawStar() {
    // TODO:
}

void Star::update(long timeSpan) {
    // TODO:
}

Planet::Planet(GLfloat radius, GLfloat distance,
               GLfloat speed, GLfloat selfSpeed,
               Star* parentStar, GLfloat rgbColor[3]) :
Star(radius, distance, speed, selfSpeed, parentStar) {
    // TODO:
}

void Planet::drawPlanet() {
    // TODO:
}

LightPlanet::LightPlanet(GLfloat radius, GLfloat distance, GLfloat speed,
                         GLfloat selfSpeed, Star* parentStar, GLfloat rgbColor[3]) :
Planet(radius, distance, speed, selfSpeed, parentStar, rgbColor) {
    // TODO:
}

void LightPlanet::drawLight() {
    // TODO:
}
In solarsystem.hpp, the SolarSystem class is designed:
//
// solarsystem.hpp
// solarsystem
//
#include <GL/glut.h>

#include "stars.hpp"

#define STARS_NUM 10

class SolarSystem {

public:

    SolarSystem();
    ~SolarSystem();

    void onDisplay();
    void onUpdate();
    void onKeyboard(unsigned char key, int x, int y);

private:
    Star *stars[STARS_NUM];

    // Define the parameters of the viewing angle
    GLdouble viewX, viewY, viewZ;
    GLdouble centerX, centerY, centerZ;
    GLdouble upX, upY, upZ;
};
In the ~/project/ directory, create a solarsystem.cpp file and implement the corresponding member functions from solarsystem.hpp:
Click to see the full code
//
// solarsystem
//
#include "solarsystem.hpp"

#define TIMEPAST 1
#define SELFROTATE 3

enum STARS {Sun, Mercury, Venus, Earth, Moon,
    Mars, Jupiter, Saturn, Uranus, Neptune};

void SolarSystem::onDisplay() {
    // TODO:
}
void SolarSystem::onUpdate() {
    // TODO:
}
void SolarSystem::onKeyboard(unsigned char key, int x, int y) {
    // TODO:
}
SolarSystem::SolarSystem() {
    // TODO:

}
SolarSystem::~SolarSystem() {
    // TODO:
}
In the ~/project/ directory, create a Makefile file and add the following code to it:
Please enter it manually, do not copy and paste directly, and remember to use the <tab> key instead of the space key.
CXX = g++
EXEC = solarsystem
SOURCES = main.cpp stars.cpp solarsystem.cpp
OBJECTS = main.o stars.o solarsystem.o
LDFLAGS = -lglut -lGL -lGLU

all :
    $(CXX) $(SOURCES) $(LDFLAGS) -o $(EXEC)

clean:
    rm -f $(EXEC) *.gdb *.o
When writing the compilation command, pay attention to the placement of -lglut -lGLU -lGL. This is because the usage of the -l option in the g++ compiler is slightly special.
For example: foo1.cpp -lz foo2.cpp, if the target file foo2.cpp uses functions from the library z, these functions will not be directly loaded. However, if foo1.o uses functions from the z library, no compilation error will occur.
In other words, the entire linking process goes from left to right. When an unresolved function symbol is encountered in foo1.cpp, it looks for the right-side link library. When it encounters the option z, it searches in z and finds the function, thus completing the link smoothly. Therefore, the library with the -l option should be placed to the right of all compiled files.
Finally, run in the terminal:
make && ./solarsystem
You can see that the window has been created, but there is nothing in it (it displays what is behind the window). This is because we haven't implemented the refresh mechanism for the graphics in the window yet. We will continue to complete the remaining code in the next experiment to make the entire solar system simulation run.
The Concept of Matrices in OpenGL
In linear algebra, we are familiar with the concept of matrices, but our understanding of their specific purpose and function may be limited. So what exactly is a matrix?
Let's start by looking at the following equation:
x = Ab
Where A is a matrix, and x, b are vectors.
Perspective One:
If x and b are both vectors in our three-dimensional space, what does A do? It transforms b into (or to) x. From this perspective, a matrix A can be understood as a transformation.
Now let's consider another equation:
Ax = By
Where A, B are matrices, and x, y are vectors.
Perspective Two:
For two different vectors x and y, they are essentially the same because they can be made equal by multiplying them with matrices A and B. From this perspective, a matrix A can be understood as a coordinate system. In other words, the vectors themselves are unique, but we define a coordinate system to describe them. Since different coordinate systems are used, the coordinates of vectors will vary. In this case, for the same vector, it has different coordinates in different coordinate systems.
Matrix A precisely describes a coordinate system, and matrix B describes another coordinate system. When these two coordinate systems are applied to x and y, they yield the same result, meaning x and y are essentially the same vector but with different coordinate systems.
Combining these two perspectives, we can conclude that the essence of a matrix is to describe motion.
In the context of OpenGL, there is a matrix responsible for rendering transformations, known as the matrix mode in OpenGL.
As mentioned earlier, a matrix can describe both the transformation of an object and the coordinate system it exists in. Therefore, when dealing with different operations, we need to set different matrix modes in OpenGL. This is achieved using the function glMatrixMode().
This function accepts three different modes: GL_PROJECTION for projection operations, GL_MODELVIEW for model-view operations, and GL_TEXTURE for texture operations.
GL_PROJECTION tells OpenGL that projection operations will be performed, projecting the object onto a plane. When this mode is enabled, the matrix needs to be set as the identity matrix using glLoadIdentity(), followed by operations such as setting the perspective using gluPerspective (we will explain this function in more detail later when we discuss the concept of viewing in OpenGL).
GL_MODELVIEW tells OpenGL that the subsequent statements will be used to depict a model-based operation, such as setting the camera's viewpoint. Similarly, after enabling this mode, we need to set the OpenGL matrix mode as the identity matrix.
GL_TEXTURE is used for texture-related operations, which we won't delve into at this time.
If you're not familiar with the concept of matrices, you can simply understand
glMatrixMode()as declarations to OpenGL about the upcoming operations. Before rendering or rotating an object, we must useglPushMatrixto save the current matrix environment; otherwise, mysterious drawing errors may occur.
Common OpenGL Image Drawing APIs
OpenGL provides many commonly used APIs related to graphics drawing. Here, we will briefly introduce a few of them and use them in the following code:
- glEnable(GLenum cap): This function is used to activate various functionalities provided by OpenGL. The parameter cap is a macro internal to OpenGL, which provides effects such as lighting, fog, and dithering.
- glPushMatrix() and glPopMatrix(): These functions save the current matrix to the top of the stack (saving the current matrix).
- glRotatef(alpha, x, y, z): Represents rotating the current shape counterclockwise by alpha degrees along the
(x, y, z)axis. - glTranslatef(distance, x, y): Represents translating the current shape by distance along the
(x, y)direction. - glutSolidSphere(GLdouble radius, GLint slices, GLint stacks): Draws a sphere, where radius is the radius, slices is the number of longitudinal lines, and stacks is the number of latitudinal lines.
- glBegin() and glEnd(): When we want to draw a shape, we need to call these two functions before and after the drawing.
glBegin()specifies the type of the shape to be drawn. For example,GL_POINTSrepresents drawing points,GL_LINESrepresents drawing points connected by lines,GL_TRIANGLEScompletes a triangle with each three points, andGL_POLYGONdraws a polygon from the first point to the n-th point, and so on. For example, when we need to draw a circle, we can use a polygon with many sides to simulate it:
// r is the radius, n is the number of sides
glBegin(GL_POLYGON);
    for(i=0; i<n; ++i)
        glVertex2f(r*cos(2*PI/n*i), r*sin(2*PI/n*i));
glEnd();
Perspective Coordinates in OpenGL
In the previous section, we defined nine member variables in the SolarSystem class in OpenGL:
GLdouble viewX, viewY, viewZ;
GLdouble centerX, centerY, centerZ;
GLdouble upX, upY, upZ;
To understand these nine variables, we first need to establish the concept of the camera perspective in 3D programming with OpenGL.
Imagine that the scenes we usually watch in movies are actually filmed from the perspective of the camera. Therefore, OpenGL also has a similar concept. If we imagine the camera as our own head, then:
viewX,viewY,viewZcorrespond to the coordinates of the head (camera) in the OpenGL world coordinate system;centerX,centerY,centerZcorrespond to the coordinates of the object being viewed (as seen by the camera);upX,upY,upZcorrespond to the direction vector pointing upwards from the top of the head (camera top) (as we can tilt our head to observe an object).
With this understanding, you now have a concept of the coordinate system in OpenGL.
For this experiment, let's assume that the initial perspective is at coordinates (x, -x, x). Therefore, we have:
#define REST 700
#define REST_Y (-REST)
#define REST_Z (REST)
The position of the observed object (sun) is at (0,0,0), so in the constructor of the SolarSystem class, we initialize the perspective as follows:
viewX = 0;
viewY = REST_Y;
viewZ = REST_Z;
centerX = centerY = centerZ = 0;
upX = upY = 0;
upZ = 1;
Then, we can set the nine parameters of the perspective using the gluLookAt function:
gluLookAt(viewX, viewY, viewZ, centerX, centerY, centerZ, upX, upY, upZ);
Next, let's take a look at gluPerspective(GLdouble fovy,GLdouble aspect,GLdouble zNear,GLdouble zFar).
This function will create a symmetric perspective viewing volume, and before using this function, the matrix mode of OpenGL needs to be set to GL_PROJECTION.
As shown in the following figure:
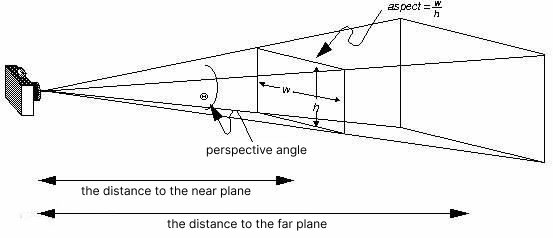
The image in the window is captured by the camera, and the actual content being captured is on the far plane, while the displayed content is on the near plane. Therefore, this function requires four parameters:
- The first parameter is the size of the perspective angle.
- The second parameter is the aspect ratio of the actual window, as shown in the figure
aspect=w/h. - The third parameter is the distance to the near plane.
- The fourth parameter is the distance to the far plane.
Lighting Effects in OpenGL
OpenGL divides the lighting system into three parts: light sources, materials, and lighting environment.
As the name suggests, a light source is the source of light, such as the sun; Materials refer to the surfaces of various objects that receive light, such as planets and satellites in the solar system other than the sun; The lighting environment includes additional parameters that determine the final lighting effect, such as the reflection of light rays, which can be controlled by setting a parameter called "ambient brightness" to make the final image closer to reality.
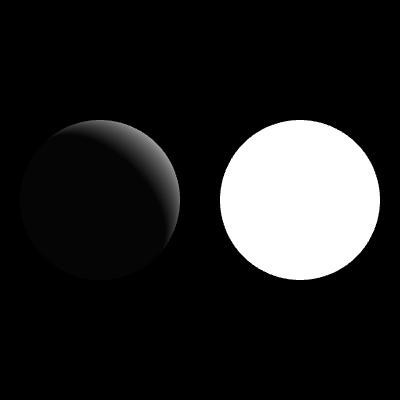
In physics, when parallel light hits a smooth surface, the reflected light remains parallel. This type of reflection is called "specular reflection." On the other hand, reflection caused by an uneven surface is called "diffuse reflection."
Light Sources
To implement the lighting system in OpenGL, the first thing we need to do is set up the light sources. It is worth mentioning that OpenGL supports a limited number of light sources (eight in total), represented by the macros GL_LIGHT0 to GL_LIGHT7. They can be enabled with the glEnable function and disabled with the glDisable function. For example: glEnable(GL_LIGHT0);
The position of the light source is set using the glLightfv function, for example:
GLfloat light_position[] = {0.0f, 0.0f, 0.0f, 1.0f};
glLightfv(GL_LIGHT0, GL_POSITION, light_position); // Specify the position of light source 0
The position is represented by four values, (x, y, z, w). When w is 0, it means that the light source is infinitely far away. The values of x, y, and z specify the direction of this infinitely distant light source. When w is not 0, it represents a positional light source, and its position is (x/w, y/w, z/w).
Materials
To set the material of an object, five attributes are generally required:
- The intensity of light left in the environment after multiple reflections.
- The intensity of light after diffuse reflection.
- The intensity of light after specular reflection.
- The intensity of light emitted by non-light-emitting objects in OpenGL, which is weak and does not affect other objects.
- The specular exponent, which represents the roughness of the material. A smaller value means rougher material, and when the light emitted by a point source of light shines on it, larger bright spots are produced. Conversely, a larger value means the material is more like a specular surface, producing smaller bright spots.
OpenGL provides two versions of functions to set materials:
void glMaterialf(GLenum face, GLenum pname, TYPE param);
void glMaterialfv(GLenum face, GLenum pname, TYPE *param);
The difference between them is that only one value needs to be set for the specular exponent, so glMaterialf is used. For other material settings that require multiple values, an array is used, and the version with pointer vector parameters, glMaterialfv, is used. For example:
GLfloat mat_ambient[]  = {0.0f, 0.0f, 0.5f, 1.0f};
GLfloat mat_diffuse[]  = {0.0f, 0.0f, 0.5f, 1.0f};
GLfloat mat_specular[] = {0.0f, 0.0f, 1.0f, 1.0f};
GLfloat mat_emission[] = {0.5f, 0.5f, 0.5f, 0.5f};
GLfloat mat_shininess  = 90.0f;
glMaterialfv(GL_FRONT, GL_AMBIENT,   mat_ambient);
glMaterialfv(GL_FRONT, GL_DIFFUSE,   mat_diffuse);
glMaterialfv(GL_FRONT, GL_SPECULAR,  mat_specular);
glMaterialfv(GL_FRONT, GL_EMISSION,  mat_emission);
glMaterialf (GL_FRONT, GL_SHININESS, mat_shininess);
Lighting Environment
By default, OpenGL does not handle lighting. To enable the lighting functionality, you need to use the macro GL_LIGHTING, that is, glEnable(GL_LIGHTING);
Drawing Planets
When drawing a planet, we first need to consider its revolution angle and rotation angle. Therefore, we can first implement the member function Star::update(long timeSpan) of the Star class in the ~/project/stars.cpp file:
void Star::update(long timeSpan) {
    alpha += timeSpan * speed;  // update revolution angle
    alphaSelf += selfSpeed;     // update rotation angle
}
After updating the revolution and rotation angles, we can draw the specific planet based on the parameters:
void Star::drawStar() {

    glEnable(GL_LINE_SMOOTH);
    glEnable(GL_BLEND);

    int n = 1440;

    // Save the current OpenGL matrix environment
    glPushMatrix();
    {
        // Revolution

        // If it is a planet and the distance is not 0, then translate it to the origin by a radius
        // This part is used for satellites
        if (parentStar != 0 && parentStar->distance > 0) {
            // Rotate the drawing graphics around the z-axis by alpha
            glRotatef(parentStar->alpha, 0, 0, 1);
            // Translate in the x-axis direction by distance, while y and z directions remain unchanged
            glTranslatef(parentStar->distance, 0.0, 0.0);
        }
        // Draw the orbit
        glBegin(GL_LINES);
        for(int i=0; i<n; ++i)
            glVertex2f(distance * cos(2 * PI * i / n),
                       distance * sin(2 * PI * i / n));
        glEnd();
        // Rotate around the z-axis by alpha
        glRotatef(alpha, 0, 0, 1);
        // Translate in the x-axis direction by distance, while y and z directions remain unchanged
        glTranslatef(distance, 0.0, 0.0);

        // Rotation
        glRotatef(alphaSelf, 0, 0, 1);

        // Draw the planet color
        glColor3f(rgbaColor[0], rgbaColor[1], rgbaColor[2]);
        glutSolidSphere(radius, 40, 32);
    }
    // Restore the matrix environment before drawing
    glPopMatrix();

}
This code uses the sin() and cos() functions, which require including #include<cmath>.
Drawing of Illumination
For the class Planet, which represents a non-luminous celestial body, we need to draw its illumination effect. Add the following code to the file ~/project/stars.cpp:
void Planet::drawPlanet() {
    GLfloat mat_ambient[]  = {0.0f, 0.0f, 0.5f, 1.0f};
    GLfloat mat_diffuse[]  = {0.0f, 0.0f, 0.5f, 1.0f};
    GLfloat mat_specular[] = {0.0f, 0.0f, 1.0f, 1.0f};
    GLfloat mat_emission[] = {rgbaColor[0], rgbaColor[1], rgbaColor[2], rgbaColor[3]};
    GLfloat mat_shininess  = 90.0f;

    glMaterialfv(GL_FRONT, GL_AMBIENT,   mat_ambient);
    glMaterialfv(GL_FRONT, GL_DIFFUSE,   mat_diffuse);
    glMaterialfv(GL_FRONT, GL_SPECULAR,  mat_specular);
    glMaterialfv(GL_FRONT, GL_EMISSION,  mat_emission);
    glMaterialf (GL_FRONT, GL_SHININESS, mat_shininess);
}
As for the class LightPlanet, which represents a luminous celestial body, we not only need to set its illumination material, but also need to set its light source position:
void LightPlanet::drawLight() {

    GLfloat light_position[] = {0.0f, 0.0f, 0.0f, 1.0f};
    GLfloat light_ambient[]  = {0.0f, 0.0f, 0.0f, 1.0f};
    GLfloat light_diffuse[]  = {1.0f, 1.0f, 1.0f, 1.0f};
    GLfloat light_specular[] = {1.0f, 1.0f, 1.0f, 1.0f};
    glLightfv(GL_LIGHT0, GL_POSITION, light_position); // Specify the position of light source 0
    glLightfv(GL_LIGHT0, GL_AMBIENT,  light_ambient);  // Represents the intensity of light rays from various sources that reach the material, after multiple reflections and tracing
    glLightfv(GL_LIGHT0, GL_DIFFUSE,  light_diffuse);  // Intensity of light after diffuse reflection
    glLightfv(GL_LIGHT0, GL_SPECULAR, light_specular); // Intensity of light after specular reflection

}
Drawing the Window
In the previous section, we mentioned the two most important functions for handling image display: glutDisplayFunc and glutIdleFunc. glutDisplayFunc executes the callback function when GLUT determines that the window content needs to be updated, while glutIdleFunc handles the callback when the event loop is idle.
To make the entire solar system move, we need to consider when to update the positions of the planets and when to refresh the view.
Obviously, glutDisplayFunc should focus on refreshing the view, and when the event is idle, we can start updating the positions of the planets. After the positions are updated, we can then call the view refresh function to refresh the display.
Therefore, we can first implement the member function SolarSystem::onUpdate() called in glutDisplayFunc:
#define TIMEPAST 1 // Assume that each update takes one day
void SolarSystem::onUpdate() {

    for (int i=0; i<STARS_NUM; i++)
        stars[i]->update(TIMEPAST); // Update the positions of the stars

    this->onDisplay(); // Refresh the display
}
Next, the refreshing of the display view is implemented in SolarSystem::onDisplay():
void SolarSystem::onDisplay() {

    // Clear the viewport buffer
    glClear(GL_COLOR_BUFFER_BIT  |  GL_DEPTH_BUFFER_BIT);
    // Clear and set the color buffer
    glClearColor(.7f, .7f, .7f, .1f);
    // Specify the current matrix as the projection matrix
    glMatrixMode(GL_PROJECTION);
    // Specify the specified matrix as an identity matrix
    glLoadIdentity();
    // Specify the current view volume
    gluPerspective(75.0f, 1.0f, 1.0f, 40000000);
    // Specify the current matrix as the model view matrix
    glMatrixMode(GL_MODELVIEW);
    // Specify the current matrix as an identity matrix
    glLoadIdentity();
    // Define the view matrix and multiply it with the current matrix
    gluLookAt(viewX, viewY, viewZ, centerX, centerY, centerZ, upX, upY, upZ);

    // Set the first light source (light source 0)
    glEnable(GL_LIGHT0);
    // Enable lighting
    glEnable(GL_LIGHTING);
    // Enable depth testing, automatically hide covered graphics based on the coordinates
    glEnable(GL_DEPTH_TEST);

    // Draw the planets
    for (int i=0; i<STARS_NUM; i++)
        stars[i]->draw();

    // We used GLUT_DOUBLE when initializing the display mode in the main function
    // We need to use glutSwapBuffers to implement buffer swapping for double buffering after drawing is finished
    glutSwapBuffers();
}
Class Constructors and Destructors
The constructors of the classes defined in stars.hpp need to initialize the member variables of the classes. This part is relatively simple and even default destructors can be used, so please implement these constructors by yourself:
Star::Star(GLfloat radius, GLfloat distance,
           GLfloat speed,  GLfloat selfSpeed,
           Star* parent);
Planet::Planet(GLfloat radius, GLfloat distance,
               GLfloat speed,  GLfloat selfSpeed,
               Star* parent, GLfloat rgbColor[3]);
LightPlanet::LightPlanet(GLfloat radius, GLfloat distance,
                         GLfloat speed,  GLfloat selfSpeed,
                         Star* parent,   GLfloat rgbColor[3]);
Hint: Note that when initializing the speed variable, convert it to angular speed. The conversion formula is: alpha_speed = 360/speed.
For the constructor of solarsystem.cpp, we need to initialize all the planets. Here we provide the parameters between the planets for convenience:
// Revolution radius
#define SUN_RADIUS 48.74
#define MER_RADIUS  7.32
#define VEN_RADIUS 18.15
#define EAR_RADIUS 19.13
#define MOO_RADIUS  6.15
#define MAR_RADIUS 10.19
#define JUP_RADIUS 42.90
#define SAT_RADIUS 36.16
#define URA_RADIUS 25.56
#define NEP_RADIUS 24.78

// Distance from the sun
#define MER_DIS   62.06
#define VEN_DIS  115.56
#define EAR_DIS  168.00
#define MOO_DIS   26.01
#define MAR_DIS  228.00
#define JUP_DIS  333.40
#define SAT_DIS  428.10
#define URA_DIS 848.00
#define NEP_DIS 949.10

// Movement speed
#define MER_SPEED   87.0
#define VEN_SPEED  225.0
#define EAR_SPEED  365.0
#define MOO_SPEED   30.0
#define MAR_SPEED  687.0
#define JUP_SPEED 1298.4
#define SAT_SPEED 3225.6
#define URA_SPEED 3066.4
#define NEP_SPEED 6014.8

// Self-rotation speed
#define SELFROTATE 3

// Define a macro to facilitate the setting of a multi-dimensional array
#define SET_VALUE_3(name, value0, value1, value2) \
                   ((name)[0])=(value0), ((name)[1])=(value1), ((name)[2])=(value2)

// In the previous experiment, we defined the enum of the planets
enum STARS {Sun, Mercury, Venus, Earth, Moon,
    Mars, Jupiter, Saturn, Uranus, Neptune};
Hint:
We define a macro SET_VALUE_3 here. You may think that we can write a function to achieve the same purpose.
In fact, macros complete the overall substitution work in the compilation process, while defining functions
This requires function stack operations during the call, which is far less efficient than macro processing during the compilation process.
Therefore, macros can be more efficient.
However, it is worth noting that although macros can be more efficient, excessive use can lead to ugly and less readable code. Appropriate use of macros, on the other hand, is encouraged.
Therefore, we can implement the constructor of the SolarSystem class, where the colors of the planets are randomly selected. Readers can change the colors of the planets by themselves:
SolarSystem::SolarSystem() {

    // Define the perspective view, as we have discussed the initialization of the perspective view before
    viewX = 0;
    viewY = REST_Y;
    viewZ = REST_Z;
    centerX = centerY = centerZ = 0;
    upX = upY = 0;
    upZ = 1;

    // Sun
    GLfloat rgbColor[3] = {1, 0, 0};
    stars[Sun]     = new LightPlanet(SUN_RADIUS, 0, 0, SELFROTATE, 0, rgbColor);
    // Mercury
    SET_VALUE_3(rgbColor, .2, .2, .5);
    stars[Mercury] = new Planet(MER_RADIUS, MER_DIS, MER_SPEED, SELFROTATE, stars[Sun], rgbColor);
    // Venus
    SET_VALUE_3(rgbColor, 1, .7, 0);
    stars[Venus]   = new Planet(VEN_RADIUS, VEN_DIS, VEN_SPEED, SELFROTATE, stars[Sun], rgbColor);
    // Earth
    SET_VALUE_3(rgbColor, 0, 1, 0);
    stars[Earth]   = new Planet(EAR_RADIUS, EAR_DIS, EAR_SPEED, SELFROTATE, stars[Sun], rgbColor);
    // Moon
    SET_VALUE_3(rgbColor, 1, 1, 0);
    stars[Moon]    = new Planet(MOO_RADIUS, MOO_DIS, MOO_SPEED, SELFROTATE, stars[Earth], rgbColor);
    // Mars
    SET_VALUE_3(rgbColor, 1, .5, .5);
    stars[Mars]    = new Planet(MAR_RADIUS, MAR_DIS, MAR_SPEED, SELFROTATE, stars[Sun], rgbColor);
    // Jupiter
    SET_VALUE_3(rgbColor, 1, 1, .5);
    stars[Jupiter] = new Planet(JUP_RADIUS, JUP_DIS, JUP_SPEED, SELFROTATE, stars[Sun], rgbColor);
    // Saturn
    SET_VALUE_3(rgbColor, .5, 1, .5);
    stars[Saturn]  = new Planet(SAT_RADIUS, SAT_DIS, SAT_SPEED, SELFROTATE, stars[Sun], rgbColor);
    // Uranus
    SET_VALUE_3(rgbColor, .4, .4, .4);
    stars[Uranus]  = new Planet(URA_RADIUS, URA_DIS, URA_SPEED, SELFROTATE, stars[Sun], rgbColor);
    // Neptune
    SET_VALUE_3(rgbColor, .5, .5, 1);
    stars[Neptune] = new Planet(NEP_RADIUS, NEP_DIS, NEP_SPEED, SELFROTATE, stars[Sun], rgbColor);

}
In addition, do not forget to release the allocated memory in the destructor:
SolarSystem::~SolarSystem() {
    for(int i = 0; i<STARS_NUM; i++)
        delete stars[i];
}
Implementation of Perspective Change with Keyboard Keys
To control the perspective change, we can use the five keys w, a, s, d, x on the keyboard, and use the key r to reset the perspective. First, we need to determine the magnitude of the perspective change after each key press. Here, we define a macro OFFSET. Then, we can determine the user's key press behavior by inspecting the passed parameter key.
#define OFFSET 20
void SolarSystem::onKeyboard(unsigned char key, int x, int y) {

    switch (key)    {
        case 'w': viewY += OFFSET; break; // Increase the camera's Y-axis position by OFFSET
        case 's': viewZ += OFFSET; break;
        case 'S': viewZ -= OFFSET; break;
        case 'a': viewX -= OFFSET; break;
        case 'd': viewX += OFFSET; break;
        case 'x': viewY -= OFFSET; break;
        case 'r':
            viewX = 0; viewY = REST_Y; viewZ = REST_Z;
            centerX = centerY = centerZ = 0;
            upX = upY = 0; upZ = 1;
            break;
        case 27: exit(0); break;
        default: break;
    }

}
Run and Test
We mainly implemented the code in the stars.cpp and solarsystem.cpp files.
The code for stars.cpp is as follows:
Click to see the full code
//
//  stars.cpp
//  solarsystem
//

#include "stars.hpp"
#include <cmath>

#define PI 3.1415926535

Star::Star(GLfloat radius, GLfloat distance,
           GLfloat speed,  GLfloat selfSpeed,
           Star* parent) {
    this->radius = radius;
    this->selfSpeed = selfSpeed;
    this->alphaSelf = this->alpha = 0;
    this->distance = distance;

    for (int i = 0; i < 4; i++)
        this->rgbaColor[i] = 1.0f;

    this->parentStar = parent;
    if (speed > 0)
        this->speed = 360.0f / speed;
    else
        this->speed = 0.0f;
}

void Star::drawStar() {

    glEnable(GL_LINE_SMOOTH);
    glEnable(GL_BLEND);

    int n = 1440;

    glPushMatrix();
    {
        if (parentStar != 0 && parentStar->distance > 0) {
            glRotatef(parentStar->alpha, 0, 0, 1);
            glTranslatef(parentStar->distance, 0.0, 0.0);
        }
        glBegin(GL_LINES);
        for(int i=0; i<n; ++i)
            glVertex2f(distance * cos(2 * PI * i / n),
                       distance * sin(2 * PI * i / n));
        glEnd();
        glRotatef(alpha, 0, 0, 1);
        glTranslatef(distance, 0.0, 0.0);

        glRotatef(alphaSelf, 0, 0, 1);

        glColor3f(rgbaColor[0], rgbaColor[1], rgbaColor[2]);
        glutSolidSphere(radius, 40, 32);
    }
    glPopMatrix();

}

void Star::update(long timeSpan) {
    alpha += timeSpan * speed;
    alphaSelf += selfSpeed;
}


Planet::Planet(GLfloat radius, GLfloat distance,
               GLfloat speed,  GLfloat selfSpeed,
               Star* parent, GLfloat rgbColor[3]) :
Star(radius, distance, speed, selfSpeed, parent) {
    rgbaColor[0] = rgbColor[0];
    rgbaColor[1] = rgbColor[1];
    rgbaColor[2] = rgbColor[2];
    rgbaColor[3] = 1.0f;
}

void Planet::drawPlanet() {
    GLfloat mat_ambient[]  = {0.0f, 0.0f, 0.5f, 1.0f};
    GLfloat mat_diffuse[]  = {0.0f, 0.0f, 0.5f, 1.0f};
    GLfloat mat_specular[] = {0.0f, 0.0f, 1.0f, 1.0f};
    GLfloat mat_emission[] = {rgbaColor[0], rgbaColor[1], rgbaColor[2], rgbaColor[3]};
    GLfloat mat_shininess  = 90.0f;

    glMaterialfv(GL_FRONT, GL_AMBIENT,   mat_ambient);
    glMaterialfv(GL_FRONT, GL_DIFFUSE,   mat_diffuse);
    glMaterialfv(GL_FRONT, GL_SPECULAR,  mat_specular);
    glMaterialfv(GL_FRONT, GL_EMISSION,  mat_emission);
    glMaterialf (GL_FRONT, GL_SHININESS, mat_shininess);
}

LightPlanet::LightPlanet(GLfloat radius,    GLfloat distance, GLfloat speed,
                         GLfloat selfSpeed, Star* parent,   GLfloat rgbColor[3]) :
Planet(radius, distance, speed, selfSpeed, parent, rgbColor) {
    ;
}

void LightPlanet::drawLight() {

    GLfloat light_position[] = {0.0f, 0.0f, 0.0f, 1.0f};
    GLfloat light_ambient[]  = {0.0f, 0.0f, 0.0f, 1.0f};
    GLfloat light_diffuse[]  = {1.0f, 1.0f, 1.0f, 1.0f};
    GLfloat light_specular[] = {1.0f, 1.0f, 1.0f, 1.0f};
    glLightfv(GL_LIGHT0, GL_POSITION, light_position);
    glLightfv(GL_LIGHT0, GL_AMBIENT,  light_ambient);
    glLightfv(GL_LIGHT0, GL_DIFFUSE,  light_diffuse);
    glLightfv(GL_LIGHT0, GL_SPECULAR, light_specular);

}
The code for solarsystem.cpp is as follows:
Click to see the full code
//
// solarsystem.cpp
// solarsystem
//

#include "solarsystem.hpp"

#define REST 700
#define REST_Z (REST)
#define REST_Y (-REST)

void SolarSystem::onDisplay() {

    glClear(GL_COLOR_BUFFER_BIT  |  GL_DEPTH_BUFFER_BIT);
    glClearColor(.7f, .7f, .7f, .1f);
    glMatrixMode(GL_PROJECTION);
    glLoadIdentity();
    gluPerspective(75.0f, 1.0f, 1.0f, 40000000);
    glMatrixMode(GL_MODELVIEW);
    glLoadIdentity();
    gluLookAt(viewX, viewY, viewZ, centerX, centerY, centerZ, upX, upY, upZ);

    glEnable(GL_LIGHT0);
    glEnable(GL_LIGHTING);
    glEnable(GL_DEPTH_TEST);

    for (int i=0; i<STARS_NUM; i++)
        stars[i]->draw();

    glutSwapBuffers();
}

#define TIMEPAST 1
void SolarSystem::onUpdate() {

    for (int i=0; i<STARS_NUM; i++)
        stars[i]->update(TIMEPAST);

    this->onDisplay();
}

#define OFFSET 20
void SolarSystem::onKeyboard(unsigned char key, int x, int y) {

    switch (key)    {
        case 'w': viewY += OFFSET; break;
        case 's': viewZ += OFFSET; break;
        case 'S': viewZ -= OFFSET; break;
        case 'a': viewX -= OFFSET; break;
        case 'd': viewX += OFFSET; break;
        case 'x': viewY -= OFFSET; break;
        case 'r':
            viewX = 0; viewY = REST_Y; viewZ = REST_Z;
            centerX = centerY = centerZ = 0;
            upX = upY = 0; upZ = 1;
            break;
        case 27: exit(0); break;
        default: break;
    }

}

#define SUN_RADIUS 48.74
#define MER_RADIUS  7.32
#define VEN_RADIUS 18.15
#define EAR_RADIUS 19.13
#define MOO_RADIUS  6.15
#define MAR_RADIUS 10.19
#define JUP_RADIUS 42.90
#define SAT_RADIUS 36.16
#define URA_RADIUS 25.56
#define NEP_RADIUS 24.78

#define MER_DIS   62.06
#define VEN_DIS  115.56
#define EAR_DIS  168.00
#define MOO_DIS   26.01
#define MAR_DIS  228.00
#define JUP_DIS  333.40
#define SAT_DIS  428.10
#define URA_DIS 848.00
#define NEP_DIS 949.10

#define MER_SPEED   87.0
#define VEN_SPEED  225.0
#define EAR_SPEED  365.0
#define MOO_SPEED   30.0
#define MAR_SPEED  687.0
#define JUP_SPEED 1298.4
#define SAT_SPEED 3225.6
#define URA_SPEED 3066.4
#define NEP_SPEED 6014.8

#define SELFROTATE 3

enum STARS {Sun, Mercury, Venus, Earth, Moon,
    Mars, Jupiter, Saturn, Uranus, Neptune};

#define SET_VALUE_3(name, value0, value1, value2) \
                   ((name)[0])=(value0), ((name)[1])=(value1), ((name)[2])=(value2)

SolarSystem::SolarSystem() {

    viewX = 0;
    viewY = REST_Y;
    viewZ = REST_Z;
    centerX = centerY = centerZ = 0;
    upX = upY = 0;
    upZ = 1;

    GLfloat rgbColor[3] = {1, 0, 0};
    stars[Sun]     = new LightPlanet(SUN_RADIUS, 0, 0, SELFROTATE, 0, rgbColor);

    SET_VALUE_3(rgbColor, .2, .2, .5);
    stars[Mercury] = new Planet(MER_RADIUS, MER_DIS, MER_SPEED, SELFROTATE, stars[Sun], rgbColor);

    SET_VALUE_3(rgbColor, 1, .7, 0);
    stars[Venus]   = new Planet(VEN_RADIUS, VEN_DIS, VEN_SPEED, SELFROTATE, stars[Sun], rgbColor);

    SET_VALUE_3(rgbColor, 0, 1, 0);
    stars[Earth]   = new Planet(EAR_RADIUS, EAR_DIS, EAR_SPEED, SELFROTATE, stars[Sun], rgbColor);

    SET_VALUE_3(rgbColor, 1, 1, 0);
    stars[Moon]    = new Planet(MOO_RADIUS, MOO_DIS, MOO_SPEED, SELFROTATE, stars[Earth], rgbColor);

    SET_VALUE_3(rgbColor, 1, .5, .5);
    stars[Mars]    = new Planet(MAR_RADIUS, MAR_DIS, MAR_SPEED, SELFROTATE, stars[Sun], rgbColor);

    SET_VALUE_3(rgbColor, 1, 1, .5);
    stars[Jupiter] = new Planet(JUP_RADIUS, JUP_DIS, JUP_SPEED, SELFROTATE, stars[Sun], rgbColor);

    SET_VALUE_3(rgbColor, .5, 1, .5);
    stars[Saturn]  = new Planet(SAT_RADIUS, SAT_DIS, SAT_SPEED, SELFROTATE, stars[Sun], rgbColor);

    SET_VALUE_3(rgbColor, .4, .4, .4);
    stars[Uranus]  = new Planet(URA_RADIUS, URA_DIS, URA_SPEED, SELFROTATE, stars[Sun], rgbColor);

    SET_VALUE_3(rgbColor, .5, .5, 1);
    stars[Neptune] = new Planet(NEP_RADIUS, NEP_DIS, NEP_SPEED, SELFROTATE, stars[Sun], rgbColor);

}

SolarSystem::~SolarSystem() {
    for(int i = 0; i<STARS_NUM; i++)
        delete stars[i];
}
Run in the terminal:
make && ./solarsystem
The result is shown in the figure:
Since the colors of the planets are single, the lighting effect is not very obvious but still visible. For example, on the right side of the yellow Jupiter, there is a whitish appearance.
Summary
In this project, we have achieved a simple model of the solar system. By using the lighting system in OpenGL, we are able to see the lighting effects of the planets as they revolve around the sun. Additionally, we can adjust the perspective using the keyboard to observe the solar system from different angles.