Introduction
In this project, you will learn how to implement a login verification feature using AJAX and JSON data transfer. The project involves creating a login form, handling the form submission with AJAX, and validating the user's login credentials on the server-side.
👀 Preview
🎯 Tasks
In this project, you will learn:
- How to prepare the project environment and set up the necessary files and dependencies.
- How to implement the login form in the
AjaxJson.jsppage using HTML. - How to handle the login form submission using jQuery and AJAX.
- How to encapsulate the login data in JSON format and send it to the server.
- How to receive and process the JSON response from the server to determine the login status.
- How to redirect the user to the appropriate page based on the login result.
🏆 Achievements
After completing this project, you will be able to:
- Use AJAX to send data to the server without a full page refresh.
- Work with JSON data format for data transfer between the client and server.
- Handle form submission and user input validation on the client-side.
- Process the server's response and update the user interface accordingly.
- Integrate client-side and server-side components to create a complete login verification feature.
Prepare the Project Environment
In this step, you will learn how to prepare the project environment. Follow the steps below to complete this step:
Open the lab environment and navigate to the
AjaxJsonProjectdirectory using the following command:cd AjaxJsonProject/AjaxJsonProjectStart the Tomcat server with the following command:
mvn tomcat7:runSwitch to the Web 8080 tab above the environment to see the project running.
Implement the Login Form
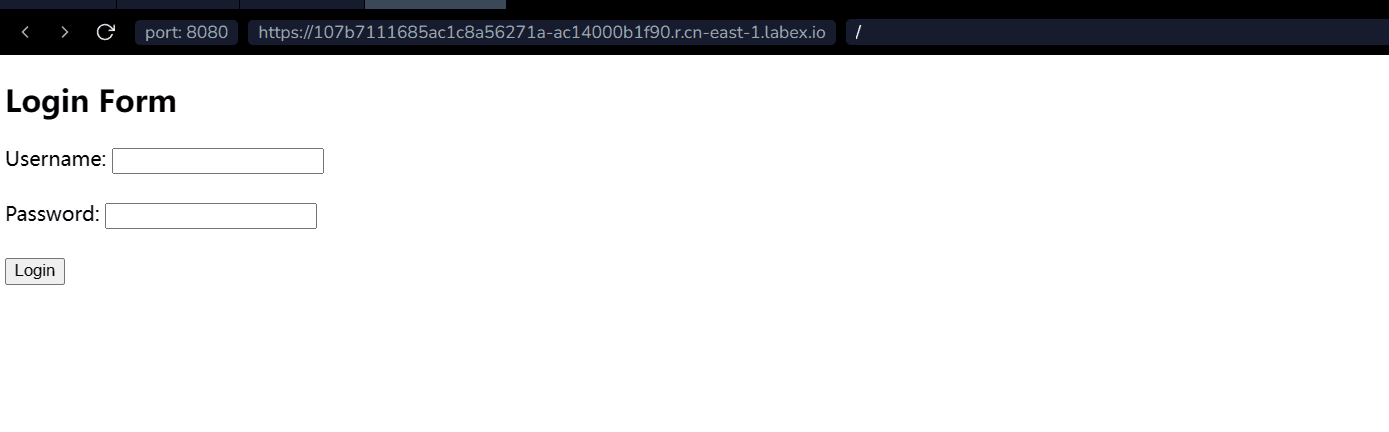
In this step, you will learn how to implement the login form in the AjaxJson.jsp page. Follow the steps below to complete this step:
Open the
AjaxJson.jspfile in theAjaxJsonProject/AjaxJsonProject/src/main/webappdirectory.Add the following HTML code to create the login form:
<%@ page language="java" contentType="text/html; charset=UTF-8"
    pageEncoding="UTF-8"%>
<!DOCTYPE html>
<html>
<head>
<meta charset="UTF-8">
<title>Login Form</title>
</head>
<body>
    <h2>Login Form</h2>
    <form id="loginForm">
        <label for="userName">Username:</label>
        <input type="text" id="userName" name="userName"><br><br>

        <label for="userPwd">Password:</label>
        <input type="password" id="userPwd" name="userPwd"><br><br>

        <input type="submit" value="Login">
    </form>
</body>
</html>
Include the jQuery library by adding the following script tag in the
<head>section:<script src="https://cdn.staticfile.org/jquery/1.12.4/jquery.min.js"></script>
Handle the Login Form Submission with AJAX
In this step, you will learn how to handle the login form submission using AJAX. Follow the steps below to complete this step:
Add the following JavaScript code inside the
<script>tags in theAjaxJson.jspfile:<script> $(document).ready(function(){ $("#loginForm").submit(function(event){ // Prevent the default form submission behavior event.preventDefault(); // Get the entered username and password var $userName = $("#userName").val(); var $userPwd = $("#userPwd").val(); // Check if the username and password are empty if($userName.trim() === "" || $userPwd.trim() === ""){ alert("Username and password cannot be empty"); return; } // Encapsulate the data to be sent in JSON format var data = { "u_name": $userName, "u_pwd": $userPwd }; // Send an AJAX request $.ajax({ type: "POST", url: "/AJAXJSONLoginServlet", contentType: "application/json", data: JSON.stringify(data), dataType: "json", success: function(response){ // Check if the login was successful based on the returned data if(response.code === 200){ alert("Login successful"); // Redirect to index.jsp after successful login window.location.href = "index.jsp"; } else { alert("Incorrect username or password"); } }, error: function(xhr, status, error){ console.error("AJAX request failed: " + status + ", " + error); } }); }); }); </script>This code handles the form submission by preventing the default form behavior, getting the entered username and password, and sending an AJAX request to the
/AJAXJSONLoginServletendpoint.The backend will return a JSON response with a
codeproperty. If the code is 200, the login is successful, and the user is redirected to theindex.jsppage. If the code is not 200, the login failed, and an error message is displayed.
Test the Login Functionality
Run the Tomcat server with the
mvn tomcat7:runcommand if it's not already running.Open the Web 8080 TAB above the environment to see the project in action. When running again, you need to refresh.
Enter a valid username and password, then click the "Login" button.
If the login is successful, you should see an alert message "Login successful" and be redirected to the
index.jsppage.If the login fails, you should see an alert message "Incorrect username or password".
Congratulations! You have successfully implemented the login verification feature using AJAX and JSON data transfer.
Summary
Congratulations! You have completed this project. You can practice more labs in LabEx to improve your skills.