Build an Image Cropping Tool Using HTML5

CSSCSSBeginner
Practice Now

Introduction

This project will guide you through the process of creating a simple image cropping tool. By the end, you'll have an interactive application that allows users to upload, display, and crop images.

👀 Preview

effect

🎯 Tasks

In this project, you will learn:

  • How to create the HTML structure for the image cropping tool
  • How to style the webpage using CSS to make it visually appealing
  • How to initialize variables and event listeners using JavaScript to handle user interactions
  • How to handle image upload and display using the FileReader API in JavaScript
  • How to implement the cropping mechanism using the Canvas API in JavaScript
  • How to save the cropped image and display the result

🏆 Achievements

After completing this project, you will be able to:

  • Understand HTML tags and structure
  • Apply CSS properties and selectors effectively
  • Utilize JavaScript syntax, variables, and event listeners
  • Leverage the FileReader API in JavaScript for handling file uploads
  • Implement image manipulation using the Canvas API in JavaScript

Skills Graph

%%%%{init: {'theme':'neutral'}}%%%% flowchart RL css(("`CSS`")) -.-> css/BasicConceptsGroup(["`Basic Concepts`"]) css(("`CSS`")) -.-> css/BasicStylingGroup(["`Basic Styling`"]) css(("`CSS`")) -.-> css/CoreLayoutGroup(["`Core Layout`"]) css(("`CSS`")) -.-> css/IntermediateStylingGroup(["`Intermediate Styling`"]) css(("`CSS`")) -.-> css/DynamicStylingGroup(["`Dynamic Styling`"]) css(("`CSS`")) -.-> css/CSSPreprocessorsGroup(["`CSS Preprocessors`"]) css(("`CSS`")) -.-> css/CodingStandardsandBestPracticesGroup(["`Coding Standards and Best Practices`"]) html(("`HTML`")) -.-> html/BasicStructureGroup(["`Basic Structure`"]) html(("`HTML`")) -.-> html/TextContentandFormattingGroup(["`Text Content and Formatting`"]) html(("`HTML`")) -.-> html/LayoutandSectioningGroup(["`Layout and Sectioning`"]) html(("`HTML`")) -.-> html/MultimediaandGraphicsGroup(["`Multimedia and Graphics`"]) html(("`HTML`")) -.-> html/FormsandInputGroup(["`Forms and Input`"]) javascript(("`JavaScript`")) -.-> javascript/BasicConceptsGroup(["`Basic Concepts`"]) javascript(("`JavaScript`")) -.-> javascript/AdvancedConceptsGroup(["`Advanced Concepts`"]) javascript(("`JavaScript`")) -.-> javascript/DOMManipulationGroup(["`DOM Manipulation`"]) javascript(("`JavaScript`")) -.-> javascript/ToolsandEnvironmentGroup(["`Tools and Environment`"]) css/BasicConceptsGroup -.-> css/selectors("`Selectors`") css/BasicStylingGroup -.-> css/colors("`Colors`") css/BasicStylingGroup -.-> css/text_styling("`Text Styling`") css/CoreLayoutGroup -.-> css/margin_and_padding("`Margin and Padding`") css/CoreLayoutGroup -.-> css/borders("`Borders`") css/CoreLayoutGroup -.-> css/width_and_height("`Width and Height`") css/CoreLayoutGroup -.-> css/display_property("`Display Property`") css/CoreLayoutGroup -.-> css/positioning("`Positioning`") css/IntermediateStylingGroup -.-> css/backgrounds("`Backgrounds`") css/DynamicStylingGroup -.-> css/transitions("`Transitions`") css/CSSPreprocessorsGroup -.-> css/nesting("`Nesting`") css/CodingStandardsandBestPracticesGroup -.-> css/comments("`Comments`") html/BasicStructureGroup -.-> html/basic_elems("`Basic Elements`") html/BasicStructureGroup -.-> html/charset("`Character Encoding`") html/BasicStructureGroup -.-> html/lang_decl("`Language Declaration`") html/BasicStructureGroup -.-> html/viewport("`Viewport Declaration`") html/BasicStructureGroup -.-> html/head_elems("`Head Elements`") html/TextContentandFormattingGroup -.-> html/para_br("`Paragraphs and Line Breaks`") html/LayoutandSectioningGroup -.-> html/doc_flow("`Document Flow Understanding`") html/MultimediaandGraphicsGroup -.-> html/multimedia("`Multimedia Elements`") html/FormsandInputGroup -.-> html/forms("`Form Elements`") css/IntermediateStylingGroup -.-> css/pseudo_classes("`Pseudo-classes`") javascript/BasicConceptsGroup -.-> javascript/variables("`Variables`") javascript/BasicConceptsGroup -.-> javascript/data_types("`Data Types`") javascript/BasicConceptsGroup -.-> javascript/arith_ops("`Arithmetic Operators`") javascript/BasicConceptsGroup -.-> javascript/comp_ops("`Comparison Operators`") javascript/BasicConceptsGroup -.-> javascript/cond_stmts("`Conditional Statements`") javascript/BasicConceptsGroup -.-> javascript/functions("`Functions`") javascript/BasicConceptsGroup -.-> javascript/str_manip("`String Manipulation`") javascript/BasicConceptsGroup -.-> javascript/array_methods("`Array Methods`") javascript/BasicConceptsGroup -.-> javascript/obj_manip("`Object Manipulation`") javascript/AdvancedConceptsGroup -.-> javascript/closures("`Closures`") javascript/DOMManipulationGroup -.-> javascript/dom_select("`DOM Selection`") javascript/DOMManipulationGroup -.-> javascript/event_handle("`Event Handling`") javascript/ToolsandEnvironmentGroup -.-> javascript/bom("`Browser Object Model`") subgraph Lab Skills css/selectors -.-> lab-298929{{"`Build an Image Cropping Tool Using HTML5`"}} css/colors -.-> lab-298929{{"`Build an Image Cropping Tool Using HTML5`"}} css/text_styling -.-> lab-298929{{"`Build an Image Cropping Tool Using HTML5`"}} css/margin_and_padding -.-> lab-298929{{"`Build an Image Cropping Tool Using HTML5`"}} css/borders -.-> lab-298929{{"`Build an Image Cropping Tool Using HTML5`"}} css/width_and_height -.-> lab-298929{{"`Build an Image Cropping Tool Using HTML5`"}} css/display_property -.-> lab-298929{{"`Build an Image Cropping Tool Using HTML5`"}} css/positioning -.-> lab-298929{{"`Build an Image Cropping Tool Using HTML5`"}} css/backgrounds -.-> lab-298929{{"`Build an Image Cropping Tool Using HTML5`"}} css/transitions -.-> lab-298929{{"`Build an Image Cropping Tool Using HTML5`"}} css/nesting -.-> lab-298929{{"`Build an Image Cropping Tool Using HTML5`"}} css/comments -.-> lab-298929{{"`Build an Image Cropping Tool Using HTML5`"}} html/basic_elems -.-> lab-298929{{"`Build an Image Cropping Tool Using HTML5`"}} html/charset -.-> lab-298929{{"`Build an Image Cropping Tool Using HTML5`"}} html/lang_decl -.-> lab-298929{{"`Build an Image Cropping Tool Using HTML5`"}} html/viewport -.-> lab-298929{{"`Build an Image Cropping Tool Using HTML5`"}} html/head_elems -.-> lab-298929{{"`Build an Image Cropping Tool Using HTML5`"}} html/para_br -.-> lab-298929{{"`Build an Image Cropping Tool Using HTML5`"}} html/doc_flow -.-> lab-298929{{"`Build an Image Cropping Tool Using HTML5`"}} html/multimedia -.-> lab-298929{{"`Build an Image Cropping Tool Using HTML5`"}} html/forms -.-> lab-298929{{"`Build an Image Cropping Tool Using HTML5`"}} css/pseudo_classes -.-> lab-298929{{"`Build an Image Cropping Tool Using HTML5`"}} javascript/variables -.-> lab-298929{{"`Build an Image Cropping Tool Using HTML5`"}} javascript/data_types -.-> lab-298929{{"`Build an Image Cropping Tool Using HTML5`"}} javascript/arith_ops -.-> lab-298929{{"`Build an Image Cropping Tool Using HTML5`"}} javascript/comp_ops -.-> lab-298929{{"`Build an Image Cropping Tool Using HTML5`"}} javascript/cond_stmts -.-> lab-298929{{"`Build an Image Cropping Tool Using HTML5`"}} javascript/functions -.-> lab-298929{{"`Build an Image Cropping Tool Using HTML5`"}} javascript/str_manip -.-> lab-298929{{"`Build an Image Cropping Tool Using HTML5`"}} javascript/array_methods -.-> lab-298929{{"`Build an Image Cropping Tool Using HTML5`"}} javascript/obj_manip -.-> lab-298929{{"`Build an Image Cropping Tool Using HTML5`"}} javascript/closures -.-> lab-298929{{"`Build an Image Cropping Tool Using HTML5`"}} javascript/dom_select -.-> lab-298929{{"`Build an Image Cropping Tool Using HTML5`"}} javascript/event_handle -.-> lab-298929{{"`Build an Image Cropping Tool Using HTML5`"}} javascript/bom -.-> lab-298929{{"`Build an Image Cropping Tool Using HTML5`"}} end

Lay Out the HTML Structure

Requirements:

  • Knowledge of HTML tags and structure.

Functionality:

  • Design an interface to allow users to upload an image and trigger the cropping process.

Embed the HTML code into your index.html.

<!doctype html>
<html lang="en">
  <head>
    <meta charset="UTF-8" />
    <meta name="viewport" content="width=device-width, initial-scale=1.0" />
    <title>HTML5 Crop Image</title>
    <link rel="stylesheet" href="style.css" />
  </head>
  <body>
    <input type="file" name="file" id="post_file" />

    <button id="save_button">SAVE</button>
    <div id="label">
      <canvas id="get_image"></canvas>
      <p>
        <canvas id="cover_box"></canvas>
        <canvas id="edit_pic"></canvas>
      </p>
    </div>
    <p>
      <span id="show_edit"></span>
      <span id="show_pic"><img src="" /></span>
    </p>
    <script type="text/javascript" src="main.js"></script>
  </body>
</html>

The three <canvas> tags mentioned above are used for processing content related to images. The detailed handling will be provided in subsequent js (JavaScript) code. The elements with id show_edit and id show_pic are for previewing the image and viewing the final image generation result.

Style the Webpage

Requirements:

  • Familiarity with CSS properties and selectors.

Functionality:

  • Style the HTML elements to make the interface user-friendly and visually appealing.

Embed the CSS into your style.css.

body {
  background-color: #f6f6f6;
  margin: 0;
  padding: 20px;
  text-align: center;
}

#label {
  border: 1px solid #ccc;
  background-color: #fff;
  text-align: center;
  height: 300px;
  width: 300px;
  margin: 20px auto;
  position: relative;
}

#get_image {
  position: absolute;
}

#edit_pic {
  position: absolute;
  display: none;
  background: #000;
}

#cover_box {
  position: absolute;
  z-index: 9999;
  display: none;
  top: 0px;
  left: 0px;
}

#show_edit {
  margin: 0 auto;
  display: inline-block;
}

#show_pic {
  height: 100px;
  width: 100px;
  border: 2px solid #000;
  overflow: hidden;
  margin: 0 auto;
  display: inline-block;
}

canvas {
  position: absolute;
  top: 0;
  left: 0;
}

#save_button {
  padding: 8px 16px;
  background-color: #3498db;
  color: #fff;
  border: none;
  border-radius: 5px;
  cursor: pointer;
  transition: background-color 0.2s;
}

#save_button:hover {
  background-color: #2980b9;
}

input[type="file"] {
  margin-bottom: 20px;
}

Initialize Variables and Event Listeners

Requirements:

  • Fundamental understanding of JavaScript syntax, variables, and event listeners.

Functionality:

  • Initialize properties and configurations for the cropping tool. Add an event listener to process the uploaded image.

In main.js, write the code to initialize cropping tool properties and set up event listeners.

var postFile = {
  init: function () {
    var t = this;
    t.regional = document.getElementById("label");
    t.getImage = document.getElementById("get_image");
    t.editPic = document.getElementById("edit_pic");
    t.editBox = document.getElementById("cover_box");
    t.px = 0; //background image x
    t.py = 0; //background image y
    t.sx = 15; //crop area x
    t.sy = 15; //crop area y
    t.sHeight = 150; //crop area height
    t.sWidth = 150; //crop area width
    document
      .getElementById("post_file")
      .addEventListener("change", t.handleFiles, false);
  }
};

All of our functions and variables are encapsulated within the postFile object. The init function mentioned above mainly sets some initial values.

t.px = 0;
t.py = 0;
t.sx = 15;
t.sy = 15;
t.sHeight = 100;
t.sWidth = 100;

The variables t.px and t.py represent the coordinates of the background image in the real-time preview area; t.sx, t.sy, t.sHeight, and t.sWidth represent the image's x, y coordinates and width, height respectively.

We also obtain several elements that we will operate on later through document.getElementById.

document
  .getElementById("post_file")
  .addEventListener("change", t.handleFiles, false);

We listen to the change event of the input form with the id post_file to process the files uploaded by the user. Here, we delegate this to the handleFiles function. So, next, we'll implement the handleFiles function.

Handle Image Upload and Display

Requirements:

  • Basic knowledge of the FileReader API in JavaScript.

Functionality:

  • Ensure that when users upload an image, it's correctly processed, read, and displayed on the screen.

Expand your main.js with the functions to process and display the uploaded image.

  1. To implement the handleFiles function

    Here, we are using the HTML5 File API. First, by invoking new FileReader(), we instantiate a FileReader object named oFReader. Then, we call its readAsDataURL() method to read the file content and convert it into a base64 encoded format.

    Finally, when the file is fully read and loaded, we process the image we've read using postFile.paintImage(oFREvent.target.result). In simple terms, we're redrawing the image data we've read onto the browser.

handleFiles: function () {
        var fileList = this.files[0];
        var oFReader = new FileReader();
        oFReader.readAsDataURL(fileList);
        oFReader.onload = function (oFREvent) {
            postFile.paintImage(oFREvent.target.result);
        };
},
  1. To implement the paintImage function

    The most crucial step here is to draw the image according to the size of the container using canvas. In the previous step, using the File API's FileReader, we've already obtained the URL of the image we want to upload (the value of oFREvent.target.result). The next step is to use canvas to draw this image. First, we use getImage.getContext to obtain the 2d content of <canvas id="get_image"></canvas>, which can be simply understood as the image content. After that, we use new Image() to create an <img> element and set its src attribute value.

paintImage: function (url) {
        var t = this;
        var createCanvas = t.getImage.getContext("2d");
        var img = new Image();
        img.src = url;
        img.onload = function () {
            if (
                img.width < t.regional.offsetWidth &&
                img.height < t.regional.offsetHeight
            ) {
                t.imgWidth = img.width;
                t.imgHeight = img.height;
            } else {
                var pWidth = img.width / (img.height / t.regional.offsetHeight);
                var pHeight = img.height / (img.width / t.regional.offsetWidth);
                t.imgWidth = img.width > img.height ? t.regional.offsetWidth : pWidth;
                t.imgHeight =
                    img.height > img.width ? t.regional.offsetHeight : pHeight;
            }
            t.px = (t.regional.offsetWidth - t.imgWidth) / 2 + "px";
            t.py = (t.regional.offsetHeight - t.imgHeight) / 2 + "px";

            t.getImage.height = t.imgHeight;
            t.getImage.width = t.imgWidth;
            t.getImage.style.left = t.px;
            t.getImage.style.top = t.py;

            createCanvas.drawImage(img, 0, 0, t.imgWidth, t.imgHeight);
            t.imgUrl = t.getImage.toDataURL();
            t.cutImage();
            t.drag();
        };
},

Within the img.onload function, our main goal is to redraw the image in its original size while maintaining its proportions, which is why we have an if condition. Ultimately, we use the line of code createCanvas.drawImage(img,0,0,t.imgWidth,t.imgHeight); to truly render the image.

Implement the Cropping Mechanism

Requirements:

  • Familiarity with the Canvas API in JavaScript for drawing and image manipulation.

Functionality:

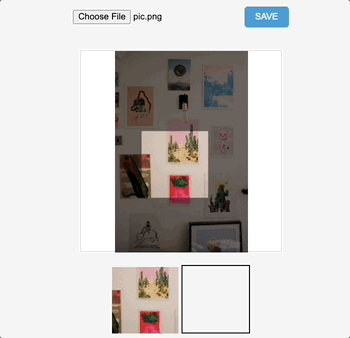
  • Add a cropping region on the displayed image and make this region draggable. This provides users with the flexibility to select the desired area to crop.

Add the relevant methods in main.js.

  1. Create a cutImage method

    The cutImage method is primarily responsible for two tasks: one is to create a mask layer, and the other is to use the CSS background property to provide a real-time preview of the selected cropping area.

cutImage: function () {
        var t = this;

        t.editBox.height = t.imgHeight;
        t.editBox.width = t.imgWidth;
        t.editBox.style.display = "block";
        t.editBox.style.left = t.px;
        t.editBox.style.top = t.py;

        var cover = t.editBox.getContext("2d");
        cover.fillStyle = "rgba(0, 0, 0, 0.5)";
        cover.fillRect(0, 0, t.imgWidth, t.imgHeight);
        cover.clearRect(t.sx, t.sy, t.sHeight, t.sWidth);

        document.getElementById("show_edit").style.background =
            "url(" + t.imgUrl + ")" + -t.sx + "px " + -t.sy + "px no-repeat";
        document.getElementById("show_edit").style.height = t.sHeight + "px";
        document.getElementById("show_edit").style.width = t.sWidth + "px";
},
  1. Create a drag method
drag: function () {
        var t = this;
        var draging = false;
        var startX = 0;
        var startY = 0;

        document.getElementById("cover_box").onmousemove = function (e) {
            var pageX = e.pageX - (t.regional.offsetLeft + this.offsetLeft);
            var pageY = e.pageY - (t.regional.offsetTop + this.offsetTop);

            if (
                pageX > t.sx &&
                pageX < t.sx + t.sWidth &&
                pageY > t.sy &&
                pageY < t.sy + t.sHeight
            ) {
                this.style.cursor = "move";

                this.onmousedown = function () {
                    draging = true;

                    t.ex = t.sx;
                    t.ey = t.sy;

                    startX = e.pageX - (t.regional.offsetLeft + this.offsetLeft);
                    startY = e.pageY - (t.regional.offsetTop + this.offsetTop);
                };
                window.onmouseup = function () {
                    draging = false;
                };

                if (draging) {
                    if (t.ex + (pageX - startX) < 0) {
                        t.sx = 0;
                    } else if (t.ex + (pageX - startX) + t.sWidth > t.imgWidth) {
                        t.sx = t.imgWidth - t.sWidth;
                    } else {
                        t.sx = t.ex + (pageX - startX);
                    }

                    if (t.ey + (pageY - startY) < 0) {
                        t.sy = 0;
                    } else if (t.ey + (pageY - startY) + t.sHeight > t.imgHeight) {
                        t.sy = t.imgHeight - t.sHeight;
                    } else {
                        t.sy = t.ey + (pageY - startY);
                    }

                    t.cutImage();
                }
            } else {
                this.style.cursor = "auto";
            }
        };
},

To understand this method, you need to grasp the following key points:

var pageX = e.pageX - (t.regional.offsetLeft + this.offsetLeft);
var pageY = e.pageY - (t.regional.offsetTop + this.offsetTop);

With the above two lines of code, we obtain the distance between the mouse and the background image. e.pageX represents the distance from the mouse to the left edge of the browser, and t.regional.offsetLeft + this.offsetLeft computes the distance from the image to the left edge of the browser. Similarly, the top distance can be deduced.

 if ( pageX > t.sx && pageX < t.sx + t.sWidth && pageY > t.sy && pageY < t.sy + t.sHeight )

Having understood the distance between the mouse and the background image, this should be easy to grasp: it determines whether the mouse is within the region of the image.

t.ex = t.sx;
t.ey = t.sy;

startX = e.pageX - (t.regional.offsetLeft + this.offsetLeft);
startY = e.pageY - (t.regional.offsetTop + this.offsetTop);

These two code snippets are worth highlighting. The first two lines record the coordinates from the last screenshot (or if there wasn't a previous one, then the initial coordinates); the next two lines record the coordinates when the mouse is pressed. You can inspect these values separately using console.log().

if (draging) {
  if (t.ex + (pageX - startX) < 0) {
    t.sx = 0;
  } else if (t.ex + (pageX - startX) + t.sWidth > t.imgWidth) {
    t.sx = t.imgWidth - t.sWidth;
  } else {
    t.sx = t.ex + (pageX - startX);
  }

  if (t.ey + (pageY - startY) < 0) {
    t.sy = 0;
  } else if (t.ey + (pageY - startY) + t.sHeight > t.imgHeight) {
    t.sy = t.imgHeight - t.sHeight;
  } else {
    t.sy = t.ey + (pageY - startY);
  }

  t.cutImage();
}

The above code essentially says: if we are in the midst of dragging, we need to update the values of t.sx and t.sy in real-time based on the coordinate changes and call the cutImage method to provide a live preview.

The coordinates of the cropping area during movement = last recorded position + (current mouse position - position when the mouse was pressed)

Save the Cropped Image

Requirements:

  • Knowledge of using canvas to extract and display image data.

Functionality:

  • After cropping the desired image area, allow users to save this cropped region, displaying the result on the screen.

Enhance the initialization function in main.js to handle the saving of the cropped image.

var postFile = {
  init: function () {
    // ...
    document.getElementById("save_button").onclick = function () {
      t.editPic.height = t.sHeight;
      t.editPic.width = t.sWidth;
      var ctx = t.editPic.getContext("2d");
      var images = new Image();
      images.src = t.imgUrl;

      images.onload = function () {
        ctx.drawImage(
          images,
          t.sx,
          t.sy,
          t.sHeight,
          t.sWidth,
          0,
          0,
          t.sHeight,
          t.sWidth
        );
        document.getElementById("show_pic").getElementsByTagName("img")[0].src =
          t.editPic.toDataURL();
      };
    };
  }
};
postFile.init();

Similar to implementing the paintImage method, we first listen for the click event on the save button. We then use the drawImage method to render the selected image region. Finally, we employ the toDataURL method to convert the image into a base64 encoded format. This value is then assigned to the src attribute of the img under show_pic. In this way, the image cropping and saving are completed.

Test the Tool

  • Open index.html in a web browser.
    open web
  • Upload an image and test the cropping functionality.
  • The effect of the page is as follows:
    effect

Summary

Congratulations! You've constructed a basic image cropping tool using HTML5 and JavaScript. This foundation can be built upon for more advanced functionalities or other image manipulation tasks. Practice by enhancing the tool or exploring other web development projects!

Other CSS Tutorials you may like