
Introduction
In this project, you will learn how to create a new address and manage addresses in a web application. The project involves implementing state-city cascading dropdown, form validation, label styling, and rendering of new addresses.
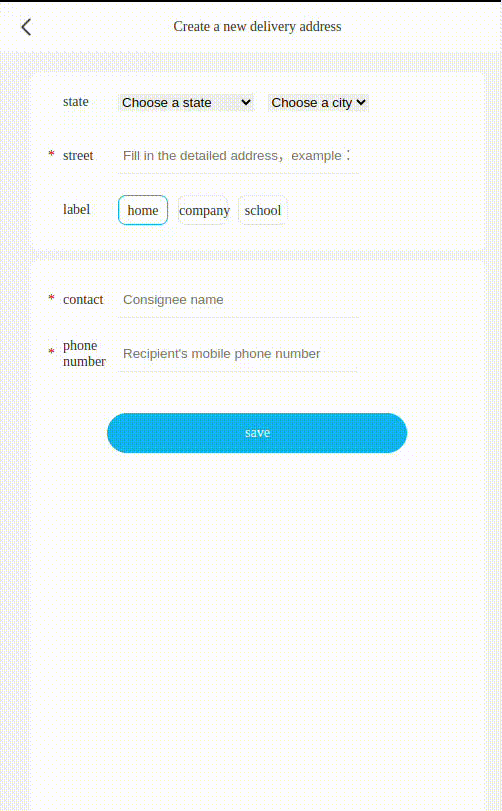
👀 Preview
🎯 Tasks
In this project, you will learn:
- How to initialize the province dropdown with data from the
data.jsfile - How to implement the state-city cascading dropdown functionality
- How to add a click event to the labels in the tag list, allowing the selected label to be activated and others to be deactivated
- How to validate the address, contact, and phone number fields before saving a new address
- How to create and append a new address list item to the address list
🏆 Achievements
After completing this project, you will be able to:
- Manipulate the DOM using JavaScript
- Handle user interactions and events
- Implement form validation and data handling
- Dynamically create and append HTML elements
Set Up the Project Structure
In this step, you will set up the project files and structure. Follow the steps below to complete this step:
Open the project folder. The directory structure is as follows:
├── index.html
├── css
├── images
└── js
    ├── data.js
    └── index.js
Where:
index.htmlis the main page.cssis the folder for style files.imagesis the folder for images.js/data.jsis the data for the provinces and cities.js/index.jsis the JavaScript file that needs to be completed.
Click on Go Live button in the bottom right corner of WebIDE, to run the project.
Next, open "Web 8080" on the top of the VM and manually refresh it to see the page.
Implement State-City Cascading Dropdown
In this step, you will learn how to implement the state-city cascading dropdown functionality.
- Locate the
provincechange()function in thejs/index.jsfile. - This function is responsible for updating the city dropdown when a state is selected.
- First, it gets a reference to the selected province dropdown element using
document.getElementById("param_province"). - Then, it gets a reference to the city dropdown element using
document.getElementById("param_city"). - Next, it retrieves the selected province index from the province dropdown using
selectedProvince.value. - It then uses the selected province index to access the corresponding cities from the
townsarray in thedata.jsfile. - Finally, it sets the length of the city dropdown options to the number of cities, and loops through the cities to set the text and value of each dropdown option.
// Implement the state-city cascading dropdown.
function provincechange() {
  var selectedProvince = document.getElementById("param_province");
  var city = document.getElementById("param_city");
  var { value } = selectedProvince;
  var cities = towns[value];
  city.length = cities.length;
  for (var i = 0; i < cities.length; i++) {
    city.options[i].text = cities[i];
    city.options[i].value = i;
  }
}
Add Click Event to Labels
In this step, you will learn how to add a click event to the labels in the tag list, which will activate the selected label's style and deactivate the other labels.
- Locate the
addClick()function in thejs/index.jsfile. - This function is responsible for adding the click event to the labels.
- First, it gets a reference to all the label elements using
document.querySelectorAll(".mark a"). - Then, it gets a reference to the
param_markinput field, which will store the selected label's index. - Next, it loops through the label elements and adds a click event listener to each one.
- Inside the event listener, it first removes the
activeclass from all the labels usinglabels.forEach((l) => l.classList.remove("active")). - Then, it adds the
activeclass to the clicked label usinglabel.classList.add("active"). - Finally, it sets the value of the
param_markinput field to the index of the clicked label.
function addClick() {
  var labels = document.querySelectorAll(".mark a");
  var input = document.getElementById("param_mark");

  labels.forEach((label, index) => {
    label.addEventListener("click", () => {
      labels.forEach((l) => l.classList.remove("active"));
      label.classList.add("active");
      input.value = index;
    });
  });
}
Validate and Save Address Information
In this step, you will learn how to validate the address information and save the new address to the address list.
- Locate the
saveInfo()function in thejs/index.jsfile. - This function is responsible for validating the input fields and saving the new address.
- First, it retrieves the values of the province, city, address, mark, name, and phone number input fields.
- It then checks if the province, address, name, or phone number fields are empty. If any of these required fields are empty, it displays a warning dialog.
- If all the required fields are filled, it creates a new list item element (
<li>) and populates it with the address information. - The new address list item includes the label (based on the selected mark), the full address (province and city), the address, and the name and phone number.
- Finally, it appends the new address list item to the
.address-listelement and calls theback()function to redirect to the address management page.
function saveInfo() {
  var { value: provinceIdx, options: provinces } =
    document.getElementById("param_province");
  var { value: cityIdx, options: cities } =
    document.getElementById("param_city");
  var { value: address } = document.getElementById("param_address");
  var { value: markId } = document.getElementById("param_mark");
  var labelNodes = document.querySelectorAll(".mark a");
  var label = labelNodes[markId].text;
  var { value: name } = document.getElementById("param_name");
  var { value: phone } = document.getElementById("param_phone");

  if (provinceIdx === 0 || !address || !name || !phone) {
    document.querySelector(".warning-dialog").style.display = "block";
    return;
  }

  var addressListElement = document.querySelector(".address-list");
  var newAddressElement = document.createElement("li");
  newAddressElement.innerHTML = `
    <div class="show-area">
      <label class="school">${label}</label>
      <span>${provinces[provinceIdx].text}${cities[cityIdx].text}</span>
    </div>
    <div class="show-address">
      <span>${address}</span>
      <a><img src="./images/edit.png" /></a>
    </div>
    <div class="show-info">
      <span>${name}</span>
      <span>${phone}</span>
    </div>
  `;
  addressListElement.appendChild(newAddressElement);
  back();
}
By following these steps, you have successfully implemented the "Add New Address" functionality in the project. Congratulations!
The final page effect should be as follows:
Summary
Congratulations! You have completed this project. You can practice more labs in LabEx to improve your skills.


