Introduction
In this lab, we will implement video object tracking using OpenCV. You must finish the course "Building Solar System with C++" before learning this project.
Things to Learn
- C++ basics
- g++ basics
- Image representation
- OpenCV application
- Meanshift & Camshift algorithms
Final Results
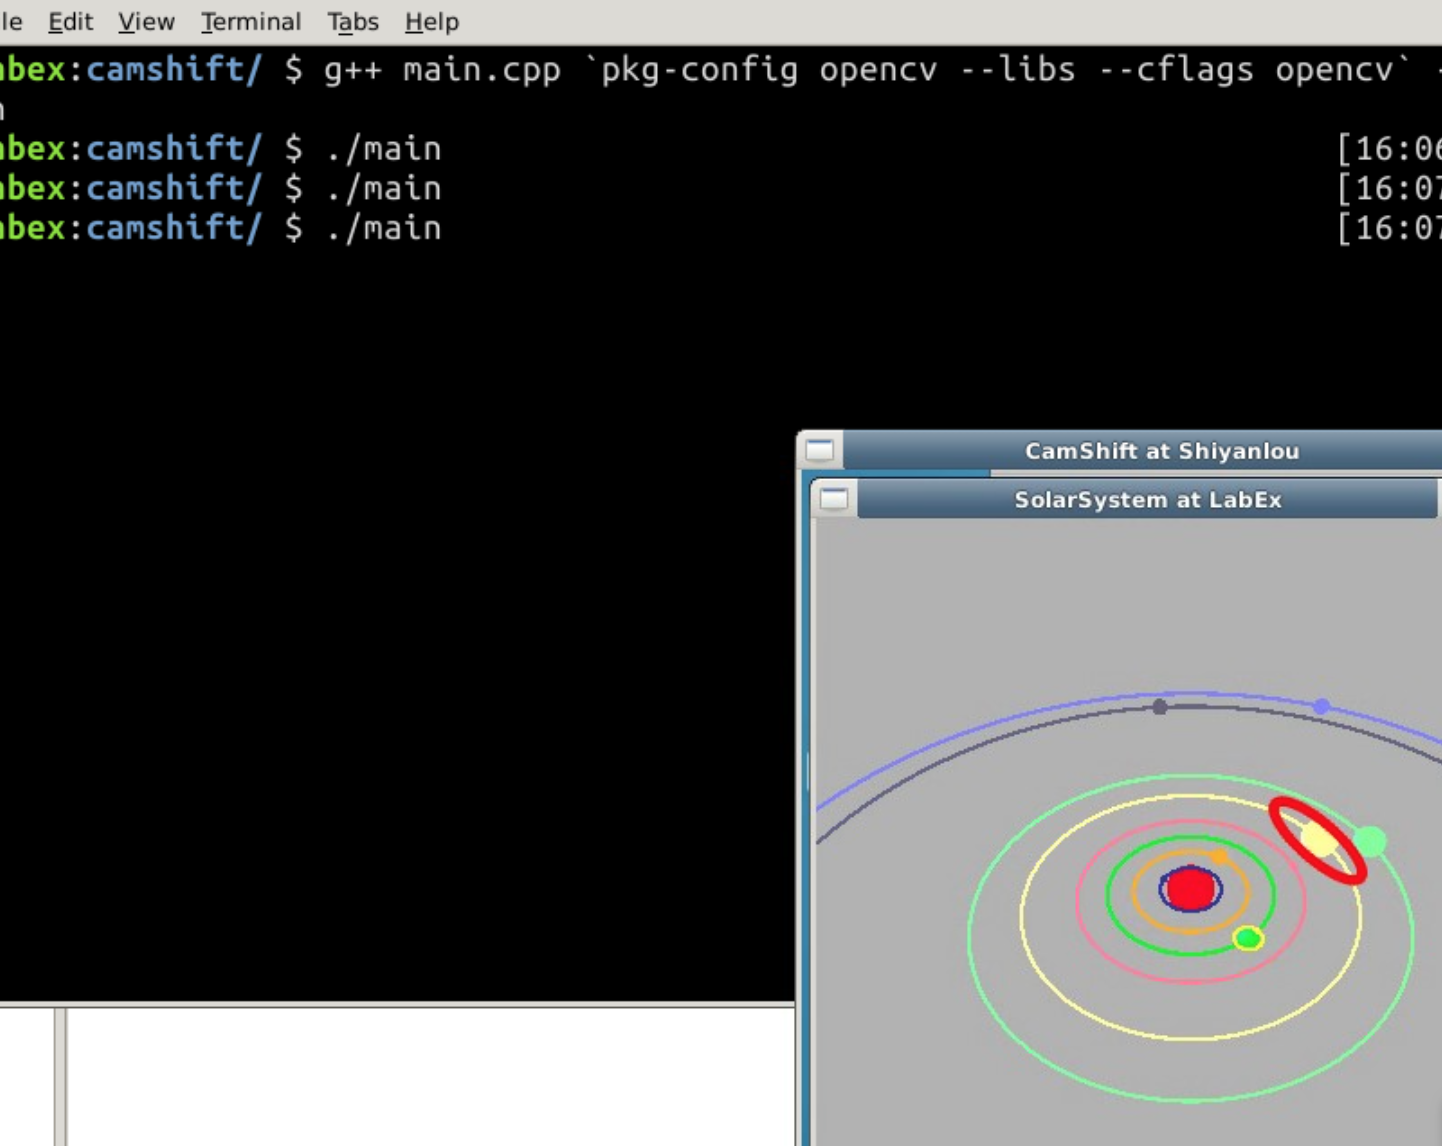
This experiment will implement a program that can track the planets in a solar system. (In the following image, we selected Jupiter from yellow orbit, and you can see the tracked object has been marked by a red eclipse):
Before you write this project, you must finish our course "Building Solar System with C++".
To Create a Video File
In LabEx environment, we do not support camera environment. Thus, we need to create a video file for our project.
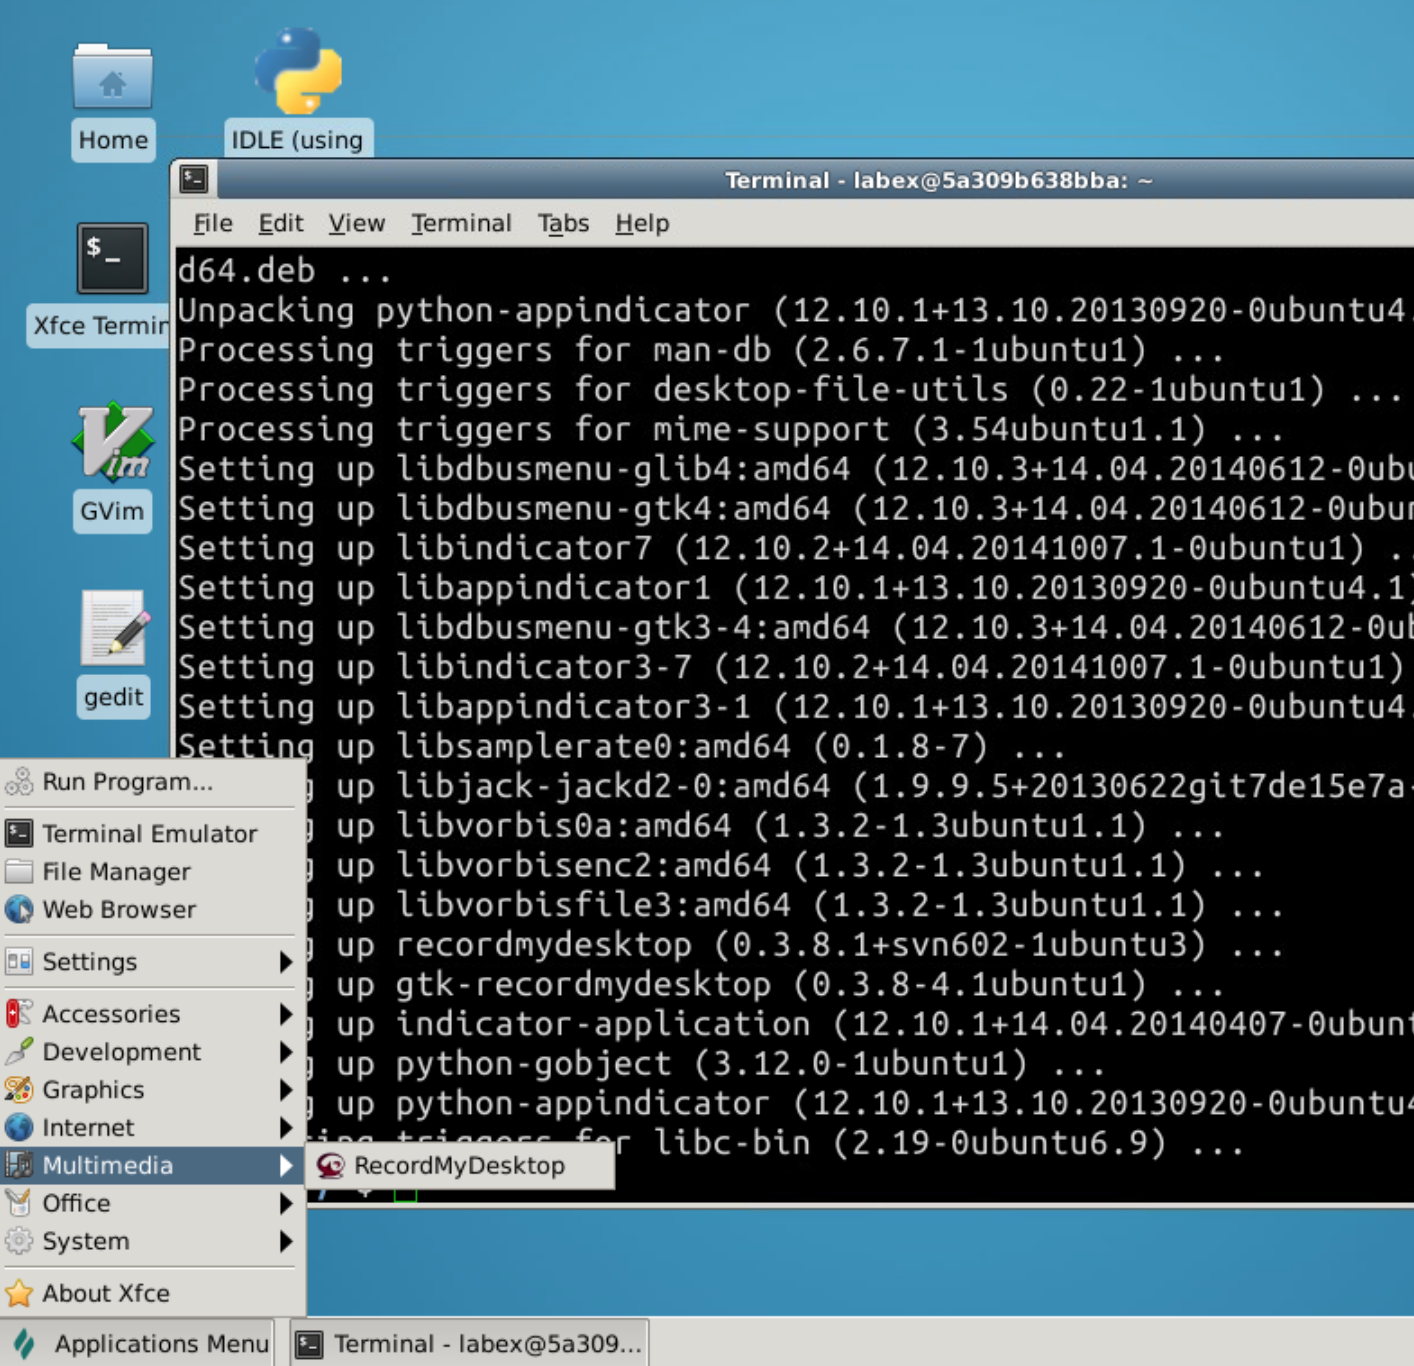
Let's install video recording tool:
sudo apt-get update && sudo apt-get install gtk-recordmydesktop
After installation, we can find the recording software in the application menu:
Then, you can run the solar system program ./solarsystem and use RecordMyDesktop to record the desktop screen (1030s will be fine), and save it to `/Code/camshiftwith namevideo`:
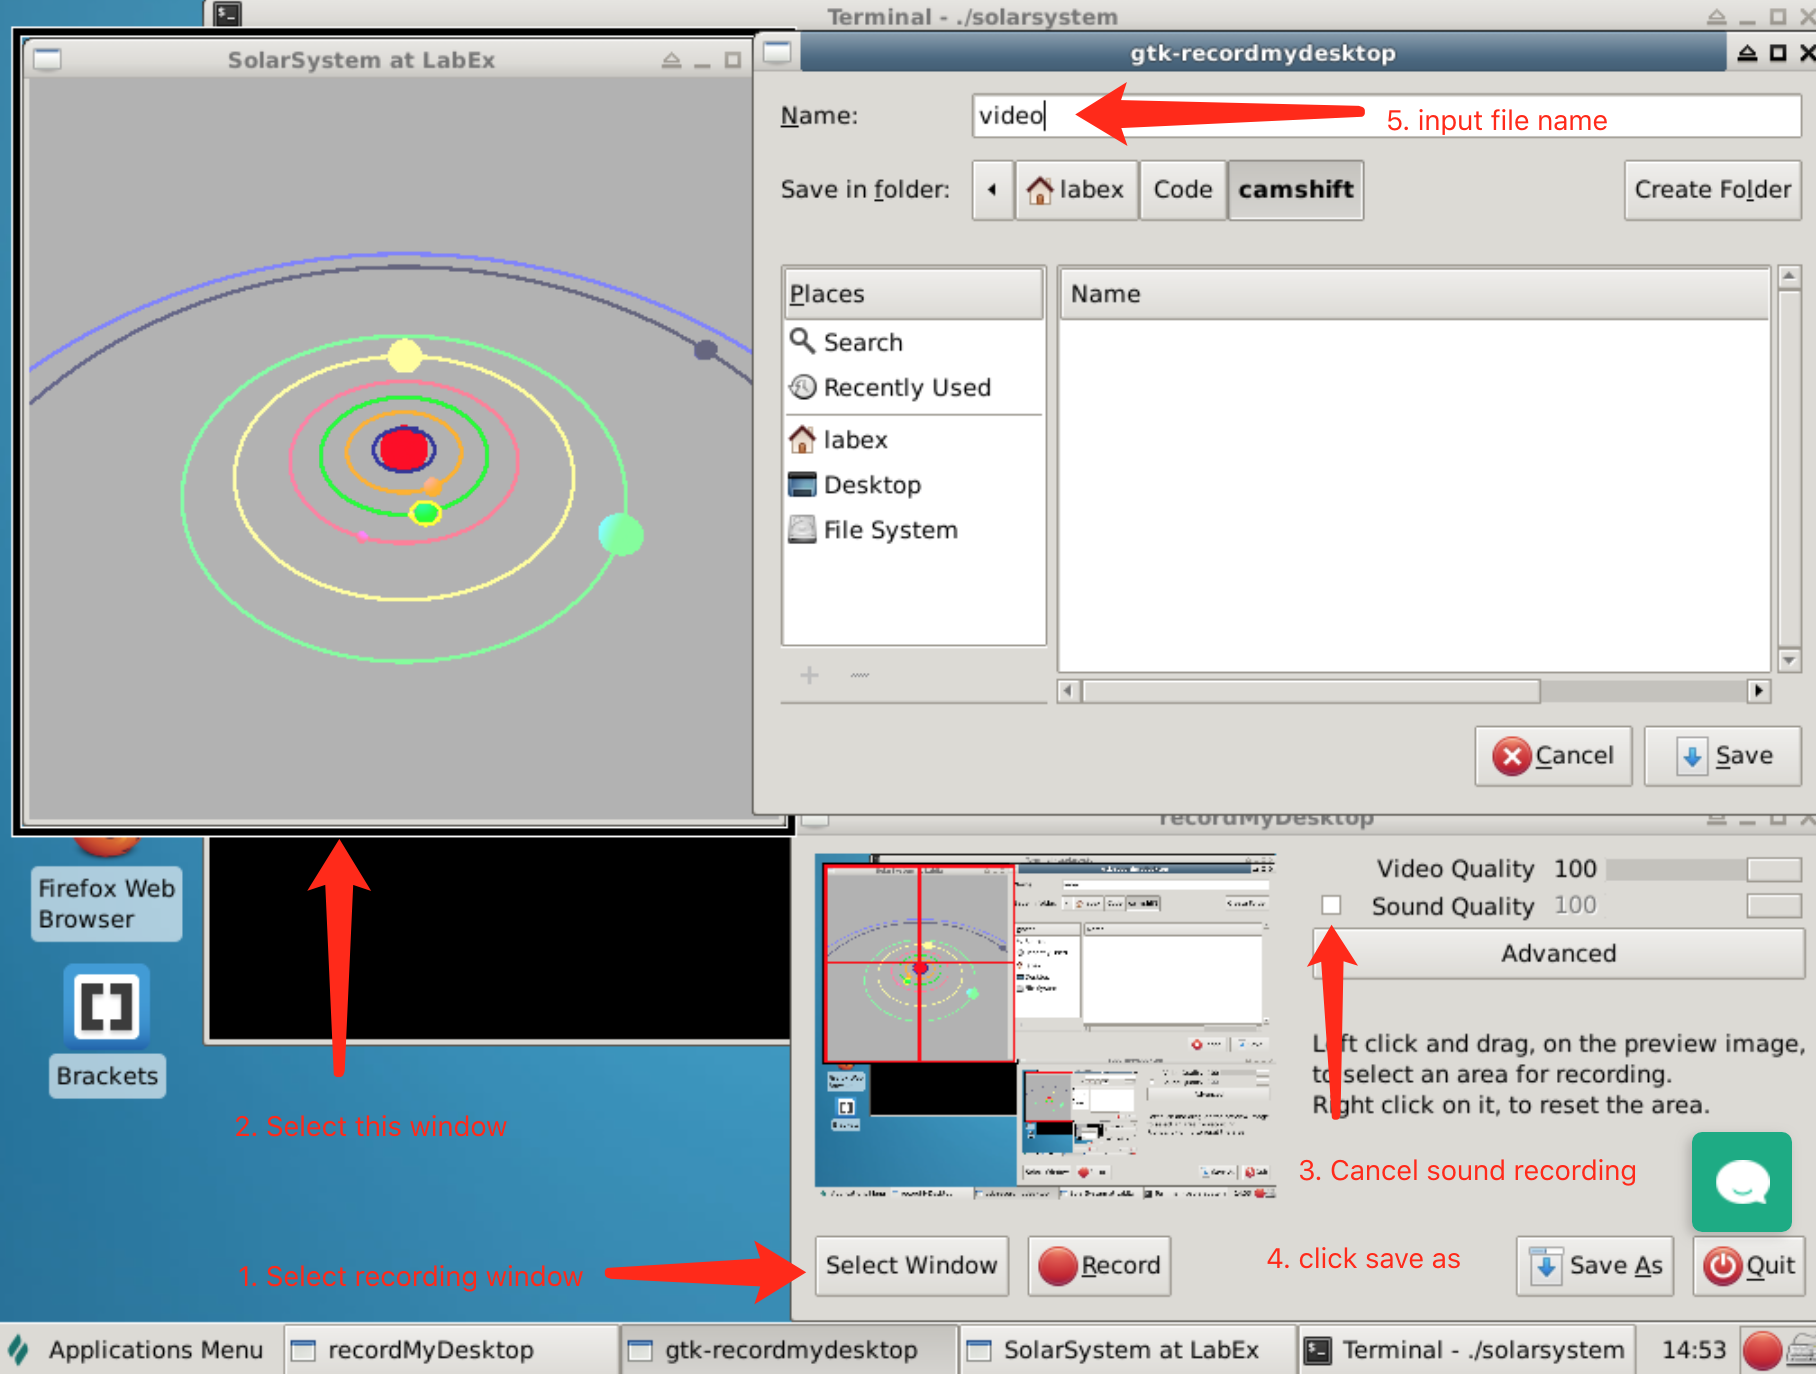
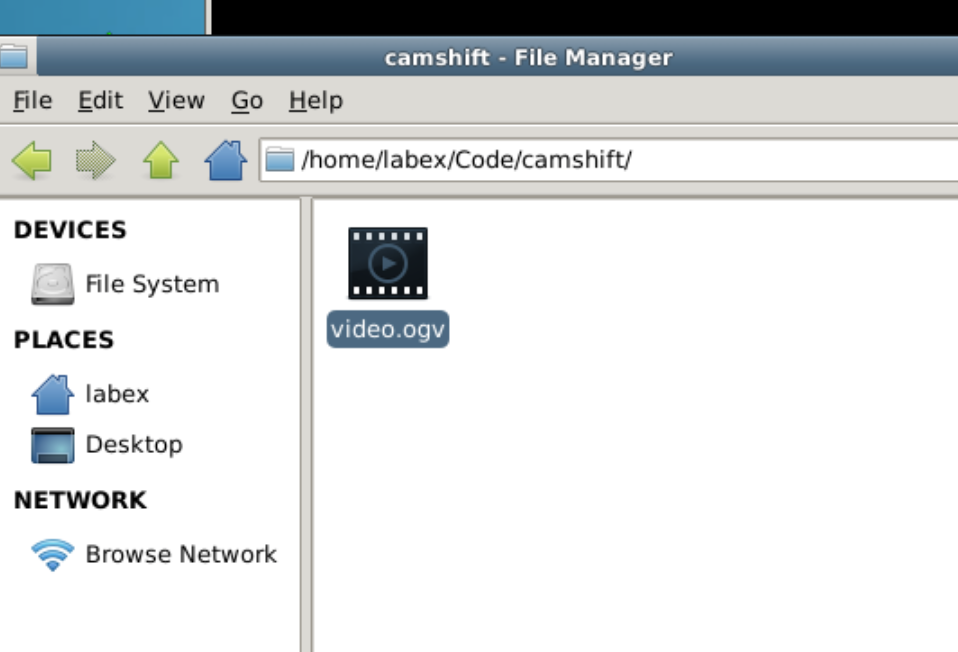
When you want to finish recording, you can click the Stop button in the bottom right corner. Then you will get a video.ogv file:
Basics of Digital Images
OpenCV is an open source cross-platform computer vision library. Unlike OpenGL's image rendering, OpenCV implements many common algorithms for image processing and computer vision. Before learning OpenCV, we need to understand some basic concepts of images and videos in the computer.
First of all, we must understand how the picture or image is represented in the computer. There are two common ways of storing pictures: one is vector map and the other is pixel map.
In vector map, images are mathematically defined as a series of points connected by lines. The graphic element in a vector map file is called an object. Every object is a self-contained entity, which has properties such as color, shape, outline, size and screen position.
The more common one is the pixel map. For example, the size of an image is often 1024*768. This means that the picture has 1024 pixels in the horizontal direction and 768 pixels in the vertical direction.
Pixel is the basic unit of the pixel map. Usually, a pixel is a mixture of three primary colors (red, green and blue). Since the nature of the computer is the recognition of numbers, under normal circumstances we represent a primary color in terms of brightness from 0 to 255. In other words, for primary red colors, 0 means the darkest, i.e., black, and 255 means the brightest, i.e., pure red.
Thus a pixel can be represented as a triplet (R,G,B), such that white can be represented as (255,255,255), and black is (0,0,0). Then we call this image to be an image in RGB color space. R, G and B become the three channels of the image; and there are many other color spaces besides the RGB color space, such as HSV, YCrCb and so on.
As pixel is to the pixel map, image is the basic unit of the video. A video consists of a series of images in which we call each of the images a frame. And what we usually call video frame rate means that this video contains so many frame images per second. For example, if the frame rate is 25, then this video will play 25 frames per second.
If there are 1000 milliseconds in 1 second and let's say the frame rate is rate, then the time interval between frame images is 1000/rate.
Color Histogram of Image
A color histogram is a tool for describing an image. It is similar to a normal histogram, except that the color histogram needs to be calculated from a certain image.
If a picture is in an RGB color space, then we can count the number of occurrences of every color in the R channel. Thus we can get an array of 256 lengths (color probability lookup table). Divide all the values simultaneously by the total number of pixels (width times height) in the image and convert the resulting sequence into a histogram. The result is a color histogram of R channel. In similar way, you can have the histograms in G channel and B channel.
Back Projection of Histogram
It has been proved that in the RGB color space histogram is sensitive to changes in light illumination. In order to reduce the impact of this change on the tracking effect, the histogram needs to be back-projected. This process is divided into three steps:
- Firstly, we convert the image from RGB space to HSV space.
- Then we calculate the histogram of the H channel.
- The value of each pixel in the image is replaced with the corresponding probability in the color probability look-up table to obtain a color probability distribution map.
This process is called back projection and the color probability distribution map is a grayscale image.
Basics of OpenCV
We need to install OpenCV first:
sudo apt update
sudo apt-get install libopencv-dev
We assume you already know the basic syntax of C++. You know that almost every program will be using the header file #include <iostream> and using namespace std; or std::cout. OpenCV has its own namespace, too.
To use OpenCV, we only need to include the following header file:
#include <opencv2/opencv.hpp>
Then:
using namespace cv;
to enable OpenCV namespace (or directly using cv:: prefix for all API).
This is your first time of using OpenCV and you may be unfimiliar with OpenCV interfaces, thus we recommend using cv:: prefix to learn OpenCV APIs.
Let's write our first program to read our recorded video:
//
// main.cpp
//
#include <opencv2/opencv.hpp> // OpenCV head file

int main() {

    // create a video capsure object
    // OpenCV offers VideoCapture object and
    // treat reading video from file as same as reading from camera.
    // when input parameter is a file path, it will read a video file;
    // if it is a identifier number of camera (usually it is 0),
    // it will read the camera
    cv::VideoCapture video("video.ogv"); // reading from file
    // cv::VideoCapture video(0);        // reading from camera

    // container for the reading image frame, Mat object in OpenCV
    // The key class in OpenCV is Mat, which means Matrix
    // OpenCV use matrix to describe images
    cv::Mat frame;
    while(true) {

        // write video data to frame, >> is overwrited by OpenCV
        video >> frame;

        // when there is no frame, break the loop
        if(frame.empty()) break;

        // visualize current frame
        cv::imshow("test", frame);

        // video frame rate is 15, so we need wait 1000/15 for playing smoothly
        // waitKey(int delay) is a waiting function in OpenCV
        // at this point, the program will wait `delay` milsec for keyboard input
        int key = cv::waitKey(1000/15);

        // break the loop when click ECS button on keyboard
        if (key == 27) break;
    }
    // release memory
    cv::destroyAllWindows();
    video.release();
    return 0;

}
Put this main.cpp file in the same folder with video.ogv at ~/Code/camshift, and compile the program:
g++ main.cpp `pkg-config opencv --libs --cflags opencv` -o main
When we run the program, we can see the video is playing:
./main
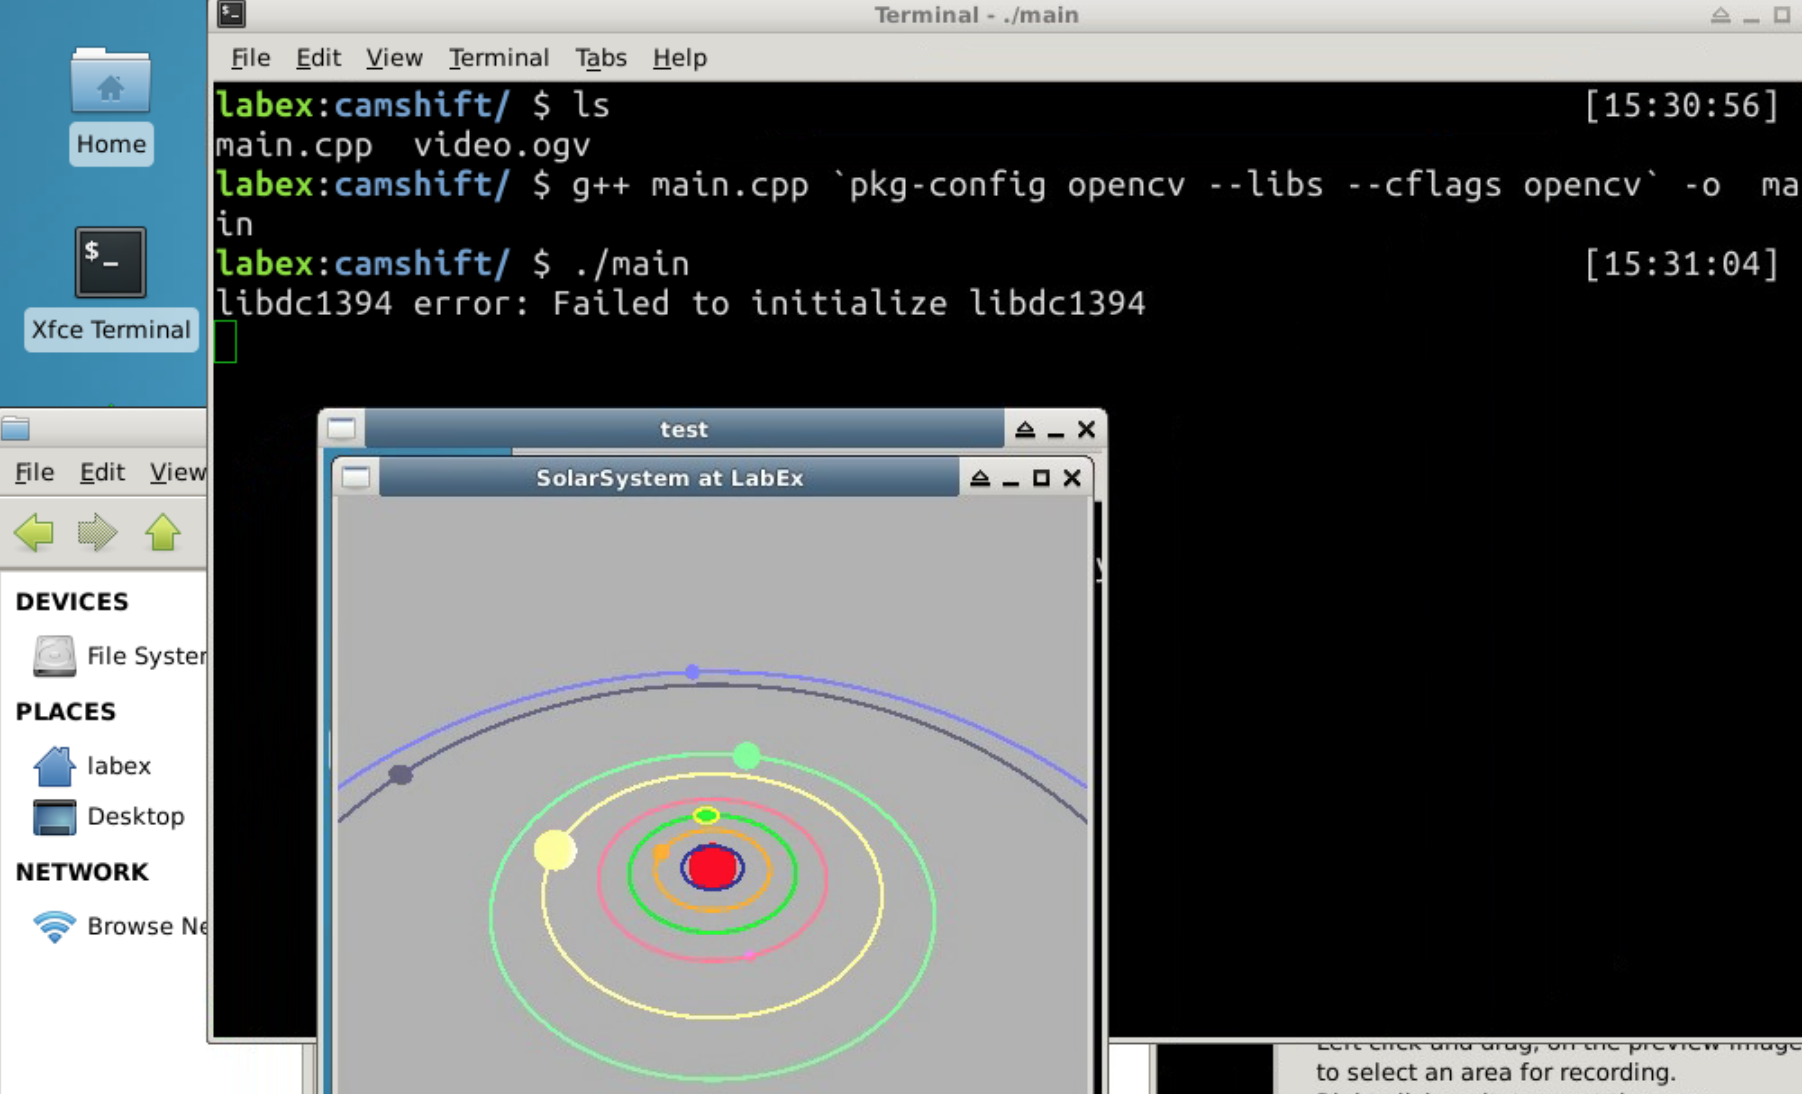
Note
You may observe the following error:
libdc1394 error: Failed to initialize libdc1394This is a bug from OpenCV and it doesn't influence our running.
If you want to eliminate the problem, you can run the following code before running the program:
sudo ln /dev/null /dev/raw1394
Meanshift and Camshift Algorithms
- Meanshift
- Camshift
- To set the mouse callback event to select the tracked target
- To read the image from the video stream
- To iImplement the Camshift
Meanshift
The Meanshift and Camshift algorithms are two classic algorithms for object tracking. Camshift is based on Meanshift. Their mathematical interpretation is complex, but the basic idea is relatively simple. So, we skip those mathematical facts and first introduce the Meanshift algorithm.
Assuming that there is a set of red dots on the screen, the blue circle (window) must be moved to the points where there is the most dense region (or where the points are the most in number):
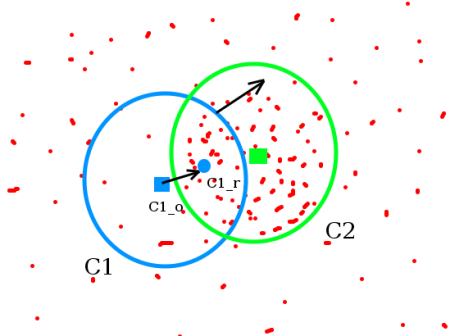
As shown in above image, mark the blue circle as C1 and the center of the circle as C1_o. But the barycenter of this circle is C1_r, marked as a blue solid circle.
When C1_o and C1_r do not overlap, move the circle C1 to the center of the circle C1_r repeatedly. Eventually it will stay on the highest density circle C2.
For image processing, we usually use the back-projected histogram of the image. When the tracked target moves, it is clear that this movement process can be reflected by the back-projected histogram. So, the Meanshift algorithm will eventually move our selected window to the position of the moving target. (Algorithm has proved convergence in the end.)
Camshift
After the previous description, we saw that the Meanshift algorithm always tracks a fixed window size, which is not in line with our needs, because in a video, the target object does not have to be large.
So Camshift was created to improve this problem. This can also be seen from the Continuously Adaptive Meanshift of Camshift.
Its basic idea is: First apply the Meanshift algorithm. Once the Meanshift results converge, Camshift updates the window size, calculates a directional ellipse to match the window and then applies the ellipse as a new window to apply the Meanshift algorithm.
OpenCV provides a generic interface to the Camshift algorithm:
RotatedRect CamShift(InputArray probImage, Rect& window, TermCriteria criteria)
The first parameter, probImage, is the back projection of the target histogram. The second parameter, window, is the search window of the Camshift algorithm. The third parameter, criteria, is the condition for the end (termination) of the algorithm.
Analysis
After understanding the basic idea of the Camshift algorithm, we can analyze that the implementation of this code is mainly divided into several steps:
- To set the mouse callback event to select the tracked target.
- To read the image from the video stream.
- To implement the Camshift process.
Below we continue to modify the code in main.cpp.
To Select Tracked Object by Mouse Callback Function
OpenCV is different from OpenGL. There are five parameters specified for the mouse callback function. The first three are what we need the most: Through the value of event, we can get the event of pressed left button of the mouse (CV_EVENT_LBUTTONDOWN), the event of released left button of the mouse (CV_EVENT_LBUTTONUP) and so on:
bool selectObject = false; // use for whether selected object or not
int trackObject = 0;       // 1 means has a tracking object, 0 means no object, and -1 means haven't calculated the Camshift property
cv::Rect selection;        // save selected region by mouse
cv::Mat image;             // cache image from video

// Callback function of mouse from OpenCV:
// void onMouse(int event, int x, int y, int flag, void *param)
// the fouth parameter `flag` represents additional state,
// param means user parameter, we don't need them, so, no names.
void onMouse( int event, int x, int y, int, void* ) {
    static cv::Point origin;
    if(selectObject) {
        // determing selected height and width and top-left corner position
        selection.x = MIN(x, origin.x);
        selection.y = MIN(y, origin.y);
        selection.width = std::abs(x - origin.x);
        selection.height = std::abs(y - origin.y);

        // & is overwrited by cv::Rect
        // it means the intersection of two region,
        // the main purpose here is to process the region outside selected region
        selection &= cv::Rect(0, 0, image.cols, image.rows);
    }

    switch(event) {
            // processing left button is pressed
        case CV_EVENT_LBUTTONDOWN:
            origin = cv::Point(x, y);
            selection = cv::Rect(x, y, 0, 0);
            selectObject = true;
            break;
            // processing left button is released
        case CV_EVENT_LBUTTONUP:
            selectObject = false;
            if( selection.width > 0 && selection.height > 0 )
                trackObject = -1; // tracking object haven't calculate Camshift property
            break;
    }
}
To Read Images from Video Streaming
We have implemented the structure of reading video streaming. Let's write more details:
int main() {
    cv::VideoCapture video("video.ogv");
    cv::namedWindow("CamShift at LabEx");

    // 1. register mouse event callback
    cv::setMouseCallback("CamShift at LabEx", onMouse, NULL);

    cv::Mat frame;

    // 2. read image from video
    while(true) {
        video >> frame;
        if(frame.empty()) break;

        // write image from frame to global variable image for cache
        frame.copyTo(image);

        // draw ractangle if selecting object
        if( selectObject && selection.width > 0 && selection.height > 0 ) {
            cv::Mat roi(image, selection);
            bitwise_not(roi, roi);
        }
        imshow("CamShift at LabEx", image);
        int key = cv::waitKey(1000/15.0);
        if(key == 27) break;
    }
    // release allocated memory
    cv::destroyAllWindows();
    video.release();
    return 0;
}
Note:
ROI (Region of Interest): In image processing, any region to be processed can be a region of interest, namely ROI.
To Implement Camshift with OpenCV
The back-projected histogram for calculating the tracked target needs to use the cvtColor function, which can convert the original image of the RGB color space to the HSV color space. Calculating the histogram must be after selecting the initial target, therefore:
int main() {
    cv::VideoCapture video("video.ogv");
    cv::namedWindow("CamShift at LabEx");
    cv::setMouseCallback("CamShift at LabEx", onMouse, NULL);

    cv::Mat frame;
    cv::Mat hsv, hue, mask, hist, backproj;
    cv::Rect trackWindow;             // tracking window
    int hsize = 16;                   // for histogram
    float hranges[] = {0,180};        // for histogram
    const float* phranges = hranges;  // for histogram

    while(true) {
        video >> frame;
        if(frame.empty()) break;
        frame.copyTo(image);

        // trasfer to HSV space
        cv::cvtColor(image, hsv, cv::COLOR_BGR2HSV);
        // processing when there is an object
        if(trackObject) {

            // only processing H: 0~180, S: 30~256, V: 10~256, filter the others and copy the rest part to mask
            cv::inRange(hsv, cv::Scalar(0, 30, 10), cv::Scalar(180, 256, 10), mask);
            // seperate channel h from hsv
            int ch[] = {0, 0};
            hue.create(hsv.size(), hsv.depth());
            cv::mixChannels(&hsv, 1, &hue, 1, ch, 1);

            // property extract if tracking object haven't been calculated
            if( trackObject < 0 ) {

                // setup channel h and mask ROI
                cv::Mat roi(hue, selection), maskroi(mask, selection);
                // calculate ROI histogram
                calcHist(&roi, 1, 0, maskroi, hist, 1, &hsize, &phranges);
                // normalization of histogram
                normalize(hist, hist, 0, 255, CV_MINMAX);

                // setting tracking object 设置追踪的窗口
                trackWindow = selection;

                // mark tracking object has been calculated
                trackObject = 1;
            }
            // back project histogram
            calcBackProject(&hue, 1, 0, hist, backproj, &phranges);
            // fetch common region
            backproj &= mask;
            // call Camshift algorithm
            cv::RotatedRect trackBox = CamShift(backproj, trackWindow, cv::TermCriteria( CV_TERMCRIT_EPS | CV_TERMCRIT_ITER, 10, 1 ));
            // processing region is too small for draw
            if( trackWindow.area() <= 1 ) {
                int cols = backproj.cols, rows = backproj.rows, r = (MIN(cols, rows) + 5)/6;
                trackWindow = cv::Rect(trackWindow.x - r, trackWindow.y - r,
                                       trackWindow.x + r, trackWindow.y + r) & cv::Rect(0, 0, cols, rows);
            }
            // draw tracking area
            ellipse( image, trackBox, cv::Scalar(0,0,255), 3, CV_AA );

        }


        if( selectObject && selection.width > 0 && selection.height > 0 ) {
            cv::Mat roi(image, selection);
            bitwise_not(roi, roi);
        }
        imshow("CamShift at LabEx", image);
        int key = cv::waitKey(1000/15.0);
        if(key == 27) break;
    }
    cv::destroyAllWindows();
    video.release();
    return 0;
}
Summary
The following shows all we wrote in this project:
#include <opencv2/opencv.hpp>

bool selectObject = false; // use for whether selected object or not
int trackObject = 0;       // 1 means has a tracking object, 0 means no object, and -1 means haven't calculated the Camshift property
cv::Rect selection;        // save selected region by mouse
cv::Mat image;             // cache image from video

// Callback function of mouse from OpenCV:
// void onMouse(int event, int x, int y, int flag, void *param)
// the fouth parameter `flag` represents additional state,
// param means user parameter, we don't need them, so, no names.
void onMouse( int event, int x, int y, int, void* ) {
    static cv::Point origin;
    if(selectObject) {
        // determing selected height and width and top-left corner position
        selection.x = MIN(x, origin.x);
        selection.y = MIN(y, origin.y);
        selection.width = std::abs(x - origin.x);
        selection.height = std::abs(y - origin.y);

        // & is overwrited by cv::Rect
        // it means the intersection of two region,
        // the main purpose here is to process the region outside selected region
        selection &= cv::Rect(0, 0, image.cols, image.rows);
    }

    switch(event) {
            // processing left button is pressed
        case CV_EVENT_LBUTTONDOWN:
            origin = cv::Point(x, y);
            selection = cv::Rect(x, y, 0, 0);
            selectObject = true;
            break;
            // processing left button is released
        case CV_EVENT_LBUTTONUP:
            selectObject = false;
            if( selection.width > 0 && selection.height > 0 )
                trackObject = -1; // tracking object haven't calculate Camshift property
            break;
    }
}

int main( int argc, const char** argv ) {
    cv::VideoCapture video("video.ogv");
    cv::namedWindow("CamShift at LabEx");
    cv::setMouseCallback("CamShift at LabEx", onMouse, NULL);

    cv::Mat frame, hsv, hue, mask, hist, backproj;
    cv::Rect trackWindow;             // tracking window
    int hsize = 16;                   // for histogram
    float hranges[] = {0,180};        // for histogram
    const float* phranges = hranges;  // for histogram

    while(true) {
        video >> frame;
        if(frame.empty()) break;
        frame.copyTo(image);

        // trasfer to HSV space
        cv::cvtColor(image, hsv, cv::COLOR_BGR2HSV);
        // processing when there is an object
        if(trackObject) {

            // only processing H: 0~180, S: 30~256, V: 10~256, filter the others and copy the rest part to mask
            cv::inRange(hsv, cv::Scalar(0, 30, 10), cv::Scalar(180, 256, 256), mask);
            // seperate channel h from hsv
            int ch[] = {0, 0};
            hue.create(hsv.size(), hsv.depth());
            cv::mixChannels(&hsv, 1, &hue, 1, ch, 1);

            // property extract if tracking object haven't been calculated
            if( trackObject < 0 ) {

                // setup channel h and mask ROI
                cv::Mat roi(hue, selection), maskroi(mask, selection);
                // calculate ROI histogram
                calcHist(&roi, 1, 0, maskroi, hist, 1, &hsize, &phranges);
                // normalization of histogram
                normalize(hist, hist, 0, 255, CV_MINMAX);

                // setting tracking object
                trackWindow = selection;

                // mark tracking object has been calculated
                trackObject = 1;
            }
            // back project histogram
            calcBackProject(&hue, 1, 0, hist, backproj, &phranges);
            // fetch common region
            backproj &= mask;
            // call Camshift algorithm
            cv::RotatedRect trackBox = CamShift(backproj, trackWindow, cv::TermCriteria( CV_TERMCRIT_EPS | CV_TERMCRIT_ITER, 10, 1 ));
            // processing region is too small for draw
            if( trackWindow.area() <= 1 ) {
                int cols = backproj.cols, rows = backproj.rows, r = (MIN(cols, rows) + 5)/6;
                trackWindow = cv::Rect(trackWindow.x - r, trackWindow.y - r,
                                       trackWindow.x + r, trackWindow.y + r) & cv::Rect(0, 0, cols, rows);
            }
            // draw tracking area
            ellipse( image, trackBox, cv::Scalar(0,0,255), 3, CV_AA );

        }


        if( selectObject && selection.width > 0 && selection.height > 0 ) {
            cv::Mat roi(image, selection);
            bitwise_not(roi, roi);
        }
        imshow("CamShift at LabEx", image);
        int key = cv::waitKey(1000/15.0);
        if(key == 27) break;
    }
    cv::destroyAllWindows();
    video.release();
    return 0;
}
Let's re-compile main.cpp:
g++ main.cpp $(pkg-config opencv --libs --cflags opencv) -o main
and run it:
./main
Now, we can select the object in the program, and the tracking is on the way:

In the above image, we selected Jupiter and the tracking window is a red ellipse.
Summary
- OpenCV Tutorial: http://docs.opencv.org/2.4/
- Learning OpenCV: http://shop.oreilly.com/product/0636920044765.do
- Gary, Bradsky. Computer Vision Face Tracking for Use in a Perceptual User Interface. http://opencv.jp/opencv-1.0.0_org/docs/papers/camshift.pdf