Linux ls Command: Content Listing

LinuxLinuxBeginner
Practice Now

Introduction

Welcome to the exciting world of Linux file management! In this tutorial, we'll embark on a journey to master the ls command - your trusty companion for navigating the file system. Whether you're a budding system administrator or a curious newcomer, understanding ls is crucial for your Linux adventures.

Imagine you're a detective investigating a mysterious folder. The ls command is your magnifying glass, revealing hidden clues and uncovering the secrets of your file system. Let's begin our investigation!


Skills Graph

%%%%{init: {'theme':'neutral'}}%%%% flowchart RL linux(("`Linux`")) -.-> linux/InputandOutputRedirectionGroup(["`Input and Output Redirection`"]) linux(("`Linux`")) -.-> linux/TextProcessingGroup(["`Text Processing`"]) linux(("`Linux`")) -.-> linux/BasicFileOperationsGroup(["`Basic File Operations`"]) linux/InputandOutputRedirectionGroup -.-> linux/pipeline("`Data Piping`") linux/TextProcessingGroup -.-> linux/sort("`Text Sorting`") linux/BasicFileOperationsGroup -.-> linux/ls("`Content Listing`") subgraph Lab Skills linux/pipeline -.-> lab-219205{{"`Linux ls Command: Content Listing`"}} linux/sort -.-> lab-219205{{"`Linux ls Command: Content Listing`"}} linux/ls -.-> lab-219205{{"`Linux ls Command: Content Listing`"}} end

Entering the File System

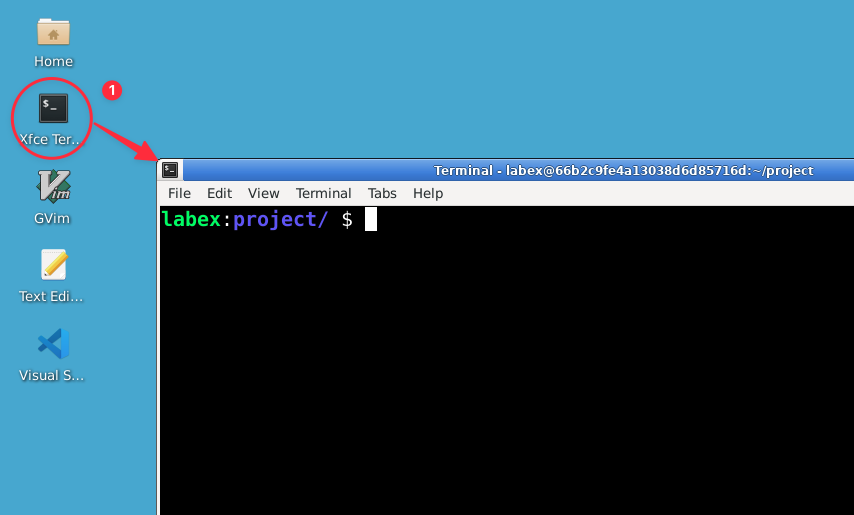
Open a terminal and let's start our investigation!

Click the Xfce Terminal icon in the desktop to open a new terminal window.

alt text

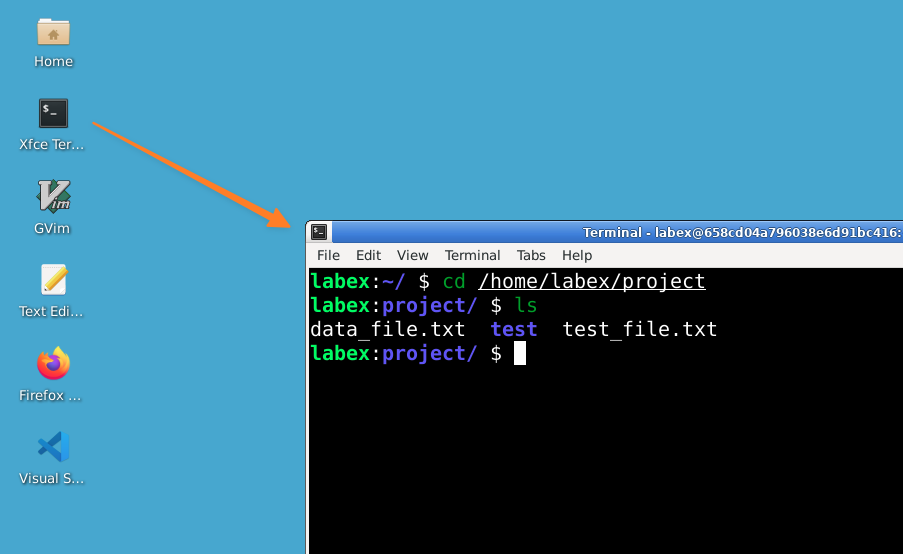
Now, let's take our first look around using the basic ls command.

Input:

ls

Output:

data_file.txt test test_file.txt
ls

The following steps no longer include screenshots of command prompts and output results. Please enter the command in the terminal to view the output.

Congratulations! You've just listed the contents of the directory. These are the visible "clues" in our mystery room. Let's understand what we're seeing:

  • data_file.txt and test_file.txt are files. In Linux, file extensions (like .txt) are often used to indicate file types, but they're not mandatory.
  • test is likely a directory (folder). Notice it doesn't have a file extension.

Don't worry if you see different file names - the contents of your directory might vary. The important thing is that you can now see what's inside your current directory!

Unveiling Hidden Secrets

Now that we've seen the obvious clues, let's look for hidden ones. In the Linux world, hidden files and directories start with a dot (.). These are often configuration files or directories that aren't meant to clutter your normal view.

Input:

ls -a

Output:

. .. data_file.txt test test_file.txt

The -a option shows all files, including hidden ones. Let's break down what we're seeing:

  • . represents the current directory. It's a shortcut you can use in commands.
  • .. represents the parent directory (the directory one level up). This is useful for navigation.
  • The other files we saw before are still listed.

You might be wondering, "Why don't I see any actual hidden files?" In this case, our directory doesn't contain any hidden files other than . and ... In many directories, especially in your home folder, you'll often see files like .bashrc or .config.

If you're coming from a Windows background, this might seem strange. In Windows, hidden files are an attribute, while in Linux, it's determined by the file name. Any file starting with a dot is considered hidden.

Gathering Detailed Information

A good detective needs detailed information. Let's use the -l option to get a long listing format. This will give us much more information about each file and directory.

Input:

ls -l

Output:

total 8
-rw-rw-r-- 1 labex labex 12 Aug  7 11:23 data_file.txt
drwxrwxr-x 2 labex labex  6 Aug  7 11:23 test
-rw-rw-r-- 1 labex labex 27 Aug  7 11:23 test_file.txt

Wow, that's a lot of information! Let's break it down piece by piece:

  1. File Permissions: The first column (e.g., -rw-rw-r--) shows the file permissions.

    • The first character indicates the file type (- for regular file, d for directory).
    • The next three characters show owner permissions.
    • The next three show group permissions.
    • The last three show permissions for others.
    • r means read, w means write, and x means execute.
  2. Number of Links: The number right after the permissions (1 for files, 2 for the directory in this example).

  3. Owner Name: The username of the file owner (labex in this case).

  4. Group Name: The group that has access to the file (also labex here).

  5. File Size: Size in bytes (12 for data_file.txt, 6 for the test directory, and 27 for test_file.txt).

  6. Last Modification Date and Time: When the file was last changed (Aug 7 11:23 for all files here).

  7. File or Directory Name: The name of the file or directory.

Notice how test has a d at the start of its permissions? That means it's a directory! Also, its size is 6 bytes, which is typical for an empty or nearly empty directory in some file systems.

This detailed view gives us a lot of information about our files and directories at a glance. It's incredibly useful for understanding who can access files, when they were last modified, and how large they are.

Making File Sizes Human-Readable

Those file sizes in bytes can be hard to understand, especially for larger files. Let's make them more human-friendly using the -h option along with -l.

Input:

ls -lh

Output:

total 8.0K
-rw-rw-r-- 1 labex labex 12 Aug  7 11:23 data_file.txt
drwxrwxr-x 2 labex labex  6 Aug  7 11:23 test
-rw-rw-r-- 1 labex labex 27 Aug  7 11:23 test_file.txt

Now we can see that the total size is 8.0K, which is much easier to understand than seeing it in bytes!

The -h option stands for "human-readable". It converts the file sizes into a format that's easier for humans to understand. Here's how it works:

  • Files smaller than 1 KB are shown in bytes (as we see with our files here).
  • Files between 1 KB and 1 MB are shown in KB (K).
  • Files between 1 MB and 1 GB are shown in MB (M).
  • Files larger than 1 GB are shown in GB (G).

This is particularly useful when dealing with large files or when you're trying to quickly understand how much space files are taking up.

You might notice that even though we added the -h option, we still included the -l option. That's because -h modifies the output of the long listing format. If we just used ls -h, we wouldn't see the file sizes at all!

Combining Our Detective Tools

Now that we've learned about several options, let's combine them to get a complete picture of our mystery room, including hidden clues and detailed information in a human-readable format.

Input:

ls -alh

Output:

total 12K
drwxr-xr-x 1 labex labex   60 Aug  7 11:23 .
drwxr-x--- 1 labex labex 4.0K Aug  7 11:24 ..
-rw-rw-r-- 1 labex labex   12 Aug  7 11:23 data_file.txt
drwxrwxr-x 2 labex labex    6 Aug  7 11:23 test
-rw-rw-r-- 1 labex labex   27 Aug  7 11:23 test_file.txt

This command combines all we've learned:

  • -a shows all files, including hidden ones
  • -l provides the long listing format with detailed information
  • -h makes the file sizes human-readable

Let's break down what we're seeing:

  1. The total disk usage of the directory (12K).
  2. The current directory (.) and its parent (..), which we saw earlier with ls -a.
  3. Our files and directories, with all the detailed information we saw with ls -l.
  4. File sizes in a human-readable format, thanks to the -h option.

You might wonder why we see a total of 12K when adding up the visible files only gives us less than that. This is because the total includes the size of the directory entries themselves, which take up space on the disk.

Also, notice how the order of the options doesn't matter. ls -alh, ls -hal, ls -lha would all produce the same output. This is true for most Linux commands, which makes them very flexible!

Sorting Our Clues

Sometimes, the order of our clues matters. Let's explore how we can sort our files in different ways.

First, let's sort our files by modification time, with the newest first:

Input:

ls -lt

This command lists files in long format (-l), sorted by modification time (-t), with the most recently modified first.

If you don't see any difference in the order, it's because all the files in this directory were likely created or modified at the same time. In a real-world scenario with files modified at different times, you'd see the most recently changed files at the top.

Now, let's reverse the order to see the oldest files first:

Input:

ls -ltr

The r option reverses the sorting order. Again, if all files have the same modification time, you won't see a difference.

Here are some other useful sorting options:

  • -S: Sort by file size, largest first
  • -X: Sort alphabetically by file extension
  • -v: Sort by version (useful for numbered files)

You can combine these with our previous options. For example, ls -lhSr would give you a long listing with human-readable sizes, sorted by size with the smallest files first.

Remember, in Linux, you can often combine options to create powerful, customized commands!

Peeking Inside Directories

So far, we've been looking at the contents of our current directory. But what if we want to investigate the contents of a subdirectory without actually going inside? We can use the ls command with a directory name as an argument.

Input:

ls -l test

This command will list the contents of the test directory while we remain in our current location. If the test directory is empty, you'll see a message like this:

total 0

This means the directory exists but contains no files.

If there are files in the test directory, you'll see them listed just like we saw in our current directory.

This ability to 'peek' into directories is very useful when you're exploring a file system or looking for specific files. You can even use wildcards to look into multiple directories at once. For example:

ls -l */

This would show you the contents of all immediate subdirectories in your current location.

Remember, if you don't have permission to read a directory, ls will tell you that access is denied. This is part of Linux's robust security model, ensuring that users can only access files and directories they're allowed to.

A Fun Trick - The Talking Cow and Understanding Color Options

Now that you've mastered the basics of ls, let's have some fun and explore a little further! Linux isn't just about serious work – it can be playful too. We're going to use a fun program called cowsay to display our directory contents in an amusing way, and then we'll learn about color options in ls.

First, let's try the cowsay trick:

Input:

ls | cowsay

You should see something like this:

 _________________________________________
/ data_file.txt test test_file.txt        \
\                                         /
 -----------------------------------------
        \   ^__^
         \  (oo)\_______
            (__)\       )\/\
                ||----w |
                ||     ||

Isn't that amusing? We've just made a cow say the contents of our directory!

You might be wondering about the | symbol between ls and cowsay. This is called a "pipe", and it's a powerful feature in Linux that connects commands together. Don't worry if you don't understand how it works right now – that's completely normal! We'll learn more about pipes in future lessons. For now, just enjoy the talking cow!

Now, let's explore a bit more about ls. Did you know that ls can display output in different colors? By default, many Linux systems are set up to show colors automatically. But we can control this behavior. Let's try using ls with a special option to turn off colors:

Input:

ls --color=never

You should now see the directory contents without any color. This is the plain, uncolored output of ls.

The --color option in ls can take three values:

  • never: Never use colors (what we just tried)
  • always: Always use colors, even when sending output to a file or another command
  • auto: Use colors when outputting directly to the terminal, but not when sending output elsewhere

Using ls --color=never can be useful in scripts or when you want to ensure consistent output regardless of your terminal settings.

These little explorations show you that Linux commands often have many options that can change their behavior. As you continue your Linux journey, you'll discover many more useful features of ls and other commands!

Summary

Congratulations, detective! You've mastered the basics of the ls command. Let's recap what we've learned:

  1. Basic usage: ls - Lists files and directories in the current directory.
  2. Showing hidden files: ls -a - Displays all files, including hidden ones.
  3. Detailed listing: ls -l - Shows detailed information about files and directories.
  4. Human-readable file sizes: ls -h - Displays file sizes in a format easy for humans to understand.
  5. Combining options: ls -alh - Shows all files with detailed information and human-readable sizes.
  6. Sorting files: ls -lt, ls -ltr - Sorts files by modification time, newest or oldest first.
  7. Listing contents of other directories: ls [directory] - Peeks into other directories without changing your current location.

There are many more ls options to explore. Here are a few more you might find useful:

  • -R: List subdirectories recursively (shows contents of all subdirectories)
  • -S: Sort by file size (largest first)
  • -X: Sort alphabetically by entry extension
  • -1: List one file per line (useful for scripts)

Remember, you can always check the manual page for ls by typing man ls in your terminal for a complete list of options and detailed explanations. Don't be intimidated by the man pages - they're a treasure trove of information once you get used to reading them!

With these tools at your disposal, you're well-equipped to explore and manage files in any Linux system. The ls command is just the beginning of your Linux journey, but it's an essential tool that you'll use daily as you become more proficient with the operating system.

As you continue to explore Linux, remember these key points:

  1. Linux commands are often short and cryptic at first, but they're designed to be powerful and efficient once you learn them.
  2. Most commands have many options that you can combine in various ways. Don't be afraid to experiment!
  3. The terminal might seem intimidating at first, but it's an incredibly powerful tool that gives you precise control over your system.
  4. Linux is case-sensitive. File.txt, file.txt, and FILE.txt are all different files in Linux.
  5. The concepts you've learned with ls (like options and arguments) apply to many other Linux commands as well.

Practice makes perfect! Try using ls with different combinations of options in various directories. The more you use it, the more natural it will become.

Remember, every expert was once a beginner. With patience and practice, you'll soon be navigating the Linux file system like a pro!

Happy exploring, and don't hesitate to refer back to this guide whenever you need a refresher on the ls command. Your journey into the world of Linux has only just begun!

Other Linux Tutorials you may like