
Introduction
In this project, you will learn how to implement an online shopping cart with drag and drop functionality. This project aims to help you understand and apply the concepts of Vue.js and the drag and drop APIs provided by web browsers.
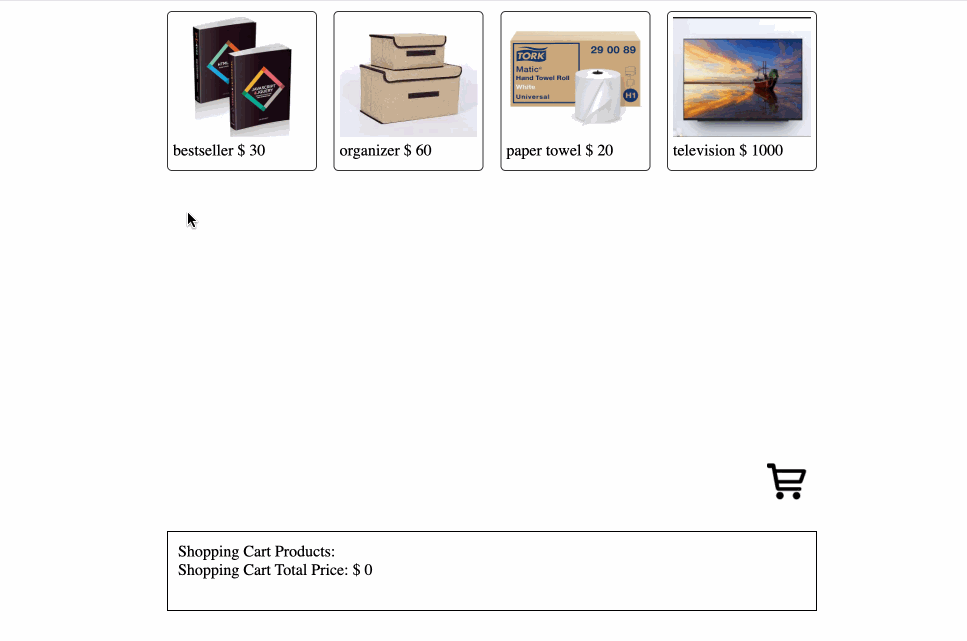
👀 Preview
🎯 Tasks
In this project, you will learn:
- How to set up the project and familiarize yourself with the provided files and structure.
- How to implement the drag and drop functionality for the online shopping cart, allowing users to add products to the cart.
- How to display the shopping cart information, including the number of products, the product details, and the total price.
- How to test the online shopping cart and ensure the functionality works as expected.
🏆 Achievements
After completing this project, you will be able to:
- Use Vue.js to build a web application.
- Implement drag and drop functionality using the web browser's built-in APIs.
- Display dynamic data and update the user interface based on user interactions.
- Write clean and maintainable code by organizing your application into components.
Set Up the Project Structure
In this step, you will set up the project files and structure. Follow the steps below to complete this step:
Open the project folder. The directory structure is as follows:
├── images
│   ├── book.jpeg
│   ├── box.jpeg
│   ├── paper.jpeg
│   ├── trolley.jpeg
│   └── tv.jpg
├── index.css
├── index.html
├── js
│   ├── http-vue-loader.js
│   └── vue.min.js
└── trolley.vue
Among them:
- The
imagesfolder provides the product images required by the page. index.cssis the style file.index.htmlis the main page.js/vue.min.jsandjs/http-vue-loader.jsare files related to the Vue library.trolley.vueis the component file that needs to be completed.
Click on Go Live button in the bottom right corner of WebIDE, to run the project.
Next, open "Web 8080" on the top of the VM and refresh it manually and you will see the page.
Implement the Drag and Drop Functionality
In this step, you will implement the drag and drop functionality for the online shopping cart.
- Open the
trolley.vuefile. - In the
data()function, you can see thegoodsarray, which contains the product information. This data will be used to display the products in the "Good List" section. - Add the following code in the
methodssection:
methods: {
  dragstart(e, good) {
    e.dataTransfer.setData("name", good.name);
    e.dataTransfer.setData("price", good.price);
  },
  dragover(e) {
    e.preventDefault();
  },
  drop(e) {
    const { bought } = this;
    const name = e.dataTransfer.getData("name");
    const price = e.dataTransfer.getData("price");
    bought.push({ name, price: Number(price) });
  }
}
Explanation:
- The
dragstartmethod is called when the user starts dragging a product. It sets the product name and price in thedataTransferobject, which can be accessed later in thedropmethod. - The
dragovermethod is called when the dragged item is over the shopping cart. It prevents the default behavior of the browser, which is necessary for thedropevent to work. - The
dropmethod is called when the user drops the dragged item into the shopping cart. It retrieves the product name and price from thedataTransferobject and adds the product to theboughtarray.
- In the
computedsection, add the following code:
computed: {
  totalPrice() {
    const { bought } = this;
    var sum = 0;
    for (key in bought) {
      sum += bought[key].price;
    }
    return sum;
  },
  goodsDetail() {
    const { bought } = this;
    const names = [];
    const goods = [];
    for (key in bought) {
      names.push(bought[key].name);
    }
    function getRepeatNum() {
      return names.reduce(function (prev, next) {
        prev[next] = prev[next] + 1 || 1;
        return prev;
      }, {});
    }
    for (key in getRepeatNum()) {
      goods.push(`${key}*${getRepeatNum()[key]}`);
    }
    return goods.join(" ");
  }
},
Explanation:
- The
totalPricecomputed property calculates the total price of the products in the shopping cart. - The
goodsDetailcomputed property generates the details of the products in the shopping cart, displaying the product name and quantity.
Binding Drag and Drop Events to HTML
In this step, we need to bind the drag and drop event to the div tag.
- In the
templatesection of thetrolley.vuefile, locate the<div class="good-list">element. - In the
<div class="good-list">element change to the following code:
<div class="good-list">
  <div
    v-for="good in goods"
    :key="good.name"
    class="good"
    draggable="true"
    @dragstart="dragstart($event, good)"
  >
    <img :src="good.cover" draggable="false" />
    <span>{{ good.name }}</span>
    <span>$ {{ good.price }}</span>
  </div>
</div>
- Locate the
<div class="trolley" id="trolley">element. - Change the
<div class="trolley" id="trolley">element to the following code:
<div id="trolley" class="trolley" @dragover="dragover" @drop="drop">
  <span id="bought" class="bought" v-if="bought.length !== 0"
    >{{ bought.length }}</span
  >
  <img src="./images/trolley.jpeg" />
</div>
Test the Online Shopping Cart
- Save the
trolley.vuefile. - Refresh the page to see the initial state of the online shopping cart.
- Try dragging and dropping the product images into the shopping cart.
- Observe the changes in the shopping cart, including the number of products, the product details, and the total price.
- Ensure that the functionality works as expected.
The final implementation effect is as follows:
Congratulations! You have successfully implemented the online shopping cart using the provided base project and the drag and drop functionality.
Summary
Congratulations! You have completed this project. You can practice more labs in LabEx to improve your skills.


