Hadoop Installation and Deployment

HadoopHadoopBeginner
Practice Now

Introduction

This lab is mainly about the foundations of Hadoop and is written for students with a certain Linux foundation to understand the architecture of the Hadoop software system, as well as the basic deployment methods.

Please input all the sample code in the document by yourself, and do not just copy and paste as far as possible. Only in this way can you be more familiar with the code. If you have problems, carefully review the documentation, else you can go to forum for help and communication.


Skills Graph

%%%%{init: {'theme':'neutral'}}%%%% flowchart RL linux(("`Linux`")) -.-> linux/BasicSystemCommandsGroup(["`Basic System Commands`"]) linux(("`Linux`")) -.-> linux/PackagesandSoftwaresGroup(["`Packages and Softwares`"]) linux(("`Linux`")) -.-> linux/BasicFileOperationsGroup(["`Basic File Operations`"]) linux(("`Linux`")) -.-> linux/UserandGroupManagementGroup(["`User and Group Management`"]) linux(("`Linux`")) -.-> linux/RemoteAccessandNetworkingGroup(["`Remote Access and Networking`"]) hadoop(("`Hadoop`")) -.-> hadoop/HadoopHDFSGroup(["`Hadoop HDFS`"]) linux/BasicSystemCommandsGroup -.-> linux/source("`Script Executing`") linux/PackagesandSoftwaresGroup -.-> linux/wget("`Non-interactive Downloading`") linux/PackagesandSoftwaresGroup -.-> linux/apt("`Package Handling`") linux/BasicFileOperationsGroup -.-> linux/ls("`Content Listing`") linux/UserandGroupManagementGroup -.-> linux/useradd("`User Adding`") linux/UserandGroupManagementGroup -.-> linux/usermod("`User Modifying`") linux/RemoteAccessandNetworkingGroup -.-> linux/ssh("`Secure Connecting`") hadoop/HadoopHDFSGroup -.-> hadoop/hdfs_setup("`HDFS Setup`") hadoop/HadoopHDFSGroup -.-> hadoop/fs_mkdir("`FS Shell mkdir`") hadoop/HadoopHDFSGroup -.-> hadoop/fs_put("`FS Shell copyToLocal/put`") hadoop/HadoopHDFSGroup -.-> hadoop/fs_get("`FS Shell copyFromLocal/get`") subgraph Lab Skills linux/source -.-> lab-272321{{"`Hadoop Installation and Deployment`"}} linux/wget -.-> lab-272321{{"`Hadoop Installation and Deployment`"}} linux/apt -.-> lab-272321{{"`Hadoop Installation and Deployment`"}} linux/ls -.-> lab-272321{{"`Hadoop Installation and Deployment`"}} linux/useradd -.-> lab-272321{{"`Hadoop Installation and Deployment`"}} linux/usermod -.-> lab-272321{{"`Hadoop Installation and Deployment`"}} linux/ssh -.-> lab-272321{{"`Hadoop Installation and Deployment`"}} hadoop/hdfs_setup -.-> lab-272321{{"`Hadoop Installation and Deployment`"}} hadoop/fs_mkdir -.-> lab-272321{{"`Hadoop Installation and Deployment`"}} hadoop/fs_put -.-> lab-272321{{"`Hadoop Installation and Deployment`"}} hadoop/fs_get -.-> lab-272321{{"`Hadoop Installation and Deployment`"}} end

Introduction to Hadoop

Released under the Apache 2.0 License, Apache Hadoop is an open source software framework that supports data-intensive distributed applications.

The Apache Hadoop software library is a framework that allows distributed processing of large datasets across computing clusters by using a simple programming model. It is designed to scale from a single server to thousands of machines, each providing local computing and storage rather than relying on hardware to provide high availability.

Core Concepts

A Hadoop project mainly includes the following four modules:

  • Hadoop Common: A public application that provides support for other Hadoop modules.
  • Hadoop Distributed File System (HDFS): A distributed file system that provides high throughput access to application data.
  • Hadoop YARN: Task scheduling and cluster resource management framework.
  • Hadoop MapReduce: A large-scale dataset parallel computing framework based on YARN.

For users who are new to Hadoop, you should focus on HDFS and MapReduce. As a distributed computing framework, HDFS satisfies the framework's storage requirements for data and MapReduce satisfies the framework's calculation requirements for data.

The following picture shows the basic architecture of a Hadoop cluster:

image

This picture is quoted from Hadoop's official website.

Hadoop Ecosystem

Just as Facebook has derived Hive data repository based on Hadoop, there are a lot of open source projects related to it in the community. Here are some recent active projects:

  • HBase: A scalable, distributed database that supports structured data storage for large tables.
  • Hive: A data repository infrastructure that provides data summarization and temporary queries.
  • Pig: Advanced data flow language and execution framework for parallel computing.
  • ZooKeeper: High performance coordination service for distributed applications.
  • Spark: A fast and versatile Hadoop data calculation engine with a simple and expressive programming model that supports data ETL (extraction, transformation and loading), machine learning, stream processing and graphics computing.

This lab will start with Hadoop, introducing the basic uses of related components.

It is worth noticing that Spark, a distributed memory computing framework, is born out of the Hadoop system. It has good inheritance for components like HDFS and YARN, and it also improves some of the existing shortcomings of Hadoop.

Some of you may have questions about the overlap between the usage scenarios of Hadoop and Spark, but learning Hadoop's working pattern and programming pattern will help deepen the understanding of the Spark framework, which is why should learn Hadoop first.

Deployment of Hadoop

For beginners, there is little difference between Hadoop versions later to version 2.0. This section will take the 3.3.6 version as an example.

Hadoop has three main deployment patterns:

  • Stand-alone pattern: Runs in a single process on a single computer.
  • Pseudo-distributed pattern: Runs in multiple processes on a single computer. This pattern simulates a "multi-node" scenario under a single node.
  • Fully distributed pattern: Runs in a single process on each of multiple computers.

Next, we install the Hadoop 3.3.6 version on a single computer.

Setting up Users and User Groups

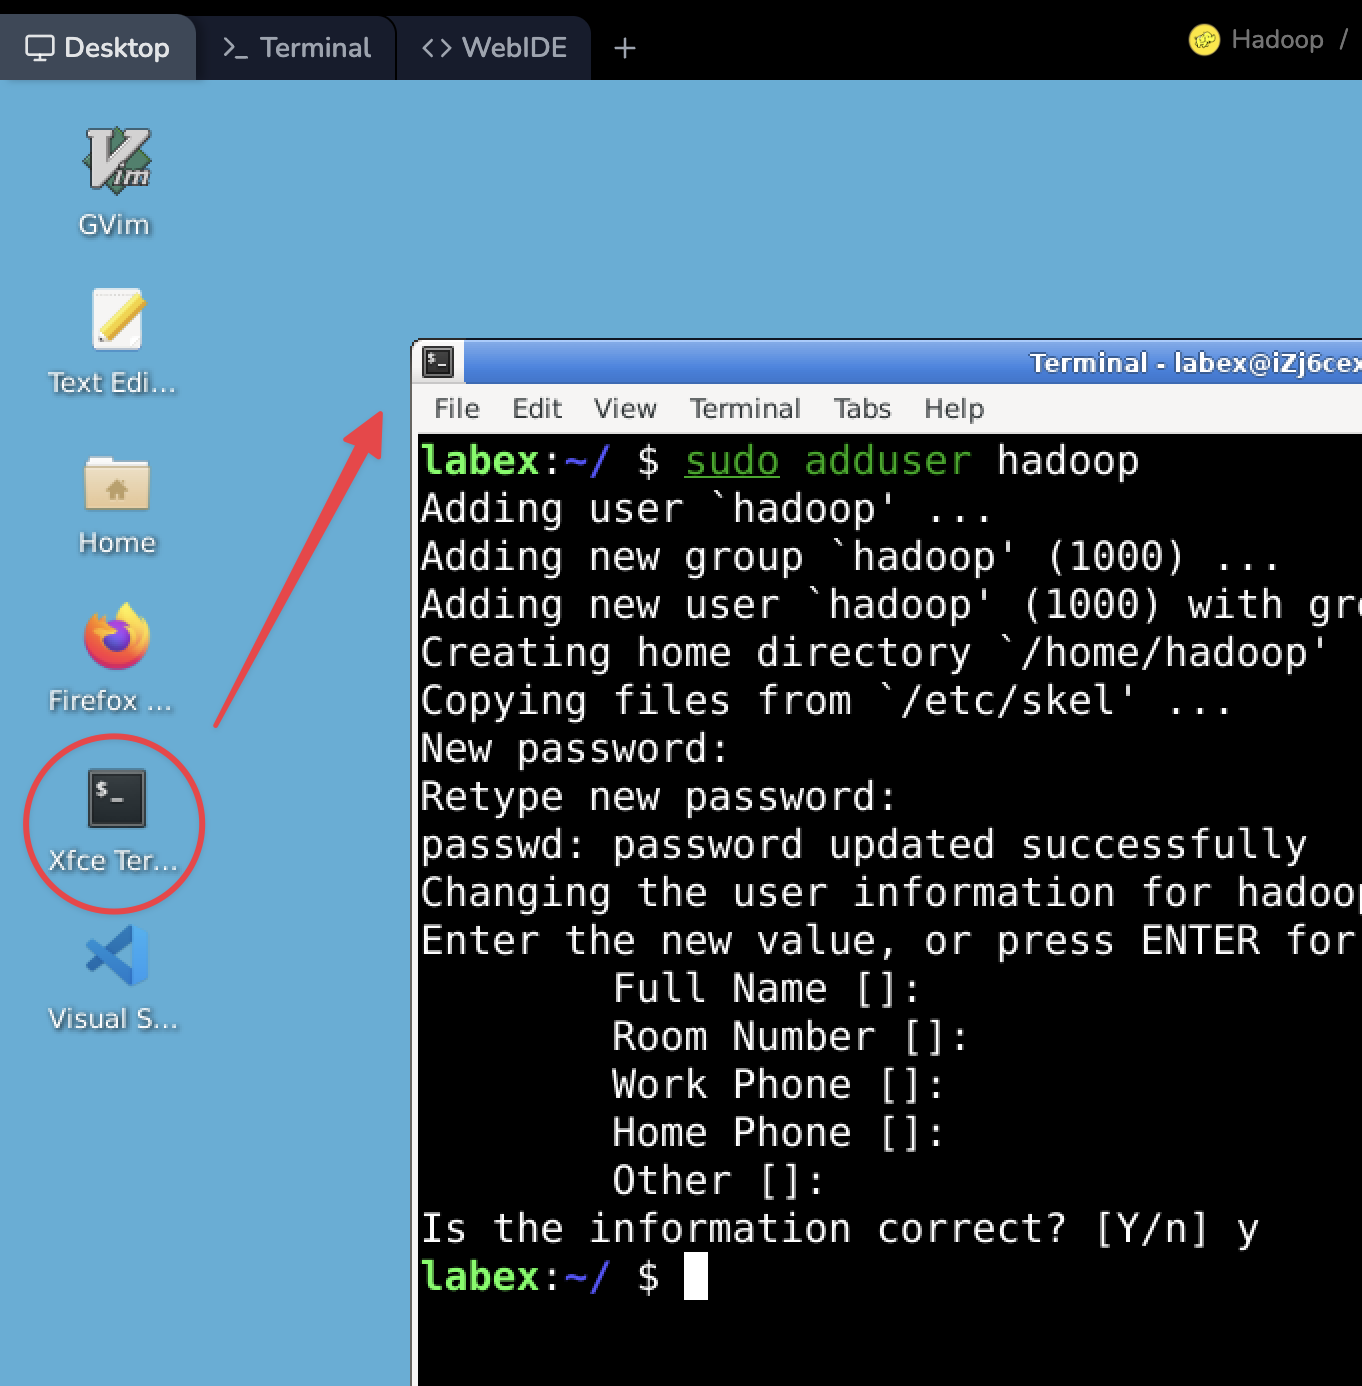
Double-click to open the Xfce terminal on your desktop and enter the following command to create a user named hadoop:

sudo adduser hadoop

And, follow the prompts to enter the password of the hadoop user; for example, one to set password to hadoop.

Note: When you enter the password, there is no prompt in the command. You can just press the Enter key when you are finished.

Then add the created hadoop user to the sudo user group to give the user higher privileges:

sudo usermod -G sudo hadoop

Verify the hadoop user has been added to the sudo group by entering the following command:

sudo cat /etc/group | grep hadoop

You should see the following output:

sudo:x:27:shiyanlou,labex,hadoop

Installing JDK

As mentioned in the previous content, Hadoop is mainly developed in Java. So, running it requires a Java environment.

Different versions of Hadoop have subtle differences in the requirements of Java version. To find which version of JDK you should choose for your Hadoop, you can read Hadoop Java Versions on the Hadoop Wiki website.

Switch the user๏ผš

su - hadoop

Install the JDK 11 version by entering the following command in the terminal:

sudo apt update
sudo apt install openjdk-11-jdk -y

Once you have successfully installed it, check the current Java version:

java -version

View the output:

openjdk version "11.0.22" 2024-01-16
OpenJDK Runtime Environment (build 11.0.22+7-post-Ubuntu-0ubuntu222.04.1)
OpenJDK 64-Bit Server VM (build 11.0.22+7-post-Ubuntu-0ubuntu222.04.1, mixed mode, sharing)

Configuring Password-Free SSH Login

The purpose of installing and configuring SSH is to make it easy for Hadoop to run scripts related to the remote management daemon. These scripts require the sshd service.

When configuring, first switch to hadoop user. Enter the following command in the terminal to do so:

su hadoop

If there's a prompt that requires you to enter a password, just enter the password which was specified when the user (hadoop) was previously created:

After switching the user successfully, the command prompt should be as shown above. Subsequent steps will perform the operations as hadoop user.

Next generate the key for the password-free SSH login.

The so-called "password-free" is to change the authentication pattern of SSH from password login to key login so that each component of Hadoop does not have to input password through user interaction when accessing each other, which can reduce a lot of redundant operations.

First switch to the user's home directory and then use the ssh-keygen command to generate the RSA key.

Please enter the following command in the terminal:

cd /home/hadoop
ssh-keygen -t rsa

When you encounter information such as the location where the key is stored, you can press the Enter key to use the default value.

The key's randomart image is:
+---[RSA 3072]----+
|     ..+.        |
|      . = . o    |
|      .o o * .   |
|     o .. . + o  |
|    = +.S. . +   |
|   + + +++. .    |
|    . B.O+.      |
|   o +oXo*E      |
|    =.+==o.      |
+----[SHA256]-----+

After the key is generated, the public key will be generated in the .ssh directory under the user's home directory.

The specific operation is shown in the figure below:

Then continue to enter the following command to add the generated public key to the host authentication record. Give the write permission to the authorized_keys file otherwise it will not be performed correctly during verification:

cat .ssh/id_rsa.pub >> .ssh/authorized_keys
chmod 600 .ssh/authorized_keys

After the addition has been successful, try to log in to the localhost. Please enter the following command in the terminal:

ssh localhost

When you log in for the first time, you will be prompted to confirm the public key fingerprint, just enter yes and confirm. Then, when you log in again, it would be a password-free login:

...
Welcome to Alibaba Cloud Elastic Compute Service !

To run a command as administrator (user "root"), use "sudo <command>".
See "man sudo_root" for details.

hadoop:~$

You need type the history -w or exit the terminal to save the changes for passing the verify script.

Installing Hadoop

Now, you can download the Hadoop installation package. The official website provides the download link for the latest version of Hadoop. You can also use the wget command to download the package directly in the terminal.

Enter the following command in the terminal to download the package:

wget https://dlcdn.apache.org/hadoop/common/hadoop-3.3.6/hadoop-3.3.6.tar.gz

Once the download is complete, you can use the tar command to extract the package:

tar zxvf hadoop-3.3.6.tar.gz
sudo mv hadoop-3.3.6 hadoop
sudo chown -R hadoop:hadoop /home/hadoop/hadoop

You can find the JAVA_HOME location by running dirname $(dirname $(readlink -f $(which java))) command on the terminal.

dirname $(readlink -f $(which java))

Then, open the .zshrc file with a text editor in the terminal:

vim /home/hadoop/.bashrc

Add the following at the end of the file /home/hadoop/.bashrc:

export JAVA_HOME=/usr/lib/jvm/java-11-openjdk-amd64
export HADOOP_HOME=/home/hadoop/hadoop
export HADOOP_INSTALL=$HADOOP_HOME
export HADOOP_MAPRED_HOME=$HADOOP_HOME
export HADOOP_COMMON_HOME=$HADOOP_HOME
export HADOOP_HDFS_HOME=$HADOOP_HOME
export HADOOP_YARN_HOME=$HADOOP_HOME
export HADOOP_COMMON_LIB_NATIVE_DIR=$HADOOP_HOME/lib/native
export PATH=$PATH:$HADOOP_HOME/sbin:$HADOOP_HOME/bin
export HADOOP_OPTS="-Djava.library.path=$HADOOP_HOME/lib/native"

Save and exit the vim editor. Then enter the source command in the terminal to activate the newly added environment variables:

source /home/hadoop/.bashrc

Verify the installation by running the hadoop version command in the terminal.

hadoop@iZj6cgdabeniugz9ypibzxZ:~$ hadoop version
Hadoop 3.3.6
Source code repository https://github.com/apache/hadoop.git -r 1be78238728da9266a4f88195058f08fd012bf9c
Compiled by ubuntu on 2023-06-18T08:22Z
Compiled on platform linux-x86_64
Compiled with protoc 3.7.1
From source with checksum 5652179ad55f76cb287d9c633bb53bbd
This command was run using /home/hadoop/hadoop/share/hadoop/common/hadoop-common-3.3.6.jar

Pseudo-Distributed Pattern Configuration

In most cases, Hadoop is used in a clustered environment, that is to say, we need to deploy Hadoop on multiple nodes. At the same time, Hadoop can also run on a single node in pseudo-distributed pattern, simulating multi-node scenarios through multiple independent Java processes. In the initial learning phase, there is no need to spend a lot of resources to create different nodes. So, this section and subsequent chapters will mainly use the pseudo-distributed pattern for Hadoop โ€œclusterโ€ deployment.

Create Directories

To begin, create the namenode and datanode directories within the Hadoop user's home directory. Execute the command below to create these directories:

rm -rf ~/hadoopdata
mkdir -p ~/hadoopdata/hdfs/{namenode,datanode}

Then, you need to modify the configuration files of Hadoop to make it run in pseudo-distributed pattern.

Edit core-site.xml

Open the core-site.xml file with a text editor in the terminal:

vim /home/hadoop/hadoop/etc/hadoop/core-site.xml

In the configuration file, modify the value of the configuration tag to the following content:

<configuration>
    <property>
        <name>fs.defaultFS</name>
        <value>hdfs://localhost:9000</value>
    </property>
</configuration>

The fs.defaultFS configuration item is used to indicate the location of the file system that the cluster uses by default:

Save the file and exit vim after editing.

Edit hdfs-site.xml

Open another configuration file hdfs-site.xml:

vim /home/hadoop/hadoop/etc/hadoop/hdfs-site.xml

In the configuration file, modify the value of the configuration tag to the following:

<configuration>
    <property>
        <name>dfs.replication</name>
        <value>1</value>
    </property>
    <property>
        <name>dfs.name.dir</name>
        <value>file:///home/hadoop/hadoopdata/hdfs/namenode</value>
    </property>
    <property>
        <name>dfs.data.dir</name>
        <value>file:///home/hadoop/hadoopdata/hdfs/datanode</value>
    </property>
</configuration>

This configuration item is used to indicate the number of file copies in HDFS, which is 3 by default. Since we have deployed it in a pseudo-distributed manner on a single node, it is modified to 1:

Save the file and exit vim after editing.

Edit hadoop-env.sh

Next edit the hadoop-env.sh file:

vim /home/hadoop/hadoop/etc/hadoop/hadoop-env.sh

Change the value of JAVA_HOME to the actual location of the installed JDK, i.e., /usr/lib/jvm/java-11-openjdk-amd64.

Note: You can use the echo $JAVA_HOME command to check the actual location of the installed JDK.

Save the file and exit vim editor after editing.

Edit yarn-site.xml

Next edit the yarn-site.xml file:

vim /home/hadoop/hadoop/etc/hadoop/yarn-site.xml

Add the following to the configuration tag:

<configuration>
    <property>
        <name>yarn.nodemanager.aux-services</name>
        <value>mapreduce_shuffle</value>
    </property>
</configuration>

Save the file and exit vim editor after editing.

Edit mapred-site.xml

Finally, you need to edit the mapred-site.xml file.

Open the file with vim editor:

vim /home/hadoop/hadoop/etc/hadoop/mapred-site.xml

Similarly, add the following to the configuration tag:

<configuration>
    <property>
        <name>mapreduce.framework.name</name>
        <value>yarn</value>
    </property>
    <property>
        <name>yarn.app.mapreduce.am.env</name>
        <value>HADOOP_MAPRED_HOME=/home/hadoop/hadoop</value>
    </property>
    <property>
        <name>mapreduce.map.env</name>
        <value>HADOOP_MAPRED_HOME=/home/hadoop/hadoop</value>
    </property>
    <property>
        <name>mapreduce.reduce.env</name>
        <value>HADOOP_MAPRED_HOME=/home/hadoop/hadoop</value>
    </property>
</configuration>

Save the file and exit vim editor after editing.

Hadoop Startup Test

First open the Xfce terminal on the desktop and switch to the Hadoop user:

su -l hadoop

The initialization of HDFS is mainly formatting:

/home/hadoop/hadoop/bin/hdfs namenode -format

tip: you need delete the HDFS data directory before formatting.

View this message, you mean successful:

2024-02-29 18:24:53,887 INFO common.Storage: Storage directory /home/hadoop/hadoopdata/hdfs/namenode has been successfully formatted.

You need type the history -w or exit the teminal to save the history for passing the verify script.

Start HDFS

Once the HDFS initialization is complete, you can start the daemons for NameNode and DataNode. Having started up, Hadoop applications (such as MapReduce tasks) can read and write files from/to HDFS.

Start the daemon by entering the following command in the terminal:

/home/hadoop/hadoop/sbin/start-dfs.sh

View the output:

Starting namenodes on [localhost]
Starting datanodes
Starting secondary namenodes [iZj6cjditp4l7k0fylhhfbZ]
iZj6cjditp4l7k0fylhhfbZ: Warning: Permanently added 'izj6cjditp4l7k0fylhhfbz' (ED25519) to the list of known hosts.

To confirm that Hadoop has been successfully run in pseudo-distributed pattern, you can use Java's process view tool jps to see if there is a corresponding process.

Enter the following command in the terminal:

jps

As shown in the figure, if you see the processes of NameNode, DataNode and SecondaryNameNode, it indicates that Hadoop's service is running fine:

View Log Files and WebUI

When Hadoop fails to start or errors are reported while a task (or else) is running, in addition to the prompt information of the terminal, viewing logs is the best way to locate a problem. Most of the problems can be found through the logs of related software to find the cause and a solution. As a learner in the field of big data, the ability to analyze logs is as important as the ability of learning the computing framework and it should be taken seriously.

The default output of Hadoop's daemon logs is in the log directory (logs) under the installation directory. Enter the following command in the terminal to enter the log directory:

ls /home/hadoop/hadoop/logs
hadoop-hadoop-datanode-iZj6cjditp4l7k0fylhhfbZ.log
hadoop-hadoop-datanode-iZj6cjditp4l7k0fylhhfbZ.out
hadoop-hadoop-namenode-iZj6cjditp4l7k0fylhhfbZ.log
hadoop-hadoop-namenode-iZj6cjditp4l7k0fylhhfbZ.out
hadoop-hadoop-secondarynamenode-iZj6cjditp4l7k0fylhhfbZ.log
hadoop-hadoop-secondarynamenode-iZj6cjditp4l7k0fylhhfbZ.out
SecurityAuth-hadoop.audit

You can use vim editor to view any log file.

After the HDFS has been started, a web page that displays the cluster status is also provided by the internal web service. Switch to the top of the LabEx VM and click on the "Web 8088" to open the web page:

After opening the web page, you can see the overview of the cluster, the status of the DataNode and so on:

Feel free to click on the menu at the top of the page to explore the tips and features.

You need type the history -w or exit the teminal to save the history for passing the verify script.

HDFS File Upload Test

Once HDFS is running, it can be thought of as a file system. Here to test the file upload functionality, you need to create a directory (one level deep per step, down to the required directory level) and try to upload some files in the Linux system to HDFS:

cd ~
/home/hadoop/hadoop/bin/hdfs dfs -mkdir /user
/home/hadoop/hadoop/bin/hdfs dfs -mkdir /user/hadoop

After the directory has been created successfully, use the hdfs dfs -put command to upload the files on the local disk (the randomly selected Hadoop configuration files here) to HDFS:

/home/hadoop/hadoop/bin/hdfs dfs -put /home/hadoop/hadoop/etc/hadoop /user/hadoop/input

PI Test Cases

The vast majority of Hadoop applications deployed in real-world production environments and solving real-world problems are based on the MapReduce programming model represented by WordCount. Therefore, WordCount can be used as a "HelloWorld" program for getting started with Hadoop, or you can add your own ideas to solve specific problems.

Start the Task

At the end of the previous section, we uploaded some configuration files to HDFS, as an example. Next we can try to run the PI test case to get word frequency statistics of these files and output them according to our filtering rules.

Start the YARN calculation service in the terminal first:

/home/hadoop/hadoop/sbin/start-yarn.sh

Then enter the following command to start the task:

/home/hadoop/hadoop/bin/hadoop jar /home/hadoop/hadoop/share/hadoop/mapreduce/hadoop-mapreduce-examples-3.3.6.jar pi 3 3

View the output results:

Estimated value of Pi is 3.55555555555555555556

Among the parameters above, there are three parameters about the path. They are: the location of the jar package, the location of the input file and the storage location of the output result. When specifying the path, you should develop the habit of specifying an absolute path. It will help locate problems quickly and deliver work soon.

Complete the task, you can view Results.

Close HDFS Service

After the calculation, if there is no other software program that uses the files on the HDFS, you should close the HDFS daemon in time.

As a user of distributed clusters and related computing frameworks, you should develop the good habit of actively checking the status of related hardware and software every time it involves cluster opening and closing, hardware and software installation, or any kind of update.

Use the following command in the terminal to close the HDFS and YARN daemons:

/home/hadoop/hadoop/sbin/stop-yarn.sh
/home/hadoop/hadoop/sbin/stop-dfs.sh

You need type the history -w or exit the teminal to save the history for passing the verify script.

Summary

This lab has introduced Hadoop's architecture, installation and deployment methods of stand-alone pattern and pseudo-distributed pattern, and run WordCount for basic testing.

Here are the main points of this lab:

  • Hadoop architecture
  • Hadoop main module
  • How to use Hadoop stand-alone pattern
  • Hadoop pseudo-distributed pattern deployment
  • Basic uses of HDFS
  • WordCount test case

In general, Hadoop is a computing and storage framework commonly used in the field of big data. Its functions need to be explored further. Please keep the habit of referring to technical materials and continue to learn the follow-upfs.

Other Hadoop Tutorials you may like