
Introduction
In the Hadoop versions 2.0 and later, the new resource management pattern of YARN was introduced, which facilitates the cluster in terms of utilization, unified resource management and data sharing. Based on the foundation of building the Hadoop pseudo-distributed cluster, this section will let you learn the architecture, the working principle, configuration, and development and monitoring techniques of the YARN framework.
This lab requires a certain Java programming foundation.
Please input all the sample code in the document by yourself; do not just copy and paste as far as possible. This way can you be more familiar with the code. If you have problems, carefully review the documentation, or you can go to forum for help and communication.
YARN Architecture and Components
YARN, introduced in Hadoop 0.23 as part of MapReduce 2.0 (MRv2), revolutionized the resource management and job scheduling in Hadoop clusters:
- Decomposition of JobTracker:
MRv2decomposes the functions ofJobTrackerinto separate daemons -ResourceManagerfor resource management andApplicationMasterfor job scheduling and monitoring. - Global ResourceManager: Each application has a corresponding
ApplicationMaster, which can be a MapReduce job or a DAG describing the job. - Data Calculation Framework: The
ResourceManager,Slave, andNodeManagerform a framework where the ResourceManager governs all application resources. - ResourceManager Components: The
Schedulerallocates resources based on constraints like capacity and queues, while theApplicationsManagerhandles job submissions and ApplicationMaster execution. - Resource Allocation: Resource requirements are defined using resource containers with elements like memory, CPU, disk, and network.
- NodeManager Role: NodeManager monitors container resource usage and reports to ResourceManager and Scheduler.
- ApplicationMaster Tasks: ApplicationMaster negotiates resource containers with Scheduler, tracks status, and monitors progress.
The following figure depicts the relationship:

YARN ensures API compatibility with previous versions, allowing seamless transition for running MapReduce tasks. Understanding the architecture and components of YARN is essential for efficient resource management and job scheduling in Hadoop clusters.
Starting the Hadoop Daemon
Before learning the relevant configuration parameters and YARN application development techniques, we need to start the Hadoop daemon so that it can be used at any time.
First double-click to open the Xfce terminal on the desktop and enter the following command to switch to the hadoop user:
su - hadoop
tip: The password is 'hadoop' of the user 'hadoop'.
Once the switch is complete, you can start the Hadoop-related daemons including HDFS and YARN frameworks.
Please enter the following commands in the terminal to start the daemons:
/home/hadoop/hadoop/sbin/start-dfs.sh
/home/hadoop/hadoop/sbin/start-yarn.sh
After the boot has completed, you can choose to use the jps command to check if the associated daemons are running.
hadoop:~$ jps
3378 NodeManager
3028 SecondaryNameNode
3717 Jps
2791 DataNode
2648 NameNode
3240 ResourceManager
Preparing the Configuration File
In this section, we will learn about yarn-site.xml, which is one of the main configuration files of Hadoop, to see what settings can be made for the YARN cluster in this file.
To prevent the misuse of changes to the configuration file, it is the best to copy the Hadoop configuration file to another directory and then open it.
To do this, please enter the following command in the terminal to create a new directory for the configuration file:
mkdir /home/hadoop/hadoop_conf
Then copy the main configuration file yarn-site.xml of YARN from the installation directory to the newly created directory.
Please enter the following command in the terminal to perform the operation:
cp /home/hadoop/hadoop/etc/hadoop/yarn-site.xml /home/hadoop/hadoop_conf/yarn-site.xml
Then use vim editor to open the file to view its content:
vim /home/hadoop/hadoop_conf/yarn-site.xml
How the Configuration File Works
We know that there are two important roles in the YARN framework: ResourceManager and NodeManager. Therefore, each configuration item in the file is a setting of the above two components.
There are many configuration items that can be set in this file, but by default, this file does not contain any custom configuration items. For example, the file we open now has only the attribute aux-services that was specified when the pseudo-distributed Hadoop cluster was previously configured, as shown in the following figure:
hadoop:~$ cat /home/hadoop/hadoop/etc/hadoop/mapred-site.xml

...
<configuration>
    <property>
        <name>mapreduce.framework.name</name>
        <value>yarn</value>
    </property>
</configuration>
This configuration item is used to set the dependent services that need to be run on the NodeManager. The configuration value we specify is mapreduce_shuffle, indicating that the default value of the MapReduce program needs to be run on YARN.
Are the configuration items not written in it not working? Not exactly. When the configuration parameters are not explicitly specified in the file, Hadoop's YARN framework will read the default values stored in internal files. All configuration items explicitly specified in the yarn-site.xml file will override the default values, which is an effective way for the Hadoop system to adapt to different usage scenarios.
ResourceManager Configuration Items
Understanding and correctly configuring the ResourceManager settings in the yarn-site.xml file is essential for efficient resource management and job execution in a Hadoop cluster. Here is a summary of the key configuration items related to the ResourceManager:
yarn.resourcemanager.address: Exposes the address to clients for submitting applications and killing applications. Default port is 8032.yarn.resourcemanager.scheduler.address: Exposes the address to ApplicationMaster for requesting and releasing resources. Default port is 8030.yarn.resourcemanager.resource-tracker.address: Exposes the address to NodeManager for sending heartbeats and pulling tasks. Default port is 8031.yarn.resourcemanager.admin.address: Exposes the address to administrators for management commands. Default port is 8033.yarn.resourcemanager.webapp.address: WebUI address for viewing cluster information. Default port is 8088.yarn.resourcemanager.scheduler.class: Specifies the main class name of the scheduler (e.g., FIFO, CapacityScheduler, FairScheduler).- Thread Configuration:
yarn.resourcemanager.resource-tracker.client.thread-countyarn.resourcemanager.scheduler.client.thread-count
- Resource Allocation:
yarn.scheduler.minimum-allocation-mbyarn.scheduler.maximum-allocation-mbyarn.scheduler.minimum-allocation-vcoresyarn.scheduler.maximum-allocation-vcores
- NodeManager Management:
yarn.resourcemanager.nodes.exclude-pathyarn.resourcemanager.nodes.include-path
- Heartbeat Configuration:
yarn.resourcemanager.nodemanagers.heartbeat-interval-ms
Configuring these parameters allows fine-tuning of ResourceManager behavior, resource allocation, thread handling, NodeManager management, and heartbeat intervals in a Hadoop cluster. Understanding these configuration items helps prevent issues and ensures smooth operation of the cluster.
NodeManager Configuration Items
Configuring the NodeManager settings in the yarn-site.xml file is crucial for managing resources and tasks efficiently within a Hadoop cluster. Here is a summary of the key configuration items related to the NodeManager:
yarn.nodemanager.resource.memory-mb: Specifies the total physical memory available to the NodeManager. This value remains constant throughout YARN runtime.yarn.nodemanager.vmem-pmem-ratio: Sets the ratio of virtual memory to physical memory allocation. Default ratio is2.1.yarn.nodemanager.resource.cpu-vcores: Defines the total number of virtual CPUs available for the NodeManager. Default value is8.yarn.nodemanager.local-dirs: Path for storing intermediate results on the NodeManager, allowing configuration of multiple directories.yarn.nodemanager.log-dirs: Path to the log directory of the NodeManager, supporting configuration of multiple directories.yarn.nodemanager.log.retain-seconds: Maximum retention time for NodeManager logs, default is 10800 seconds (3 hours).
Configuring these parameters enables fine-tuning of resource allocation, memory management, directory paths, and log retention settings for optimal performance and resource utilization by the NodeManager in a Hadoop cluster. Understanding these configuration items helps ensure smooth operation and efficient task execution within the cluster.
Configuration Item Query and Default References
To explore all configuration items available in YARN and other common Hadoop components, you can refer to the default configuration files provided by Apache Hadoop. Here are the links to access the default configurations:
YARN Configuration Items:
Common Configuration Files:
- core-default.xml (core-site.xml)
- hdfs-default.xml (hdfs-site.xml)
- mapred-default.xml (mapred-site.xml)
Exploring these default configurations provides detailed descriptions of each configuration item and their purposes, helping you understand the role of each parameter in Hadoop architecture design.
After reviewing the configurations, you can close the vim editor to conclude your exploration of Hadoop configuration settings.
Creating Project Directories and Files
Let's learn the development process of the YARN application by mimicking an official YARN instance application.
First create a project directory. Please enter the following command in the terminal to perform directory creation:
mkdir /home/hadoop/yarn_app
Then create two source code files in the project separately.
The first one is Client.java. Please use the touch command in the terminal to create the file:
touch /home/hadoop/yarn_app/Client.java
Then create the ApplicationMaster.java file:
touch /home/hadoop/yarn_app/ApplicationMaster.java
hadoop:~$ tree /home/hadoop/yarn_app/
/home/hadoop/yarn_app/
├── ApplicationMaster.java
└── Client.java

0 directories, 2 files
Writing Client Code
By writing the code for the Client, you will be able to understand the APIs and their roles needed to develop the Client under the YARN framework.
The code content is a bit long. A more efficient way than reading it line by line is to enter it line by line into the source code file you have just created.
First open the Client.java file just created with vim editor (or another text editor):
vim /home/hadoop/yarn_app/Client.java
Then add the main body of the program to indicate the class name and the package name for the class:
package com.labex.yarn.app;

public class Client {
    public static void main(String[] args){
     //TODO: Edit code here.
    }
}
The following code is in the form of a segmentation. When writing, write the following code in the Client class (that is, the code block where the comment //TODO: Edit your code here is located).
The first step the client has to do is to create and initialize the YarnClient object and then start it:
YarnClient yarnClient = YarnClient.createYarnClient();
yarnClient.init(conf);
yarnClient.start();
After creating Client, we need to create an object of YARN application and its application ID:
YarnClientApplication app = yarnClient.createApplication();
GetNewApplicationResponse appResponse = app.getNewApplicationResponse();
The appResponse object contains information about the cluster, such as the cluster's minimum and maximum resource capabilities. The information is required to ensure that we can properly set the parameters when the ApplicationMaster starts the relevant container.
One of the main tasks in the Client is to set the ApplicationSubmissionContext. It defines all the information that RM needs to start AM.
In general, Client needs to set the following in the context:
- **Application information:**Includes the app's ID and name.
- **Queue and priority information:**Includes queues and assigned priorities for application submissions.
- **Users:**Who the user, who submitted the app, is.
- **ContainerLaunchContext:**Defines the information of the container in which to start and run AM. All the necessary information needed to run the application is defined in the
ContainerLaunchContext, including local resources (binary files, jar files etc.), environment variables (CLASSPATHetc.), commands to be executed and secure Token (RECT):
// Set the application to submit the context
ApplicationSubmissionContext appContext = app.getApplicationSubmissionContext();
ApplicationId appId = appContext.getApplicationId();

  appContext.setKeepContainersAcrossApplicationAttempts(keepContainers);
appContext.setApplicationName(appName);

// The following code is used to set the local resources of ApplicationMaster
/ / Local resources need to be local files or compressed packages etc.
// In this scenario, the jar package is in the form of a file as one of AM's local resources.
Map<String, LocalResource> localResources = new HashMap<String, LocalResource>();

LOG.info("Copy AppMaster jar from local filesystem and add to local environment.");

// Copy the jar package of ApplicationMaster into the file system
FileSystem fs = FileSystem.get(conf);

// Create a local resource that points to the jar package path
addToLocalResources(fs, appMasterJar, appMasterJarPath, appId.toString(), localResources, null);

// Set the parameters of logs, you can skip it
if (!log4jPropFile.isEmpty()) {
   addToLocalResources(fs, log4jPropFile, log4jPath, appId.toString(), localResources, null);
}

// The shell script will be available in the container that will eventually execute it
// So first copy it to the file system so that the YARN framework can find it
// You don't need to set it to the local resource of AM here because the latter doesn't need it
String hdfsShellScriptLocation = "";
long hdfsShellScriptLen = 0;
long hdfsShellScriptTimestamp = 0;
if (!shellScriptPath.isEmpty()) {
Path shellSrc = new Path(shellScriptPath);
String shellPathSuffix = appName + "/" + appId.toString() + "/" + SCRIPT_PATH;
Path shellDst = new Path(fs.getHomeDirectory(), shellPathSuffix);
fs.copyFromLocalFile(false, true, shellSrc, shellDst);
hdfsShellScriptLocation = shellDst.toUri().toString();
FileStatus shellFileStatus = fs.getFileStatus(shellDst);
hdfsShellScriptLen = shellFileStatus.getLen();
hdfsShellScriptTimestamp = shellFileStatus.getModificationTime();
}

if (!shellCommand.isEmpty()) {
addToLocalResources(fs, null, shellCommandPath, appId.toString(),
    localResources, shellCommand);
}

if (shellArgs.length > 0) {
addToLocalResources(fs, null, shellArgsPath, appId.toString(),
    localResources, StringUtils.join(shellArgs, " "));
}

// Set the environment parameters that AM requires
LOG.info("Set the environment for the application master");
Map<String, String> env = new HashMap<String, String>();

// Add the path to the shell script to the environment variable
// AM will create the correct local resource for the final container accordingly
// and the above container will execute the shell script at startup
  env.put(DSConstants.DISTRIBUTEDSHELLSCRIPTLOCATION, hdfsShellScriptLocation);

env.put(DSConstants.DISTRIBUTEDSHELLSCRIPTTIMESTAMP, Long.toString(hdfsShellScriptTimestamp));

env.put(DSConstants.DISTRIBUTEDSHELLSCRIPTLEN, Long.toString(hdfsShellScriptLen));

// Add the path to AppMaster.jar to the classpath
// Note that there is no need to provide a Hadoop-related classpath here, as we have an annotation in the external configuration file.
// The following code adds all the classpath-related path settings required by AM to the current directory
StringBuilder classPathEnv = new StringBuilder(Environment.CLASSPATH.$$())
    .append(ApplicationConstants.CLASS_PATH_SEPARATOR).append("./*");
for (String c : conf.getStrings(
    YarnConfiguration.YARN_APPLICATION_CLASSPATH,
    YarnConfiguration.DEFAULT_YARN_CROSS_PLATFORM_APPLICATION_CLASSPATH)) {
    classPathEnv.append(ApplicationConstants.CLASS_PATH_SEPARATOR);
    classPathEnv.append(c.trim());
  }
  classPathEnv.append(ApplicationConstants.CLASS_PATH_SEPARATOR).append(
    "./log4j.properties");

// Set the command to execute AM
Vector<CharSequence> vargs = new Vector<CharSequence>(30);

// Set the executable command for Java
LOG.info("Setting up app master command");
vargs.add(Environment.JAVA_HOME.$$() + "/bin/java");
// Set the memory numbers assigned by Xmx parameters under JVM
vargs.add("-Xmx" + amMemory + "m");
// Set class names
vargs.add(appMasterMainClass);
// Set the parameter of ApplicationMaster
vargs.add("--container_memory " + String.valueOf(containerMemory));
vargs.add("--container_vcores " + String.valueOf(containerVirtualCores));
vargs.add("--num_containers " + String.valueOf(numContainers));
vargs.add("--priority " + String.valueOf(shellCmdPriority));

for (Map.Entry<String, String> entry : shellEnv.entrySet()) {
    vargs.add("--shell_env " + entry.getKey() + "=" + entry.getValue());
  }
  if (debugFlag) {
    vargs.add("--debug");
  }

vargs.add("1>" + ApplicationConstants.LOG_DIR_EXPANSION_VAR + "/AppMaster.stdout");
vargs.add("2>" + ApplicationConstants.LOG_DIR_EXPANSION_VAR + "/AppMaster.stderr");

// Generate the final parameter and configure
StringBuilder command = new StringBuilder();
for (CharSequence str : vargs) {
    command.append(str).append(" ");
}

LOG.info("Completed setting up app master command " + command.toString());
List<String> commands = new ArrayList<String>();
commands.add(command.toString());

// Set container for AM to start context
ContainerLaunchContext amContainer = ContainerLaunchContext.newInstance(
    localResources, env, commands, null, null, null);

// The requirement of setting resource types, including memory and virtual CPU cores.
Resource capability = Resource.newInstance(amMemory, amVCores);
  appContext.setResource(capability);

// If needed, the data of YARN service is passed to the applications in binary format. But it's not needed in this example.
// amContainer.setServiceData(serviceData);

// Set the Token
if (UserGroupInformation.isSecurityEnabled()) {
    Credentials credentials = new Credentials();
    String tokenRenewer = conf.get(YarnConfiguration.RM_PRINCIPAL);
    if (tokenRenewer == null || tokenRenewer.length() == 0) {
      throw new IOException(
        "Can't get Master Kerberos principal for the RM to use as renewer");
    }

// Get the token of the default file system
final Token<?> tokens[] =
    fs.addDelegationTokens(tokenRenewer, credentials);
    if (tokens != null) {
      for (Token<?> token : tokens) {
        LOG.info("Got dt for " + fs.getUri() + "; " + token);
      }
    }
    DataOutputBuffer dob = new DataOutputBuffer();
    credentials.writeTokenStorageToStream(dob);
    ByteBuffer fsTokens = ByteBuffer.wrap(dob.getData(), 0, dob.getLength());
    amContainer.setTokens(fsTokens);
  }

  appContext.setAMContainerSpec(amContainer);
Once the setup process is complete, the client can submit applications with the specified priority and queue:
 / / Set the priority of AM
Priority pri = Priority.newInstance(amPriority);
appContext.setPriority(pri);

// Set the queue where the application submits to RM
appContext.setQueue(amQueue);

// Submit the app to AM
yarnClient.submitApplication(appContext);
At this point, RM will accept the application and set up and launch AM on the assigned container in background.
Clients can track the progress of actual tasks in a variety of ways.
(1) One of them is that you can communicate with the RM via the YarnClient object's getApplicationReport() method and request an application report:
// Use the app ID to get its report
ApplicationReport report = yarnClient.getApplicationReport(appId);
Reports received from RM include the following:
- **General Information:**Includes the number (position) of the application, the queue for submitting the application, the user who submitted the application and the start time of the application.
- **ApplicationMaster details:**The host that is running AM, the RPC port that is listening to the requests from Clients and the Tokens that Client and AM need to communicate with.
- **Application-tracking information:**If the application supports some form of progress tracking, it can set the tracked URL through the
getTrackingUrl()method reported by the application and the client can monitor the progress by this method. - **Application status:**You can see the application status of
ResourceManageringetYarnApplicationState. IfYarnApplicationStateis set tocomplete, the Client should referencegetFinalApplicationStatusto check if the application's task has actually executed successfully. In the event of a failure, more information about the failure can be found withgetDiagnostics.
(2) If the ApplicationMaster supports it, the Client can directly query the progress of the AM itself by using the hostname:rpcport information obtained from the application report.
In some cases, if the application has been running for too long, the Client may wish to terminate the application. YarnClient supports calling killApplication. It allows the Client to send a termination signal to AM via the ResourceManager. If so designed, the application manager can also terminate the call through its RPC layer support, which the client can take advantage of.
The specific code is as follows, but the code is only for reference and has not to be written in Client.java:
yarnClient.killApplication(appId);
After editing the content above, save the content and exit vim editor.
Writing ApplicationMaster Code
Similarly, use vim editor to open the ApplicationMaster.java file to write code:
vim /home/hadoop/yarn_app/ApplicationMaster.java
package com.labex.yarn.app;

public class ApplicationMaster {

    public static void main(String[] args){
   //TODO:Edit code here.
    }
}
The code explanation is still in the form of a segment. All the code mentioned below should be written in the ApplicationMaster class (i.e., the code block where the comment //TODO:Edit code here. is located).
AM is the actual owner of the job, which is started by RM and provides all the necessary information and resources through the Client to supervise and finish the task.
Since AM is started in a single container, it is likely that the container shares the same physical host with other containers. Given the multi-tenancy features of the cloud computing platform and other issues, it is possible to be unable to know the pre-configured ports to listen to at the beginning.
So, when AM starts, it can be given several parameters through the environment. These parameters include the ContainerId of the AM container, the submission time of the application and details about the NodeManager host which is running AM.
All the interactions with RM require an application to schedule. If this process fails, each application may try again. You can get ApplicationAttemptId from the container ID of AM. There are related APIs that can convert values obtained from the environment into objects.
Write the following code:
Map<String, String> envs = System.getenv();
String containerIdString = envs.get(ApplicationConstants.AM_CONTAINER_ID_ENV);
  If (containerIdString == null) {
    // The container ID should be set in the environment variable of the framework
    Throw new IllegalArgumentException(
        "Container ID not set in the environment");
  }
ContainerId containerId = ConverterUtils.toContainerId(containerIdString);
ApplicationAttemptId appAttemptID = containerId.getApplicationAttemptId();
After AM has been fully initialized, we can start two clients: one client to the ResourceManager and the other one to the NodeManager. We use a custom event handler to set it up, and the details are discussed later:
AMRMClientAsync.CallbackHandler allocListener = new RMCallbackHandler();
amRMClient = AMRMClientAsync.createAMRMClientAsync(1000, allocListener);
amRMClient.init(conf);
amRMClient.start();

containerListener = createNMCallbackHandler();
nmClientAsync = new NMClientAsyncImpl(containerListener);
nmClientAsync.init(conf);
nmClientAsync.start();
AM must send heartbeats to RM periodically so that the latter knows that AM is still running. The expiration interval on the RM is defined by YarnConfiguration and its default value is defined by the YarnConfiguration.RM_AM_EXPIRY_INTERVAL_MS configuration item in the configuration file. AM needs to register itself in the ResourceManager to start sending heartbeats:
// Register yourself with RM and start sending heartbeats to RM
appMasterHostname = NetUtils.getHostname();
RegisterApplicationMasterResponse response = amRMClient.registerApplicationMaster(appMasterHostname, appMasterRpcPort, appMasterTrackingUrl);
The response information of the registration process may include the maximum resource capacity of the cluster. We can use this information to check the application's request:
// Temporarily save information about cluster resource capabilities in RM
int maxMem = response.getMaximumResourceCapability().getMemory();
LOG.info("Max mem capability of resources in this cluster " + maxMem);

int maxVCores = response.getMaximumResourceCapability().getVirtualCores();
LOG.info("Max vcores capability of resources in this cluster " + maxVCores);

// Use the maximum memory limit to constrain the container's memory capacity request value
if (containerMemory > maxMem) {
    LOG.info("Container memory specified above max threshold of cluster."
        + " Using max value." + ", specified=" + containerMemory + ", max="
        + maxMem);
    containerMemory = maxMem;
}

if (containerVirtualCores > maxVCores) {
    LOG.info("Container virtual cores specified above max threshold of cluster."
      + " Using max value." + ", specified=" + containerVirtualCores + ", max="
      + maxVCores);
    containerVirtualCores = maxVCores;
}

List<Container> previousAMRunningContainers =
      response.getContainersFromPreviousAttempts();
LOG.info("Received " + previousAMRunningContainers.size()
          + " previous AM's running containers on AM registration.");
Depending on the task requirements, AM can schedule a set of containers to run tasks. We use these requirements to calculate how many containers we need and request a corresponding number of containers:
int numTotalContainersToRequest = numTotalContainers - previousAMRunningContainers.size();

for (int i = 0; i < numTotalContainersToRequest; ++i) {
    //Set the request object to the RM request container
    ContainerRequest containerAsk = setupContainerAskForRM();
    //Send container request to RM
    amRMClient.addContainerRequest(containerAsk);

    // This loop means polling RM for containers after getting fully allocated quotas
  }
The above loop will keep on running until all the containers have been started and the shell script has been executed (no matter if it succeeds or fails).
In setupContainerAskForRM(), you need to set the following:
- **Resource capabilities:**Currently, YARN supports memory-based resource requirements, so the request should define how much memory is needed. This value is defined in megabytes and must be less than the exact multiple of the cluster's maximum and minimum capabilities. This memory resource corresponds to the physical memory limit imposed on the task container. Resource capabilities also include computation-based resources (vCore).
- Priority: When requesting a container set, AM can define different priorities for collections. For example, MapReduce AM can assign a higher priority to the containers required by the Map task, while the Reduce task container has a lower priority:
Private ContainerRequest setupContainerAskForRM() {
    / / Set the priority of the request
    Priority pri = Priority.newInstance(requestPriority);

    / / Set the request for the resource type, including memory and CPU
    Resource capability = Resource.newInstance(containerMemory,
      containerVirtualCores);

    ContainerRequest request = new ContainerRequest(capability, null, null, pri);
    LOG.info("Requested container allocation: " + request.toString());
    Return request;
  }
After AM has sent a container allocation request, the container is started asynchronously by the event handler of the AMRMClientAsync client. Programs that handle this logic should implement the AMRMClientAsync.CallbackHandler interface.
(1) When dispatched to a container, the handler needs to start a thread. The thread runs the relevant code to start the container. Here we use LaunchContainerRunnable for demonstration. We will discuss this class later:
@Override
public void onContainersAllocated(List<Container> allocatedContainers) {
    LOG.info("Got response from RM for container allocation, allocatedCnt=" + allocatedContainers.size());
    numAllocatedContainers.addAndGet(allocatedContainers.size());
    for (Container allocatedContainer : allocatedContainers) {
      LaunchContainerRunnable runnableLaunchContainer =
          new LaunchContainerRunnable(allocatedContainer, containerListener);
      Thread launchThread = new Thread(runnableLaunchContainer);

      // Start and run the container with different threads, which prevents the main thread from blocking when all the containers cannot be allocated resources
      launchThreads.add(launchThread);
      launchThread.start();
    }
}
(2) When sending a heartbeat, the event handler should report the progress of the application:
@Override
public float getProgress() {
// Set the progress information and report it to RM the next time you send a heartbeat
    float progress = (float) numCompletedContainers.get() / numTotalContainers;
Return progress;
}
The container's startup thread actually starts the container on NM. After assigning a container to AM, it needs to follow a similar process that the Client follows when setting the ContainerLaunchContext up for the final task to run on the allocated container. After defining the ContainerLaunchContext, the AM can start it via NMClientAsync:
// Set the necessary commands to execute on the allocated container
Vector<CharSequence> vargs = new Vector<CharSequence>(5);

// Set the executable command
vargs.add(shellCommand);
// Set the path of the shell script
if (!scriptPath.isEmpty()) {
    vargs.add(Shell.WINDOWS ? ExecBatScripStringtPath
      : ExecShellStringPath);
}

// Set parameters for shell commands
vargs.add(shellArgs);
// Add log redirection parameters
vargs.add("1>" + ApplicationConstants.LOG_DIR_EXPANSION_VAR + "/stdout");
vargs.add("2>" + ApplicationConstants.LOG_DIR_EXPANSION_VAR + "/stderr");

// Get the final command
StringBuilder command = new StringBuilder();
for (CharSequence str : vargs) {
command.append(str).append(" ");
}

List<String> commands = new ArrayList<String>();
commands.add(command.toString());

// Set ContainerLaunchContext to set local resources, environment variables, commands and tokens for the constructor.
ContainerLaunchContext ctx = ContainerLaunchContext.newInstance(
    localResources, shellEnv, commands, null, allTokens.duplicate(), null);
  containerListener.addContainer(container.getId(), container);
  nmClientAsync.startContainerAsync(container, ctx);
NMClientAsync object and its event handler are responsible for handling container events. It includes start, stop, status updates and errors for the container.
After the ApplicationMaster has determined that it's done, it needs to unregister with the Client of AM-RM and then stop the Client:
try {
    amRMClient.unregisterApplicationMaster(appStatus, appMessage, null);
  } catch (YarnException ex) {
    LOG.error("Failed to unregister application", ex);
  } catch (IOException e) {
    LOG.error("Failed to unregister application", e);
  }

  amRMClient.stop();
The content above is the main code of ApplicationMaster. After editing, save the content and exit vim editor.
The Process of Application Launching
The process of launching an application on a Hadoop cluster is as follows:
Compiling and Launching the Application
After the code in the previous section has been completed, you can compile it into a Jar package and submit it to the Hadoop cluster by using a build tool like Maven and Gradle.
Since the compilation process requires networking to pull the relevant dependencies, it takes a long time (about a 1-hour peak). So, skip the compilation process here and use the already compiled Jar package in the Hadoop installation directory for subsequent experiments.
In this step, we use the simple example jar to run the yarn application instead of building the specified jar by maven.
Please use the yarn jar command in the terminal to submit the execution. The parameters involved in the following commands are the path to the Jar package to run, the name of the main class, the path to the Jar package submitted to the YARN framework, the number of the shell commands to be executed and the number of containers:
/home/hadoop/hadoop/bin/yarn jar /home/hadoop/hadoop/share/hadoop/mapreduce/hadoop-mapreduce-examples-3.3.6.jar pi 3 3
View the output in the terminal, and you can see the progress of the application execution.
Estimated value of Pi is 3.55555555555555555556
During the execution of the task, you can see the prompts of each stage from the output of the terminal, such as initializing the Client, connecting to the RM and obtaining the cluster information.
Viewing Application Execution Results
Double-click to open Firefox web browser on the desktop and enter the following URL in the address bar to view the resource information of the nodes in the YARN pattern of the Hadoop cluster:
http://localhost:8088
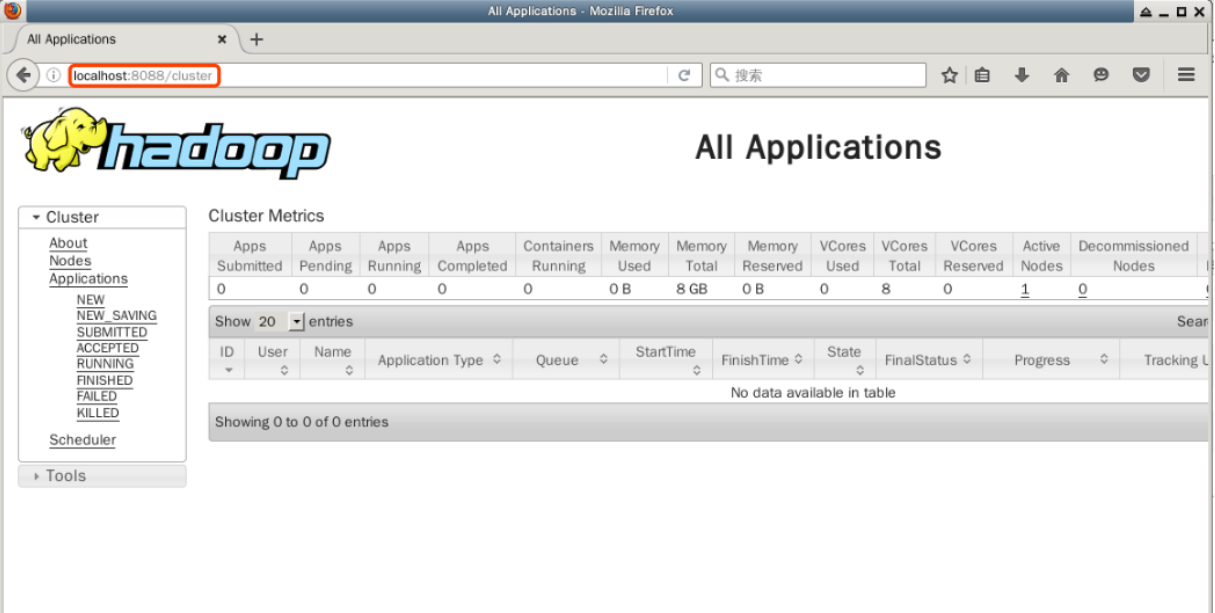
In this page, all the information about the Hadoop cluster is displayed, including the status of nodes, applications and schedulers.
The most important of these is the management of the application, and we can see the execution status of the submitted application here later. Please do not close the Firefox browser for now.
Summary
Based on the completion of the Hadoop pseudo-distributed cluster, this lab continues to teach us the architecture, working principle, configuration, and development and monitoring techniques of the YARN framework. A lot of code and configuration files are given in the course, so please read them carefully.


