
Introduction
When working with Red Hat-based Linux distributions like CentOS or RHEL, the "sudo: yum: command not found" error can prevent you from installing software packages or updating your system. This error typically occurs when the YUM package manager is missing, misconfigured, or corrupted.
In this practical lab, you'll learn how to diagnose and resolve this common issue through hands-on exercises in a CentOS environment. You'll use Docker to create a CentOS container where you can safely experiment with package management, troubleshoot YUM-related problems, and apply best practices for system maintenance.
This Lab requires an internet connection for learning, thus only Pro users can start the VM. Upgrade your account to Pro.
Setting Up a CentOS Environment with Docker
In this lab, we'll use Docker to create a CentOS environment where we can work with the YUM package manager. Docker allows us to quickly set up isolated containers for testing and troubleshooting without affecting our host system.
Understanding Package Managers in Linux
Different Linux distributions use different package management systems:
Debian-based distributions (Ubuntu, Debian, Linux Mint):
- Use the APT package manager (Advanced Package Tool)
- Package format:
.deb - Commands:
apt,apt-get,dpkg
Red Hat-based distributions (RHEL, CentOS, Fedora):
- Use YUM (Yellowdog Updater, Modified) or DNF (Dandified YUM)
- Package format:
.rpm - Commands:
yum,dnf,rpm
Creating a CentOS Container
Let's start by creating a CentOS container using Docker. Open your terminal and run:
docker run -it --name centos-lab centos:7 /bin/bash
This command:
- Creates an interactive container named
centos-lab - Uses the CentOS 7 image
- Gives you a bash shell inside the container
After running this command, your terminal prompt will change, indicating that you're now working inside the CentOS container. You can confirm this by checking the system information:
cat /etc/os-release
You should see information showing that you're using CentOS Linux.

Simulating and Diagnosing the YUM Error
In this step, we'll simulate the "sudo: yum: command not found" error and learn how to diagnose it. While CentOS typically comes with YUM pre-installed, we'll create a scenario where YUM is either missing or corrupted.
Checking YUM Installation
First, let's verify if YUM is installed in your CentOS container:
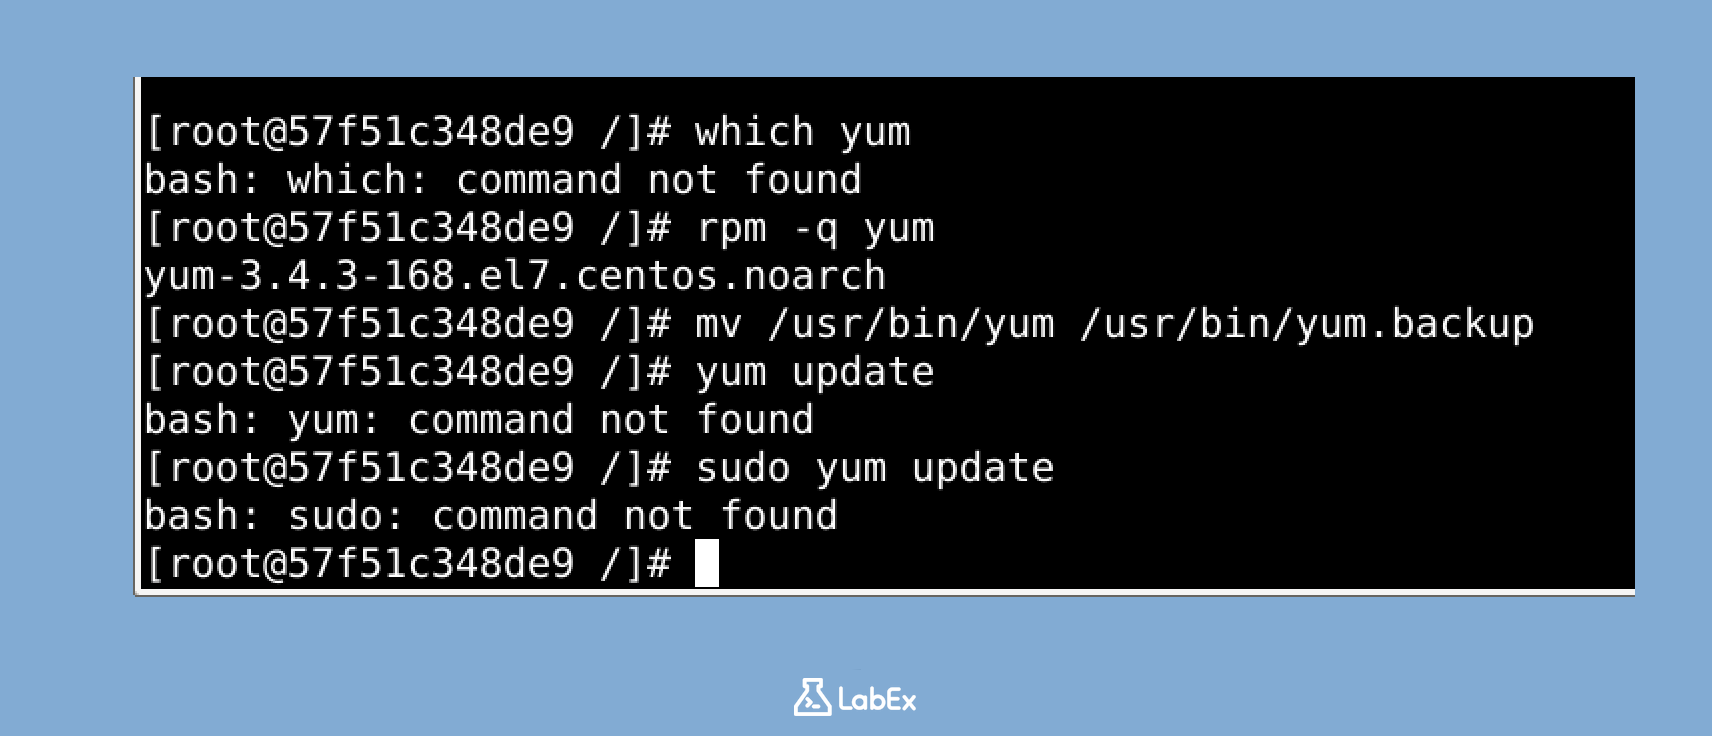
which yum
rpm -q yum
The which yum command should show the path to the YUM executable (typically /usr/bin/yum), and rpm -q yum should display the installed YUM package version.
Creating a Test Scenario
To simulate a situation where YUM is missing, let's rename the YUM executable:
mv /usr/bin/yum /usr/bin/yum.backup
Now, try to use YUM:
yum update
You should see an error message like "yum: command not found." This simulates what happens when the YUM executable is missing from the system.
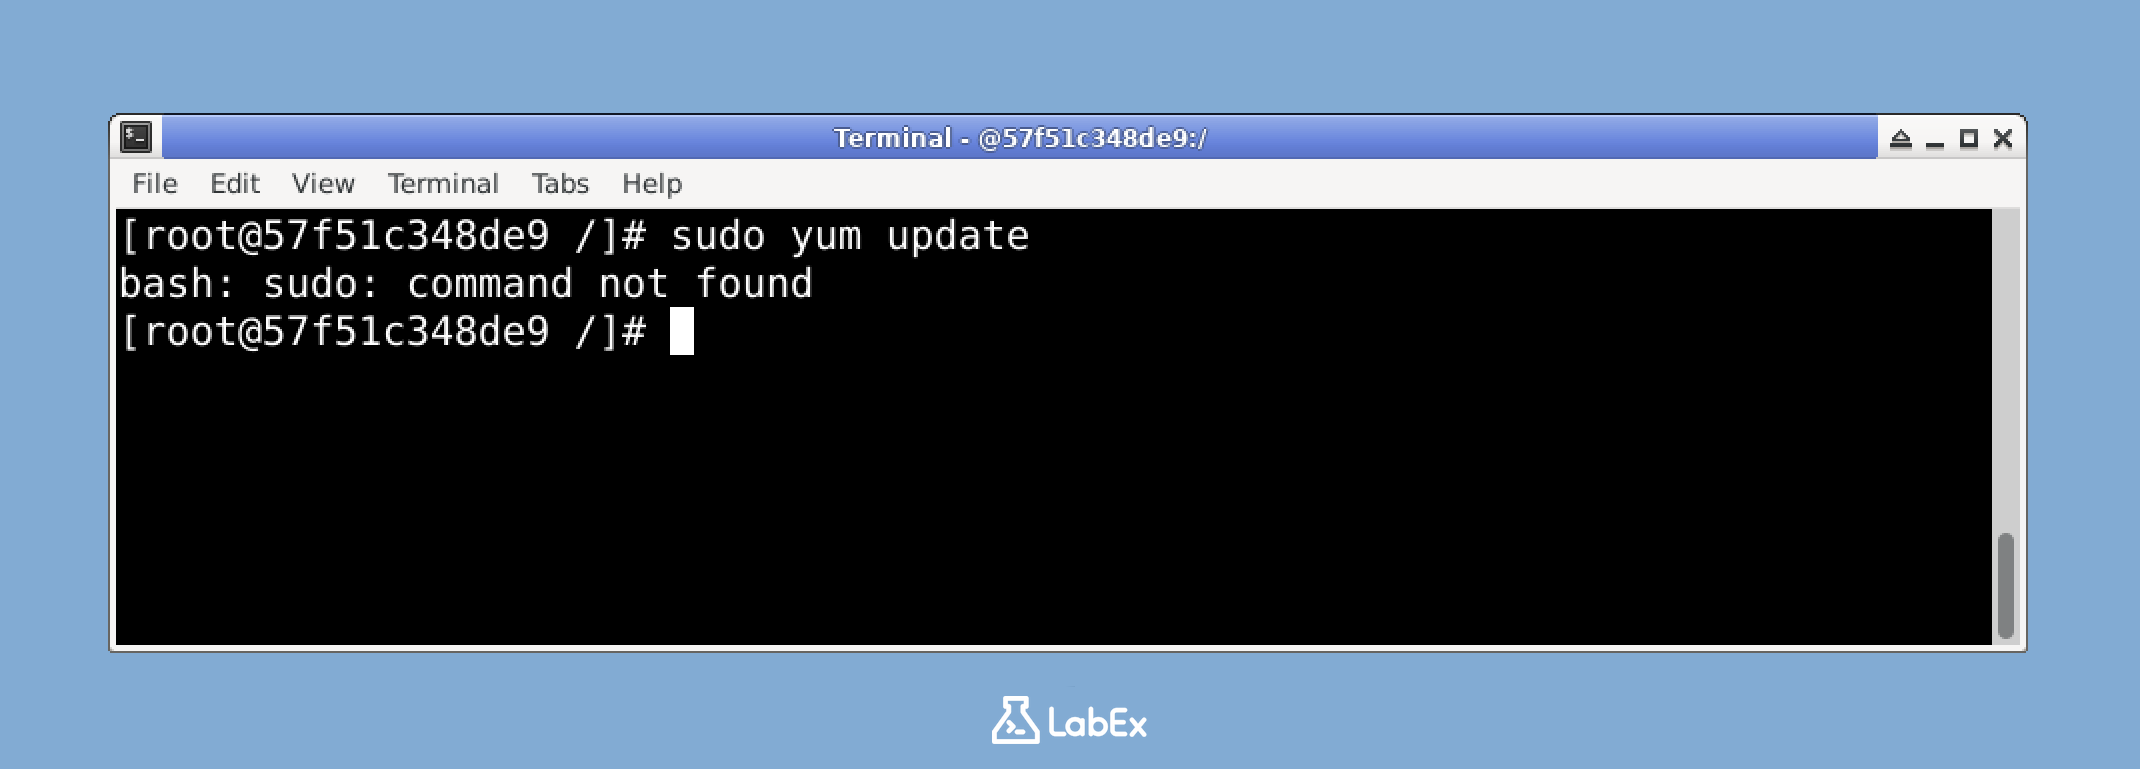
Let's also try with sudo:
sudo yum update
You will see the "sudo: yum: command not found" error, which is the focus of our troubleshooting.
Understanding the Error Causes
The "sudo: yum: command not found" error can occur for several reasons:
- The YUM package is not installed
- The YUM executable has been moved, renamed, or deleted
- The PATH environment variable doesn't include the directory containing the YUM executable
- Insufficient permissions to execute YUM
Let's check our PATH environment variable:
echo $PATH
This should display a list of directories separated by colons. Make sure /usr/bin (where YUM is typically located) is included in this list.
Resolving the Missing YUM Issue
Now that we've diagnosed the problem, let's resolve the "yum: command not found" error. There are several ways to fix this issue, depending on its root cause.
Restoring the YUM Executable
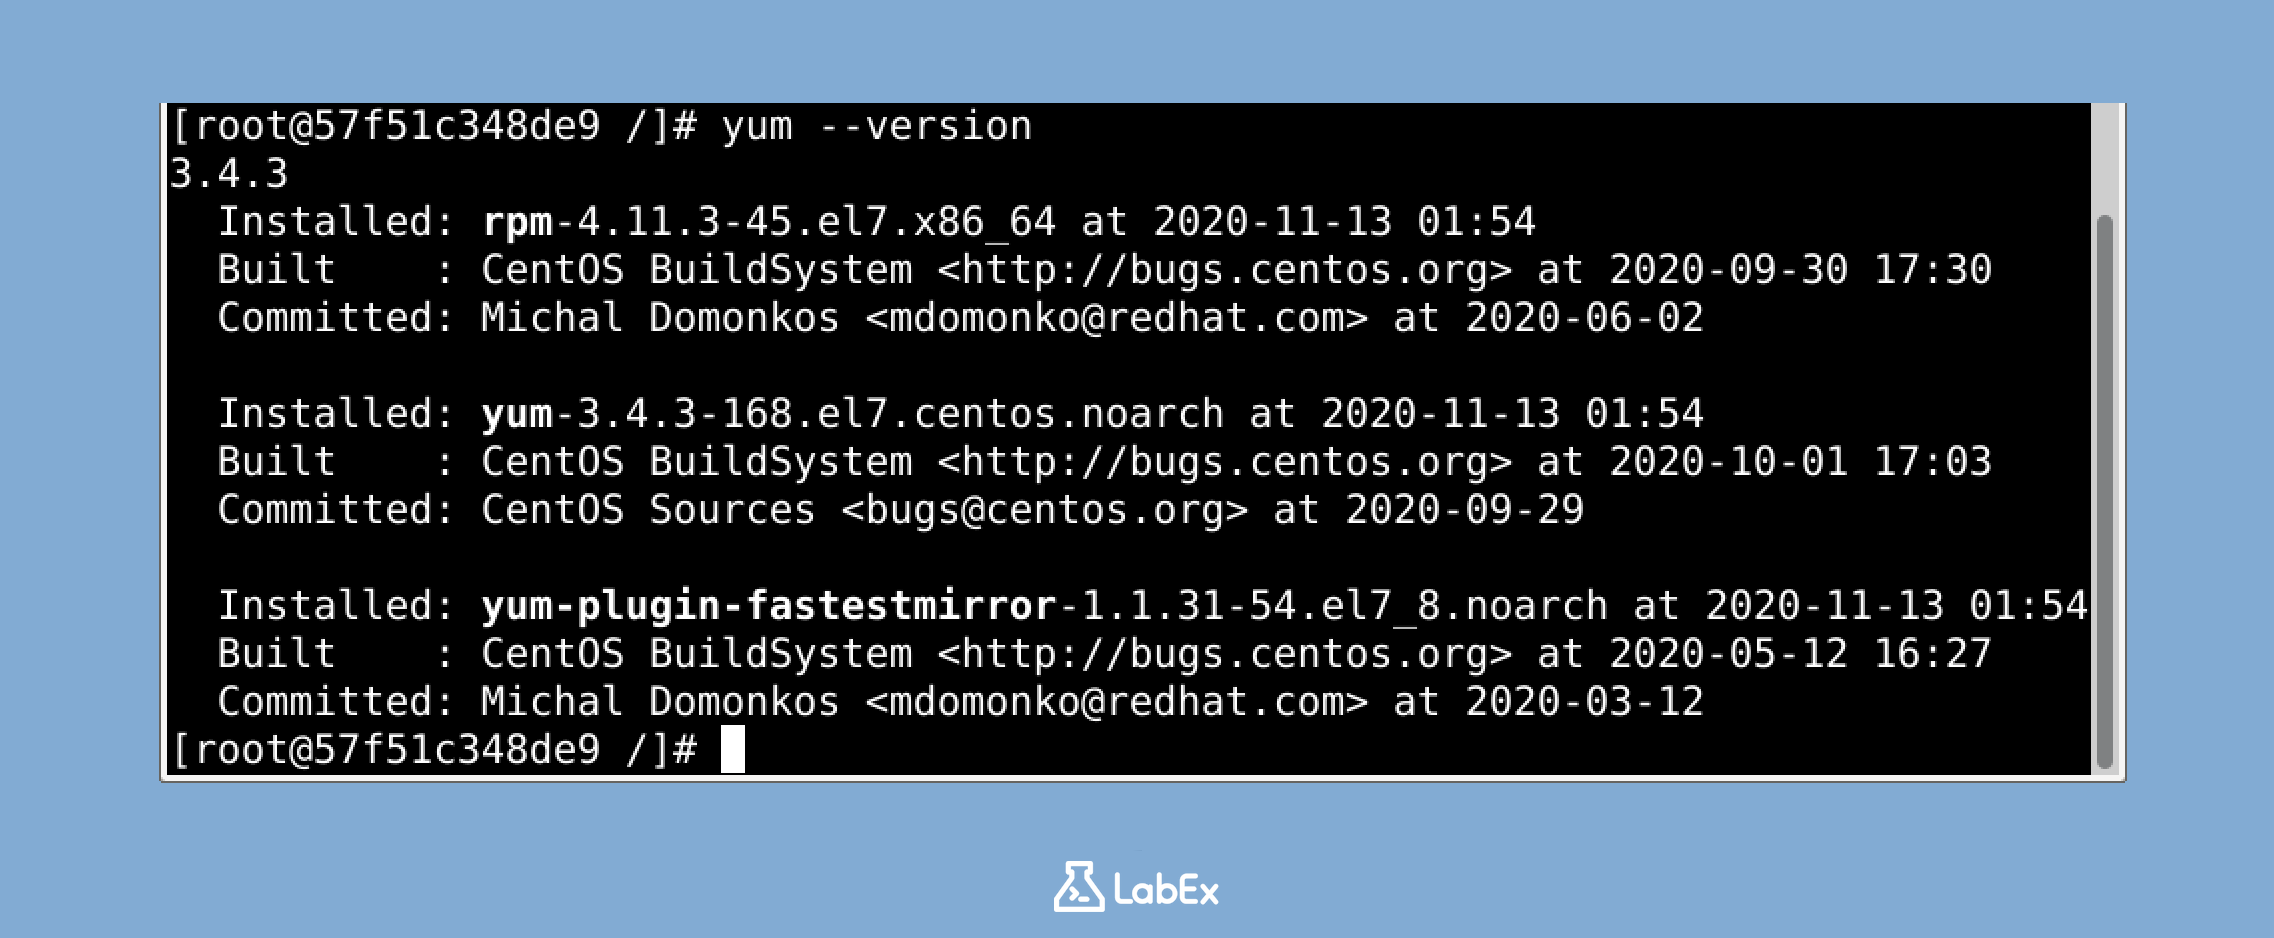
Since we renamed the YUM executable in the previous step, let's restore it to its original location:
mv /usr/bin/yum.backup /usr/bin/yum
Now verify that YUM is working again:
yum --version
You should see the YUM version information, indicating that YUM is now accessible.
Installing YUM (If Missing)
In a real scenario where YUM is completely missing, you would need to install it using RPM (Red Hat Package Manager), which is a lower-level package management tool. Here's how you could do it:
## This is for demonstration. Don't run this command since we already restored YUM
## rpm -ivh http://mirror.centos.org/centos/7/os/x86_64/Packages/yum-3.4.3-168.el7.centos.noarch.rpm
Fixing YUM Permissions
If YUM exists but has incorrect permissions, you can fix them using the chmod command:
## Check current permissions
ls -l /usr/bin/yum

## Set correct permissions if needed
chmod 755 /usr/bin/yum
The correct permissions for YUM should be 755 (readable and executable by everyone, writable only by the owner).
Updating PATH (If Needed)
If the directory containing YUM is not in your PATH, you can add it temporarily with:
export PATH=$PATH:/usr/bin
For a permanent solution, you would add this line to your shell's configuration file (like .bashrc).
Troubleshooting YUM Configuration Issues
Even with YUM properly installed, you might encounter other issues that prevent it from working correctly. Let's explore some common YUM configuration problems and how to resolve them.
Understanding YUM Configuration Files
YUM's configuration is primarily controlled by these files and directories:
- Main configuration file:
/etc/yum.conf - Repository files directory:
/etc/yum.repos.d/
Let's examine the main configuration file:
cat /etc/yum.conf
This file contains global YUM settings like the cache directory, log file location, and default options.
Checking YUM Repositories
YUM repositories are defined in files with the .repo extension in the /etc/yum.repos.d/ directory. Let's list these files:
ls -l /etc/yum.repos.d/
Now, let's examine one of the repository files:
cat /etc/yum.repos.d/CentOS-Base.repo
Each repository definition includes:
- A unique repository ID in square brackets (e.g.,
[base]) name: A descriptive namebaseurl: The URL where packages are locatedenabled: Whether the repository is active (1) or inactive (0)gpgcheck: Whether package signatures should be verified (1) or not (0)
Simulating a Repository Issue
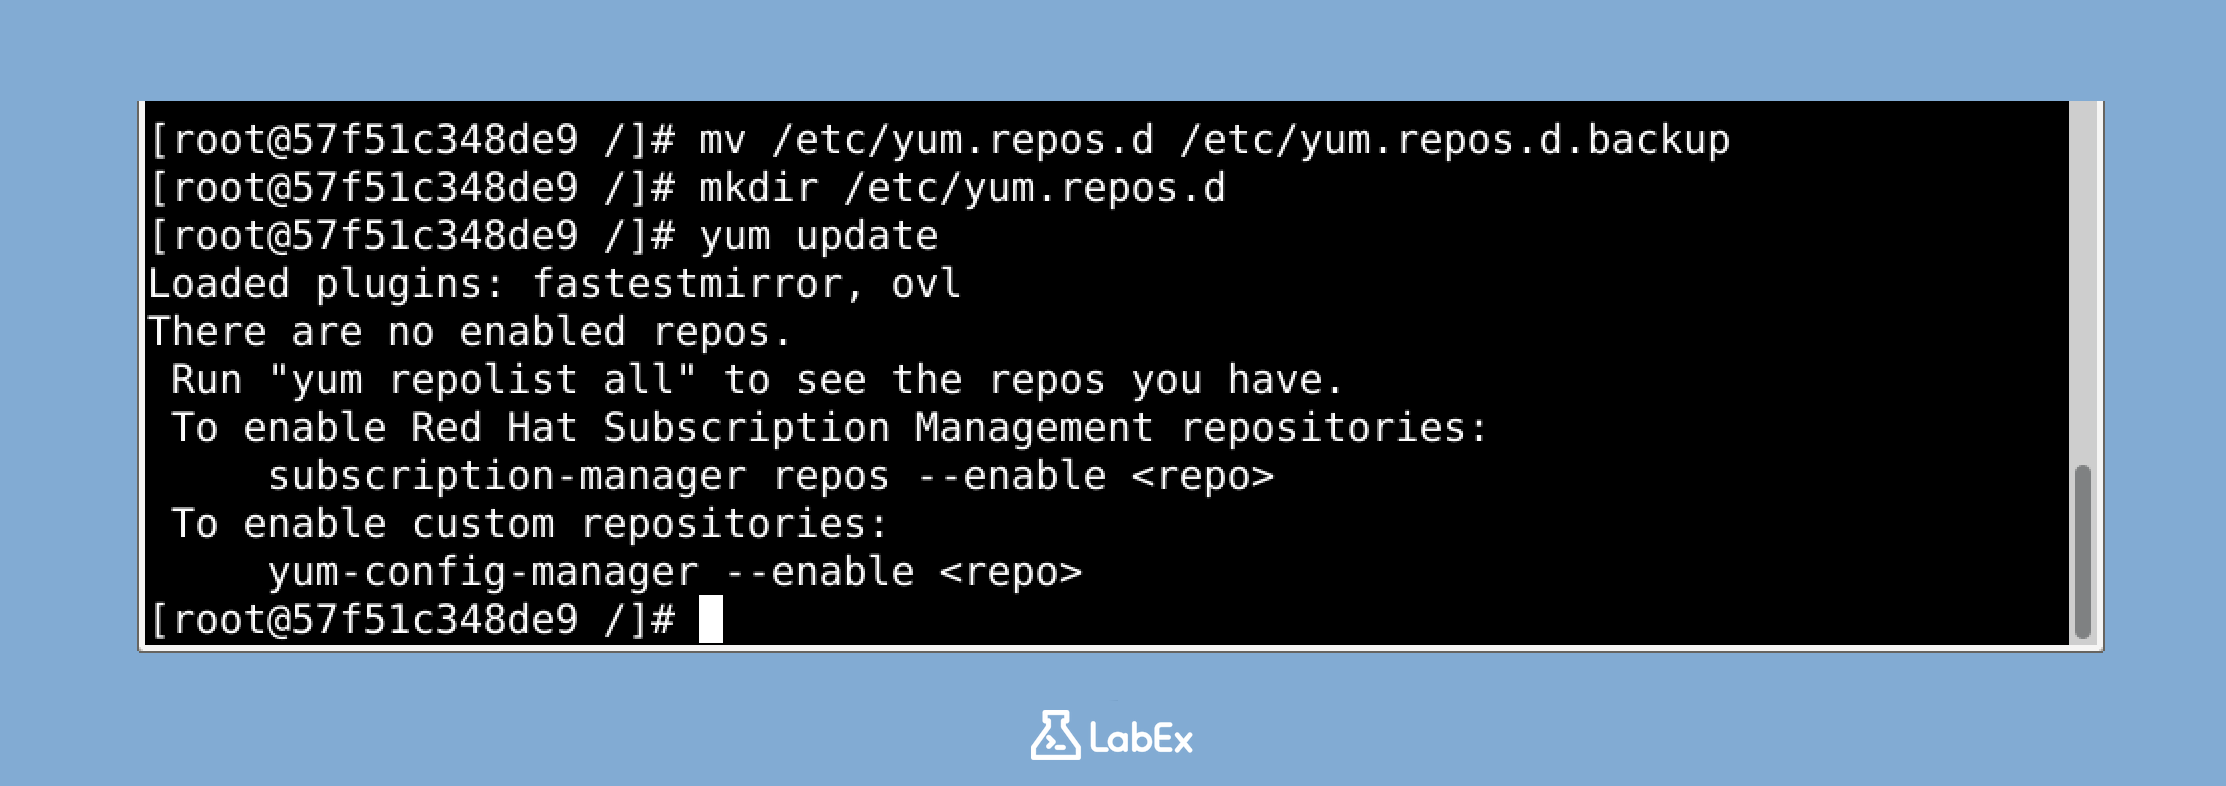
Let's simulate a repository issue by renaming the repository directory:
mv /etc/yum.repos.d /etc/yum.repos.d.backup
mkdir /etc/yum.repos.d
Now, try to use YUM:
yum update
You'll likely see an error about being unable to find any enabled repositories. This is a common issue that might prevent YUM from working even when it's properly installed.
Restoring Repository Configuration
Let's restore the repository configuration:
rm -rf /etc/yum.repos.d
mv /etc/yum.repos.d.backup /etc/yum.repos.d
Now verify that YUM works again:
yum repolist
This should list the enabled repositories on your system.
YUM Maintenance and Best Practices
Now that we've resolved various YUM issues, let's discuss best practices for maintaining a healthy package management system in CentOS or other Red Hat-based distributions.
Regular System Updates
Keeping your system updated is crucial for security and stability. Run these commands regularly:
## Update package metadata
yum check-update

## Install all available updates
yum update -y
Cleaning YUM Cache
YUM maintains a cache of package metadata and downloaded packages. Periodically cleaning this cache can help resolve issues and free up disk space:
## Clean metadata
yum clean metadata

## Clean packages
yum clean packages

## Clean everything
yum clean all

## Rebuild the cache
yum makecache
Managing YUM Plugins
YUM functionality can be extended with plugins. To list installed plugins:
yum list installed "yum-plugin-*"
Common useful plugins include:
yum-plugin-fastestmirror: Automatically select the fastest repository mirroryum-plugin-security: Filter updates by security relevanceyum-plugin-priorities: Set priorities for different repositories
Troubleshooting YUM Issues
When facing YUM problems, these commands can help diagnose issues:
## Check if repositories are accessible
yum repolist

## Show YUM history (past transactions)
yum history

## Check for package problems
yum check

## Run YUM with debug output
yum -v update
Exiting the Container
When you're finished with the lab, exit the CentOS container by typing:
exit
This will return you to your Ubuntu host system.
Summary
Congratulations on completing this lab on troubleshooting the "sudo: yum: command not found" error in Linux. In this hands-on exercise, you have:
- Set up a CentOS environment using Docker for safe experimentation
- Simulated and diagnosed the "yum: command not found" error
- Implemented various solutions to restore YUM functionality
- Explored common YUM configuration issues and their resolutions
- Learned best practices for YUM maintenance and troubleshooting
Key takeaways from this lab:
- The "yum: command not found" error can occur due to missing executables, incorrect permissions, or PATH issues
- YUM configuration is controlled by
/etc/yum.confand files in/etc/yum.repos.d/ - Regular maintenance tasks like cleaning caches and updating packages help maintain system health
- Docker provides an excellent environment for safely learning and troubleshooting Linux systems
These skills will help you maintain and troubleshoot Red Hat-based Linux systems, ensuring your package management system functions correctly for software installation and system updates.


