Introduction
In this project, we will create a simple clock animation using OpenGL and GLUT (Graphics Library Utility Toolkit). This animation will display a clock with moving clock hands to represent the current time. The clock will update in real-time, simulating the movement of the hour, minute, and second hands. We will start by setting up the project files and then proceed with the necessary code.
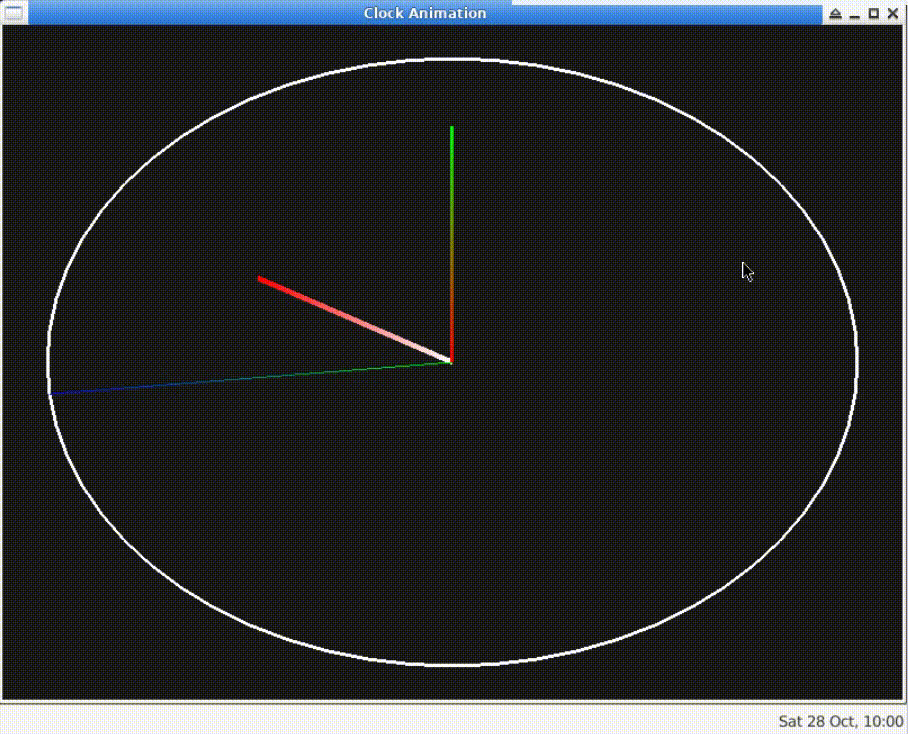
👀 Preview
🎯 Tasks
In this project, you will learn:
- How to set up the project files and libraries
- How to create the window and initialize OpenGL
- How to draw the clock background and outline
- How to rotate the clock to have the 12 o'clock position at the top
- How to get the current time and calculate the positions of the clock hands
- How to draw the hour, minute, and second hands on the clock
- How to resize the window and display the clock in real-time
🏆 Achievements
After completing this project, you will be able to:
- Set up and initialize OpenGL and GLUT
- Draw basic shapes and lines using OpenGL
- Rotate objects in OpenGL
- Retrieve the current time and use it to animate objects
- Handle window resizing and real-time display of graphics
Create the Project Files
First, run the following command in the terminal to install the OpenGL and GLUT libraries:
sudo apt update
sudo apt-get install mesa-utils freeglut3-dev -y
This will install the Mesa 3D graphics library as well as the GLUT library. After that, you can compile OpenGL programs using gcc.
Next, create a new file named clock_opengl.c and open it in your preferred code editor.
cd ~/project
touch clock_opengl.c
Include Headers and Define Variables
Next we will write the code step by step to implement this project.
#include <GL/gl.h>
#include <GL/glut.h>
#include <time.h>
#include <math.h>
#include <stdio.h>

const int WINDOW_WIDTH = 800;
const int WINDOW_HEIGHT = 600;
const int ROTATE_DEGREES = 180;
Three integer constants are defined, WINDOW_WIDTH, WINDOW_HEIGHT, and ROTATE_DEGREES. These constants are used to define the width and height of the window and the rotation Angle.
Set Up the Window and Initialize OpenGL
In this step, we will configure the window size and initialize OpenGL and GLUT.
int main(int argc, char** argv) {
    glutInit(&argc, argv);
    glutInitDisplayMode(GLUT_DOUBLE | GLUT_RGB);
    glutInitWindowSize(WINDOW_WIDTH, WINDOW_HEIGHT);
    glutCreateWindow("Clock Animation");

    glutDisplayFunc(drawClockHands);
    glutReshapeFunc(reshape);
    glutIdleFunc(idle);

    glClearColor(0.0, 0.0, 0.0, 1.0);

    glutMainLoop();

    return 0;
}
glutInit(): It is used to initialize the GLUT library.glutInitDisplayMode(): Sets the display mode of the window.GLUT_DOUBLEmeans to use double buffering, andGLUT_RGBmeans to use RGB color mode.glutInitWindowSize(): Sets the size of the window.glutCreateWindow(): Creates a window and sets the title of the window toClock Animation.glutDisplayFunc(): Set the drawing function so that thedrawClockHandsfunction is called when a graph needs to be drawn.glutReshapeFunc(): Set the callback function for window resizing, that is, when the window size changes, thereshapefunction will be called.glutIdleFunc(): Set the idle callback function, that is, theidlefunction will be called when there is no other event processing.glClearColor(0.0, 0.0, 0.0, 1.0): Set the empty color to black (RGBA color value).glutMainLoop(): Enter the main loop of GLUT, which keeps running, handling windowing events, drawing graphs, and user input.
Draw the Clock Background
Create a function called drawClockHands, We will add code to draw the clock's background, including a dark-colored circle.
void drawClockHands() {
    glClear(GL_COLOR_BUFFER_BIT);

    glBegin(GL_QUADS);
    glColor3f(0.1, 0.1, 0.1);
    glVertex2f(-1, -1);
    glVertex2f(1, -1);
    glVertex2f(1, 1);
    glVertex2f(-1, 1);
    glEnd();
}
glClear(): This function call clears the color buffer in preparation for drawing a new graph.GL_COLOR_BUFFER_BITmeans to clear the color buffer so that the contents of the previous drawing are cleared before drawing a new drawing.glBegin(): This function indicates the start of defining an element (in this case, a quadrilateral).GL_QUADSmeans we want to use quadrangles to define the graph.glColor3f(): Sets the floating point value of the current drawing color to RGB colors (red, green, blue). Here, the color is set to dark gray, with RGB values(0.1, 0.1, 0.1)representing dark gray.glVertex2f(): Define the corners of a quadrilateral.
The purpose here is to draw a dark gray rectangle in the OpenGL window as the background of the clock. The four vertices define the boundaries of the rectangle, and the code between glBegin and glEnd is used to define the appearance of the graph. This is part of drawing the clock background, which is usually drawn before other elements such as the hour hand, minute hand, second hand, etc.
Rotate the Clock
We'll add code to rotate the clock by 180 degrees to have the 12 o'clock position at the top.
// Inside the drawClockHands() function
glPushMatrix();
glRotatef(ROTATE_DEGREES, 0, 0, 1);
glPushMatrix(): This is a function in OpenGL that puts the current matrix state (usually the model view matrix) on the stack so that it can be restored later. This is a common practice because you may need to make several different matrix transformations in a drawing, and you need to ensure that subsequent transformations do not affect previous states.glRotatef(): This is another OpenGL function that does the rotation transformation. It rotates the current model view matrix byROTATE_DEGREESabout the Z axis.(0, 0, 1)is the definition of the axis of rotation, which here means rotation about the Z axis. The first value is the rotation component about the X axis, the second value is the rotation component about the Y axis, and the third value is the rotation component about the Z axis.
Draw the Clock's Outline
We will draw the clock's outline with tick marks for each hour.
// Inside the drawClockHands() function
glLineWidth(3.0);
glBegin(GL_LINE_LOOP);
for (int i = 0; i < 360; i += 6) {
    double angle = i * M_PI / 180;
    double x = 0.9 * cos(angle);
    double y = 0.9 * sin(angle);
    glColor3f(1.0, 1.0, 1.0);
    glVertex2d(x, y);
}
glEnd();
The main purpose here is to draw a white circular outline on the background of the clock, representing the outer frame of the clock. glLineWidth sets the line width, and the loop between glBegin and glEnd draws a series of points on a circle centered at the origin, which are then connected to form a closed loop, the outer outline of the clock.
Get Current Time and Calculate Clock Hands' Positions
We will retrieve the current time and calculate the positions of the clock hands: hour, minute, and second.
// Inside the drawClockHands() function
time_t rawtime;
struct tm* timeinfo;
time(&rawtime);
timeinfo = localtime(&rawtime);

int hours = timeinfo->tm_hour % 12;
int minutes = timeinfo->tm_min;
int seconds = timeinfo->tm_sec;
A variable named rawtime is defined to store the rawtime data taken from the system. time_t is a data type commonly used to represent the number of seconds in time from a specific point in time (usually January 1, 1970) to the present.
Defines a pointer to a tm structure called timeinfo. The tm structure is used to store the various components of time and date information, such as year, month, day, hour, minute, second, etc.
Use the time function to get the current system time, storing the seconds of the time in the rawtime variable. The number of seconds returned by the time function represents the number of seconds from a specific point in time (usually January 1, 1970, also known as a UNIX timestamp) to the current time.
Use the localtime function to convert the number of seconds obtained from the time function (stored in the rawtime variable) into concrete time and date information, and store the result in a timeinfo structure. The localtime function converts the number of seconds into information such as year, month, day, hour, minute, second, and so on, and stores this information in the timeinfo structure.
Gets the current number of hours from the timeinfo structure, then modulates 12 to limit the number of hours to a 12-hour scale, tm_hour indicates the hour. Gets the current number of minutes from the timeinfo structure, tm_min indicates the minute. Gets the current number of seconds from the timeinfo structure, tm_sec indicates the second.
Draw the Hour Hand
We will draw the hour hand on the clock.
// Inside the drawClockHands() function
double hourAngle = -(90 + hours * 360 / 12) + (360 / 12) * minutes / 60;
glLineWidth(5.0); // Set line width
glBegin(GL_LINES);
glVertex2d(0, 0);
glColor3f(1.0, 0.0, 0.0); // Hour hand color
glVertex2d(0.5 * cos(hourAngle * M_PI / 180), 0.5 * sin(hourAngle * M_PI / 180));
glEnd();
First, clocks are usually on a 12-hour scale, so the number of hours needs to be converted to the Angle on the clock dial. This calculation begins by mapping the number of hours from a 12-hour scale to a 360-degree angular range. The contribution of the minutes (by the position of the minute hand) is then added to the hour Angle. The resulting hourAngle represents the Angle of the hour hand with respect to the 12 o'clock direction.
Then, define an element, in this case a line segment, representing the hour hand. The starting point of the line segment is located at the coordinate (0, 0), the center of the clock. The end point of the line segment, using the trigonometric functions cos and sin to calculate the end position of the hour hand. Subsequent minute and second hands are also drawn in this way.
Draw the Minute Hand
We will add code to draw the minute hand on the clock.
// Inside the drawClockHands() function
double minuteAngle = -(90 + minutes * 360 / 60);
glLineWidth(3.0); // Set line width
glBegin(GL_LINES);
glVertex2d(0, 0);
glColor3f(0.0, 1.0, 0.0); // Minute hand color
glVertex2d(0.7 * cos(minuteAngle * M_PI / 180), 0.7 * sin(minuteAngle * M_PI / 180));
glEnd();
The clock dial is usually 60 minutes, so the number of minutes needs to be converted to the Angle on the clock dial. This calculation first maps the number of minutes to a 360 degree angular range and subtracts it by 90 degrees to correspond 0 minutes to the 12 o 'clock direction. The resulting minuteAngle represents the Angle of the minute hand with respect to the 12 o'clock direction.
Draw the Second Hand
We will add code to draw the second hand on the clock.
// Inside the drawClockHands() function
double secondAngle = -(90 + seconds * 360 / 60);
glLineWidth(1.0); // Set line width
glBegin(GL_LINES);
glVertex2d(0, 0);
glColor3f(0.0, 0.0, 1.0); // Second hand color
glVertex2d(0.9 * cos(secondAngle * M_PI / 180), 0.9 * sin(secondAngle * M_PI / 180));
glEnd();
Clocks are usually 60 seconds, so the number of seconds needs to be converted to the Angle on the clock face. This calculation first maps the number of seconds to an angular range of 360 degrees and subtracts it by 90 degrees to correspond 0 seconds to the 12 o 'clock direction. The resulting secondAngle represents the Angle of the second hand with respect to the 12 o 'clock direction.
Finally, we will restore the original rotation and display the clock animation.
// Inside the drawClockHands() function
glPopMatrix();
glutSwapBuffers();
glPopMatrix() is used to restore the previously saved matrix state, and glutSwapBuffers() is used to complete the double buffered drawing, rendering the drawn image to the screen to achieve smooth animation effects.
Window Reshape and Real-time Display
We will create a reshape function that is called when the window size changes.
void reshape(int w, int h) {
    glViewport(0, 0, w, h); // Set the OpenGL viewport for window size adjustments
    glMatrixMode(GL_PROJECTION); // Switch to projection matrix mode
    glLoadIdentity(); // Reset the current matrix
    gluOrtho2D(-1, 1, -1, 1); // Set the orthographic projection matrix
    glMatrixMode(GL_MODELVIEW); // Switch back to model-view matrix mode
}
The purpose of this reshape function is to adjust OpenGL's viewport according to the new window size when the window size changes, and set the appropriate projection matrix to ensure that the drawn graph will still display correctly under the new window size.
Next, we define a function called idle to perform some operations when the program is idle.
void idle() {
    glutPostRedisplay(); // Request a redisplay when idle
}
The purpose of this idle function is to call glutPostRedisplay() when the program is idle; To request that the contents of the window be redrawn in order to animate or update the contents of the window in real time.
Compile and Run the Project
- Open your terminal and navigate to the project directory.
cd ~/project
- Compile the code using the following command:
gcc -o clock_opengl clock_opengl.c -lGL -lglut -lGLU -lm
- Run the application:
./clock_opengl
Summary
In this project, you've learned how to create a simple clock animation using OpenGL and GLUT. We covered setting up the project files, initializing the window and OpenGL, drawing the clock background, rotating the clock, drawing the clock's outline, getting the current time, and drawing the clock hands. By following these steps, you can create a basic clock animation that displays the current time in a visually engaging manner.