Create and Build the Docker Image
Now, what if you don't have python installed locally? Don't worry! Because you don't need it. One of the advantages of using containers is that you can build python inside your containers, without having python installed on your host machine.
Create a Dockerfile but running the following command. (copy-paste the entire code block)
echo 'FROM python:3.8-alpine
RUN pip install flask
CMD ["python","app.py"]
COPY app.py /app.py' > Dockerfile
A Dockerfile lists the instructions needed to build a docker image. Let's go through the above file line by line.
FROM python:3.8-alpine
This is the starting point for your Dockerfile. Every Dockerfile must start with a FROM line that is the starting image to build your layers on top of.
In this case, we are selecting the python:3.8-alpine base layer (see Dockerfile for python3.8/alpine3.12) since it already has the version of python and pip that we need to run our application.
The alpine version means that it uses the Alpine Linux distribution, which is significantly smaller than many alternative flavors of Linux, around 8 MB in size, while a minimal installation to disk might be around 130 MB. A smaller image means it will download (deploy) much faster, and it also has advantages for security because it has a smaller attack surface. Alpine Linux is a Linux distribution based on musl and BusyBox.
Here we are using the "3.8-alpine" tag for the python image. Take a look at the available tags for the official python image on the Docker Hub. It is best practice to use a specific tag when inheriting a parent image so that changes to the parent dependency are controlled. If no tag is specified, the "latest" tag takes into effect, which is acts as a dynamic pointer that points to the latest version of an image.
For security reasons, it is very important to understand the layers that you build your docker image on top of. For that reason, it is highly recommended to only use "official" images found in the docker hub, or non-community images found in the docker-store. These images are vetted to meet certain security requirements, and also have very good documentation for users to follow. You can find more information about this python base image, as well as all other images that you can use, on the docker hub.
For a more complex application you may find the need to use aFROM image that is higher up the chain. For example, the parent Dockerfile for our python app starts with FROM alpine, then specifies a series of CMD and RUN commands for the image. If you needed more fine-grained control, you could start with FROM alpine (or a different distribution) and run those steps yourself. To start off though, I recommend using an official image that closely matches your needs.
RUN pip install flask
The RUN command executes commands needed to set up your image for your application, such as installing packages, editing files, or changing file permissions. In this case we are installing flask. The RUN commands are executed at build time, and are added to the layers of your image.
CMD ["python","app.py"]
CMD is the command that is executed when you start a container. Here we are using CMD to run our python app.
There can be only one CMD per Dockerfile. If you specify more thane one CMD, then the last CMD will take effect. The parent python:3.8-alpine also specifies a CMD (CMD python3). You can find the Dockerfile for the official python:alpine image here.
You can use the official python image directly to run python scripts without installing python on your host. But today, we are creating a custom image to include our source, so that we can build an image with our application and ship it around to other environments.
COPY app.py /app.py
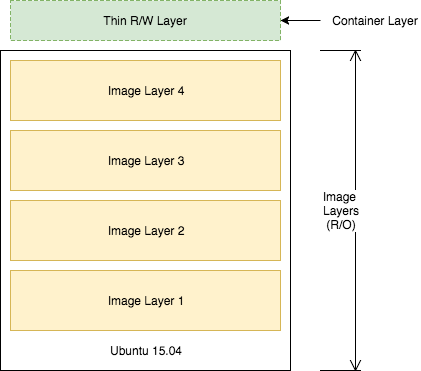
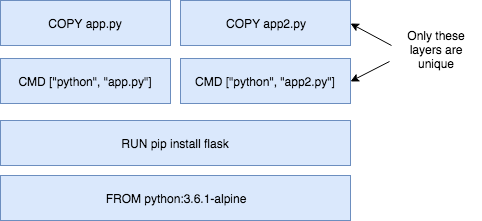
This copies the app.py in the local directory (where you will run docker image build) into a new layer of the image. This instruction is the last line in the Dockerfile. Layers that change frequently, such as copying source code into the image, should be placed near the bottom of the file to take full advantage of the Docker layer cache. This allows us to avoid rebuilding layers that could otherwise be cached. For instance, if there was a change in the FROM instruction, it would invalidate the cache for all subsequent layers of this image. We will demonstrate a this little later in this lab.
It seems counter-intuitive to put this after the CMD ["python","app.py"] line. Remember, the CMD line is executed only when the container is started, so we won't get a file not found error here.
And there you have it: a very simple Dockerfile. A full list of commands you can put into a Dockerfile can be found here. Now that we defined our Dockerfile, let's use it to build our custom docker image.
Build the docker image.
Pass in -t to name your image python-hello-world.
docker image build -t python-hello-world .
Verify that your image shows up in your image list.
docker image ls
Note that your base image python:3.8-alpine is also in your list.
You can run a history command to show the history of an image and its layers,
docker history python-hello-world
docker history python:3.8-alpine


