Racing Game Using Pygame

PythonPythonBeginner
Practice Now

Introduction

In this project, you will learn how to create a simple racing game using the Pygame library. The game involves a player car and multiple enemy cars. The player car can be moved left and right using the arrow keys, while the enemy cars move down the screen. The goal is to avoid collisions with the enemy cars for as long as possible. The game will display a game over screen when a collision occurs and allow the player to restart the game by pressing the "R" key.

👀 Preview
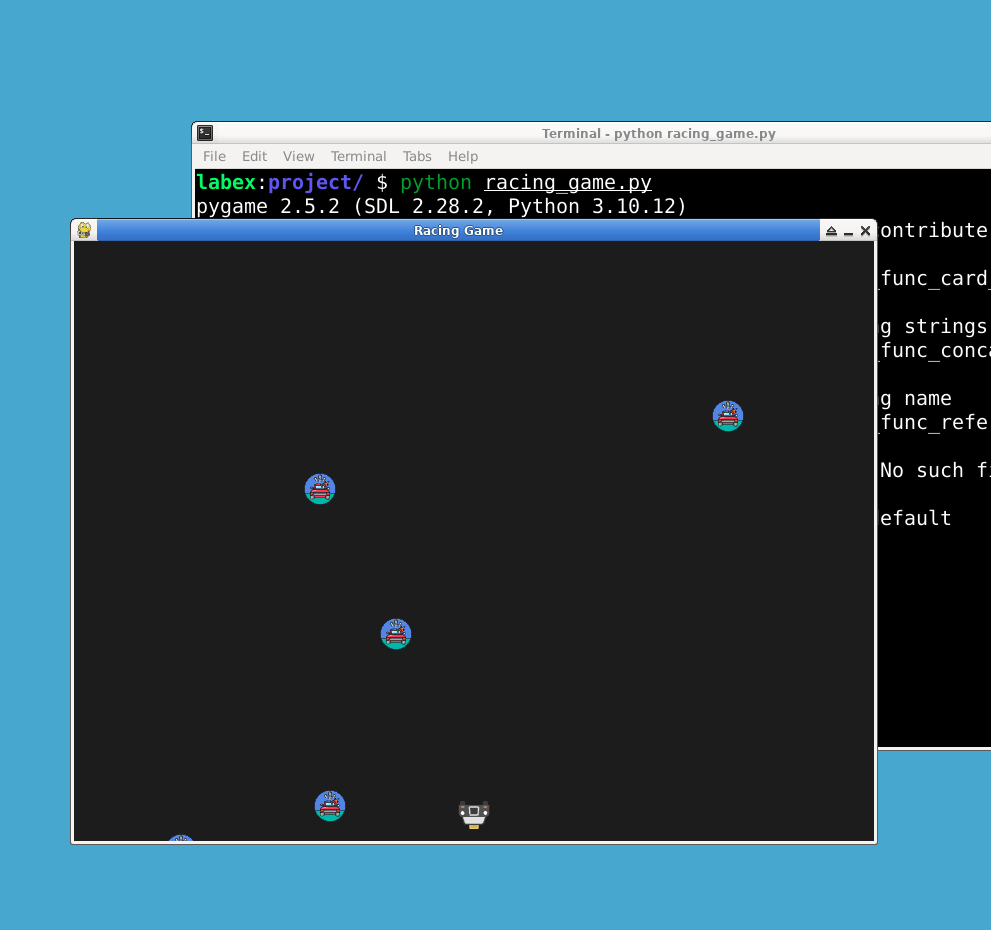
Racing Game Preview

ðŸŽŊ Tasks

In this project, you will learn:

  • How to set up the game window and import necessary libraries
  • How to define colors and load car images
  • How to define the player car
  • How to define the enemy cars
  • How to define game over variables and font
  • How to implement the game logic
  • How to display the game over screen
  • How to quit the game

🏆 Achievements

After completing this project, you will be able to:

  • Use the Pygame library to create a game window
  • Load and display images in a game
  • Handle collisions between game objects
  • Implement a game loop for continuous gameplay
  • Handle user input to control game objects
  • Display text on the screen using Pygame's font module

Create the project files

  1. Create a new file named racing_game.py.
cd ~/project
touch racing_game.py
âœĻ Check Solution and Practice

Set up the game window and import necessary libraries

import pygame
import random

## Initialize Pygame
pygame.init()

## Set up the game window
window_width = 800
window_height = 600
window = pygame.display.set_mode((window_width, window_height))
pygame.display.set_caption("Racing Game")

In this step, we import the pygame library and initialize it. Then, we set up the game window with a width of 800 pixels and a height of 600 pixels. We also set the window caption to "Racing Game".

Install the pygame library by running the following command in the terminal:

sudo pip install pygame
âœĻ Check Solution and Practice

Define colors and load car images

## Define colors
background_color = (30, 30, 30)
player_car_color = (255, 255, 255)
enemy_car_color = (255, 0, 0)
text_color = (255, 255, 255)

## Load car images
player_car_img = pygame.image.load("player_car.png").convert_alpha()
enemy_car_img = pygame.image.load("enemy_car.png").convert_alpha()

In this step, we define some colors used in the game: background_color, player_car_color, enemy_car_color, and text_color. We also load the images for the player car and enemy car using the pygame.image.load() function.

The player_car.png and enemy_car.png images are included in the ~/project directory.

âœĻ Check Solution and Practice

Define the player car

## Define the player car
player_car_width = player_car_img.get_width()
player_car_height = player_car_img.get_height()
player_car_x = window_width // 2 - player_car_width // 2
player_car_y = window_height - player_car_height - 10
player_car_speed = 5

In this step, we define the properties of the player car: player_car_width and player_car_height are set to the dimensions of the player car image. player_car_x and player_car_y represent the initial position of the player car on the screen. player_car_speed determines how fast the player car can move.

âœĻ Check Solution and Practice

Define the enemy cars

## Define the enemy cars
enemy_cars = []
num_enemy_cars = 3
enemy_car_width = 80
enemy_car_height = 160
for _ in range(num_enemy_cars):
    enemy_car_x = random.randint(0, window_width - enemy_car_width)
    enemy_car_y = random.randint(-window_height, -enemy_car_height)
    enemy_car_speed = random.randint(2, 5)
    enemy_cars.append({"x": enemy_car_x, "y": enemy_car_y, "speed": enemy_car_speed})

In this step, we define the properties of the enemy cars: enemy_cars is a list that will store the enemy car objects. num_enemy_cars determines the number of enemy cars in the game. enemy_car_width and enemy_car_height represent the dimensions of the enemy car image. We use a loop to generate random positions and speeds for each enemy car and add them to the enemy_cars list.

âœĻ Check Solution and Practice

Define game over variables and font

## Define game over variables
game_over = False
font = pygame.font.Font(None, 50)
game_over_text = font.render("Game Over", True, text_color)
restart_text = font.render("Press R to Restart", True, text_color)

In this step, we define the variables related to the game over screen: game_over is a boolean variable that indicates whether the game is over or not. font is a Pygame font object with a size of 50. We render the "Game Over" text and "Press R to Restart" text using the font and store them in the game_over_text and restart_text variables.

âœĻ Check Solution and Practice

Game loop

## Game loop
running = True
clock = pygame.time.Clock()

while running:
    for event in pygame.event.get():
        if event.type == pygame.QUIT:
            running = False
        if event.type == pygame.KEYDOWN:
            if event.key == pygame.K_r and game_over:
                game_over = False
                player_car_x = window_width // 2 - player_car_width // 2
                player_car_y = window_height - player_car_height - 10
                for enemy_car in enemy_cars:
                    enemy_car["x"] = random.randint(0, window_width - enemy_car_width)
                    enemy_car["y"] = random.randint(-window_height, -enemy_car_height)

    if not game_over:
        ## Game logic code goes here...

        ## Refresh the window
        window.fill(background_color)
        window.blit(player_car_img, (player_car_x, player_car_y))
        for enemy_car in enemy_cars:
            window.blit(enemy_car_img, (enemy_car["x"], enemy_car["y"]))
    else:
        ## Game over screen code goes here...

    pygame.display.update()
    clock.tick(60)

In this step, we set up the game loop using a while loop. The loop runs as long as the running variable is True. We handle the events such as quitting the game and restarting the game by checking the event types and keys. When the game is not over, the code inside the if not game_over block is executed, which includes the game logic and drawing the player car and enemy cars on the screen. When the game is over, the code inside the else block is executed, which displays the game over screen. Finally, we update the display and set the frame rate to 60 frames per second.

âœĻ Check Solution and Practice

Game logic code

if not game_over:
    ## Move the player car
    keys = pygame.key.get_pressed()
    if keys[pygame.K_LEFT] and player_car_x > player_car_speed:
        player_car_x -= player_car_speed
    if (
        keys[pygame.K_RIGHT]
        and player_car_x < window_width - player_car_width - player_car_speed
    ):
        player_car_x += player_car_speed

    ## Move the enemy cars
    for enemy_car in enemy_cars:
        enemy_car["y"] += enemy_car["speed"]
        if enemy_car["y"] > window_height:
            enemy_car["x"] = random.randint(0, window_width - enemy_car_width)
            enemy_car["y"] = random.randint(-window_height, -enemy_car_height)
            enemy_car["speed"] = random.randint(2, 5)

        ## Check for collision
        if player_car_y < enemy_car["y"] + enemy_car_height:
            if (
                player_car_x < enemy_car["x"] + enemy_car_width
                and player_car_x + player_car_width > enemy_car["x"]
            ):
                game_over = True

In this step, we implement the game logic code inside the game loop. We check for user input to move the player car left and right. We update the positions of the enemy cars and check if any collision has occurred between the player car and enemy cars. If a collision occurs, we set the game_over variable to True.

âœĻ Check Solution and Practice

Game over screen code

else:
    ## Game over screen
    window.fill(background_color)
    game_over_rect = game_over_text.get_rect(
        center=(window_width // 2, window_height // 2 - 50)
    )
    restart_rect = restart_text.get_rect(
        center=(window_width // 2, window_height // 2 + 50)
    )
    window.blit(game_over_text, game_over_rect)
    window.blit(restart_text, restart_rect)

In this step, we implement the game over screen code inside the game loop. We display the game over text and restart text on the screen using the window.blit() function. The text is centered on the screen using the get_rect() and center properties.

âœĻ Check Solution and Practice

Quit the game

## Quit the game
pygame.quit()

In this final step, we quit the game and close the Pygame window when the game loop exits.

Now, you can run the game using the following command:

python racing_game.py
Alt text
âœĻ Check Solution and Practice

Summary

Congratulations! You have successfully created a simple racing game using the Pygame library. The game includes a player car that can be moved left and right, as well as multiple enemy cars. The objective is to avoid collisions with the enemy cars for as long as possible. The game also features a game over screen and the ability to restart the game by pressing the "R" key. Keep practicing and experimenting to enhance your game development skills.

Other Python Tutorials you may like