
Introduction
Python virtual environments are essential tools for managing dependencies in Python projects. They create isolated spaces where you can install packages without affecting your system's global Python installation. This isolation helps prevent conflicts between different projects that might require different versions of the same package.
In this lab, you will learn how to create, activate, and deactivate Python virtual environments. These skills are fundamental for Python developers and will help you maintain clean, organized, and reproducible development environments for your projects.
Understanding and Creating Python Virtual Environments
Let's begin by understanding what Python virtual environments are and why they are important before creating one.
What is a Python Virtual Environment?
A Python virtual environment is an isolated Python interpreter installation. When you activate a virtual environment, any packages you install will be placed in that environment's private directory, not in the system-wide Python installation. This isolation provides several benefits:
- You can use different versions of the same package for different projects
- You can easily share the exact list of required packages with others
- You can keep your system Python clean and organized
Creating Your First Virtual Environment
Python 3.3 and later includes the venv module, which is the recommended tool for creating virtual environments. Let's create our first virtual environment:
First, make sure you're in the project directory:
mkdir -p ~/project/python_env_demo
cd ~/project/python_env_demo
Create a new virtual environment named
myenvby running:sudo apt-get update sudo apt-get install python3.10-venv -y python3 -m venv myenvLet's examine what was created:
ls -la myenvYou should see output similar to:
total 20
drwxrwxr-x 5 labex labex 4096 Sep 14 10:00 .
drwxrwxr-x 3 labex labex 4096 Sep 14 10:00 ..
drwxrwxr-x 2 labex labex 4096 Sep 14 10:00 bin
drwxrwxr-x 2 labex labex 4096 Sep 14 10:00 include
drwxrwxr-x 3 labex labex 4096 Sep 14 10:00 lib
-rw-rw-r-- 1 labex labex   70 Sep 14 10:00 pyvenv.cfg
The venv command created a directory called myenv with several subdirectories. The most important ones are:
bin: Contains the Python interpreter, pip, and activation scriptslib: Contains installed packages for this environmentpyvenv.cfg: Configuration file for the virtual environment
Now you have successfully created a Python virtual environment that's ready to be activated and used.
Activating a Python Virtual Environment
Now that you have created a virtual environment, you need to activate it before you can use it. Activation modifies your shell's environment variables to use the Python interpreter and packages from your virtual environment instead of the system-wide Python installation.
How to Activate a Virtual Environment
Make sure you're in the project directory:
cd ~/project/python_env_demoActivate the virtual environment by running:
source myenv/bin/activateNotice that your command prompt has changed. It now shows the name of the virtual environment in parentheses at the beginning of the prompt:
(myenv) labex:python_env_demo/ $This visual indicator helps you remember that you're working within a virtual environment.
Verifying the Activation
To confirm that your virtual environment is active and working correctly, you can check:
Which Python interpreter is being used:
which pythonYou should see output like:
/home/labex/project/python_env_demo/myenv/bin/pythonThis shows that the
pythoncommand now points to the Python interpreter in your virtual environment, not the system-wide one.Which pip (Python package installer) is being used:
which pipYou should see output like:
/home/labex/project/python_env_demo/myenv/bin/pipThis confirms that you'll install packages to your virtual environment, not to the system Python.
Check the Python version:
python --versionThe output will show the Python version being used in your virtual environment.
Now you have successfully activated your Python virtual environment. Any Python commands you run and any packages you install will use this isolated environment rather than your system's Python installation.
Installing Packages in a Virtual Environment
One of the main benefits of virtual environments is the ability to install and manage Python packages isolated from the system-wide Python installation. Let's explore how to install packages in your activated virtual environment.
Installing Packages with pip
Make sure your virtual environment is still activated. You should see
(myenv)at the beginning of your command prompt. If it's not activated, activate it with:source myenv/bin/activateLet's install a simple package called
requests, which is commonly used for making HTTP requests:pip install requestsYou'll see output showing the download and installation process.
Verify that the package was installed by checking the list of installed packages:
pip listYou should see
requestsand its dependencies in the list:Package Version ------------------ --------- certifi 2025.1.31 charset-normalizer 3.4.1 idna 3.10 pip 22.0.2 requests 2.32.3 setuptools 59.6.0 urllib3 2.3.0
Using the Installed Package
Let's create a simple Python script to test the requests package:
Open the editor and create a new file called
test_requests.pyin the~/project/python_env_demodirectory:import requests response = requests.get('https://httpbin.org/get') print(f"Status Code: {response.status_code}") print(f"Content Type: {response.headers['content-type']}") print("\nResponse Body Preview:") print(response.text[:300] + "...")Save the file and run it:
python test_requests.py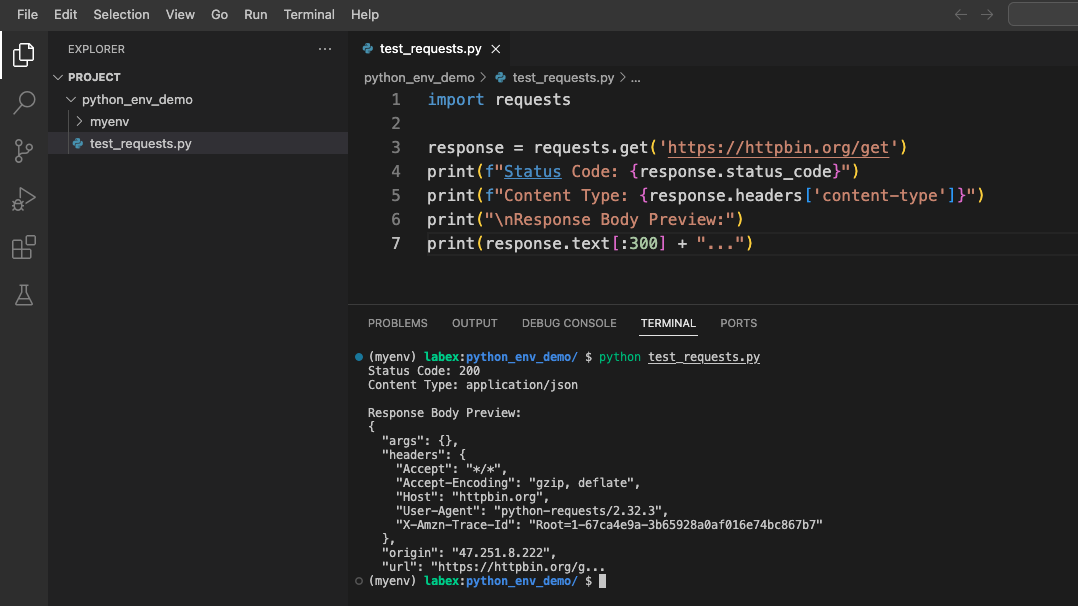
You should see output similar to:
Status Code: 200
Content Type: application/json

Response Body Preview:
{
"args": {},
"headers": {
"Accept": "_/_",
"Accept-Encoding": "gzip, deflate",
"Host": "httpbin.org",
"User-Agent": "python-requests/2.32.3",
"X-Amzn-Trace-Id": "Root=1-67ca4e9a-3b65928a0af016e74bc867b7"
},
"origin": "47.251.8.222",
"url": "https://httpbin.org/g...
This demonstrates that the requests package has been successfully installed in your virtual environment and is working correctly.
Deactivating a Python Virtual Environment
After you finish working with a virtual environment, you may want to return to the system's global Python environment. This process is called deactivation.
How to Deactivate a Virtual Environment
Make sure your virtual environment is currently activated. You should see
(myenv)at the beginning of your command prompt.To deactivate the virtual environment, simply run:
deactivateNotice that your command prompt has changed back to normal. The
(myenv)prefix has disappeared:labex:python_env_demo/ $
Verifying the Deactivation
To confirm that your virtual environment has been deactivated and you're back to using the system Python, run the following checks:
Check which Python interpreter is being used:
which python3You should see output like:
/usr/bin/python3This shows that the
python3command now points to the system-wide Python interpreter.Try running the script we created earlier:
python3 test_requests.pyDepending on whether the
requestspackage is installed in your system Python, you might see an error:Traceback (most recent call last): File "/home/labex/project/python_env_demo/test_requests.py", line 1, in <module> import requests ModuleNotFoundError: No module named 'requests'This error occurs because the
requestspackage was installed in your virtual environment, not in the system Python. This is one of the key benefits of virtual environments - isolating packages for different projects.
Reactivating the Virtual Environment
If you need to work with your project again, you can easily reactivate the virtual environment:
source myenv/bin/activate
Your command prompt will once again show (myenv), indicating that the virtual environment is active.
Common Virtual Environment Commands Summary
Here's a quick reference for the commands we've covered:
| Command | Description |
|---|---|
python3 -m venv myenv |
Create a new virtual environment named "myenv" |
source myenv/bin/activate |
Activate the virtual environment |
pip install package_name |
Install a package in the active virtual environment |
pip list |
List installed packages in the active virtual environment |
deactivate |
Deactivate the current virtual environment |
These commands form the foundation of working with Python virtual environments, allowing you to create, use, and manage isolated Python environments for your projects.
Summary
In this lab, you have learned the essential skills for working with Python virtual environments:
- Understanding the concept and benefits of virtual environments
- Creating a new virtual environment with the
venvmodule - Activating a virtual environment to isolate your Python work
- Installing packages within a virtual environment using pip
- Testing installed packages with a simple Python script
- Deactivating a virtual environment when you're done working with it
These skills form the foundation of good Python development practices. By using virtual environments, you can:
- Keep your projects' dependencies isolated from each other
- Avoid conflicts between different versions of packages
- Make your projects more reproducible and easier to share
- Maintain a clean and organized Python development environment
Virtual environments are an essential tool for Python developers of all levels, from beginners to experts. As you continue your Python journey, using virtual environments will become a natural part of your development workflow.


