Building a Network Scanner in Python

PythonPythonBeginner
Practice Now

Introduction

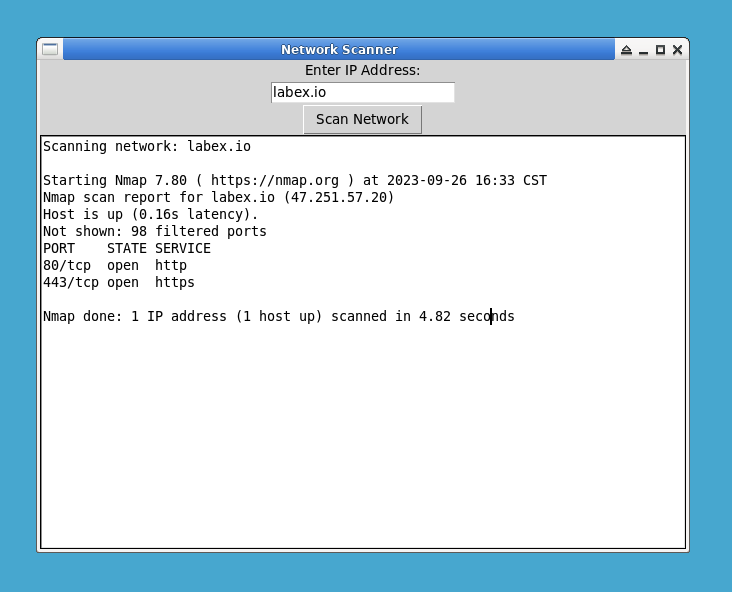
In this project, you will learn how to build a network scanner using Python. The network scanner will utilize the nmap command-line tool to scan a specified IP address and display the results in a graphical user interface (GUI) using the Tkinter library.
Alt text

ðŸŽŊ Tasks

In this project, you will learn:

  • How to set up the project and install necessary libraries
  • How to import necessary libraries for GUI and executing the nmap command-line tool
  • How to define a scanning function to retrieve the user-entered IP address and scan the network
  • How to create the main window of the GUI
  • How to add an input field for the IP address and a "Scan Network" button
  • How to create a text area to display the scan results
  • How to run the project and perform network scanning

🏆 Achievements

After completing this project, you will be able to:

  • Set up a Python project and install libraries
  • Import libraries and use them in a Python script
  • Create a GUI using Tkinter
  • Handle user input and trigger functions
  • Use the nmap command-line tool for network scanning

Set up the project

Create a new Python file and name it network_scanner.py. Open the file in a code editor of your choice.

cd ~/project
touch network_scanner.py

Then, install the nmap, tkinter, and python-nmap command-line tool using the following command:

sudo apt-get install nmap -y
sudo apt-get install python3-tk -y
sudo pip install python-nmap
âœĻ Check Solution and Practice

Import necessary libraries

At the beginning of the file, import the required libraries: tkinter for GUI and subprocess for executing the nmap command-line tool.

import tkinter as tk
import subprocess
âœĻ Check Solution and Practice

Define the scanning function

Define a function called scan_network that will be triggered when the "Scan Network" button is clicked. This function will retrieve the IP address entered by the user, clear the result text area, and execute the nmap command to scan the network.

def scan_network():
    ip_address = entry_ip.get()
    result_text.delete(1.0, tk.END)
    result_text.insert(tk.END, f"Scanning network: {ip_address}\n\n")

    try:
        output = subprocess.check_output(["nmap", "-F", ip_address])
        result_text.insert(tk.END, output.decode("utf-8"))
    except subprocess.CalledProcessError:
        result_text.insert(tk.END, "An error occurred while scanning the network.")
âœĻ Check Solution and Practice

Create the main window

Create the main window of the GUI using the Tk() class from Tkinter.

window = tk.Tk()
window.title("Network Scanner")
âœĻ Check Solution and Practice

Add input field and scan button

Create a label and an entry field for the user to enter the IP address. Then, create a "Scan Network" button that will call the scan_network function when clicked.

label_ip = tk.Label(window, text="Enter IP Address:")
label_ip.pack()
entry_ip = tk.Entry(window)
entry_ip.pack()
scan_button = tk.Button(window, text="Scan Network", command=scan_network)
scan_button.pack()
âœĻ Check Solution and Practice

Add result text area

Create a text area using the Text() class from Tkinter. This text area will display the scan results.

result_text = tk.Text(window)
result_text.pack()
âœĻ Check Solution and Practice

Start the main loop

Add the following line at the end of the file to start the main loop of the GUI:

window.mainloop()
âœĻ Check Solution and Practice

Run the project

Save the file and run it using a Python interpreter. The GUI window will appear.

cd ~/project
python network_scanner.py

Enter the IP address you want to scan in the input field and click the "Scan Network" button. The network scan will be performed using nmap, and the results will be displayed in the text area.

Alt text
âœĻ Check Solution and Practice

Summary

In this project, you have learned how to build a network scanner in Python using the Tkinter library. The network scanner utilizes the nmap command-line tool to scan a specified IP address. The results are displayed in a graphical user interface, allowing users to easily perform network scans and view the output. You can further enhance the network scanner by adding more features and improving the user interface according to your requirements.

Other Python Tutorials you may like