Custom Form Validation with Vue.js

JavaScriptJavaScriptBeginner
Practice Now

Introduction

In this project, you will learn how to implement a custom form validator using Vue.js. The custom form validator allows you to validate form fields and check the validity of the data before the user submits the form.

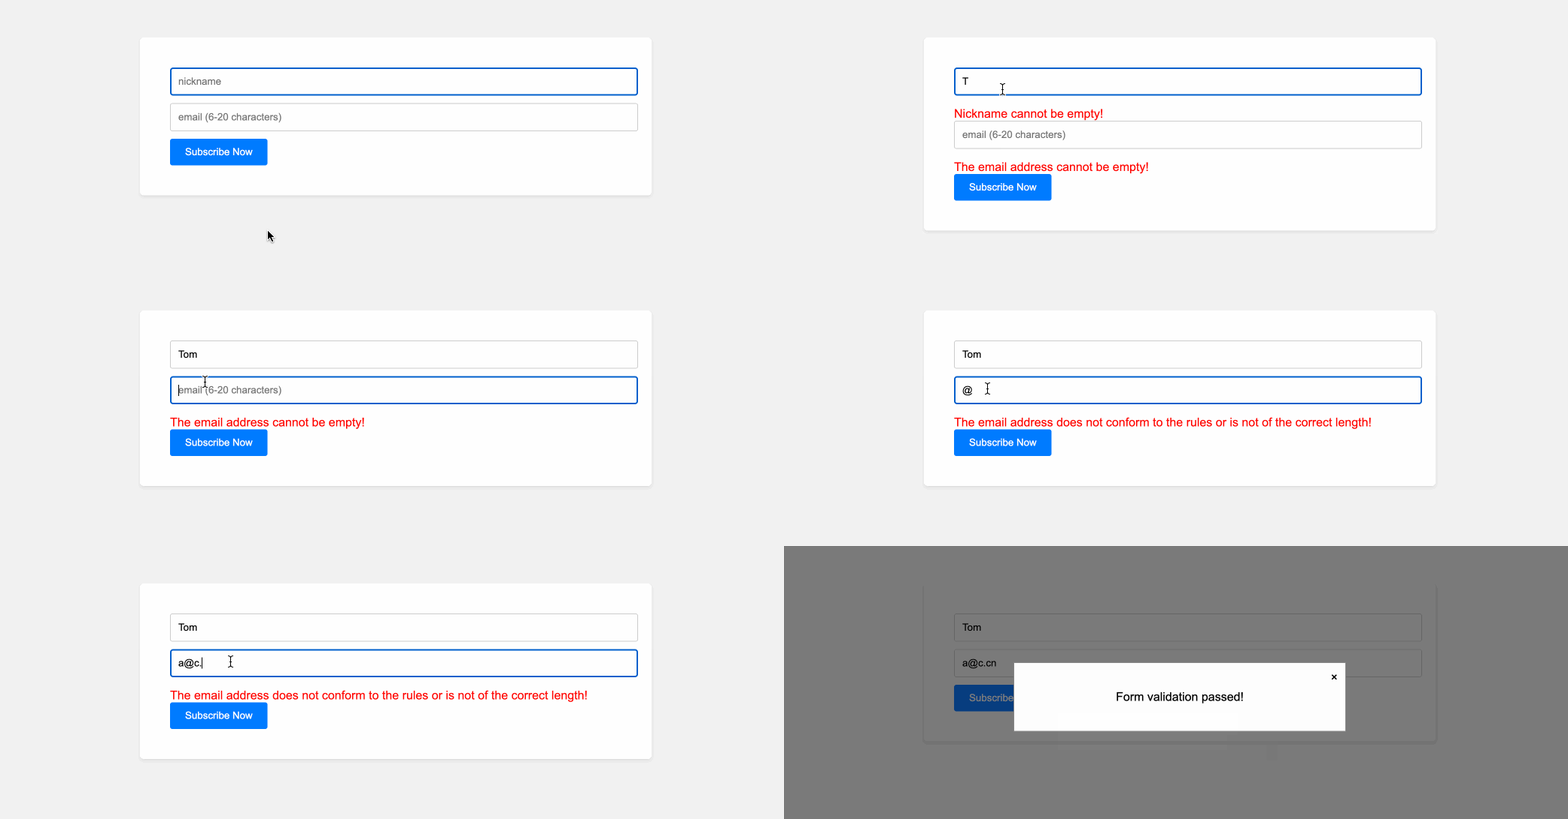
๐Ÿ‘€ Preview

Form validation demo animation

๐ŸŽฏ Tasks

In this project, you will learn:

  • How to implement the FormInput component to update the v-model value of the component when the value of the input field changes.
  • How to implement the is_email function to validate the email address based on specific rules.
  • How to implement the validateForm function to validate the form data based on the defined validation rules.

๐Ÿ† Achievements

After completing this project, you will be able to:

  • Create a custom form validator in Vue.js.
  • Validate form fields using custom validation rules.
  • Handle form validation errors and display them to the user.
Skills Graph

%%%%{init: {'theme':'neutral'}}%%%% flowchart RL javascript(("`JavaScript`")) -.-> javascript/BasicConceptsGroup(["`Basic Concepts`"]) javascript(("`JavaScript`")) -.-> javascript/AdvancedConceptsGroup(["`Advanced Concepts`"]) javascript(("`JavaScript`")) -.-> javascript/DOMManipulationGroup(["`DOM Manipulation`"]) javascript/BasicConceptsGroup -.-> javascript/variables("`Variables`") javascript/BasicConceptsGroup -.-> javascript/cond_stmts("`Conditional Statements`") javascript/BasicConceptsGroup -.-> javascript/functions("`Functions`") javascript/BasicConceptsGroup -.-> javascript/str_manip("`String Manipulation`") javascript/AdvancedConceptsGroup -.-> javascript/error_handle("`Error Handling`") javascript/DOMManipulationGroup -.-> javascript/dom_select("`DOM Selection`") javascript/DOMManipulationGroup -.-> javascript/dom_manip("`DOM Manipulation`") javascript/DOMManipulationGroup -.-> javascript/event_handle("`Event Handling`") javascript/DOMManipulationGroup -.-> javascript/dom_traverse("`DOM Traversal`") subgraph Lab Skills javascript/variables -.-> lab-445733{{"`Custom Form Validation with Vue.js`"}} javascript/cond_stmts -.-> lab-445733{{"`Custom Form Validation with Vue.js`"}} javascript/functions -.-> lab-445733{{"`Custom Form Validation with Vue.js`"}} javascript/str_manip -.-> lab-445733{{"`Custom Form Validation with Vue.js`"}} javascript/error_handle -.-> lab-445733{{"`Custom Form Validation with Vue.js`"}} javascript/dom_select -.-> lab-445733{{"`Custom Form Validation with Vue.js`"}} javascript/dom_manip -.-> lab-445733{{"`Custom Form Validation with Vue.js`"}} javascript/event_handle -.-> lab-445733{{"`Custom Form Validation with Vue.js`"}} javascript/dom_traverse -.-> lab-445733{{"`Custom Form Validation with Vue.js`"}} end

Set Up the Project Structure

In this step, you will set up the project files and structure. Follow the steps below to complete this step:

Open the project folder. The directory structure is as follows:

โ”œโ”€โ”€ components
โ”‚   โ”œโ”€โ”€ FormInput.js
โ”‚   โ””โ”€โ”€ FormValidator.js
โ”œโ”€โ”€ css
โ”œโ”€โ”€ index.html
โ”œโ”€โ”€ js
โ”‚   โ””โ”€โ”€ util.js
โ””โ”€โ”€ lib
    โ””โ”€โ”€ vue.global.js

Where:

  • index.html is the main page.
  • css is the folder for storing project styles.
  • lib is the folder for storing project dependencies.
  • components/FormInput.js is the input component.
  • components/FormValidator.js is the form validator component.
  • js/util.js is the utility function required by the project.

Click on Go Live button in the bottom right corner of WebIDE, to run the project.

Next, open "Web 8080" on the top of the VM and manually refresh it to see the page.

Implement the FormInput Component

In this step, you will learn how to implement the FormInput component to update the v-model value of the component in index.html when the value of the input field changes.

  1. Open the FormInput.js file located in the components directory.

  2. In the setup function of the FormInput component, find the TODO section for objective 1.

  3. Implement the code to trigger an event to update the v-model value of the component when the value of the input field (with the class form-input) changes.

    watch(inputValue, (newValue) => {
      emit("update:modelValue", newValue);
    });

    This code uses the watch function to observe changes to the inputValue reactive variable. When the value changes, it emits an event with the new value to update the v-model binding in the parent component.

  4. Save the changes to the FormInput.js file.

Implement the is_email Function

In this step, you will learn how to implement the is_email function in the util.js file to validate the email address.

  1. Open the util.js file located in the js directory.

  2. In the is_email function, find the TODO section for objective 2.

  3. Implement the logic to validate the email address based on the provided requirements:

    • The email address must be between 6 and 20 characters long.
    • The email address must consist of a username part and a domain part, separated by the @ symbol.
    • The username part must be at least 1 character long and can contain digits or letters.
    • The domain part must contain a . in the middle, and the part before the . must be at least 1 character long, while the part after the . must be 2 to 4 letters.

    Here's an example implementation:

    const is_email = (val) => {
      const emailRegex = /^[a-zA-Z0-9]+@[a-zA-Z0-9]+.[a-zA-Z]{2,4}$/;
      return emailRegex.test(val);
    };
  4. Save the changes to the util.js file.

Implement the validateForm Function

In this step, you will learn how to implement the validateForm function in the FormValidator.js file to validate the form data.

  1. Open the FormValidator.js file located in the components directory.

  2. In the validateForm function, find the TODO section for objective 3.

  3. Implement the logic to validate the form data based on the provided formRules object. The validation should follow these rules:

    1. If the nickname field is empty, add an error message to the errors object with the key "nickname".
    2. For the email field:
    • If the field is empty, add an error message to the errors object with the key "email".
    • If the email address does not conform to the rules or is not within the correct length range, add an error message to the errors object with the key "email".

    Here's an example implementation:

    const validateForm = () => {
      return new Promise((resolve, reject) => {
        errors.value = {}; // Clear the previous error message
    
        // Validate nickname
        try {
          props.rules.nickname.map((item) => {
            item?.validator(null, props.formData.nickname, (err) => {
              if (err) {
                throw "nickname|" + err.message;
              }
            });
          });
        } catch (e) {
          const parseErr = e.split("|"),
            errKey = parseErr[0],
            errValue = parseErr[1];
          errors.value[errKey] = errValue;
        }
    
        // Validate email
        try {
          props.rules.email.map((item) => {
            if (item?.required) {
              if (props.formData.email == "") throw "email|" + item.message;
            }
            if (item?.type) {
              if (!validateByType(item.type, props.formData.email))
                throw "email|" + item.message;
              if (props.formData.email.length < 6) throw "email|" + item.message;
              if (props.formData.email.length > 20)
                throw "email|" + item.message;
            }
          });
        } catch (e) {
          const parseErr = e.split("|"),
            errKey = parseErr[0],
            errValue = parseErr[1];
          errors.value[errKey] = errValue;
        }
    
        if (hasErrors.value) {
          resolve(false); // Error exists, validation failed
        } else {
          resolve(true);
        }
    
        emit("valid", errors.value);
      });
    };
  4. Save the changes to the FormValidator.js file.

Congratulations! You have now completed the implementation of the custom form validator. You can now test the application by running the project and interacting with the form. The completed effect is as follows:

Completed Effect
โœจ Check Solution and Practice

Summary

Congratulations! You have completed this project. You can practice more labs in LabEx to improve your skills.

Other JavaScript Tutorials you may like