Cyber IPv6 Network Monitoring Essentials

Cyber SecurityCyber SecurityBeginner
Practice Now

Introduction

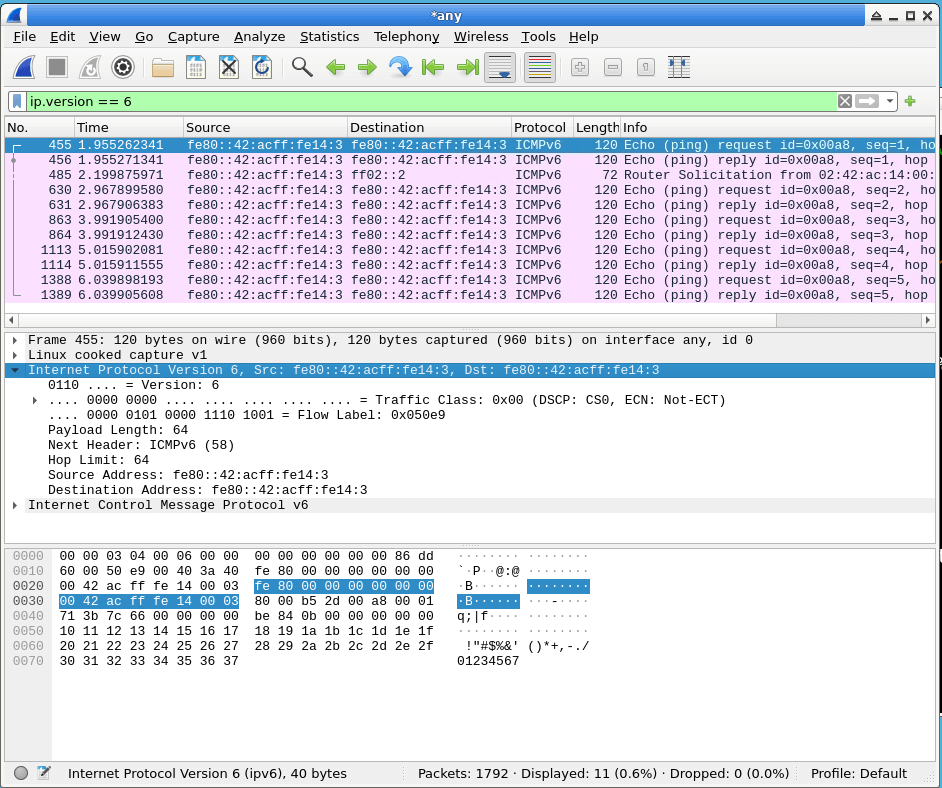
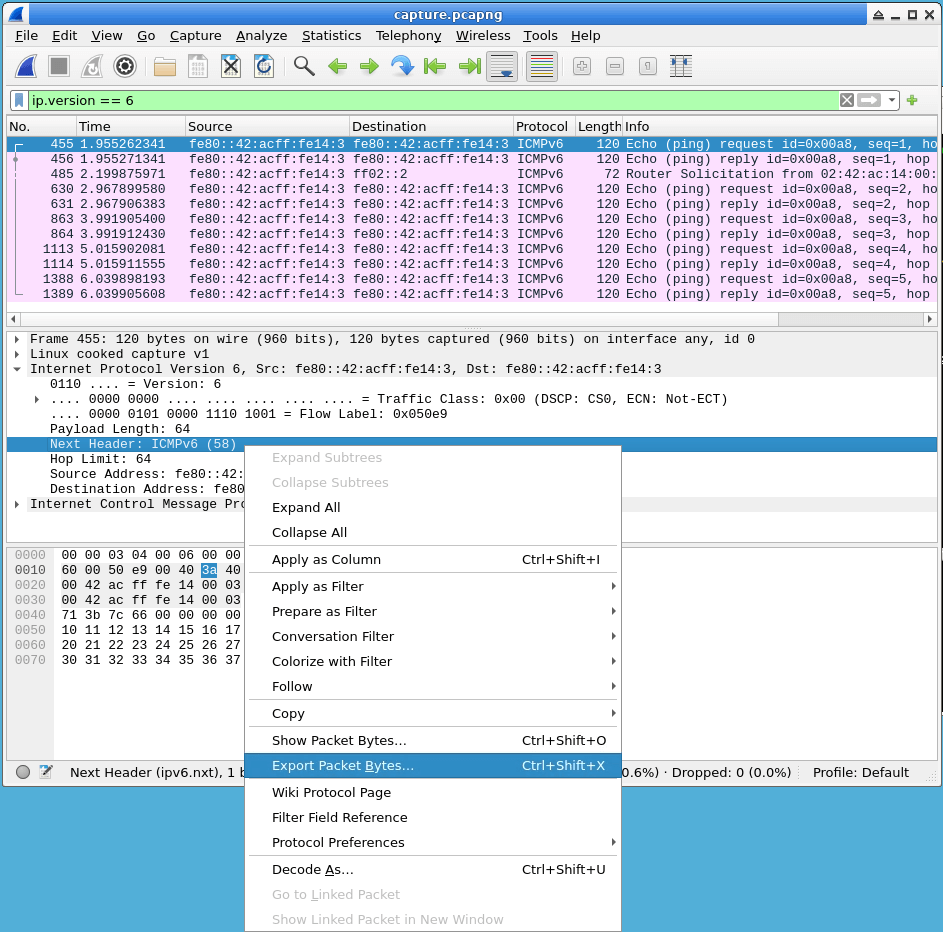
In this lab, you will learn how to use Wireshark, a powerful network protocol analyzer, to capture and analyze IPv6 network traffic. IPv6 is the next-generation Internet Protocol that provides a larger address space and improved security features over its predecessor, IPv4. With the increasing adoption of IPv6, it is essential for cybersecurity professionals to understand how to monitor and troubleshoot IPv6 networks using tools like Wireshark.


Skills Graph

%%%%{init: {'theme':'neutral'}}%%%% flowchart RL cysec(("`Cyber Security`")) -.-> cysec/WiresharkGroup(["`Wireshark`"]) cysec/WiresharkGroup -.-> cysec/ws_ipv6_support("`Wireshark IPv6 Support`") subgraph Lab Skills cysec/ws_ipv6_support -.-> lab-288915{{"`Cyber IPv6 Network Monitoring Essentials`"}} end

Capturing IPv6 Traffic

In this step, you will learn how to capture IPv6 network traffic using Wireshark.

  1. Before you begin, open a terminal window and navigate to the directory /home/labex/project/ and you will find a script named enable_ipv6.sh. Run the script using the following command:

    sudo /home/labex/project/enable_ipv6.sh

    This script will enable IPv6 on your Linux machine by configuring the network interfaces and routing tables.

  2. Now, open Wireshark on your Linux machine. You can do this by running the wireshark command in your terminal.

  3. Next, select any network interface to capture traffic. This is typically the interface connected to your network or the internet. You can select the interface by clicking on the interface list in the Capture Options dialog box.

    Once you have selected the interface, make sure the Capture Filter field is empty (or set to ip if you want to capture both IPv4 and IPv6 traffic).

    Click the Start button to begin capturing packets.

  4. To generate some IPv6 traffic, you can ping your own IPv6 address in a new terminal window.

    Find the IPv6 address of the interface eth1:

    ip addr show dev eth1 | sed -e 's/^.*inet6 \([^ ]*\)\/.*$/\1/;t;d' | awk 'length($0) > 8' | sort | tail -n 1

    Use ping6 to ping the IPv6 address wich you found in the previous command.
    For example, if the IPv6 address is fe80::42:acff:fe14:3, you can ping it using the following command:

    ping6 fe80::42:acff:fe14:3%eth1

    After capturing some traffic, stop the capture by clicking the Stop button in Wireshark.

  5. You should now see the captured IPv6 packets in the Wireshark main window.

Filtering and Analyzing IPv6 Traffic

In this step, you will learn how to filter and analyze the captured IPv6 traffic using Wireshark's powerful filtering and analysis capabilities.

  1. To filter the captured traffic to show only IPv6 packets, enter the following filter expression in the filter toolbar:

    ip.version == 6

    This will display only the IPv6 packets in the main window.

  2. Wireshark provides a wealth of information about each captured packet. To view the details of a particular packet, select the packet in the main window, and the detailed information will be displayed in the bottom panes.

    The Packet Details pane shows the protocol structure of the packet, with each protocol layer expanded to reveal its fields and values. The Packet Bytes pane displays the raw packet data in both hex and ASCII formats.

  3. To view the IPv6 header information for a particular packet, expand the Internet Protocol Version 6 section in the Packet Details pane. Here, you can see fields such as the source and destination IPv6 addresses, traffic class, flow label, and hop limit.
    IPv6 Header Information

  4. To save the captured packets to a file, go to File > Save As and save the file in a location of your choice (e.g., /home/labex/project/capture.pcapng).

Examining IPv6 Extension Headers

In this step, you will learn how to examine the different types of IPv6 extension headers and their purposes.

  1. IPv6 extension headers are used to carry additional information or options beyond what is included in the base IPv6 header. Some common extension headers include:

    • Hop-by-Hop Options Header: Carries optional information that must be examined by every node along the packet's delivery path.
    • Routing Header: Specifies the path that the packet should follow through the network.
    • Fragment Header: Used for fragmentation and reassembly of IPv6 packets.
    • Authentication Header (AH): Provides data integrity, authentication, and anti-replay protection for IPv6 packets.
    • Encapsulating Security Payload (ESP) Header: Provides confidentiality, data integrity, and authentication for IPv6 packets.
  2. To examine the extension headers in a captured packet, follow these steps:

    • Select the packet in the main Wireshark window.
    • Expand the Internet Protocol Version 6 section in the Packet Details pane.
    • Look for the Next Header or Protocol field, which indicates the type of extension header present.
    • Expand the extension header section to view its contents and fields.
  3. For example, if the Next Header value is 58 (ICMPv6), you can expand the Internet Control Message Protocol v6 section to see the ICMPv6 header fields.

    Wireshark provides detailed descriptions and explanations for each extension header field, which can help you better understand their purposes and analyze the packet contents.

  4. At last, to prove you have completed this step, right-click on the Next Header field in the Packet Details pane and select Export Packet Bytes.
    Export Packet Bytes

    Save the exported packet bytes to a file named extension_header.txt in the /home/labex/project/ directory.
    Export Packet Bytes

Summary

In this lab, you learned how to use Wireshark to capture, filter, and analyze IPv6 network traffic. You started by capturing IPv6 packets and then applied filters to display only the relevant traffic. You also explored the various IPv6 header fields and extension headers, which carry additional information and options.

Understanding how to work with IPv6 traffic in Wireshark is essential for cybersecurity professionals, as it allows them to monitor and troubleshoot IPv6 networks effectively. By completing this lab, you have gained valuable hands-on experience in using Wireshark for IPv6 analysis, which will aid you in your cybersecurity endeavors.

Other Cyber Security Tutorials you may like