
Introduction
In this lab, students will learn how to create comprehensive HTML form elements using various input types. The lab provides a structured approach to understanding form tag attributes, implementing different input elements, and exploring form design techniques. Participants will gain hands-on experience with text inputs, radio buttons, checkboxes, file uploads, and submit buttons, developing essential web development skills for creating interactive and user-friendly web forms.
The lab covers key concepts such as form tag configuration, input type variations, and practical implementation strategies. By working through step-by-step exercises, learners will understand how to structure forms, define input attributes, and create dynamic user interaction elements that are crucial for collecting and processing user data in web applications.
Understand Form Tag and Its Basic Attributes
In this step, you'll learn about HTML form tags and their basic attributes. Forms are essential for collecting user input on web pages, allowing interaction between users and websites.
Let's start by creating a basic HTML form in the WebIDE. Open a new file in the ~/project directory and name it form_basics.html.
touch ~/project/form_basics.html
<!doctype html>
<html lang="en">
  <head>
    <meta charset="UTF-8" />
    <title>HTML Form Basics</title>
  </head>
  <body>
    <form action="/submit" method="post">
      <!-- Form elements will be added here -->
    </form>
  </body>
</html>
The <form> tag has two key attributes:
action: Specifies where the form data will be sent when submittedmethod: Defines how data is sent (typically "get" or "post")
Let's break down the form attributes:
action="/submit": This would typically be a server-side endpoint that processes the form datamethod="post": Sends form data in the request body, more secure for sensitive information
Example output of a basic form structure:
<form action="/submit" method="post">
  <!-- Form will look like this when rendered -->
</form>
Common form attributes include:
name: Identifies the formid: Unique identifier for the formtarget: Specifies where to display the responseenctype: Specifies how form data should be encoded
If you render the form in a browser, it will not display any visible content yet. The form structure is the foundation for adding interactive elements like text inputs, radio buttons, and more.
Implement Text Input Elements
In this step, you'll learn about different types of text input elements in HTML forms. We'll continue working with the form_basics.html file created in the previous step.
Text inputs are fundamental form elements that allow users to enter various types of text-based information. Let's explore different input types:
Open your ~/project/form_basics.html file and update the form with various text input elements:
<form action="/submit" method="post">
  <!-- Single-line text input -->
  <label for="username">Username:</label>
  <input
    type="text"
    id="username"
    name="username"
    placeholder="Enter your username"
  />

  <!-- Email input -->
  <label for="email">Email:</label>
  <input type="email" id="email" name="email" placeholder="Enter your email" />

  <!-- Password input -->
  <label for="password">Password:</label>
  <input
    type="password"
    id="password"
    name="password"
    placeholder="Enter your password"
  />

  <!-- Number input -->
  <label for="age">Age:</label>
  <input type="number" id="age" name="age" min="0" max="120" />

  <!-- Multiline text input -->
  <label for="comments">Comments:</label>
  <textarea
    id="comments"
    name="comments"
    rows="4"
    cols="50"
    placeholder="Enter your comments"
  ></textarea>
</form>
Key attributes for text inputs:
type: Defines the type of input (text, email, password, number)id: Unique identifier for the inputname: Name used when submitting form dataplaceholder: Hint text shown before user inputminandmax: Limits for number inputsrowsandcols: Dimensions for textarea
Example output when rendered in a browser:
Notes: Learn more about How to preview HTML files in the WebIDE.

Create Radio and Checkbox Selection Elements
In this step, you'll learn how to create radio buttons and checkboxes in HTML forms. These input types are crucial for allowing users to make selections from predefined options.
Open your ~/project/form_basics.html file and add the following radio and checkbox elements:
<form action="/submit" method="post">
  <!-- Radio Button Group -->
  <fieldset>
    <legend>Select Your Favorite Programming Language:</legend>
    <input type="radio" id="python" name="language" value="python" />
    <label for="python">Python</label>

    <input type="radio" id="javascript" name="language" value="javascript" />
    <label for="javascript">JavaScript</label>

    <input type="radio" id="java" name="language" value="java" />
    <label for="java">Java</label>
  </fieldset>

  <!-- Checkbox Group -->
  <fieldset>
    <legend>Select Your Skills:</legend>
    <input type="checkbox" id="html" name="skills" value="html" />
    <label for="html">HTML</label>

    <input type="checkbox" id="css" name="skills" value="css" />
    <label for="css">CSS</label>

    <input type="checkbox" id="javascript" name="skills" value="javascript" />
    <label for="javascript">JavaScript</label>
  </fieldset>
</form>
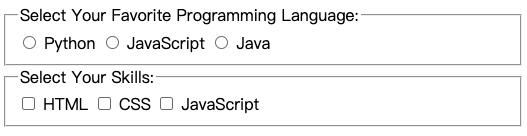
Key points about radio buttons and checkboxes:
- Radio buttons (
type="radio") allow only one selection in a group - Checkboxes (
type="checkbox") allow multiple selections nameattribute groups related inputs togethervalueattribute defines the submitted value<fieldset>and<legend>help organize and label input groups
Example output when rendered in a browser:
Add File Upload and Submit Buttons
In this step, you'll learn how to add file upload inputs and submit buttons to your HTML form. These elements are essential for allowing users to upload files and submit form data.
Open your ~/project/form_basics.html file and add the following elements:
<form action="/submit" method="post" enctype="multipart/form-data">
  <!-- Previous form elements from previous steps -->

  <!-- File Upload Input -->
  <fieldset>
    <legend>Upload Your Profile Picture:</legend>
    <input type="file" id="profile-pic" name="profile-pic" accept="image/*" />
  </fieldset>

  <!-- Submit and Reset Buttons -->
  <div>
    <input type="submit" value="Submit Form" />
    <input type="reset" value="Clear Form" />
  </div>
</form>
Key points about file upload and submit buttons:
type="file"creates a file upload inputaccept="image/*"limits file selection to imagesenctype="multipart/form-data"is required for file uploadstype="submit"creates a button to send form datatype="reset"clears all form inputs
Example output when rendered in a browser:

Important attributes:
accept: Specifies allowed file typesvalue: Sets the text on buttonsname: Identifies the input when submitted
Practice Form Element Combinations
In this final step, you'll create a comprehensive registration form that combines all the HTML form elements you've learned. We'll design a user registration form that demonstrates the practical application of various input types.
Create a new file ~/project/registration_form.html with the following content:
<!doctype html>
<html lang="en">
  <head>
    <meta charset="UTF-8" />
    <title>User Registration Form</title>
  </head>
  <body>
    <form action="/register" method="post" enctype="multipart/form-data">
      <h2>User Registration</h2>

      <!-- Personal Information -->
      <fieldset>
        <legend>Personal Details</legend>
        <label for="fullname">Full Name:</label>
        <input type="text" id="fullname" name="fullname" required />

        <label for="email">Email:</label>
        <input type="email" id="email" name="email" required />

        <label for="age">Age:</label>
        <input type="number" id="age" name="age" min="18" max="100" />
      </fieldset>

      <!-- Account Preferences -->
      <fieldset>
        <legend>Account Preferences</legend>
        <label>Preferred Programming Language:</label>
        <input type="radio" id="python" name="language" value="python" />
        <label for="python">Python</label>

        <input
          type="radio"
          id="javascript"
          name="language"
          value="javascript"
        />
        <label for="javascript">JavaScript</label>

        <label>Skills:</label>
        <input type="checkbox" id="web" name="skills" value="web" />
        <label for="web">Web Development</label>

        <input type="checkbox" id="data" name="skills" value="data" />
        <label for="data">Data Science</label>
      </fieldset>

      <!-- Profile Picture -->
      <fieldset>
        <legend>Profile Picture</legend>
        <input type="file" id="profile" name="profile" accept="image/*" />
      </fieldset>

      <!-- Additional Comments -->
      <fieldset>
        <legend>Additional Information</legend>
        <label for="comments">Comments:</label>
        <textarea id="comments" name="comments" rows="4" cols="50"></textarea>
      </fieldset>

      <!-- Form Submission -->
      <div>
        <input type="submit" value="Register" />
        <input type="reset" value="Clear Form" />
      </div>
    </form>
  </body>
</html>
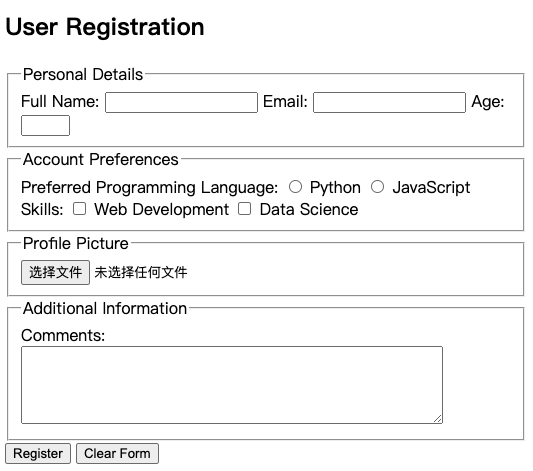
Key features of this combined form:
- Multiple input types (text, email, number, radio, checkbox)
- File upload
- Textarea for additional comments
- Submit and reset buttons
- Fieldsets for organizing form sections
- Required and optional fields
Example output when rendered in a browser:
Summary
In this lab, participants learned the fundamentals of creating HTML forms by exploring essential form elements and attributes. The lab guided students through understanding form tag structures, with a focus on key attributes like action and method, which define how form data is processed and transmitted. Participants practiced creating basic form layouts and implementing various input types, including text inputs, radio buttons, checkboxes, and file upload elements.
The hands-on approach allowed learners to develop practical skills in designing interactive web forms, covering critical aspects such as input element configuration, form submission methods, and user interaction design. By progressively building form components, students gained insights into structuring user-friendly and functional web interfaces using standard HTML form techniques.


