
Introduction
In this lab, you will learn how to use Wireshark, a powerful network protocol analyzer, to capture and analyze IPv6 network traffic. IPv6, the next-generation Internet Protocol, offers a larger address space and enhanced security features compared to IPv4.
As IPv6 adoption grows, it's crucial for cybersecurity professionals to know how to monitor and troubleshoot IPv6 networks using tools like Wireshark. This hands - on lab will give you practical experience in IPv6 traffic monitoring applicable in real - world network environments.
Capturing IPv6 Traffic
In this step, we'll focus on capturing IPv6 network traffic. IPv6 is the latest version of the Internet Protocol, designed to address the limitations of IPv4, such as the exhaustion of available IP addresses. To capture and observe the IPv6 packets traveling through your network interfaces, we'll use Wireshark, a powerful and widely-used network protocol analyzer. It allows you to see the details of network traffic, which is essential for network monitoring and troubleshooting.
Enabling IPv6 on Your System
Before we can start capturing IPv6 traffic, we need to make sure that IPv6 is enabled on your system. This is because if IPv6 is disabled, your system won't be able to send or receive IPv6 packets, and we won't be able to capture any relevant traffic.
Open a terminal window. You can do this by clicking on the terminal icon in the taskbar or by pressing
Ctrl+Alt+T. The terminal is a command-line interface where you can enter commands to interact with your system.Navigate to the project directory. This is where the script to enable IPv6 is located. Use the following command:
cd /home/labex/project/The
cdcommand stands for "change directory". It allows you to move from one directory to another in your file system.Run the script to enable IPv6 on your system. Use the following command:
sudo ./enable_ipv6.shThe
sudocommand is used to run commands with administrative privileges. The./indicates that the script is located in the current directory. This script enables IPv6 functionality on your Linux machine by configuring the network interfaces and making sure IPv6 is not disabled in the system settings.Expected output:
net.ipv6.conf.all.disable_ipv6 = 0
net.ipv6.conf.default.disable_ipv6 = 0
net.ipv6.conf.lo.disable_ipv6 = 0
These lines indicate that IPv6 is enabled for all network interfaces, the default interface, and the loopback interface respectively.
Starting Wireshark and Configuring Capture
Now that IPv6 is enabled, we can start Wireshark and configure it to capture network traffic.
Launch Wireshark by running the following command in your terminal:
wireshark &The
&symbol at the end of the command runs Wireshark in the background. This means that you can continue using the terminal while Wireshark is running.When Wireshark opens, you'll see a list of available network interfaces. These are the physical or virtual connections through which your system can send and receive network traffic. Look for the interface labeled
any. Selecting this interface allows Wireshark to capture packets from all network interfaces on your system.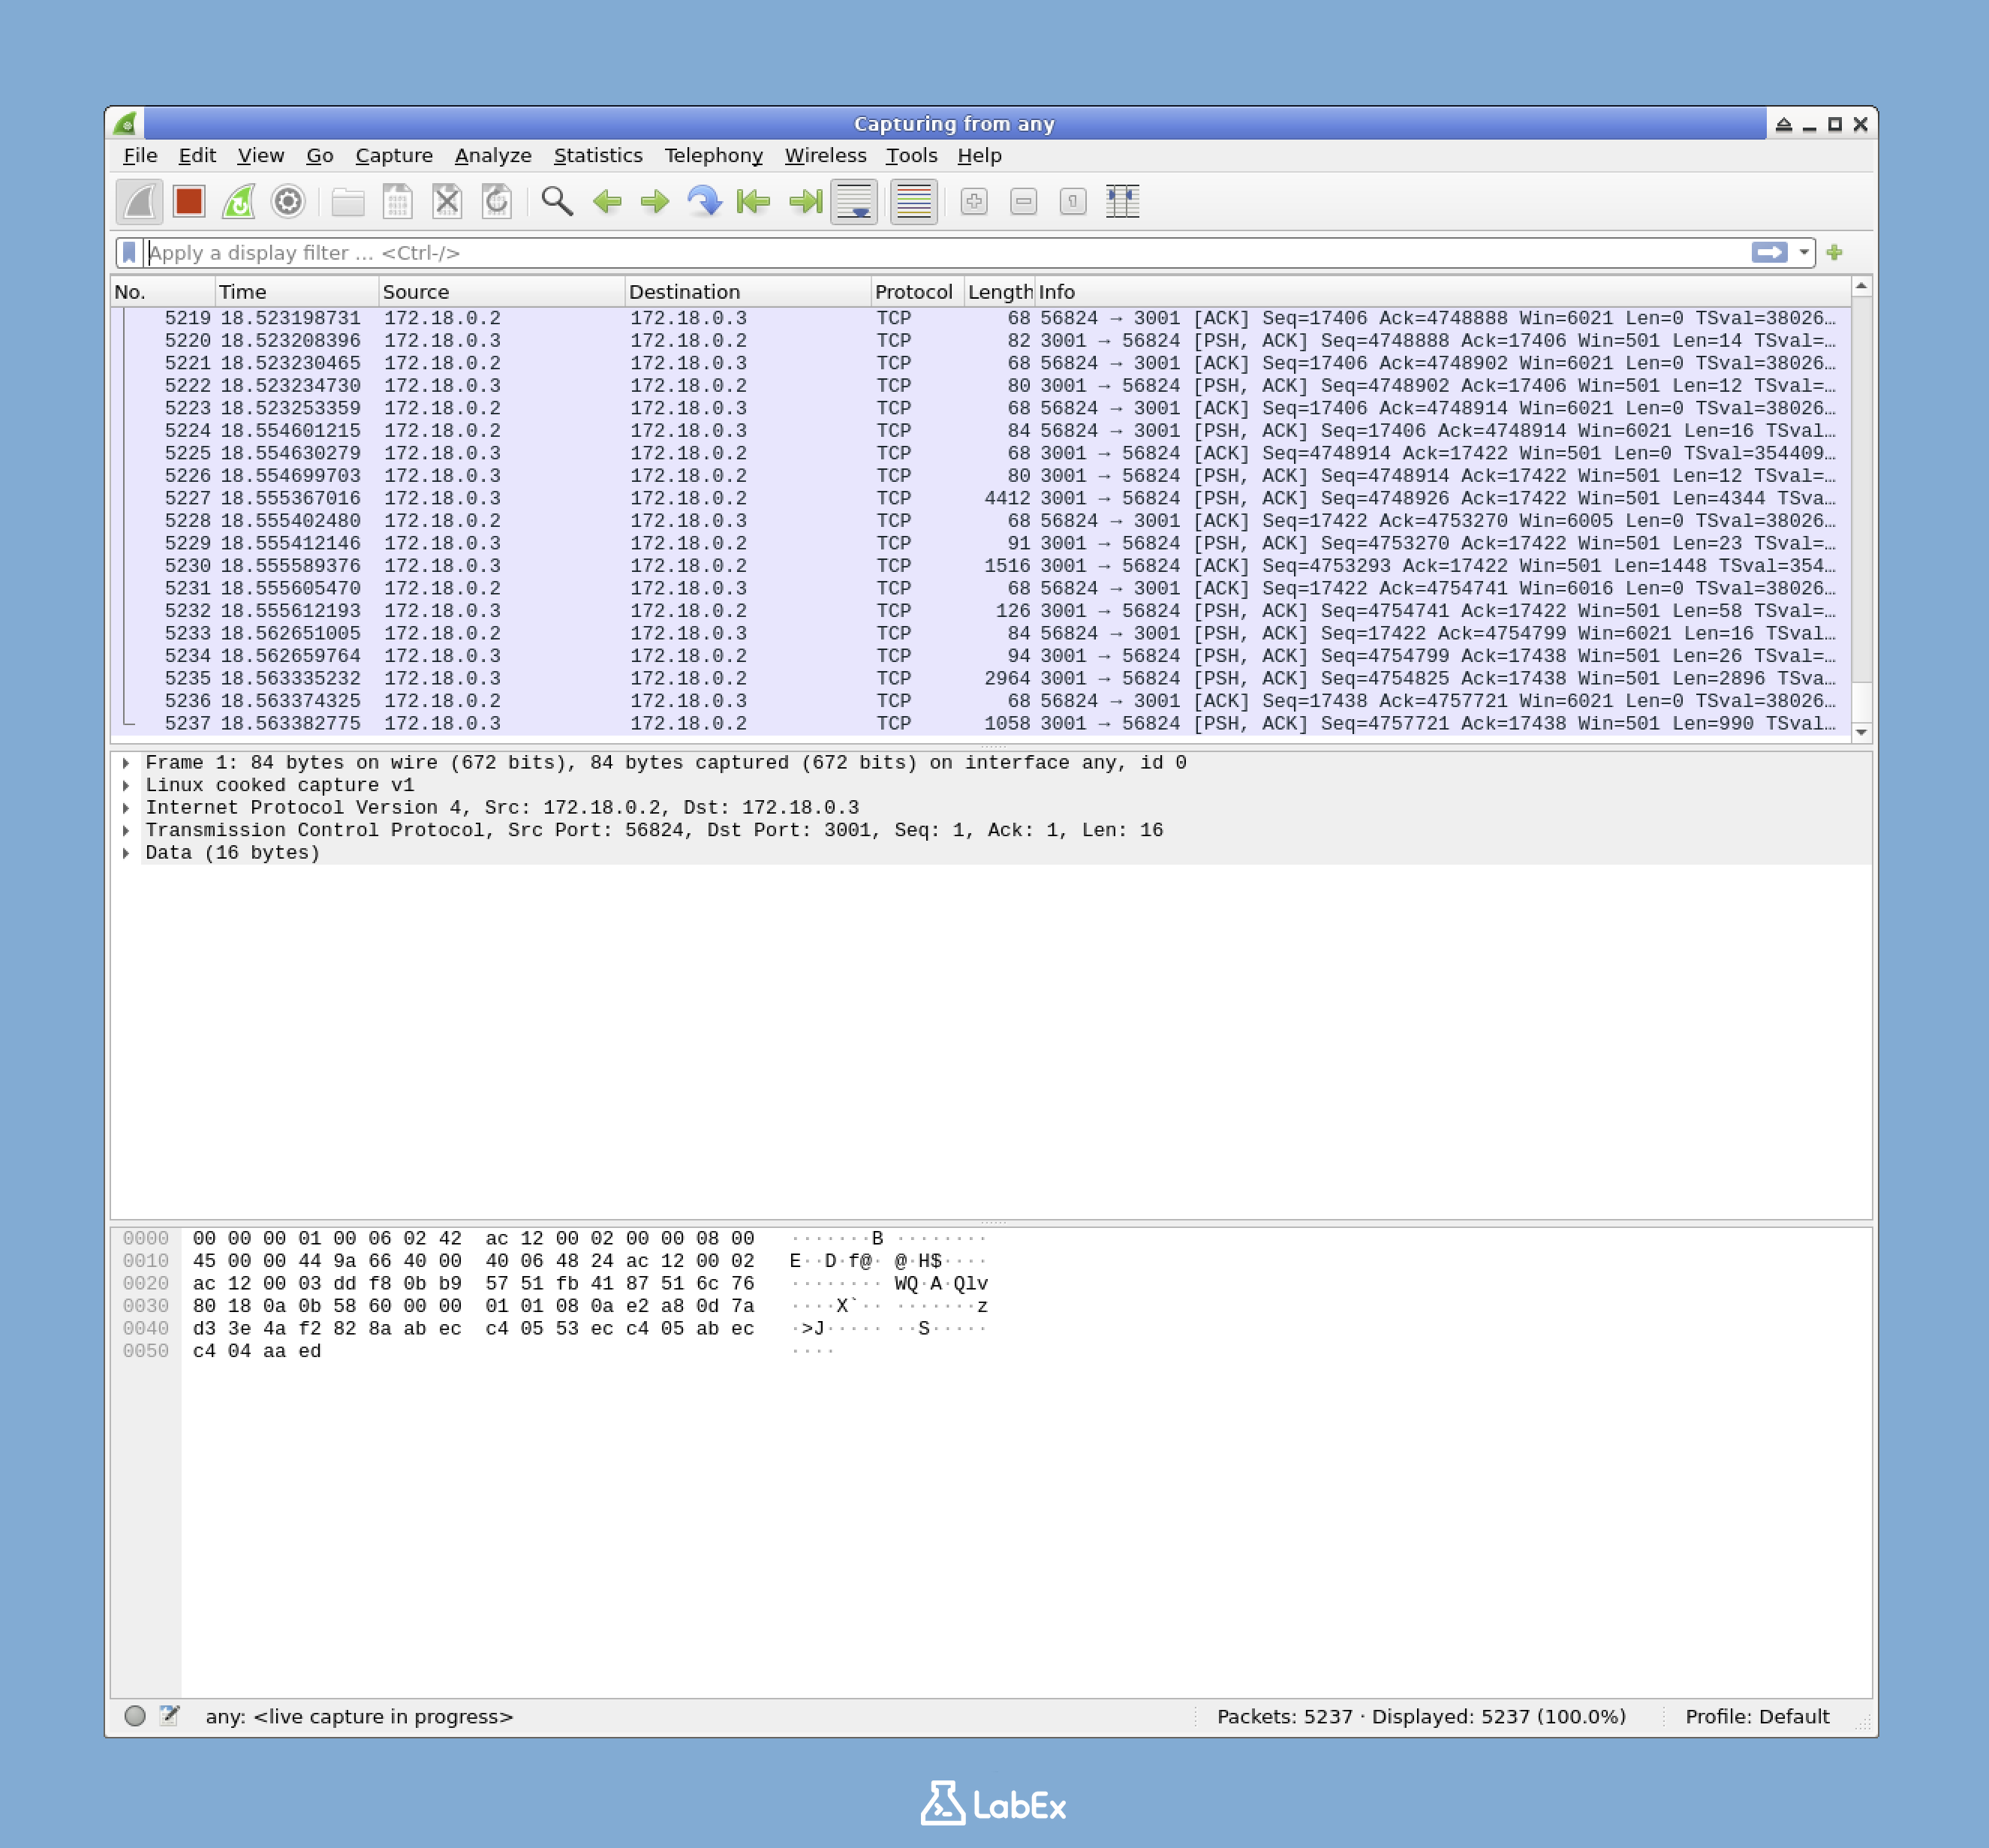
To start capturing packets, you can either double-click on the
anyinterface or select it and click the blue shark fin button in the toolbar.Wireshark will now start capturing all network traffic on your system. As packets are captured, you'll see them being displayed in the main window. Each packet entry shows information such as the source and destination IP addresses, the protocol used, and the time of capture.
Generating IPv6 Traffic for Capture
To ensure that we have some IPv6 traffic to analyze, we'll generate some IPv6 packets by pinging an IPv6 address. Pinging is a simple way to test the connectivity between two network devices.
While Wireshark is running and capturing packets, open a new terminal window. This allows you to run commands to generate traffic without interfering with the packet capture process.
First, let's find the IPv6 address of your
eth1interface. Run the following command:ip addr show dev eth1 | grep inet6The
ip addr showcommand displays the IP addresses assigned to your network interfaces. Thedev eth1specifies that we want to see the addresses for theeth1interface. The|is a pipe operator, which takes the output of the left-hand command and uses it as the input for the right-hand command. Thegrep inet6filters the output to show only the lines that contain the stringinet6, which are the IPv6 addresses.The output will show the IPv6 addresses associated with the
eth1interface. You should see a link-local IPv6 address that starts withfe80::. This is your local IPv6 address, which is used for communication within the local network segment.Example output:
inet6 fe80::42:acff:fe14:3/64 scope linkNow, ping this IPv6 address to generate some IPv6 traffic. Use the
ping6command, which is specifically designed for pinging IPv6 addresses. Include the interface name (eth1) because it's a link-local address. The interface name is needed to specify which network interface should be used for the communication.ping6 -c 4 fe80::42:acff:fe14:3%eth1Note: Replace
fe80::42:acff:fe14:3with the actual IPv6 address displayed on your system.The
-c 4parameter tells ping to send 4 packets and then stop. This is useful to limit the amount of traffic generated.Expected output:
PING fe80::42:acff:fe14:3%eth1(fe80::42:acff:fe14:3%eth1) 56 data bytes
64 bytes from fe80::42:acff:fe14:3%eth1: icmp_seq=1 ttl=64 time=0.049 ms
64 bytes from fe80::42:acff:fe14:3%eth1: icmp_seq=2 ttl=64 time=0.064 ms
64 bytes from fe80::42:acff:fe14:3%eth1: icmp_seq=3 ttl=64 time=0.064 ms
64 bytes from fe80::42:acff:fe14:3%eth1: icmp_seq=4 ttl=64 time=0.064 ms

--- fe80::42:acff:fe14:3%eth1 ping statistics ---
4 packets transmitted, 4 received, 0% packet loss, time 3060ms
rtt min/avg/max/mdev = 0.049/0.060/0.064/0.007 ms
This output shows the details of the ping process, including the time it took for each packet to travel to the destination and back, and the packet loss rate.
Return to the Wireshark window. You should now see several new packets in the capture list, including ICMPv6 packets generated by your ping command. ICMPv6 is the Internet Control Message Protocol for IPv6, which is used for error reporting and diagnostic purposes.
Stop the packet capture by clicking the red square "Stop" button in the Wireshark toolbar.
You have now successfully captured IPv6 traffic using Wireshark. In the next step, you'll learn how to filter and analyze this traffic.
Filtering and Analyzing IPv6 Traffic
Now that you have captured some IPv6 traffic, it's time to learn how to filter and analyze this traffic. Wireshark, a powerful network protocol analyzer, offers excellent filtering capabilities. Filtering the captured traffic helps you focus on the specific types of IPv6 packets you want to examine. Instead of looking at a large and mixed set of network data, filtering allows you to isolate the relevant information, making your analysis more efficient.
Using Display Filters for IPv6
Display filters in Wireshark are a great tool. They let you view only the packets that match specific criteria. In this case, we'll focus on IPv6 packets.
In the main Wireshark window, you'll see a packet list. At the top of this list, there's a display filter bar. It has a text field with the prompt "Apply a display filter". This bar is where you'll enter your filter criteria.
To show only IPv6 packets, type the following filter in the display filter bar:
ipv6This filter tells Wireshark to only display packets that use the IPv6 protocol.
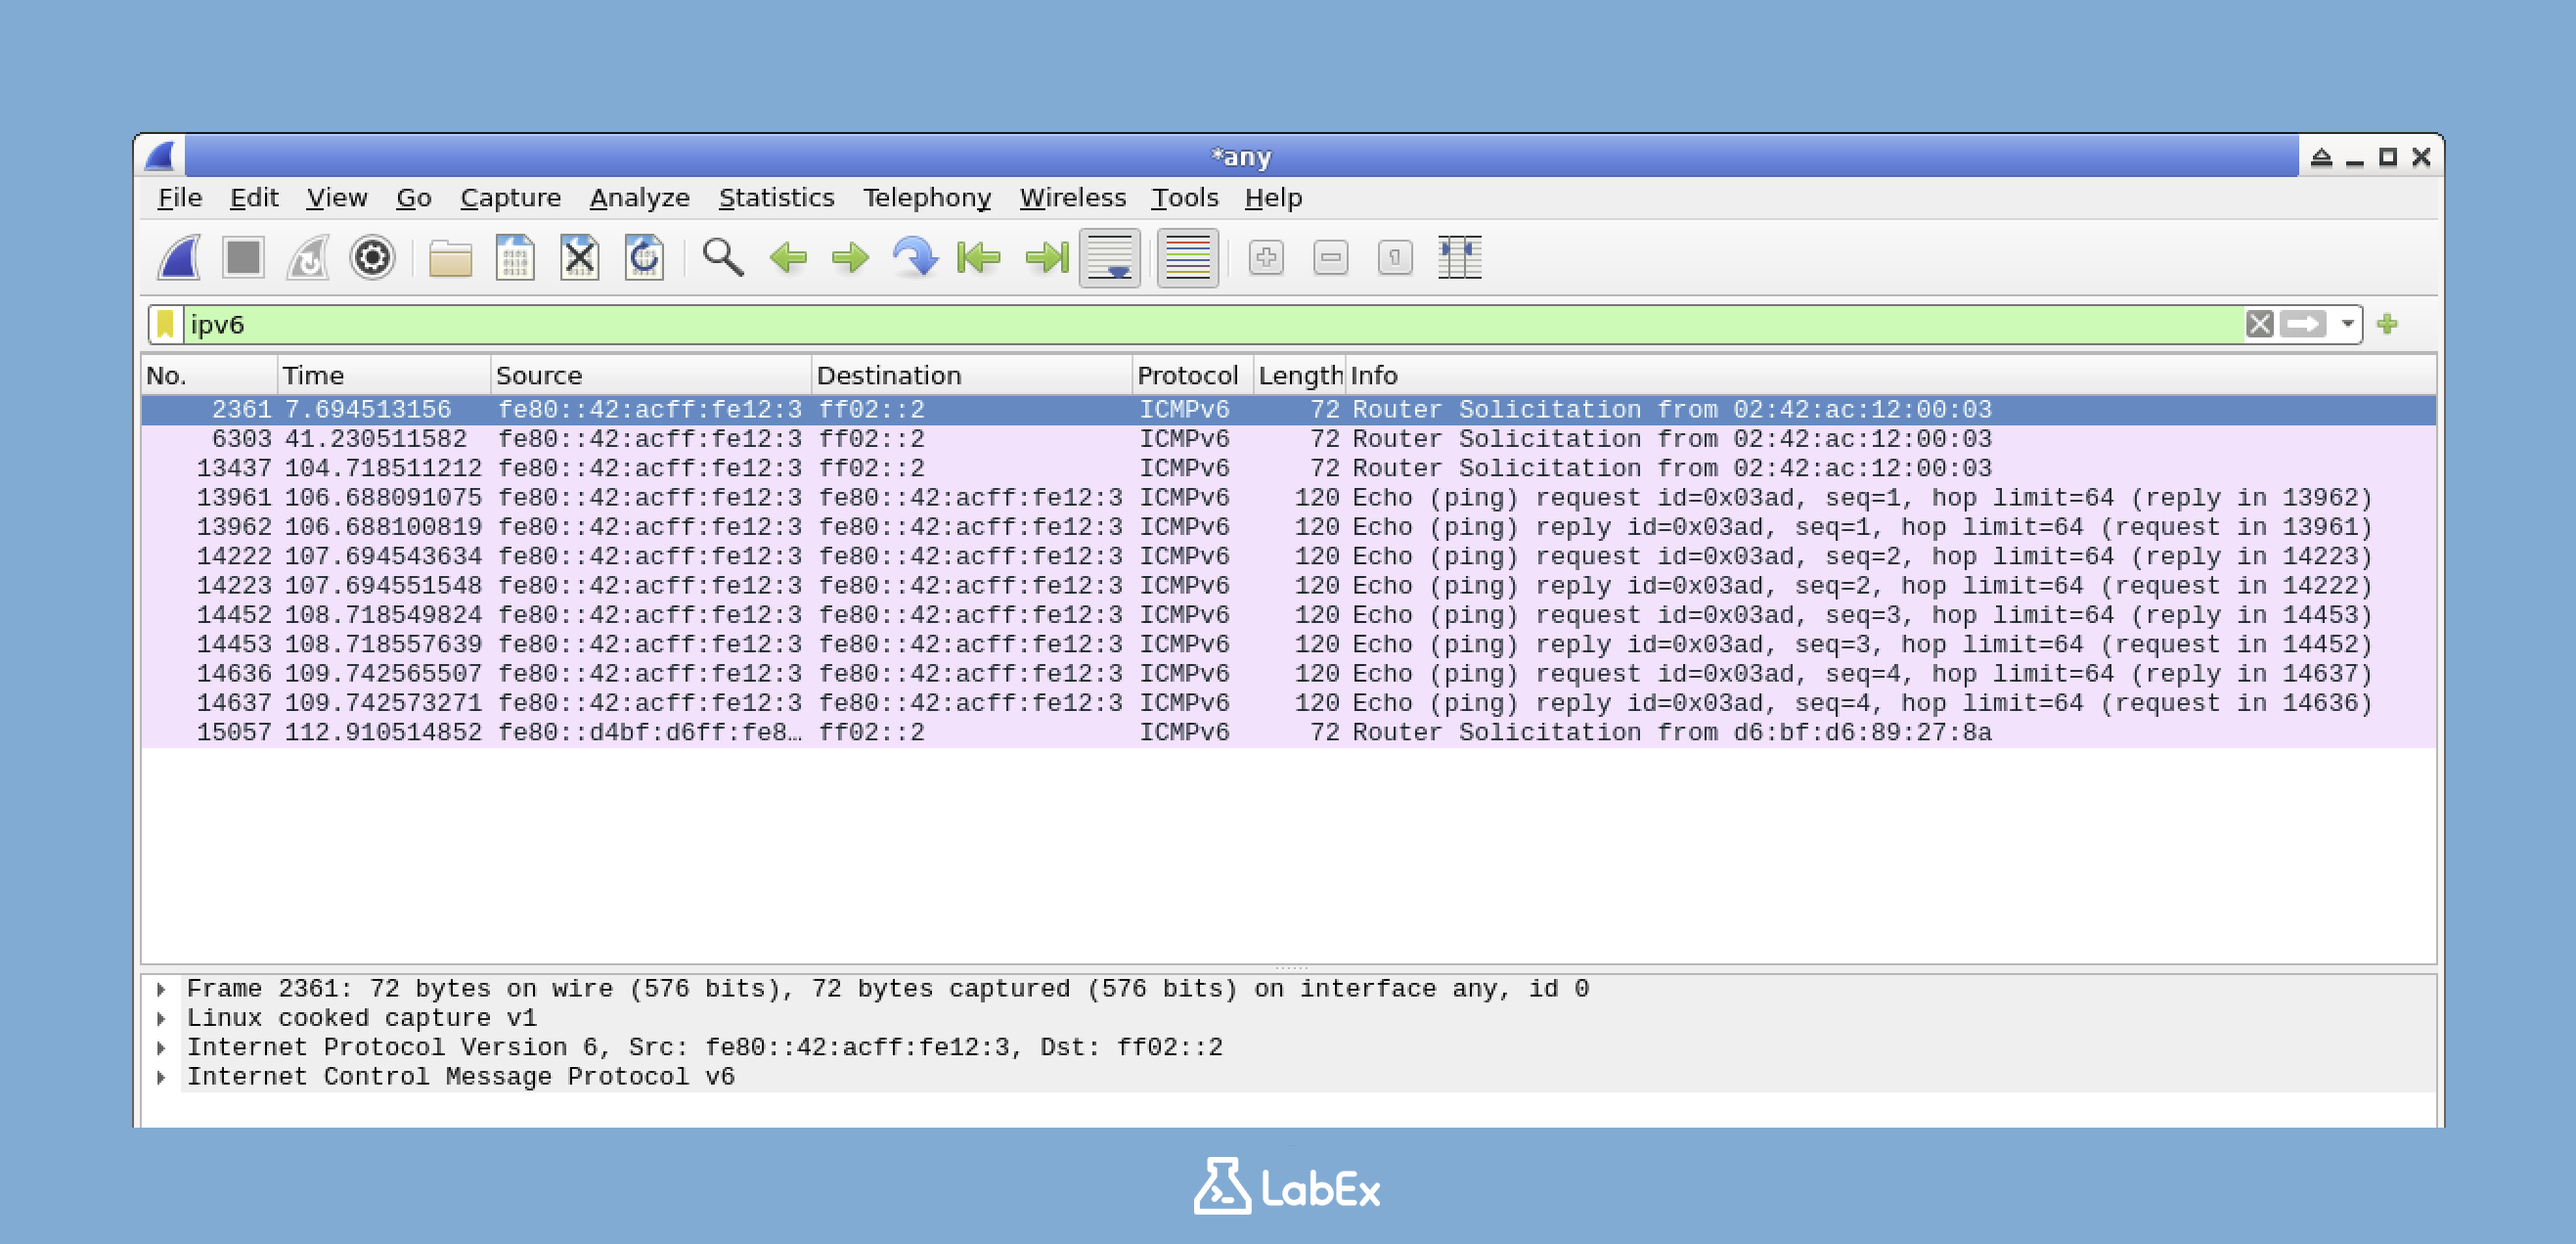
After typing the filter, press Enter or click the blue arrow button to apply it. Once applied, the packet list will now only display IPv6 packets. This means any IPv4 or other protocol packets will be filtered out, leaving you with just the IPv6 traffic.
If you want to further refine your filter to show only ICMPv6 packets (like the ones generated by the ping6 command), type the following filter:
icmpv6ICMPv6 is a key protocol for IPv6 networks, used for tasks like error reporting and diagnostic messages. By using this filter, you can focus on these specific types of packets.
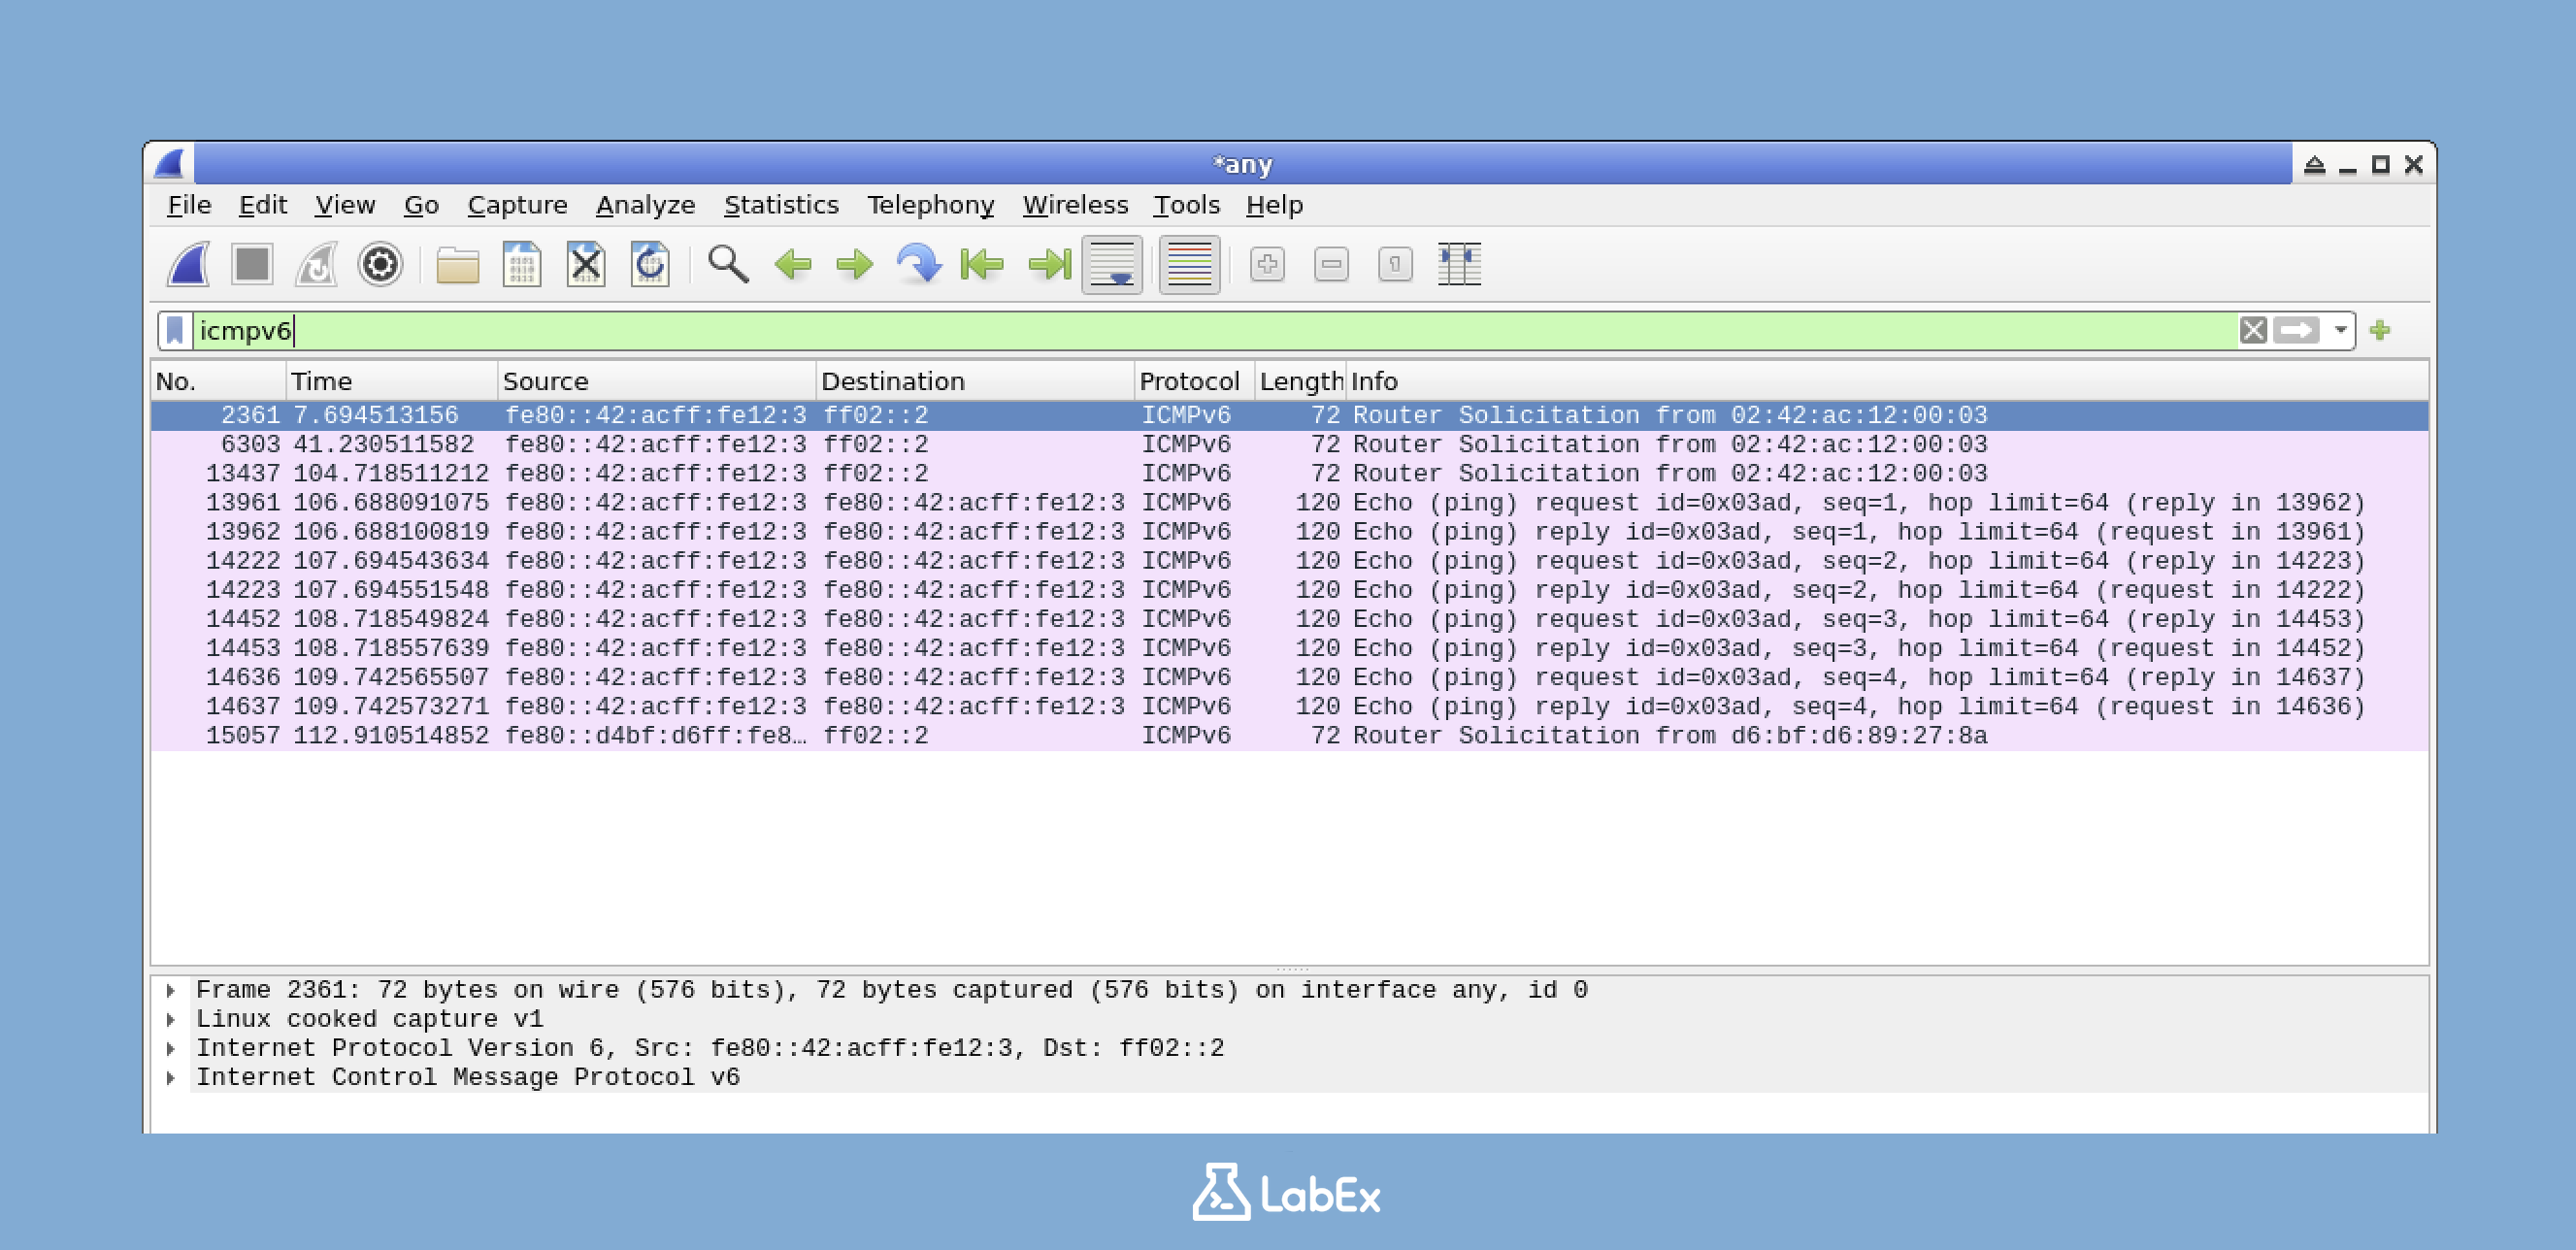
Apply the filter as before. Now, you should see only the ICMPv6 packets from your ping commands in the packet list.
Examining IPv6 Packet Details
Wireshark provides detailed information about each packet. Let's take a closer look at the structure of an IPv6 packet.
In the filtered packet list, find an ICMPv6 Echo Request packet. You can identify it by looking for "Echo (ping) request" in the Info column. Click on this packet to select it.
When you select a packet, the middle pane will show a detailed breakdown of that packet. Look for the section labeled "Internet Protocol Version 6". If it's not already expanded, click the arrow next to it to expand it. This will show you all the fields in the IPv6 header.
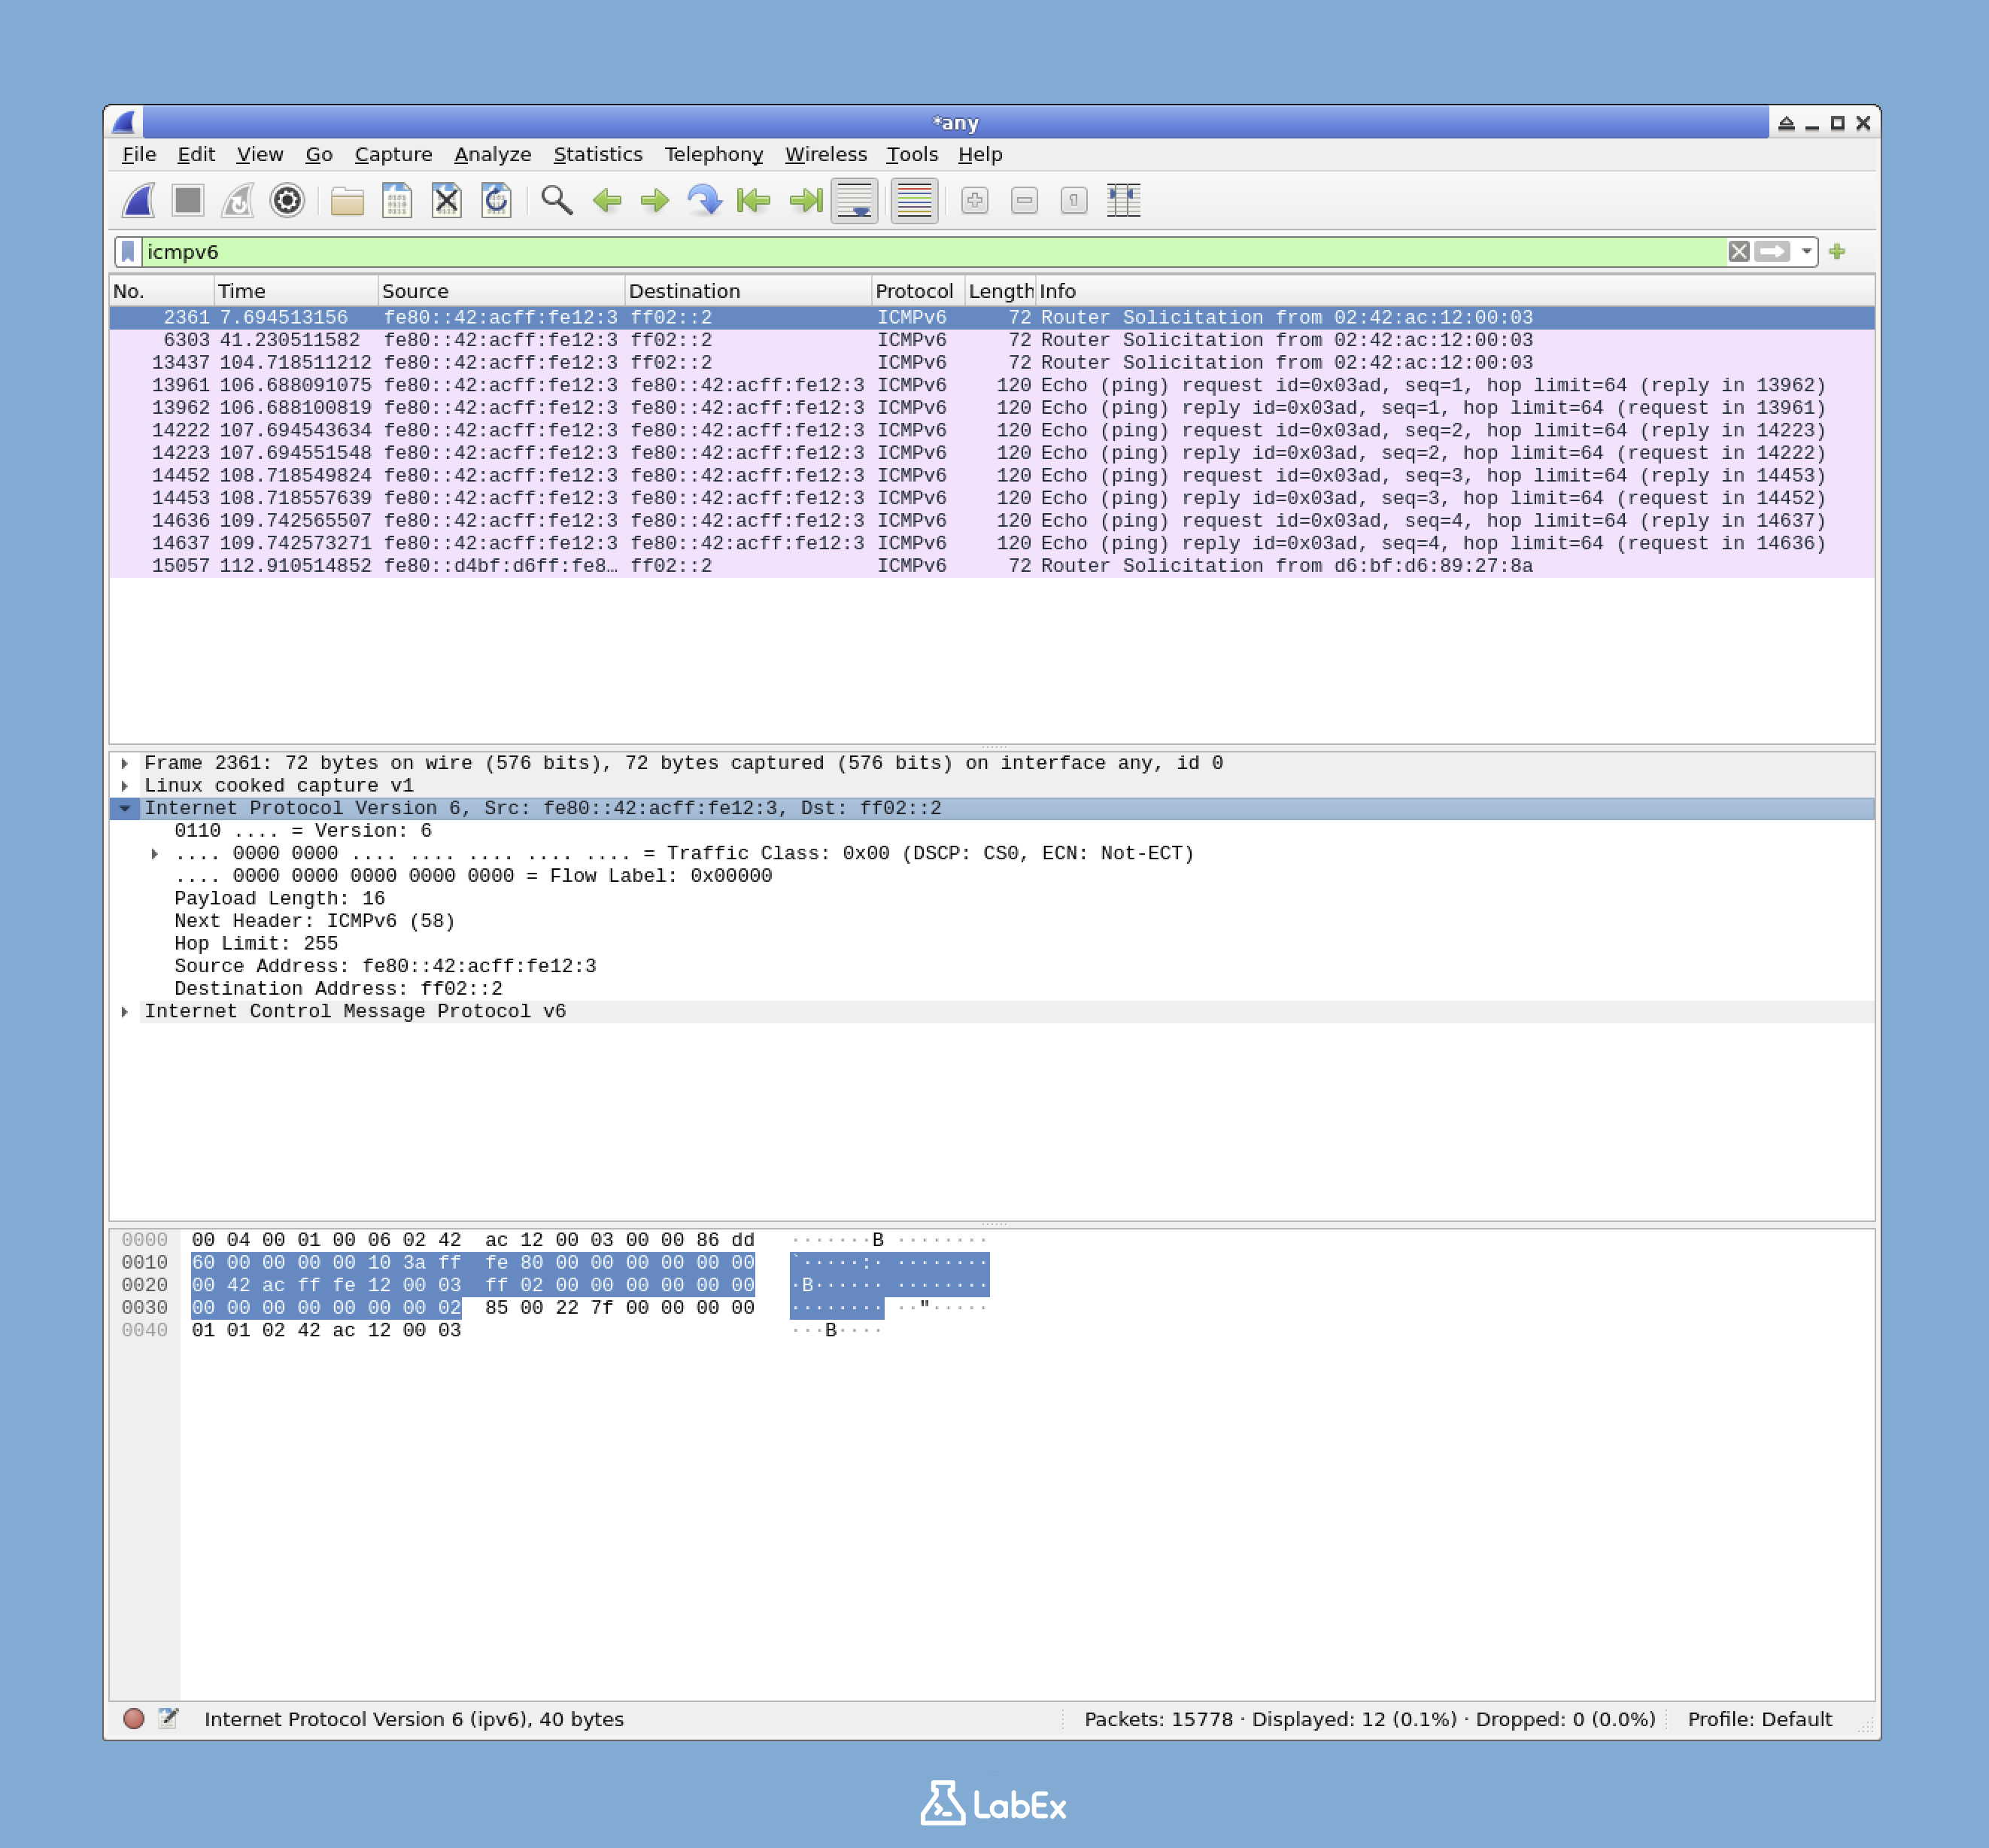
In the IPv6 header information, there are several important fields to observe:
- Version: This field should be 6 for IPv6. It's a simple way to confirm that the packet is using the IPv6 protocol.
- Traffic Class: This field is used for QoS (Quality of Service). It helps prioritize different types of traffic on the network.
- Flow Label: This can be used to maintain state for packets belonging to the same flow. It's useful for keeping track of related packets.
- Payload Length: This indicates the size of the data after the IPv6 header. It helps you understand how much data is being carried in the packet.
- Next Header: This field identifies the type of header that follows the IPv6 header. It could be another protocol header like TCP or UDP.
- Hop Limit: Similar to TTL (Time To Live) in IPv4, this value decrements at each router. It prevents packets from circulating indefinitely on the network.
- Source Address: This is the IPv6 address of the sender. It tells you where the packet originated from.
- Destination Address: This is the IPv6 address of the recipient. It shows where the packet is going.
Notice the difference between IPv6 and IPv4 addresses. IPv6 uses 128 - bit addresses, which are typically written as eight groups of four hexadecimal digits. In contrast, IPv4 uses 32 - bit addresses. This makes IPv6 addresses much longer and provides a much larger address space.
Now, expand the "Internet Control Message Protocol v6" section to see details of the ICMPv6 packet:
- Type: This indicates the ICMPv6 message type. For example, 128 is for Echo Request, and 129 is for Echo Reply.
- Code: This further specifies the message type. It provides more detailed information about the ICMPv6 message.
- Checksum: This is used to detect errors in the ICMPv6 message. It helps ensure the integrity of the data.
- Identifier: This is used to match requests with replies. It allows the sender to keep track of which reply corresponds to which request.
- Sequence: This is a sequence number that increments for each packet in a ping session. It helps in ordering the packets.
Saving the Captured Packets
It's often useful to save your packet captures for later analysis or documentation. Here's how you can do it:
In Wireshark, click on the
Filemenu, then selectSave As. This will open a dialog where you can choose where to save the file and what to name it.Navigate to the
/home/labex/project/directory. This is the location where we want to save our packet capture.Enter
capture.pcapngas the filename. This is the name that will be used to identify the saved packet capture.Click the
Savebutton to save your packet capture. The file will be saved in the PCAPNG format, which is the standard format for Wireshark packet captures. This format is widely supported and can be opened in other network analysis tools.You can verify that the file was saved correctly by running the following command in a terminal:
ls -l /home/labex/project/capture.pcapngThis command lists the details of the file, including its permissions, owner, size, and date of creation.
Expected output:
-rw-r--r-- 1 labex labex [file size] [date] /home/labex/project/capture.pcapng
Now you have learned how to filter IPv6 traffic, examine the details of IPv6 packets, and save your packet captures for future reference. In the next step, you will explore IPv6 extension headers in more detail.
Examining IPv6 Extension Headers
In this step, we'll explore IPv6 extension headers. IPv6 is the next - generation Internet protocol that offers many improvements over IPv4. One of these key improvements is the use of extension headers. These headers are crucial because they provide enhanced functionality, such as better routing and security features. Understanding them is essential for anyone involved in IPv6 network monitoring and security analysis, as they can reveal important information about how packets are being handled in the network.
Identifying Extension Headers in Wireshark
Now, let's use Wireshark to identify and understand IPv6 extension headers in the packets we captured earlier.
First, make sure Wireshark is open. If it's not, you can open it using the following command in the terminal:
wireshark &The
&at the end allows the command to run in the background, so you can continue using the terminal for other tasks.Next, open the capture file you saved in the previous step. Here's how:
- Click on
File>Openin the Wireshark menu. - Navigate to the directory
/home/labex/project/. - Select the file named
capture.pcapngand clickOpen. This file contains the network traffic you captured earlier.
- Click on
In the filter bar at the top of Wireshark, enter the following filter:
ipv6This filter shows all IPv6 packets. We'll examine the Next Header field in these packets to identify any extension headers.
Select any IPv6 packet from the packet list on the left side of Wireshark. In the middle pane, expand the "Internet Protocol Version 6" section. This will show you the details of the IPv6 header.
Look for the "Next Header" field within the expanded IPv6 header. This field is very important as it tells us what comes immediately after the IPv6 header. It could be an extension header or an upper-layer protocol like TCP or UDP.
The "Next Header" value corresponds to a specific protocol number:
- 0: Hop-by-Hop Options
- 43: Routing
- 44: Fragment
- 50: ESP
- 51: AH
- 60: Destination Options
- 58: ICMPv6
- 6: TCP
- 17: UDP
If an extension header is present in the packet, it will appear as an expandable section below the IPv6 header in the packet details pane. Expand it to see its contents, which can provide valuable information about the packet's handling.
Exporting Packet Bytes for Analysis
To further analyze the "Next Header" field, we'll export the bytes of a packet containing it.
Select any IPv6 packet from the packet list.
In the middle pane, make sure the "Internet Protocol Version 6" section is expanded. If it's not, expand it to view the details of the IPv6 header.
Find the "Next Header" field. It's usually near the top of the IPv6 header details.
Right-click on the "Next Header" field and select "Export Selected Packet Bytes".

In the dialog that appears, navigate to the directory
/home/labex/project/. This is where we'll save the exported bytes.Enter
extension_header.txtas the filename.Click "Save" to save the file.
You can verify that the file was created successfully by running the following command in the terminal:
cat /home/labex/project/extension_header.txtThe output will likely be a single character representing the Next Header value. This can be useful for further analysis or scripting.
Analyzing the Extension Header Chain
In IPv6, a packet can have multiple extension headers, forming a chain. Each extension header has a "Next Header" field that indicates what follows it.
For example, an IPv6 packet might have the following structure:
- The main IPv6 header with a "Next Header" value of 0, which means the next header is a Hop-by-Hop Options header.
- The Hop-by-Hop Options header with a "Next Header" value of 43, indicating that the next header is a Routing header.
- The Routing header with a "Next Header" value of 6, meaning the next header is a TCP header.
- Finally, the TCP header and the payload.
This chaining mechanism gives a lot of flexibility in packet handling. However, it can also be misused for security attacks, such as trying to bypass firewall rules. That's why understanding extension headers is crucial for network security monitoring.
You have now learned how to identify and examine IPv6 extension headers in Wireshark. This is an essential skill for anyone involved in IPv6 network monitoring and security analysis.
Summary
In this lab, you have learned essential skills for IPv6 network monitoring using Wireshark. You began by capturing IPv6 traffic and generating packets with ping6 commands. Then, you delved into filtering and analyzing the captured packets, with a focus on the unique structure and fields of IPv6 headers.
The key skills acquired include capturing IPv6 traffic, using display filters for specific packet types, examining packet structures and headers, saving captures for later analysis, identifying IPv6 extension headers, and understanding the Next Header field and extension header chain. These skills are vital for network administrators and cybersecurity professionals in IPv6 - prevalent environments, crucial for network security, troubleshooting, and understanding network behavior. As IPv6 adoption grows globally, this knowledge provides a solid foundation for advanced concepts.

