Introduction
This project utilizes SSE (Server-Sent Events) and Redis to implement an online chatroom. Prior knowledge of Python and JavaScript syntax, as well as a basic understanding of Flask and Redis usage, is required.
In this section of the experiment, we will learn and practice the following concepts:
- Web real-time communication
- The functioning of SSE
- Utilization of Redis
👀 Preview
🎯 Tasks
In this project, you will learn:
- How to create a simple online chatroom using Flask and SSE
- How to implement user login functionality
- How to use Redis for message storage and retrieval
🏆 Achievements
After completing this project, you will be able to:
- Set up SSE for real-time communication in a web application
- Use Redis to store and retrieve messages in a chatroom application
- Implement user login functionality in Flask
Web Real-Time Communication
Web Real-Time Communication (WebRTC) refers to a mechanism that allows us to instantly notify users of an event on a webpage without the need for them to refresh the page. There are many uses for WebRTC, such as real-time chatting and instant messaging.
There are several ways of communication between web clients and servers.
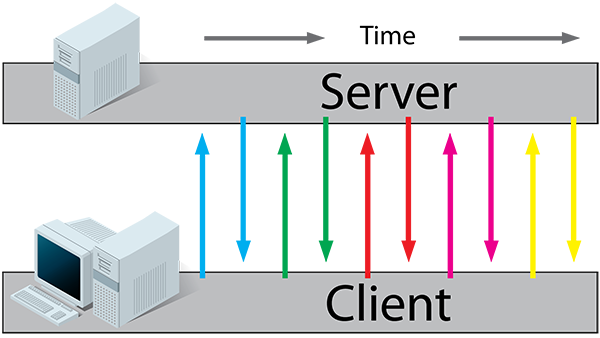
Regular HTTP Flow
- The client requests a webpage from the server.
- The server responds accordingly.
- The server sends the response back to the client.

As HTTP requests are stateless, meaning that the HTTP connection is terminated after each request, the server and the browser are completely unaware of each other until the next request is made to update the relevant information. At this point, it is not difficult to think of a simple solution where the browser can make periodic requests to simulate real-time effects. This is called polling.
Polling Flow
- The client sends a connection request to the server using regular HTTP.
- The client executes a JavaScript polling script embedded in the webpage to periodically send requests to the server (e.g., every 5 seconds) to retrieve information.
- The server responds to each request and sends back the corresponding information, just like a normal HTTP request.
Polling allows us to obtain information in near real-time. However, frequent requests from the browser to the server as a result of polling can lead to performance inefficiencies. To mitigate these issues, an alternative method was proposed. Instead of immediately responding to client requests, servers wait until there is a data change (or timeout) before returning a response. This approach maximizes the connection validity to reduce the number of requests in polling. This method is called long polling, or Long-Polling.
Long-Polling Flow
- The client requests a webpage from the server using regular HTTP.
- The client executes a JavaScript script embedded in the webpage to send data and request information to the server.
- Instead of immediately responding to the client's request, the server waits for a valid update.
- When the information is updated and valid, the server pushes the data to the client.
- Upon receiving the server's notification, the client immediately sends a new request to initiate the next round of polling.
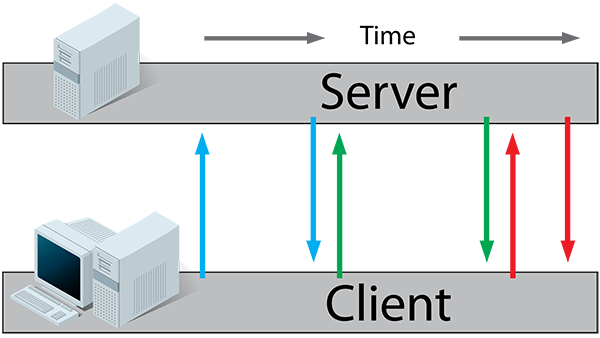
The methods mentioned above are commonly used to implement real-time web communication. However, after the introduction of HTML5, we have better options available. In HTML5, we can use Server-Sent Events (SSE) or WebSocket. SSE is specifically designed for server-to-client data pushing, which is often sufficient for scenarios such as broadcasting match information or stock price changes.
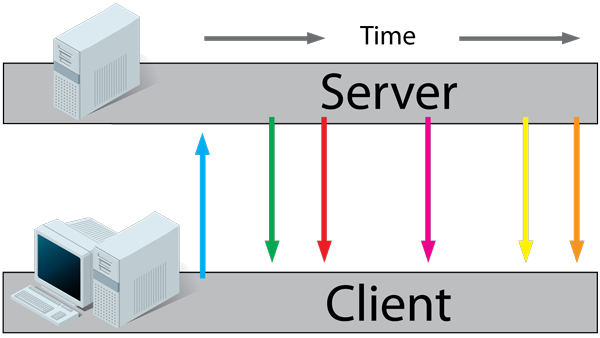
Server-Sent Events Flow
- The client requests a webpage from the server using regular HTTP.
- The client establishes a connection with the server using JavaScript embedded in the webpage.
- When the server has updates, it sends an event to the client.
If SSE does not meet our needs, we can use WebSocket instead. With WebSocket, a full-duplex communication channel is established between the browser and the server, allowing bidirectional message exchange in real-time, similar to using TCP sockets.
Simple Comparison between SSE and WebSocket
- WebSocket is a full-duplex communication channel that supports bidirectional communication and has more advanced features. SSE is a one-way channel, where the server can only send data to the browser.
- WebSocket is a new protocol and requires server-side support, while SSE is deployed on top of the HTTP protocol and is supported by existing server software.
- SSE is a lightweight protocol and relatively simpler, while WebSocket is a heavier protocol and relatively more complex.
With the understanding of these mechanisms for implementing real-time web communication, we will now use SSE to implement a simple online chatroom.
Implementing an Online Chat Room Based on SSE
There are various ways to push messages in an online chat room, and in this course, we will use Server-Sent Events (SSE) to achieve this. In order to facilitate message reception, we will leverage the pub/sub (publish/subscribe) functionality of Redis to receive and send messages. On the web server side, we will be using Flask for implementation.
How SSE Works
In the previous lessons, we learned that SSE is based on HTTP. So how does the browser know that this is a server-sent event stream? It's actually quite simple – just set the Content-Type header of the HTTP request to text/event-stream. SSE essentially involves the browser sending an HTTP request to the server, and then the server continuously pushing information to the browser in a one-way fashion. The format of these information is also very straightforward, with the prefix "data:" followed by the content of the message, and ending with "\n\n".
Redis Pub/Sub Functionality
Redis is a popular in-memory database that can be used for caching, queuing, and other services. In this course, we will be using Redis' publish/subscribe functionality. Simply put, the subscription feature allows us to subscribe to various channels, and whenever new messages are published to these channels, we automatically receive them. When the server receives a message sent by the browser via a POST request, it publishes these messages to specific channels. Afterwards, clients that have subscribed to these channels will automatically receive these messages, which will then be pushed to the clients through SSE.
Function Implementation
After the analysis above, the whole process of the chatroom is already clear. Now let's start implementing the functionality of this chatroom.
Create a file named app.py in the ~/project directory and enter the following source code:
import datetime
import flask
import redis

app = flask.Flask("labex-sse-chat")
app.secret_key = "labex"
app.config["DEBUG"] = True
r = redis.StrictRedis()


## Home route function
@app.route("/")
def home():
    ## If the user is not logged in, redirect to the login page
    if "user" not in flask.session:
        return flask.redirect("/login")
    user = flask.session["user"]
    return flask.render_template("index.html", user=user)


## Message generator
def event_stream():
    ## Create a publish-subscribe system
    pubsub = r.pubsub()
    ## Use the subscribe method of the publish-subscribe system to subscribe to a channel
    pubsub.subscribe("chat")
    for message in pubsub.listen():
        data = message["data"]
        if type(data) == bytes:
            yield "data: {}\n\n".format(data.decode())


## Login function, login is required for the first visit
@app.route("/login", methods=["GET", "POST"])
def login():
    if flask.request.method == "POST":
        ## Store the username in the session dictionary and then redirect to the homepage
        flask.session["user"] = flask.request.form["user"]
        return flask.redirect("/")
    return flask.render_template("login.html")


## Receive data sent by JavaScript using the POST method
@app.route("/post", methods=["POST"])
def post():
    message = flask.request.form["message"]
    user = flask.session.get("user", "anonymous")
    now = datetime.datetime.now().replace(microsecond=0).time()
    r.publish("chat", "[{}] {}: {}\n".format(now.isoformat(), user, message))
    return flask.Response(status=204)


## Event stream interface
@app.route("/stream")
def stream():
    ## The return object of this route function must be of type text/event-stream
    return flask.Response(event_stream(), mimetype="text/event-stream")


## Run the Flask application
app.run()
In the above code, we use the session feature of Flask to store user login information, the publish-subscribe feature of Redis to receive and send messages, and SSE to implement message pushing.
Here:
- The
event_streamfunction is a message generator that continuously retrieves messages from Redis and pushes them to the client. - The
streamfunction is an event stream interface that returns an object of typetext/event-stream, which is the SSE event stream. - The
postfunction is an interface that receives data sent by JavaScript using the POST method. It publishes the received data to thechatchannel in Redis. - The
loginfunction is a login function that is required for the first visit. After a successful login, the username is stored in the session dictionary and then redirected to the homepage. - The
homefunction is the homepage route function. If the user is not logged in, it will redirect to the login page. If the user is logged in, it will render theindex.htmltemplate.
Implementing login.html Template
First, create a templates directory under ~/project to store the required HTML files. In the templates directory, create a login.html file and write the following code:
<!doctype html>
<title>Online Chat Login</title>
<style>
  body {
    max-width: 500px;
    margin: auto;
    padding: 1em;
    background: black;
    color: #fff;
    font:
      16px/1.6 menlo,
      monospace;
  }
</style>

<body>
  <form action="" method="post">
    User Name: <input name="user" />
    <input type="submit" value="login" />
  </form>
</body>
In the login.html file, we utilize Flask's template functionality and use {{ user }} to represent the user's name, which is retrieved from flask.session.
Implementing the index.html Template
Next, let's create an index.html file in the templates directory to implement the chat room page. Write the following code into it:
<!doctype html>
<title>Online Chat</title>
<script src="https://cdn.jsdelivr.net/npm/jquery@3.7.1/dist/jquery.min.js"></script>
<style>
  body {
    max-width: 500px;
    margin: auto;
    padding: 1em;
    background: black;
    color: #fff;
    font:
      16px/1.6 menlo,
      monospace;
  }
</style>
<p><b>Hi, {{ user }}!</b></p>
<p>Message: <input id="in" /></p>
<pre id="out"></pre>
<script>
  function sse() {
    // Connect to server's event stream
    var source = new EventSource("/stream");
    var out = document.getElementById("out");
    source.onmessage = function (e) {
      out.innerHTML = e.data + "\n" + out.innerHTML;
    };
  }
  // POST message to server
  $("#in").keyup(function (e) {
    if (e.keyCode == 13) {
      $.post("/post", { message: $(this).val() });
      $(this).val("");
    }
  });
  sse();
</script>
In the index.html file, we use jQuery's $.post method to send messages to the server and use EventSource to receive server-push messages.
Running and Testing
As Redis is being used, you need to start the Redis service in your environment and download the redis module required to connect Python to the Redis server:
pip install redis
sudo service redis-server start
Next, you can run our chatroom:
cd ~/project
python app.py
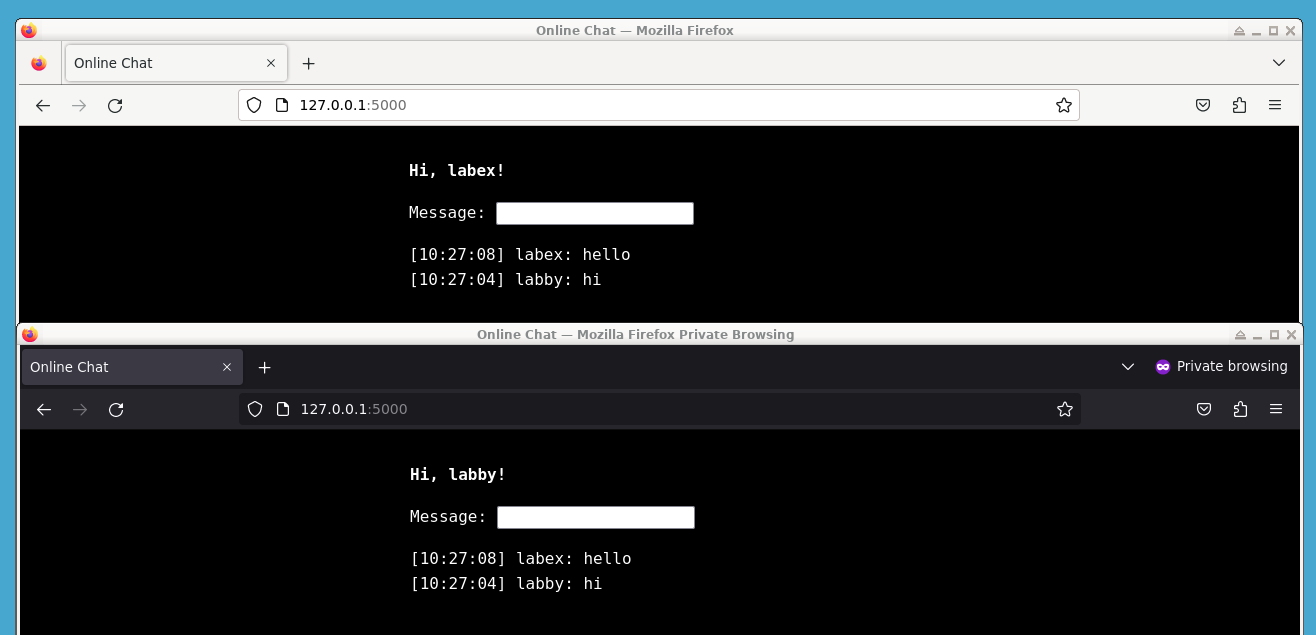
Then, you can access http://localhost:5000 in your browser, enter a random username, and enter the chatroom.
You can also open another browser window in private mode to enter the chatroom, and then you can chat in both windows.
Summary
This project utilizes SSE to implement real-time web communication features and relies on Flask and Redis to create an online chat room. The goal is for everyone to gain an understanding of the communication process under the HTTP protocol through this section of the experiment.