Introduction
In this project, we will create a simple Notes App using React. The app will allow users to add, edit, and delete notes. We will break down the development into several steps, ensuring that each step meets specific requirements and adds essential functionality.
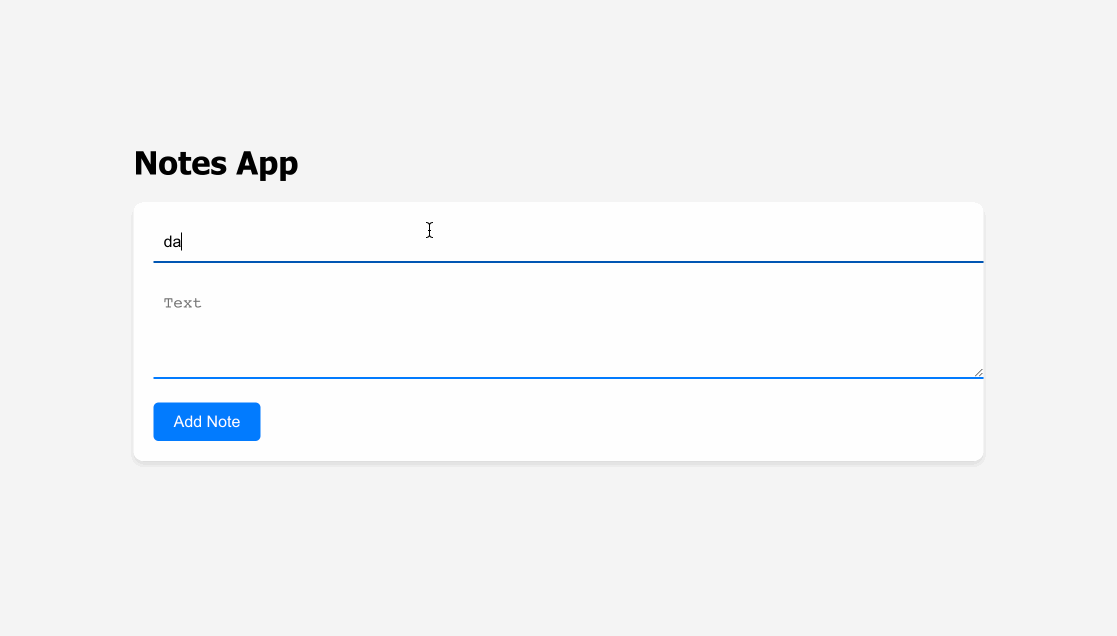
👀 Preview
🎯 Tasks
In this project, you will learn:
- How to create a new React project with the Create React App command
- How to build functional React components to create a user interface
- How to manage state using React's
useStatehook - How to add and manage notes within the application
- How to implement features like adding, editing, and deleting notes
- How to handle user interactions and events in React components
- How to style a React application using CSS
- How to develop a basic CRUD (Create, Read, Update, Delete) application
- How to structure and organize a React project
- How to build a simple, responsive user interface for a Notes App
🏆 Achievements
After completing this project, you will be able to:
- Set up a new React project
- Create and manage React components
- Use React hooks like
useStatefor managing component state - Handle user input and form submissions in a React application
- Pass data and functions between parent and child components using props
- Create responsive and interactive user interfaces in React
- Implement basic data storage and manipulation within a React application
- Structure and organize code files in a React project
- Use CSS for styling React components
- Debug and troubleshoot React applications
- Follow best practices for building a React application
Project Setup
Requirements:
- Installing Dependencies in the new React project.
Functionality:
- Initialize the project with the necessary dependencies and a basic project structure.
Steps:
Open a terminal and Navigate to the project folder:
cd notes-appYou need to run this command under the
projectdirectory.Installing Dependencies in the Project:
npm installAfter the installation is complete, a
node_modulesfolder is created; if it does not exist, it means the installation was not successful.
Create Note Component
Requirements:
- Create a
Notecomponent that represents an individual note. - The
Notecomponent should display note content, provide an edit button, and delete button.
Functionality:
- Display a note's title and text.
- Provide buttons for editing and deleting a note.
Steps:
Inside the
srcfolder, create a new file namedNote.js.Implement the
Notecomponent as follows:
import React from "react";

const Note = ({ note }) => {
  return (
    <div className="note">
      <h3>{note.title}</h3>
      <p>{note.text}</p>
      <button>Edit</button>
      <button>Delete</button>
    </div>
  );
};

export default Note;
Create App Component and State
Requirements:
- Create an
Appcomponent that will manage notes and their state. - Initialize the state to hold an array of notes.
- Implement functions to add, delete, and edit notes.
Functionality:
- Maintain an array of notes.
- Add new notes.
- Delete notes.
- Edit notes.
Steps:
In the
srcfolder, open theApp.jsfile.Import the
useStatehook at the top of the file:// App.js import React, { useState } from "react"; import "./App.css"; import Note from "./Note";Set up the initial state and functions for adding, deleting, and editing notes within the
Appcomponent:
// App.js
function App() {
  const [notes, setNotes] = useState([]);
  const [newNote, setNewNote] = useState({ title: "", text: "" });

  const addNote = () => {
    // TODO: Implement addNote function
  };

  const deleteNote = (id) => {
    // TODO: Implement deleteNote function
  };

  const editNote = (id, newText) => {
    // TODO: Implement editNote function
  };

  return <div className="App">{/* App content goes here */}</div>;
}
Implement Add Note Functionality
Requirements:
- Implement the
addNotefunction to add new notes to the state. - Ensure that notes have a title and text.
Functionality:
- Add new notes to the state.
- Clear the input fields after adding a note.
Steps:
- Implement the
addNotefunction:
// App.js
const addNote = () => {
  if (newNote.title && newNote.text) {
    const newId = Date.now().toString();
    setNotes([...notes, { ...newNote, id: newId }]);
    setNewNote({ title: "", text: "" });
  }
};
- In your JSX, use
onChangehandlers to capture the input values and update the state:
// App.js
return (
  <div className="App">
    <h1>Notes App</h1>
    <div className="note-form">
      <input
        type="text"
        placeholder="Title"
        value={newNote.title} => setNewNote({ ...newNote, title: e.target.value })}
      />
      <textarea
        rows="4"
        cols="50"
        placeholder="Text"
        value={newNote.text} => setNewNote({ ...newNote, text: e.target.value })}
      />
      <button Note</button>
    </div>
  </div>
);
Implement Delete Note Functionality
Requirements:
- Implement the
deleteNotefunction to remove a note from the state when the "Delete" button is clicked.
Functionality:
- Delete a note from the state when the "Delete" button is clicked.
Steps:
- Implement the
deleteNotefunction:
// App.js
const deleteNote = (id) => {
  const updatedNotes = notes.filter((note) => note.id !== id);
  setNotes(updatedNotes);
};
- Pass the
deleteNotefunction as a prop to theNotecomponent to enable note deletion.
// App.js
<div className="App">
  <div className="note-list">
    {notes.map((note) => (
      <Note key={note.id} note={note} />
    ))}
  </div>
</div>
Implement Edit Note Functionality
Requirements:
- Implement the
editNotefunction to update a note's text when the "Edit" button is clicked.
Functionality:
- Display the note text in an editable textarea.
- Update the note's text when the "Save" button is clicked.
Steps:
- Implement the
editNotefunction:
// App.js
const editNote = (id, newText) => {
  const updatedNotes = notes.map((note) =>
    note.id === id ? { ...note, text: newText } : note
  );
  setNotes(updatedNotes);
};
- Update the
Notecomponent to handle editing:
// Note.js
import React, { useState } from "react";
const Note = ({ note, onDelete, onEdit }) => {
  const [isEditing, setIsEditing] = useState(false);
  const [editedText, setEditedText] = useState(note.text);

  const handleEdit = () => {
    setIsEditing(true);
  };

  const handleSave = () => {
    onEdit(note.id, editedText);
    setIsEditing(false);
  };

  return (
    <div className="note">
      <div className="note-header">
        <h3>{note.title}</h3>
        <button => onDelete(note.id)}>Delete</button>
      </div>
      {isEditing ? (
        <>
          <textarea
            rows="4"
            cols="50"
            value={editedText} => setEditedText(e.target.value)}
          />
          <button
        </>
      ) : (
        <p>{note.text}</p>
      )}
      {!isEditing && <button
    </div>
  );
};
Styling (App.css)
Requirements:
- Apply basic styling to the app for a visually pleasing interface.
Functionality:
- Style the app components for improved user experience.
Steps:
- Create an
App.cssfile and apply basic styling to your app components. Use the provided CSS code for styling the app.
body {
  font-family: "Segoe UI", Tahoma, Geneva, Verdana, sans-serif;
  background-color: #f5f5f5;
  margin: 0;
  padding: 0;
  display: flex;
  justify-content: center;
  align-items: center;
  min-height: 100vh;
}

.container {
  max-width: 800px;
  width: 100%;
  padding: 20px;
  box-sizing: border-box;
}

.header {
  background-color: #343a40;
  color: #fff;
  padding: 20px 0;
  text-align: center;
  font-size: 32px;
  margin-bottom: 20px;
  border-radius: 10px;
}

.note-form {
  background-color: #fff;
  padding: 20px;
  border-radius: 10px;
  box-shadow: 0 4px 6px rgba(0, 0, 0, 0.1);
  margin-bottom: 20px;
}

.note-form input[type="text"],
.note-form textarea {
  width: 100%;
  padding: 10px;
  margin-bottom: 20px;
  border: none;
  border-bottom: 2px solid #007bff;
  background-color: transparent;
  font-size: 16px;
  transition: border-bottom 0.3s;
}

.note-form input[type="text"]:focus,
.note-form textarea:focus {
  border-bottom: 2px solid #0056b3;
  outline: none;
}

.note-form button {
  background-color: #007bff;
  color: #fff;
  border: none;
  border-radius: 5px;
  padding: 10px 20px;
  font-size: 16px;
  cursor: pointer;
  transition: background-color 0.3s;
}

.note-form button:hover {
  background-color: #0056b3;
}

.note-list {
  display: flex;
  flex-wrap: wrap;
  gap: 20px;
  justify-content: center;
}

.note {
  background-color: #fff;
  padding: 20px;
  border-radius: 10px;
  box-shadow: 0 4px 6px rgba(0, 0, 0, 0.1);
  width: 300px;
  transition:
    transform 0.3s,
    box-shadow 0.3s;
}

.note:hover {
  transform: scale(1.03);
  box-shadow: 0 6px 8px rgba(0, 0, 0, 0.2);
}

.note-header {
  display: flex;
  justify-content: space-between;
  align-items: center;
  margin-bottom: 10px;
}

.note-header h3 {
  margin: 0;
  font-size: 24px;
  color: #007bff;
}

.note-actions {
  display: flex;
  gap: 10px;
}

.note-actions button {
  background-color: #007bff;
  color: #fff;
  border: none;
  border-radius: 5px;
  padding: 5px 10px;
  font-size: 14px;
  cursor: pointer;
  transition: background-color 0.3s;
}

.note-actions button:hover {
  background-color: #0056b3;
}
Running the App
To run your React Notes App:
Open your terminal or command prompt.
Make sure you are in the project's root directory (where the
package.jsonfile is located).Start the development server:
npm startYou should now see a basic React app running in your browser at 8080 port. We'll build upon this base to create our Notes App.
The effect of the page is as follows:
Summary
In this project, we created a simple Notes App using React by breaking down the development into multiple steps. We set up the project, created components for notes, implemented functionality to add, delete, and edit notes, and applied basic styling. By following these steps, you can build a functional Notes App and expand its features to meet your requirements.