Introduction
In this project, you will learn how to use JavaBean to directly receive multiple parameters from a request. You will implement a login process where the login page has a form with multiple input fields, and the backend will receive and process the form data using a JavaBean object.
👀 Preview
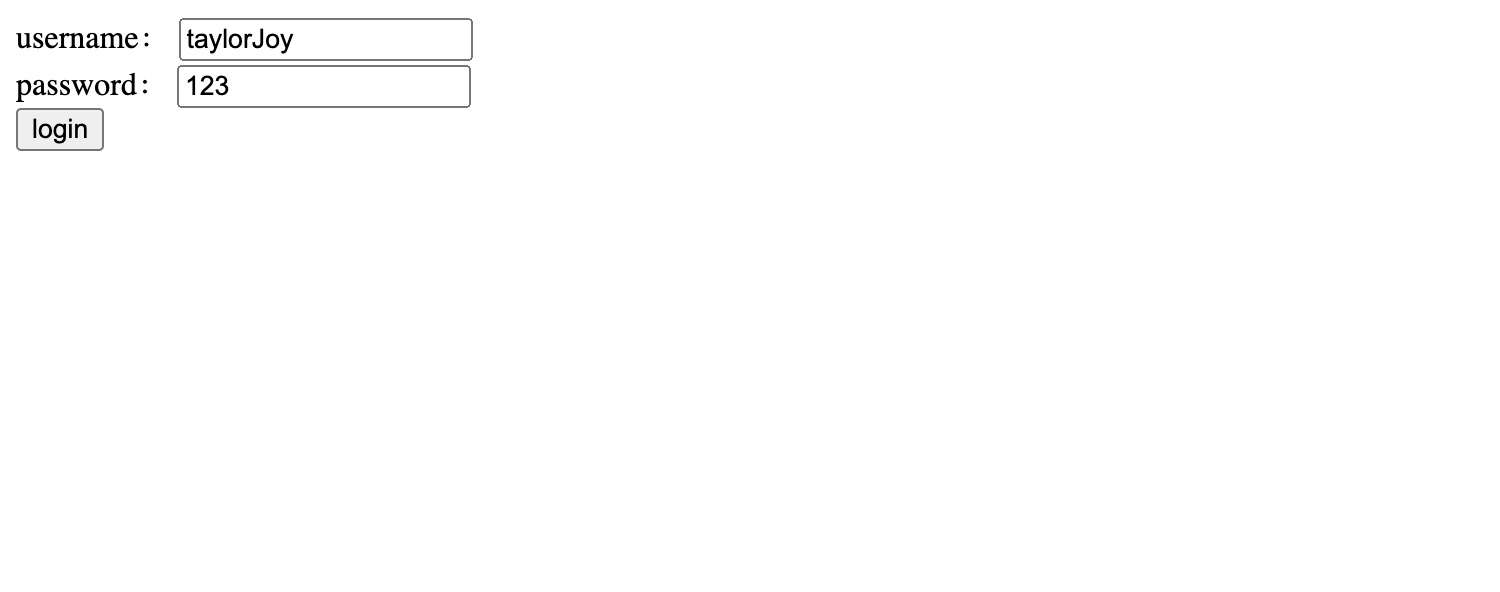
Login page
Login result

🎯 Tasks
In this project, you will learn:
- How to implement the
UserVOclass to represent the user information and receive the parameters from the request - How to implement the
UserControllerclass to handle the login request and use theUserVOobject to receive the parameters - How to test the application and verify the received parameters are correctly printed to the backend console
🏆 Achievements
After completing this project, you will be able to:
- Create a JavaBean class to represent and receive multiple parameters from a request
- Use Spring MVC to handle HTTP requests and process the received data
- Test the application and verify the expected behavior
Implement the UserVO Class
In this step, you will learn how to implement the UserVO class to receive multiple parameters from the request.
- Navigate to the
org.labex.vopackage and create a new Java class namedUserVO. - In the
UserVOclass, declare the following private attributes:username: aStringto store the usernamepassword: aStringto store the password
- Generate the getter and setter methods for the
usernameandpasswordattributes. - Implement the
toString()method to return a string representation of theUserVOobject.
Your UserVO.java file should look like this:
package org.labex.vo;

public class UserVO {
    private String username;
    private String password;

    @Override
    public String toString() {
        return "UserVO{" +
                "username='" + username + '\'' +
                ", password='" + password + '\'' +
                '}';
    }

    public String getUsername() {
        return username;
    }

    public void setUsername(String username) {
        this.username = username;
    }

    public String getPassword() {
        return password;
    }

    public void setPassword(String password) {
        this.password = password;
    }
}
Implement the UserController Class
In this step, you will learn how to implement the UserController class to handle the login request and use the UserVO object to receive the parameters.
- Navigate to the
org.labex.controllerpackage and create a new Java class namedUserController. - Annotate the
UserControllerclass with@RestControllerto make it a Spring MVC controller. - Implement a method named
login()that handles the HTTP POST request to the "/login" endpoint. - Annotate the
login()method with@PostMapping("/login")to map it to the "/login" endpoint. - Declare a single parameter for the
login()method, which should be aUserVOobject. - Inside the
login()method, print the receivedUserVOobject to the backend console usingSystem.out.println(). - Return the
usernamefrom theUserVOobject as the response.
Your UserController.java file should look like this:
package org.labex.controller;

import org.labex.vo.UserVO;
import org.springframework.web.bind.annotation.PostMapping;
import org.springframework.web.bind.annotation.RestController;

@RestController
public class UserController {

    @PostMapping("/login")
    public String login(UserVO userVO) {
        System.out.println(userVO);
        return userVO.getUsername();
    }
}
Now, you have completed the implementation of the UserVO class and the UserController class. In the next step, you will test the application.
Test the Application
To test the application, follow these steps:
- In your terminal, navigate to the
SpringMVCJavaBeanproject directory using the following command:
cd ~/project/SpringMVCJavaBean/
- Ensure that the web application is running. You can start the application by running the following command:
mvn clean tomcat7:run
Open a web browser and navigate to
http://localhost:8080/login.jsp. You should see the login page.Enter a username and password, then click the "Login" button.
In the backend console, you should see the received
UserVOobject printed, similar to the following output:
UserVO{username='taylorJoy', password='123'}
- The response from the server should be the username, which will be displayed on the web page.
Congratulations! You have successfully implemented the JavaBean Multiple Parameters project.
Summary
Congratulations! You have completed this project. You can practice more labs in LabEx to improve your skills.