Network Scanning with Nmap

CybersecurityCybersecurityBeginner
Practice Now

Introduction

In this lab, you'll explore the world of network security by learning how to use Nmap, a powerful and versatile network scanning tool. Nmap (Network Mapper) is an open-source utility used by system administrators and security professionals to discover hosts, services, and vulnerabilities on a network. It's like a flashlight in a dark room, helping you see what's there and what might be hiding.

In this hands-on lab, you'll learn:

  1. How to install and use Nmap
  2. Different types of network scans
  3. How to interpret Nmap results
  4. The importance of network security in real-world contexts

Remember, the skills you learn here are powerful and should only be used ethically and on networks you own or have explicit permission to test. Let's get started!

Installing Nmap

Before we can start exploring networks, we need to equip ourselves with the right tool. In this step, we'll install Nmap on your system.

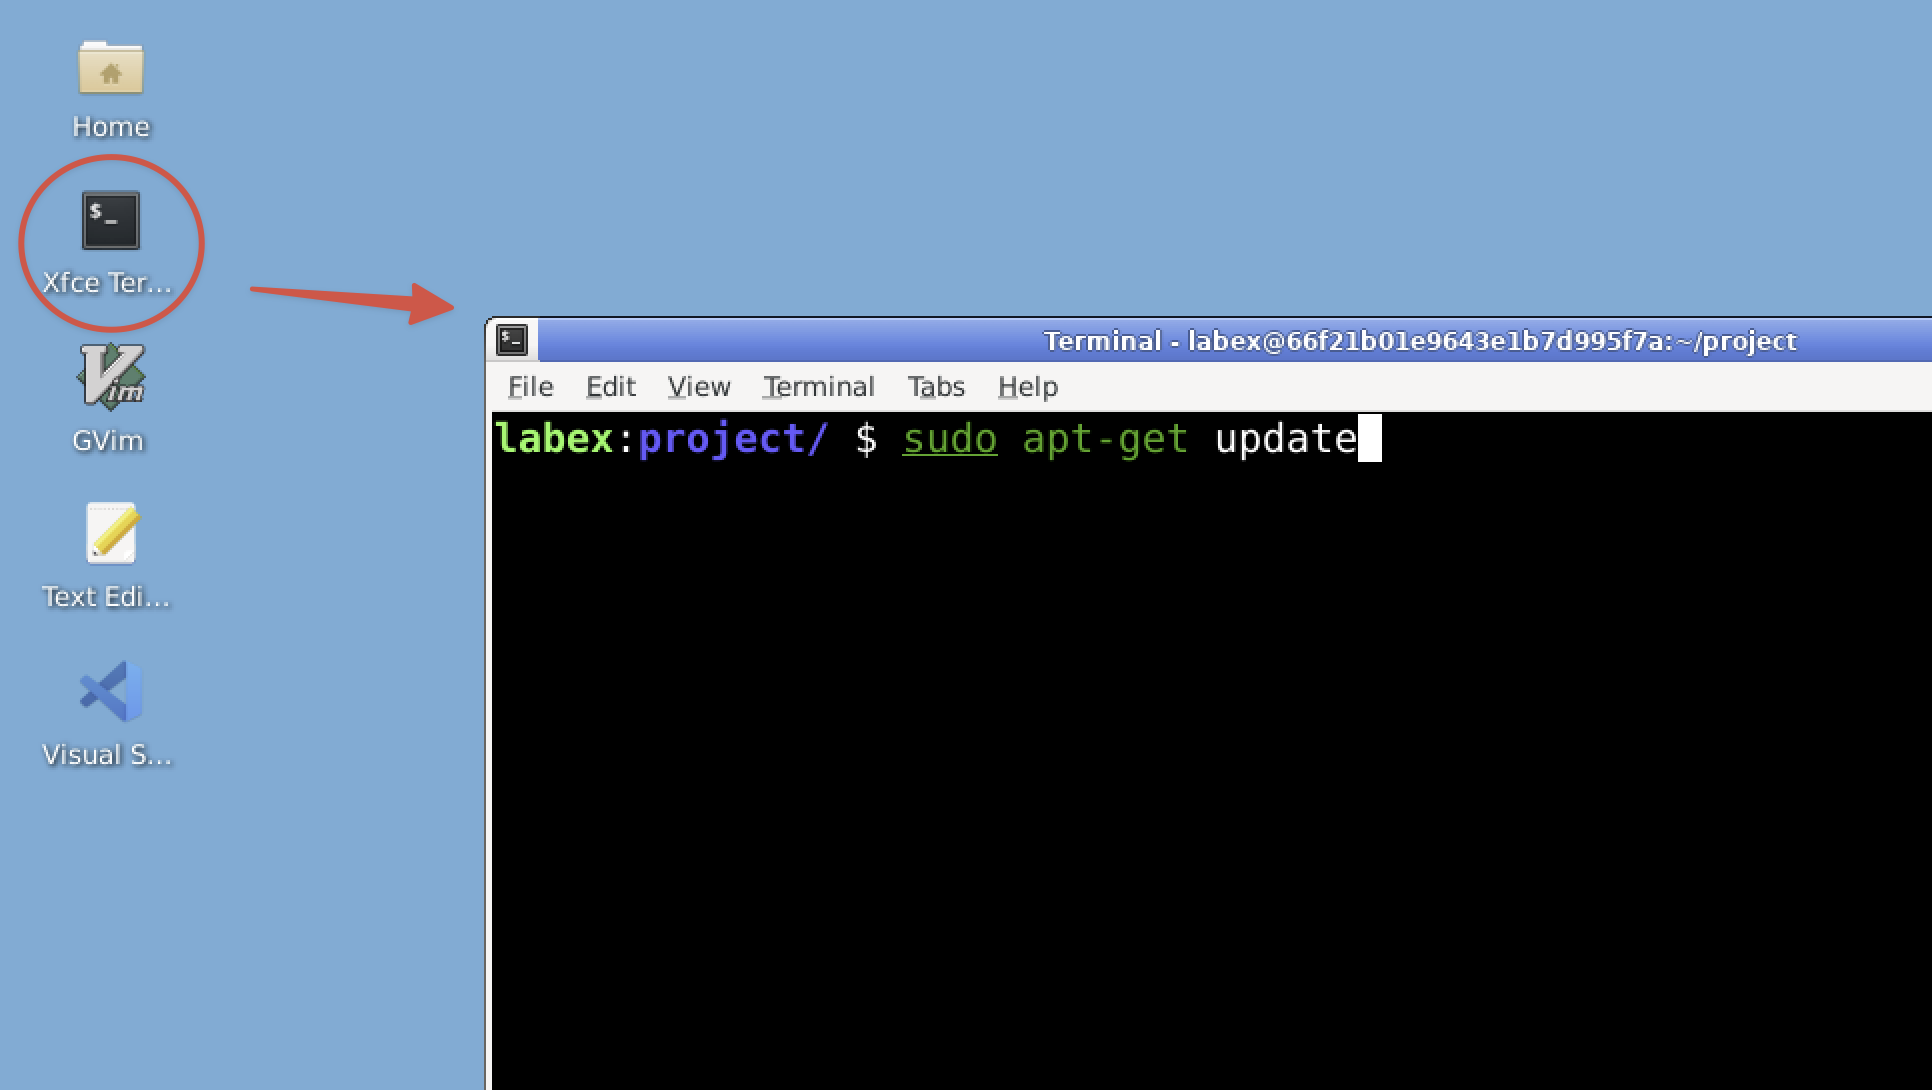
  1. First, let's open the terminal. In the real world, many network operations are performed through a command-line interface, so it's good to get comfortable with it. On your desktop, locate and open the Xfce Terminal.
alt text
  1. Once the terminal is open, we need to update the package lists. This ensures we have the latest information about available software. Type the following command and press Enter:
sudo apt-get update

sudo is used to run commands with administrative privileges.

  1. Now that our package lists are up-to-date, let's install Nmap. Enter the following command:
sudo apt-get install nmap -y

The -y flag automatically answers "yes" to any prompts, making the installation smoother.

  1. After the installation completes, it's a good practice to verify that Nmap was installed correctly. We can do this by checking its version. Enter:
nmap --version

You should see output similar to this:

Nmap version 7.80 ( https://nmap.org )
Platform: x86_64-pc-linux-gnu
Compiled with: liblua-5.3.6 openssl-3.0.2 nmap-libssh2-1.8.2 libz-1.2.11 libpcre-8.39 libpcap-1.10.1 nmap-libdnet-1.12 ipv6
Compiled without:
Available nsock engines: epoll poll select

Don't worry if the version number or some details are different – Nmap is regularly updated.

Congratulations! You've just installed a powerful network scanning tool. Nmap is like a Swiss Army knife for network exploration and security auditing. It has many features, from simple ping scans to advanced vulnerability detection. In this lab, we'll focus on its basic usage to help you understand its capabilities.

If you're curious about what else Nmap can do, you can type man nmap in the terminal. This will show you the manual page for Nmap, detailing all its options and capabilities. Feel free to explore, but don't worry about understanding everything right now – we'll cover the most important parts in this lab.

Understanding IP Addresses

Before we start scanning networks, it's crucial to understand IP addresses. Think of an IP address like a home address for your computer on the network. Just as a postal service needs your home address to deliver mail, other devices on the network need your IP address to communicate with your computer.

  1. An IP address is a unique identifier for a device on a network. It typically looks like a series of numbers separated by dots, such as 192.168.1.1.
graph LR A[Internet] --- B[Router 192.168.1.1] B --- C[PC 192.168.1.10] B --- D[Laptop 192.168.1.11] B --- E[Smartphone 192.168.1.12] B --- F[Smart TV 192.168.1.13] style A fill:#f9f,stroke:#333,stroke-width:4px style B fill:#bbf,stroke:#333,stroke-width:2px style C fill:#dfd,stroke:#333,stroke-width:2px style D fill:#dfd,stroke:#333,stroke-width:2px style E fill:#dfd,stroke:#333,stroke-width:2px style F fill:#dfd,stroke:#333,stroke-width:2px
  1. To find your own IP address, we'll use a command that shows network interface information. Enter this command:
ip addr show | grep inet

Let's break this down:

  • ip addr show displays information about all network interfaces
  • | (pipe) sends that output to the next command
  • grep inet filters the output to show only lines containing "inet", which include IP addresses

You'll see output similar to this:

inet 127.0.0.1/8 scope host lo
inet 172.19.0.3/16 brd 172.19.255.255 scope global eth1
  1. In this output, you'll see several IP addresses. Here's what they mean:

    • 127.0.0.1 is the "localhost" address. Every computer refers to itself as 127.0.0.1. This is used for local connections within your own machine.
    • 172.19.0.3 is your machine's IP address on the network. This is the address other devices would use to communicate with your machine.
  2. Make a note of the IP address that isn't 127.0.0.1 (in this case, 172.19.0.3). We'll use it in the next step.

The /16 after the IP address is called the subnet mask. It defines the size of the network. In this case, /16 means that the first two numbers of the IP address (172.19) define the network, and the last two can be used for individual devices.

If you're wondering about the different types of IP addresses, it's worth noting that there are two main versions of the IP protocol: IPv4 (like 172.19.0.3) and IPv6 (which would start with characters like fe80::). IPv6 was created to solve the problem of running out of IPv4 addresses as more devices connected to the internet. For this lab, we'll focus on IPv4 addresses.

Performing a Basic Nmap Scan

Now that we understand IP addresses and have Nmap installed, let's perform our first network scan. We'll start by scanning our own machine to see what Nmap can tell us about it.

  1. We'll use the IP address you noted in the previous step. Run the following command, replacing <YOUR_IP> with the IP address you found:
nmap <YOUR_IP>

For example, if your IP is 172.19.0.3, you would run:

nmap 172.19.0.3
  1. After you run this command, Nmap will perform a scan and output results. Here's an example of what you might see:
Starting Nmap 7.80 ( https://nmap.org ) at 2024-09-24 10:00 CST
Nmap scan report for 336efdcfb776.external (172.19.0.3)
Host is up (0.00017s latency).
Not shown: 998 closed ports
PORT     STATE SERVICE
22/tcp   open  ssh
3001/tcp open  nessus

Nmap done: 1 IP address (1 host up) scanned in 0.19 seconds
  1. Let's break down this output to understand what Nmap is telling us:

    • "Starting Nmap 7.80": This is the version of Nmap you're using.
    • "Host is up": This confirms that the IP address responded to the scan.
    • "Not shown: 998 closed ports": Nmap scanned 1000 common ports, and 998 of them were closed.
    • "PORT STATE SERVICE": This shows the open ports Nmap found.
      • 22/tcp open ssh: Port 22 is open and typically used for SSH (Secure Shell), a protocol for secure remote access.
      • 3001/tcp open nessus: Port 3001 is open and associated with the Nessus vulnerability scanner.
  2. This basic scan gives us a quick overview of the services running on the machine. In a real-world scenario, this information could be used to:

    • Identify potential vulnerabilities (e.g., an unnecessary open port)
    • Verify that required services are running
    • Detect unexpected services that might indicate a security breach

Remember, in the real world, you should only perform scans on networks and devices you own or have explicit permission to test. Unauthorized scanning can be illegal and unethical.

Performing an OS Detection Scan

Nmap isn't just limited to finding open ports. It can also try to determine the operating system of the target machine. This feature is incredibly useful for network administrators and security professionals because different operating systems have different vulnerabilities and require different security measures.

  1. To perform an OS detection scan, we use the -O flag (note that this is a capital letter 'O', not the number zero). This scan requires root privileges, so we'll use sudo. Run this command, replacing <YOUR_IP> with your actual IP address:
sudo nmap -O <YOUR_IP>

For example, if your IP is 172.19.0.3, you would run:

sudo nmap -O 172.19.0.3
  1. The output will be similar to the basic scan, but with additional information about the operating system. Here's an example:
Starting Nmap 7.80 ( https://nmap.org ) at 2024-09-24 10:01 CST
Nmap scan report for 336efdcfb776.external (172.19.0.3)
Host is up (0.000035s latency).
Not shown: 998 closed ports
PORT     STATE SERVICE
22/tcp   open  ssh
3001/tcp open  nessus
Device type: general purpose
Running: Linux 2.6.X
OS CPE: cpe:/o:linux:linux_kernel:2.6.32
OS details: Linux 2.6.32
Network Distance: 0 hops

OS detection performed. Please report any incorrect results at https://nmap.org/submit/ .
Nmap done: 1 IP address (1 host up) scanned in 1.76 seconds
  1. Let's break down the new information:

    • "Device type: general purpose": This indicates it's a regular computer, not a specialized device like a router or printer.
    • "Running: Linux 2.6.X": Nmap has determined this is likely a Linux system, running kernel version 2.6.X.
    • "OS details: Linux 2.6.32": This is a more specific guess at the kernel version.
  2. In a real-world scenario, this information could be used in several ways:

    • By attackers to target specific vulnerabilities associated with the operating system.
    • By defenders to ensure systems are properly patched and secured.
    • By network administrators to maintain an inventory of systems and ensure all are up to date.

It's worth noting that OS detection isn't always 100% accurate. Nmap makes its best guess based on how the system responds to various probes, but firewalls and other security measures can sometimes interfere with accurate detection.

Scanning a Network Range

In real network environments, you often need to scan multiple IP addresses or entire network segments. This is useful for discovering all the devices on a network, which is a common task for network administrators and security professionals. Let's try scanning a network range.

  1. We'll scan a small range of IP addresses based on the IP we've been using. Let's scan the range 172.19.0.1-20:
nmap 172.19.0.1-20

This command tells Nmap to scan all IP addresses from 172.19.0.1 to 172.19.0.20.

  1. Now, let's scan an entire subnet. We'll use the CIDR notation to specify the network. Run the following command, replacing <YOUR_NETWORK> with your network address:
nmap < YOUR_NETWORK > /24

For example:

nmap 172.19.0.0/24

NMAP scans all 256 IP addresses in the 172.19.0.0/24 network range (where /24 indicates a 24-bit subnet mask) for active hosts and open ports.

  1. To save the output of this scan to a file for later analysis, we can use the -oN flag followed by a filename. Run:
nmap 172.19.0.0/24 -oN network_scan.txt

This will perform the scan and save the results to a file named network_scan.txt in your current directory.

  1. Let's examine the contents of the file:
cat network_scan.txt

The output will show results for each responsive host in the range. Here's an example of what you might see:

## Nmap 7.80 scan initiated Fri Sep 27 15:45:29 2024 as: nmap -oN network_scan.txt 172.19.0.0/24
Nmap scan report for iZrj9gvdh5xn02z8rmsn9mZ (172.19.0.1)
Host is up (0.00045s latency).
Not shown: 997 closed ports
PORT      STATE SERVICE
22/tcp    open  ssh
111/tcp   open  rpcbind
10010/tcp open  rxapi

Nmap scan report for node_openresty.external (172.19.0.2)
Host is up (0.00047s latency).
Not shown: 999 closed ports
PORT   STATE SERVICE
80/tcp open  http

Nmap scan report for 36cff415ddd9.external (172.19.0.3)
Host is up (0.00045s latency).
Not shown: 998 closed ports
PORT     STATE SERVICE
22/tcp   open  ssh
3001/tcp open  nessus

Nmap scan report for 041bf22f47a1.external (172.19.0.4)
Host is up (0.00050s latency).
Not shown: 998 closed ports
PORT     STATE SERVICE
22/tcp   open  ssh
3001/tcp open  nessus

Nmap scan report for 2299e8eff7e5.external (172.19.0.5)
Host is up (0.00048s latency).
Not shown: 998 closed ports
PORT     STATE SERVICE
22/tcp   open  ssh
3001/tcp open  nessus

## Nmap done at Fri Sep 27 15:45:32 2024 -- 256 IP addresses (5 hosts up) scanned in 3.25 seconds
  1. Let's interpret this output:

    • Nmap scanned all 256 IP addresses in the 172.19.0.0/24 network.
    • It found 5 hosts that were up and responsive.
    • For each host, it listed the open ports and services detected.
  2. In a real-world scenario, this type of scan is invaluable for:

    • Network administrators: To maintain an inventory of active hosts and services on their network.
    • Security professionals: To identify all devices on a network and ensure they're all accounted for and secure.
    • Attackers: To identify potential targets on a network, which is why it's crucial to secure networks against unauthorized scanning.

Remember, while this knowledge is powerful, it's crucial to use it responsibly. Always obtain proper authorization before scanning any network that isn't your own.

Summary

Congratulations! You've just taken your first steps into the world of network scanning and security. In this lab, you've gained practical experience with Nmap, one of the most powerful tools in a network professional's toolkit. Let's recap what you've learned:

  1. Installation: You installed Nmap, a crucial skill for setting up your cybersecurity toolkit.
  2. Basic Usage: You performed a simple scan, learning how to identify open ports and services on a single host.
  3. OS Detection: You used Nmap's OS detection feature, understanding how this information can be crucial for both attackers and defenders.
  4. Network Exploration: You scanned a range of IP addresses and an entire subnet, simulating how professionals might map out a network.
  5. Output Management: You learned how to save scan results to a file for later analysis, an essential skill for documenting network audits.

This lab has provided you with a foundation in network scanning, but there's much more to learn about Nmap and network security. To continue your journey and deepen your understanding, we recommend taking the comprehensive "Quick Start with Nmap" course available at https://labex.io/courses/quick-start-with-nmap.

Quick Start with Nmap

This course will build on the skills you've learned today and introduce you to more advanced Nmap techniques and network security concepts.

Remember, the knowledge you've gained is powerful and should be used responsibly. Always ensure you have proper authorization before scanning any network, and use your skills to promote security and ethical practices in the digital world.

Keep learning, stay curious, and happy scanning!

Other Cybersecurity Tutorials you may like