Ansible Cron Module

AnsibleAnsibleBeginner
Practice Now

Introduction

Welcome to the Ansible Cron Module Lab! In this lab, you will learn how to automate the scheduling of tasks using the Ansible Cron module. The cron system is a time-based job scheduler in Unix-like operating systems that enables users to schedule commands or scripts to run automatically at specified times or intervals.

Through this lab, you will learn how to use Ansible to create, manage, and remove cron jobs. The exercises progress from simple to more complex configurations, allowing you to gradually build your skills with the Ansible Cron module. By the end of this lab, you will have practical experience with scheduling tasks in a consistent, automated manner using Ansible.


Skills Graph

%%%%{init: {'theme':'neutral'}}%%%% flowchart RL ansible(("Ansible")) -.-> ansible/PlaybookEssentialsGroup(["Playbook Essentials"]) ansible(("Ansible")) -.-> ansible/ModuleOperationsGroup(["Module Operations"]) ansible/ModuleOperationsGroup -.-> ansible/cron("Schedule Tasks") ansible/ModuleOperationsGroup -.-> ansible/shell("Execute Shell Commands") ansible/PlaybookEssentialsGroup -.-> ansible/playbook("Execute Playbook") subgraph Lab Skills ansible/cron -.-> lab-290157{{"Ansible Cron Module"}} ansible/shell -.-> lab-290157{{"Ansible Cron Module"}} ansible/playbook -.-> lab-290157{{"Ansible Cron Module"}} end

Create a Simple Cron Job

In this step, you will create your first cron job using the Ansible Cron module. The cron job will execute a simple shell script at regular intervals.

Understanding Cron

Before we begin, let's understand what cron is. Cron is a time-based job scheduler in Unix-like operating systems that allows users to schedule commands or scripts to run automatically at specified times or intervals. Cron jobs are useful for automating system maintenance tasks, backups, or any recurring task.

Creating the Ansible Playbook

First, you need to create an Ansible playbook that will set up the cron job. In the WebIDE, create a new file at the path /home/labex/project/cron_module_playbook.yaml by clicking on the "New File" button in the file explorer panel.

New File

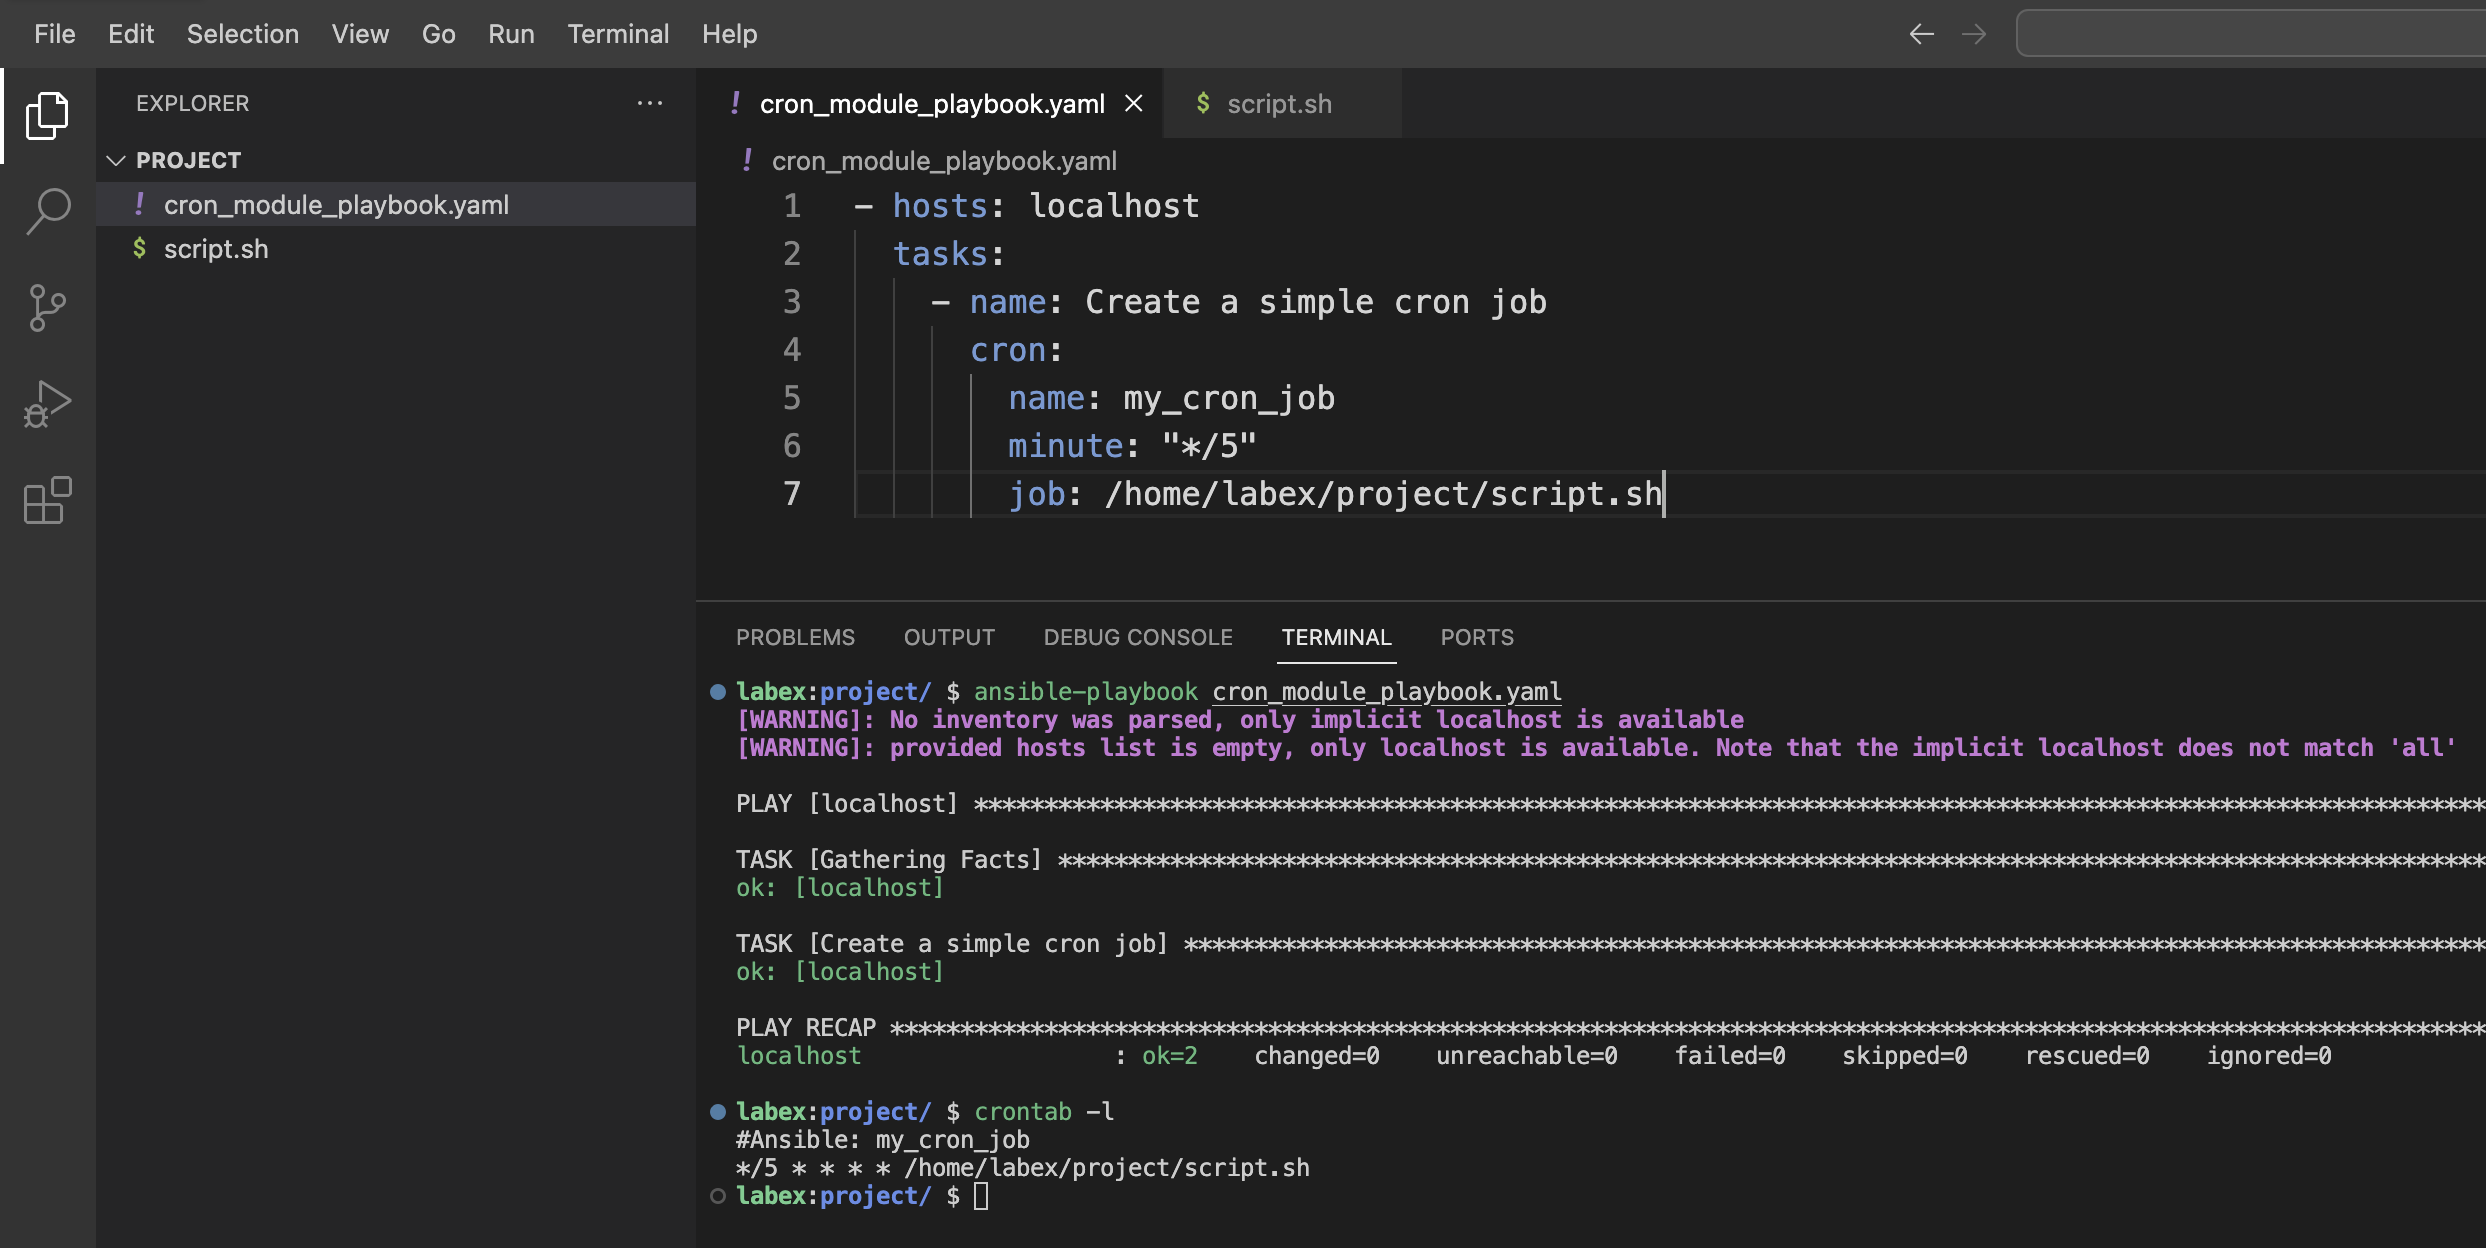
Enter the following content into the file:

- hosts: localhost
  tasks:
    - name: Create a simple cron job
      cron:
        name: my_cron_job
        minute: "*/5"
        job: /home/labex/project/script.sh

Let's examine each part of this playbook:

  • hosts: localhost - This specifies that the playbook will run on the local machine.
  • tasks - This section contains the list of tasks to be executed.
  • cron - This is the Ansible module used to manage cron jobs.
  • name: my_cron_job - This sets a descriptive name for the cron job, making it easier to identify in the crontab.
  • minute: "*/5" - This schedules the job to run every 5 minutes. The */5 syntax means "every minute divisible by 5" (0, 5, 10, 15, etc.).
  • job: /home/labex/project/script.sh - This specifies the command or script to be executed by the cron job.

Creating the Shell Script

Now, you need to create the shell script that the cron job will execute. Create a new file at the path /home/labex/project/script.sh in the WebIDE.

Enter the following content into the script file:

#!/bin/bash
echo "This is a simple script." >> /home/labex/project/cron_output.log
date >> /home/labex/project/cron_output.log

This simple script will append a message and the current date to a log file each time it runs.

Making the Script Executable

Before running the playbook, you need to make the script executable. Open a terminal in the WebIDE and run the following command:

chmod +x /home/labex/project/script.sh

Running the Ansible Playbook

Now, run the Ansible playbook to create the cron job. In the terminal, execute the following command:

cd /home/labex/project
ansible-playbook cron_module_playbook.yaml

You should see output similar to this:

[WARNING]: No inventory was parsed, only implicit localhost is available
[WARNING]: provided hosts list is empty, only localhost is available. Note that
the implicit localhost does not match 'all'

PLAY [localhost] ***************************************************************

TASK [Gathering Facts] *********************************************************
ok: [localhost]

TASK [Create a simple cron job] ************************************************
changed: [localhost]

PLAY RECAP *********************************************************************
localhost                  : ok=2    changed=1    unreachable=0    failed=0    skipped=0    rescued=0    ignored=0

The changed: [localhost] line indicates that the cron job was successfully created.

Verifying the Cron Job

To verify that the cron job has been created, check the crontab on the system with the following command:

crontab -l

You should see output similar to this:

#Ansible: my_cron_job
*/5 * * * * /home/labex/project/script.sh

The line #Ansible: my_cron_job is a comment added by Ansible to identify the cron job. The */5 * * * * part represents the schedule (every 5 minutes), and /home/labex/project/script.sh is the command to be executed.

Congratulations! You have successfully created a cron job using the Ansible Cron module. The job will run the script every 5 minutes.

Schedule a Task with Custom Time

In this step, you will learn how to schedule a cron job to run at a specific time rather than at regular intervals. This is useful for tasks that need to be executed at particular times of the day, such as backups, data processing, or generating reports.

Understanding Cron Time Format

The cron time format consists of five fields, representing:

  1. Minute (0-59)
  2. Hour (0-23)
  3. Day of the month (1-31)
  4. Month (1-12)
  5. Day of the week (0-7, where both 0 and 7 represent Sunday)

When you specify a value for each field, the cron job will run when all the conditions match. For example, 0 9 * * * means "run at 9:00 AM every day" (minute 0 of hour 9, any day of the month, any month, any day of the week).

Modifying the Ansible Playbook

Now, let's modify the existing playbook to create a new cron job that runs at a specific time. Open the file /home/labex/project/cron_module_playbook.yaml in the WebIDE and replace its contents with the following:

- hosts: localhost
  tasks:
    - name: Schedule a task with custom time
      cron:
        name: custom_cron_job
        minute: "0"
        hour: "9"
        job: /home/labex/project/script.sh

The changes in this playbook include:

  • name: custom_cron_job - We're creating a new cron job with a different name.
  • minute: "0" - This sets the job to run at minute 0 (the top of the hour).
  • hour: "9" - This sets the job to run at 9 AM.

The remaining fields (day of month, month, day of week) are not specified, which means they default to * (any value). So this job will run at 9:00 AM every day.

Running the Modified Playbook

Now, run the modified Ansible playbook to create the new cron job. In the terminal, execute the following command:

cd /home/labex/project
ansible-playbook cron_module_playbook.yaml

You should see output similar to this:

[WARNING]: No inventory was parsed, only implicit localhost is available
[WARNING]: provided hosts list is empty, only localhost is available. Note that
the implicit localhost does not match 'all'

PLAY [localhost] ***************************************************************

TASK [Gathering Facts] *********************************************************
ok: [localhost]

TASK [Schedule a task with custom time] ****************************************
changed: [localhost]

PLAY RECAP *********************************************************************
localhost                  : ok=2    changed=1    unreachable=0    failed=0    skipped=0    rescued=0    ignored=0

Verifying the New Cron Job

To verify that the new cron job has been created, check the crontab on the system:

crontab -l

You should now see two cron jobs in the output:

#Ansible: my_cron_job
*/5 * * * * /home/labex/project/script.sh
#Ansible: custom_cron_job
0 9 * * * /home/labex/project/script.sh

The first job is the one you created in Step 1, which runs every 5 minutes. The second job is the new one you just created, which runs at 9:00 AM every day.

Additional Cron Scheduling Examples

Here are some additional examples of cron scheduling to help you understand the time format better:

  • 0 * * * * - Run at the beginning of every hour
  • 0 0 * * * - Run at midnight every day
  • 0 0 1 * * - Run at midnight on the first day of every month
  • 0 0 * * 0 - Run at midnight every Sunday
  • 0 12 * * 1-5 - Run at noon on weekdays (Monday through Friday)

Understanding these patterns will help you schedule your tasks more effectively using the Ansible Cron module.

Congratulations! You have successfully scheduled a cron job to run at a specific time using the Ansible Cron module.

Ensure a Cron Job Runs as a Specific User

In this step, you will learn how to specify which user a cron job should run as. This is an important aspect of system administration and security, as it allows you to control the permissions and environment under which scheduled tasks execute.

Understanding User Context for Cron Jobs

In Unix-like systems, cron jobs inherit the permissions and environment of the user who owns them. This means:

  1. The job can only access files and resources that the user has permission to access
  2. The job runs with the user's environment variables and settings
  3. Any files created by the job will be owned by the user

By default, when you use the Ansible Cron module without specifying a user, the cron job is created for the user running the Ansible playbook. However, you can explicitly set a different user with the user parameter.

Modifying the Ansible Playbook

Let's modify our playbook to specify that the cron job should run as the labex user. Open the file /home/labex/project/cron_module_playbook.yaml in the WebIDE and replace its contents with the following:

- hosts: localhost
  tasks:
    - name: Schedule a task with custom time for specific user
      cron:
        name: custom_cron_job
        minute: "0"
        hour: "9"
        job: /home/labex/project/script.sh
        user: labex

The key addition here is:

  • user: labex - This parameter specifies that the cron job should be created for the labex user.

Even though we're already running as the labex user in this environment, explicitly setting it is a good practice for clarity and portability of your playbooks to other environments.

Running the Modified Playbook

Now, run the modified Ansible playbook to update the cron job. In the terminal, execute the following command:

cd /home/labex/project
ansible-playbook cron_module_playbook.yaml

You should see output similar to this:

[WARNING]: No inventory was parsed, only implicit localhost is available
[WARNING]: provided hosts list is empty, only localhost is available. Note that
the implicit localhost does not match 'all'

PLAY [localhost] ***************************************************************

TASK [Gathering Facts] *********************************************************
ok: [localhost]

TASK [Schedule a task with custom time for specific user] **********************
ok: [localhost]

PLAY RECAP *********************************************************************
localhost                  : ok=2    changed=0    unreachable=0    failed=0    skipped=0    rescued=0    ignored=0

Notice that the output shows ok instead of changed. This is because the cron job already exists, and the only change is the user parameter which in this case is already correct (since we were running as the labex user from the beginning).

Verifying the Cron Job

To verify that the cron job is still properly configured, check the crontab:

crontab -l

You should see output similar to:

#Ansible: my_cron_job
*/5 * * * * /home/labex/project/script.sh
#Ansible: custom_cron_job
0 9 * * * /home/labex/project/script.sh

Viewing Cron Jobs for a Specific User

If you want to see the cron jobs for a specific user, you can use the -u option with the crontab command:

sudo crontab -u labex -l

This command shows all cron jobs scheduled for the labex user. In a production environment, you might have different cron jobs running as different users depending on the access levels and permissions required for each task.

Security Considerations

When scheduling cron jobs for different users, consider the following security practices:

  1. Use the principle of least privilege - assign cron jobs to users with only the permissions they need to perform their tasks
  2. Avoid scheduling tasks as the root user unless absolutely necessary
  3. Ensure scripts run by cron jobs have appropriate permissions and error handling
  4. Consider using configuration management tools like Ansible to maintain consistent cron job settings across your infrastructure

Congratulations! You have successfully configured a cron job to run as a specific user using the Ansible Cron module. This skill will help you manage system tasks more securely and effectively.

Remove a Cron Job

In this step, you will learn how to remove unwanted cron jobs using the Ansible Cron module. Managing the complete lifecycle of cron jobs is an important skill for system administrators and DevOps engineers.

Why Remove Cron Jobs

There are several reasons why you might need to remove cron jobs:

  1. The scheduled task is no longer needed
  2. You want to replace an existing job with a new configuration
  3. You need to clean up the system to improve maintainability
  4. The task needs to be temporarily disabled

Ansible makes it easy to remove cron jobs in a systematic and repeatable way across your infrastructure.

Understanding the State Parameter

The Ansible Cron module uses the state parameter to control whether a cron job should be present or absent:

  • state: present - This is the default. It ensures the cron job exists with the specified configuration.
  • state: absent - This ensures the cron job does not exist, removing it if it was previously created.

Modifying the Ansible Playbook

Let's modify our playbook to remove the first cron job we created (named my_cron_job). Open the file /home/labex/project/cron_module_playbook.yaml in the WebIDE and replace its contents with the following:

- hosts: localhost
  tasks:
    - name: Remove the cron job
      cron:
        name: my_cron_job
        state: absent

The key elements of this playbook are:

  • name: my_cron_job - This identifies the cron job to be removed by its name.
  • state: absent - This tells Ansible to ensure the cron job does not exist.

Note that we only need to specify the name of the cron job to identify it for removal. The other parameters (like minute, hour, job, etc.) are not needed.

Running the Modified Playbook

Now, run the modified Ansible playbook to remove the cron job. In the terminal, execute the following command:

cd /home/labex/project
ansible-playbook cron_module_playbook.yaml

You should see output similar to this:

[WARNING]: No inventory was parsed, only implicit localhost is available
[WARNING]: provided hosts list is empty, only localhost is available. Note that
the implicit localhost does not match 'all'

PLAY [localhost] ***************************************************************

TASK [Gathering Facts] *********************************************************
ok: [localhost]

TASK [Remove the cron job] *****************************************************
changed: [localhost]

PLAY RECAP *********************************************************************
localhost                  : ok=2    changed=1    unreachable=0    failed=0    skipped=0    rescued=0    ignored=0

The changed: [localhost] line indicates that the cron job was successfully removed.

Verifying the Cron Job Removal

To verify that the cron job has been removed, check the crontab on the system:

crontab -l

You should now see only the second cron job in the output:

#Ansible: custom_cron_job
0 9 * * * /home/labex/project/script.sh

The my_cron_job entry has been removed, as requested in our playbook.

Idempotence in Ansible

One of the key features of Ansible is idempotence - the property that applying the same operation multiple times gives the same result as applying it once. This is especially useful for tasks like removing cron jobs.

Let's run the playbook again to demonstrate this:

ansible-playbook cron_module_playbook.yaml

You should see output similar to:

[WARNING]: No inventory was parsed, only implicit localhost is available
[WARNING]: provided hosts list is empty, only localhost is available. Note that
the implicit localhost does not match 'all'

PLAY [localhost] ***************************************************************

TASK [Gathering Facts] *********************************************************
ok: [localhost]

TASK [Remove the cron job] *****************************************************
ok: [localhost]

PLAY RECAP *********************************************************************
localhost                  : ok=2    changed=0    unreachable=0    failed=0    skipped=0    rescued=0    ignored=0

Notice that the second time, the output shows ok instead of changed for the removal task. This is because the cron job was already removed, so no changes were needed.

Managing Multiple Cron Jobs

In real-world scenarios, you might need to manage multiple cron jobs in a single playbook. You can include multiple cron tasks, each with its own configuration:

- hosts: localhost
  tasks:
    - name: Remove first cron job
      cron:
        name: job1
        state: absent

    - name: Create second cron job
      cron:
        name: job2
        minute: "0"
        hour: "12"
        job: /path/to/script.sh

    - name: Update third cron job
      cron:
        name: job3
        minute: "*/10"
        job: /path/to/another/script.sh

This approach allows you to manage the complete lifecycle of all your cron jobs in a single, version-controlled playbook.

Congratulations! You have successfully learned how to remove cron jobs using the Ansible Cron module. This completes the basic lifecycle management of cron jobs: creation, modification, and removal.

Summary

Congratulations on completing the Ansible Cron Module Lab! Throughout this lab, you have gained practical experience with several key aspects of managing scheduled tasks using Ansible:

  1. Creating simple cron jobs that run at regular intervals
  2. Scheduling tasks to run at specific times using custom cron time expressions
  3. Ensuring cron jobs run as specific users for proper security and permission management
  4. Removing cron jobs that are no longer needed

These skills are essential for automating system administration tasks, maintenance operations, and recurring processes in any Linux environment. By using Ansible to manage your cron jobs, you benefit from:

  • Consistent configuration across multiple systems
  • Version control of your job schedules
  • Idempotent operations that can be applied repeatedly
  • Automated deployment and management of scheduled tasks

As you continue to work with Ansible, consider exploring more advanced features of the Cron module, such as:

  • Setting environment variables for cron jobs
  • Using special time specifications like @daily or @reboot
  • Combining cron management with other Ansible modules for comprehensive automation solutions

The ability to effectively manage scheduled tasks is a valuable skill that will serve you well in system administration, DevOps, and other IT roles.