はじめに
このプロジェクトでは、YAML ファイルを使用して Spring Boot アプリケーションを構成し、構成データを処理するクラスを実装し、構成情報を Web ページに表示するコントローラを作成する方法を学びます。
👀 プレビュー
🎯 タスク
このプロジェクトでは、以下を学びます。
- YAML ファイルを使用してアプリケーション プロパティを構成する方法
- 構成データを処理する
Studentクラスを実装する方法 - 構成データを Web ページに表示する
StudentControllerを作成する方法 - 起動クラスを変更して、プロジェクト パッケージ内のすべてのクラスをスキャンする方法
🏆 成果
このプロジェクトを完了すると、以下ができるようになります。
- アプリケーション構成に YAML ファイルを使用する
@ConfigurationPropertiesアノテーションを使用して構成データをクラスに自動的にバインドする@Valueアノテーションを使用して構成値をコントローラに注入する@SpringBootApplicationアノテーションを使用してコンポーネント スキャンを構成する- 構成データを表示する単純な Web アプリケーションを開発する
YAML ファイルを設定する
このステップでは、YAML ファイルを使用してアプリケーション プロパティを構成する方法を学びます。このステップを完了するには、以下の手順に従ってください。
- プロジェクト内の
src/main/resourcesディレクトリに移動します。 application.ymlという名前の新しいファイルを作成します。application.ymlファイルに、以下の構成を追加します。
## Self-defined properties
school: Stanford University

student:
  id: 2024000103
  name: Taylor Joy
  age: 18
  courseId: 100018, 321001, 458911
この YAML 構成は、school プロパティと student プロパティを定義しており、学生 ID、名前、年齢、コース ID が含まれています。
Student クラスを実装する
このステップでは、構成データを処理するための Student クラスを実装します。
org.labex.entityパッケージに移動し、Student.javaという名前の新しいファイルを作成します。Student.javaファイルに、以下のコードを追加します。
package org.labex.entity;

import org.springframework.boot.context.properties.ConfigurationProperties;
import org.springframework.stereotype.Component;

import java.util.Arrays;

@Component
@ConfigurationProperties(prefix = "student")
public class Student {
    private String id;
    private String name;
    private int age;
    private int[] courseId;

    @Override
    public String toString() {
        return "Student {id=" + id +
                ", name=" + name +
                ", age=" + age +
                ", course id=" + Arrays.toString(courseId) + "}";
    }

    // Getters and setters
    //...
}
このクラスでは、@Component と @ConfigurationProperties アノテーションを使用して、application.yml ファイルのプロパティを Student クラスの対応するフィールドに自動的にバインドします。
StudentController を実装する
このステップでは、構成済みのデータを表示するための StudentController を実装します。
org.labex.controllerパッケージに移動し、StudentController.javaという名前の新しいファイルを作成します。StudentController.javaファイルに、以下のコードを追加します。
package org.labex.controller;

import org.labex.entity.Student;
import org.springframework.beans.factory.annotation.Autowired;
import org.springframework.beans.factory.annotation.Value;
import org.springframework.web.bind.annotation.GetMapping;
import org.springframework.web.bind.annotation.RestController;

@RestController
public class StudentController {
    @Value("${school}")
    private String school;

    @Autowired
    private Student student;

    @GetMapping("/student")
    public String getStudent() {
        return "school=" + school + student.toString();
    }
}
このコントローラでは、@Value アノテーションを使用して school プロパティを注入し、@Autowired アノテーションを使用して Student オブジェクトを注入します。getStudent() メソッドは、/student エンドポイント経由でアクセスされたときに、構成済みのデータをブラウザに表示します。
起動クラスを変更する
このステップでは、起動クラスを変更して、org.labex パッケージ内のすべてのクラスをスキャンするようにします。
org.labex.springbootyamlパッケージに移動し、DemoApplication.javaファイルを開きます。DemoApplicationクラスを以下のように更新します。
package org.labex.springbootyaml;

import org.springframework.boot.SpringApplication;
import org.springframework.boot.autoconfigure.SpringBootApplication;

@SpringBootApplication(scanBasePackages="org.labex")
public class DemoApplication {
    public static void main(String[] args) {
        SpringApplication.run(DemoApplication.class, args);
    }
}
@SpringBootApplication アノテーションに scanBasePackages="org.labex" を追加することで、org.labex パッケージ内のすべてのクラスが Spring コンテキストによってスキャンされ、管理されるようになります。
アプリケーションをパッケージ化して実行する
この最後のステップでは、アプリケーションを JAR ファイルにパッケージ化し、Spring Boot サービスを実行します。
- ターミナルを開き、以下のコマンドを使用してプロジェクトのルート ディレクトリに移動します。
cd ~/project/springbootyaml/
- 以下のコマンドを実行して、Spring Boot サービスをパッケージ化して起動します。
mvn clean package
mvn spring-boot:run
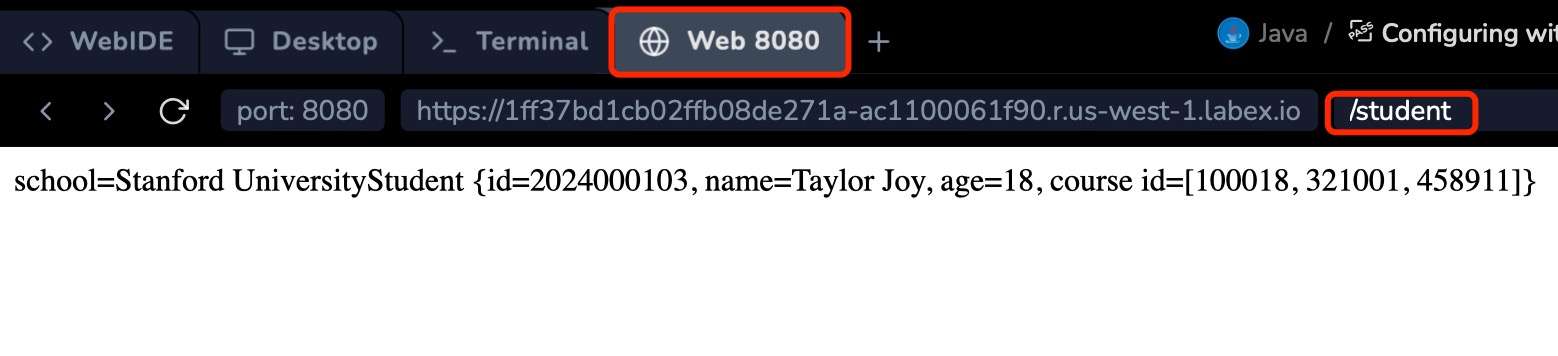
- サービスが実行されたら、Web ブラウザを開き、
http://localhost:8080/studentに移動します。ページに構成済みの学校と学生の情報が表示されるはずです。
出力は以下のようになります。
おめでとうございます!YAML ファイルを使用してアプリケーションを構成し、必要なクラスを実装し、Spring Boot サービスを実行することで、正常にプロジェクトを完了しました。
まとめ
おめでとうございます!このプロジェクトを完了しました。技術力を向上させるために、LabEx でさらに多くの実験を行って練習してください。