Introduction
Welcome to your first Java lab! If you're new to programming or have never heard of Java before, don't worry - we're here to guide you through every step. In this lab, you'll learn what Java is, why it's important, and how to write your very first Java program. By the end of this lab, you'll have a basic understanding of Java and be able to create a simple interactive program. Let's get started on this exciting journey into the world of programming!
Setting Up Your Java Environment
Welcome to the exciting world of Java programming! Before we start writing code, let's understand what Java is and why it's so popular.
Java is a programming language, which means it's a way to give instructions to a computer. Think of it like a special language that computers can understand. Java is special because it's versatile - it's used to create all sorts of things:
- Mobile apps that you might use on your smartphone
- Websites that you visit every day
- Programs that run on your computer
- Even software for things like smart TVs or car entertainment systems!

One of the coolest things about Java is that it follows a principle called "write once, run anywhere." This means that a Java program you write on your computer can run on almost any device that supports Java, without any changes. It's like writing a letter that can be read by anyone, no matter what language they speak!
You might be wondering, "Why should I learn Java?" Great question! Here are a few reasons:
- It's widely used in the professional world. Big companies like Amazon, Google, and Netflix use Java.
- It's a great language for beginners because it's relatively easy to read and understand.
- Once you learn Java, it's easier to learn other programming languages.
- Java programmers are in high demand, which means good job opportunities!
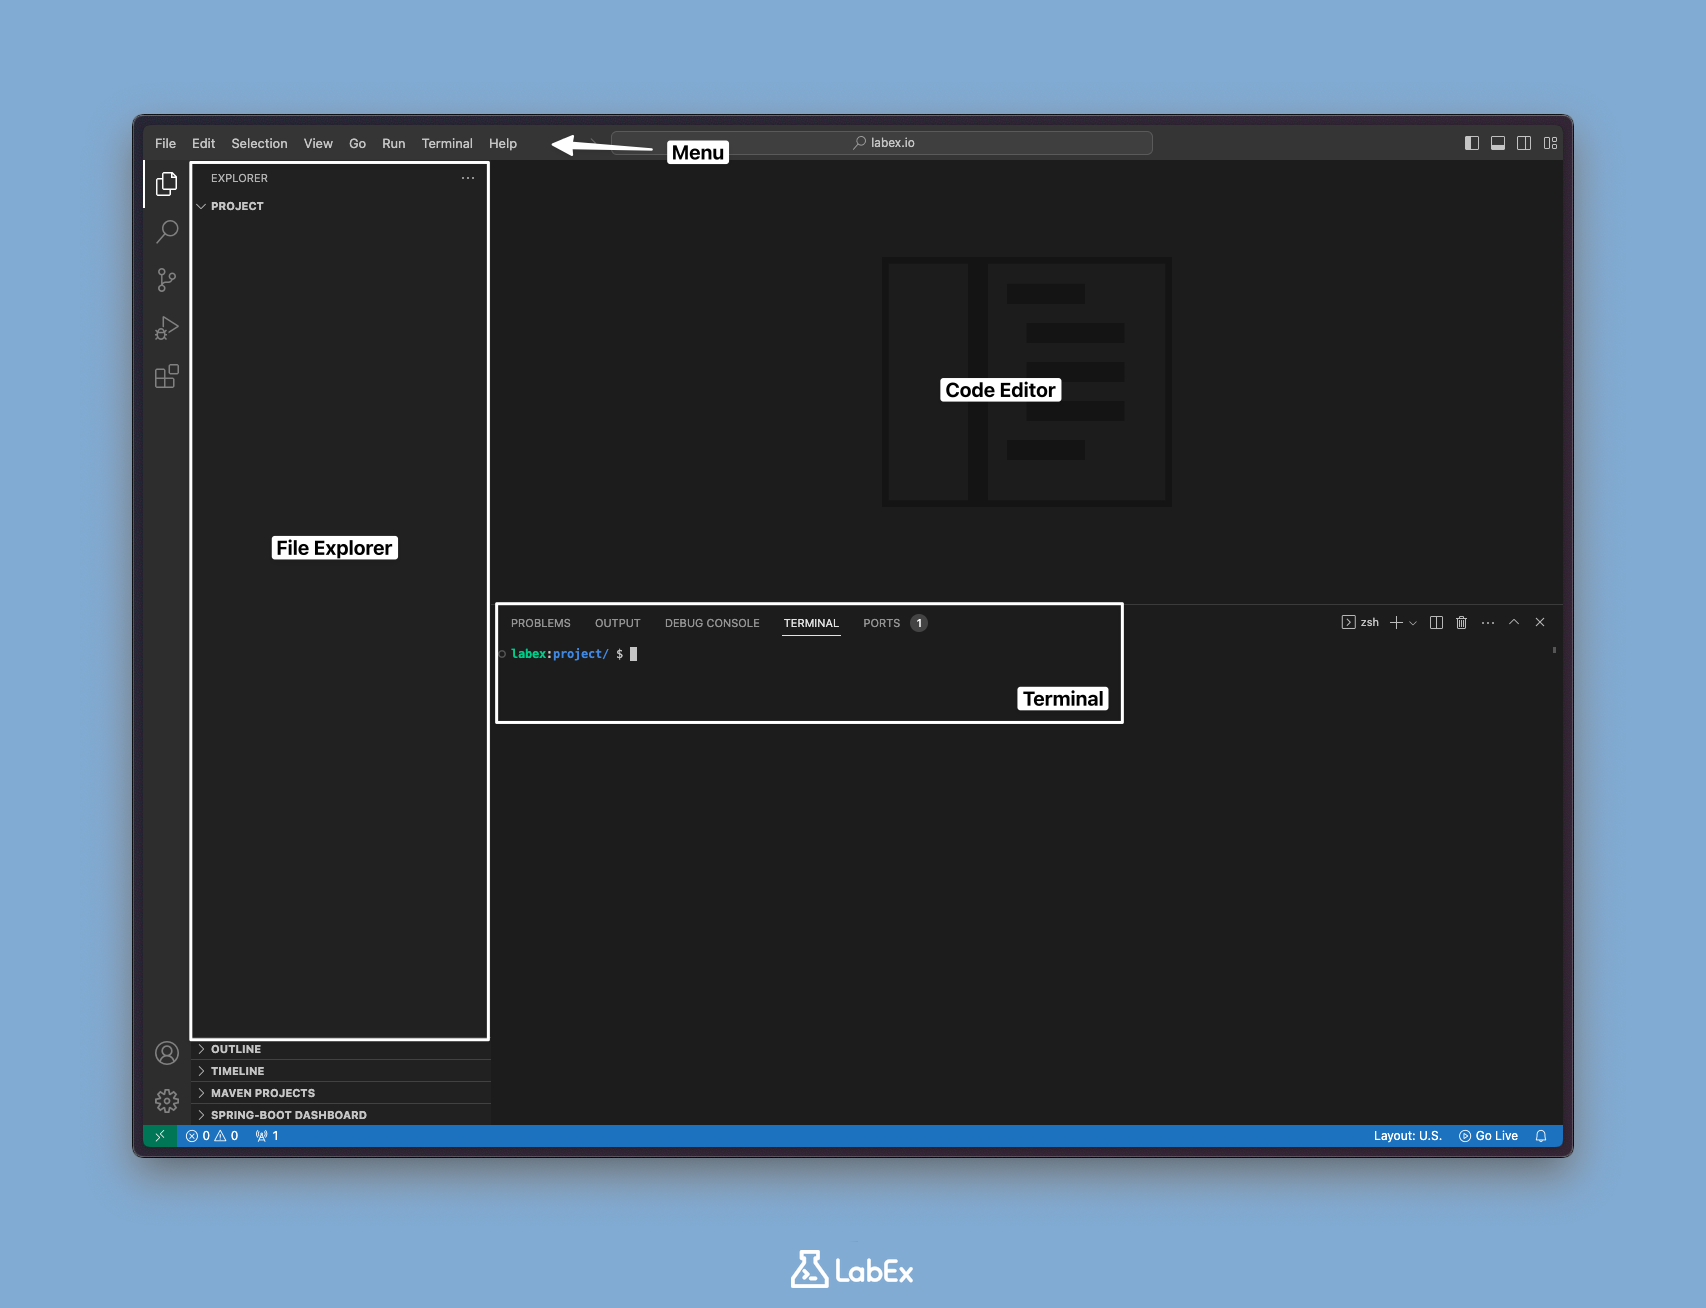
Now, let's talk about where we'll be writing our Java code. We'll be using something called WebIDE. IDE stands for Integrated Development Environment, which is a fancy way of saying "a place where we write and run our code."
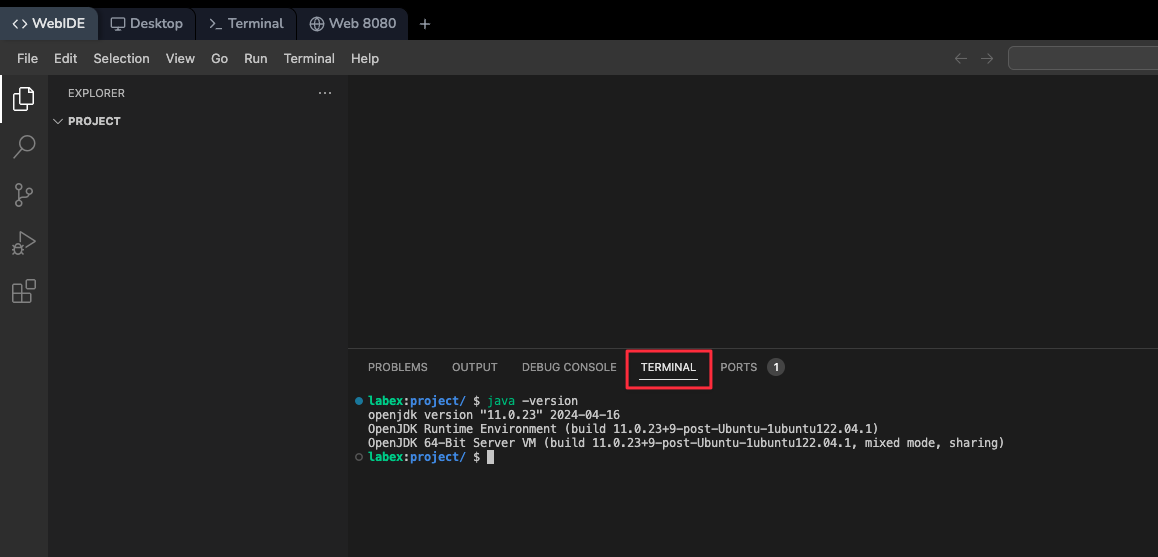
Here's what WebIDE looks like:
Note: Click on the image to see a larger version.
Let's break it down:
- On the left side, you see a list of files. This is called the File Explorer. It's like a folder on your computer where you keep all your documents.
- The big area in the middle is where we'll write our code. This is called the Code Editor. It's like a super-smart notepad that understands Java.
- At the bottom, you see a black box. This is called the Terminal. We'll use it to run special commands that will compile and run our Java programs. Don't worry if you don't understand these terms yet - we'll explain them as we go along!
Don't feel overwhelmed if this looks complicated. We'll go through each part step by step, and soon you'll be navigating WebIDE like a pro!
Now that you know what Java is and where we'll be working, are you ready to write your first Java program? Let's go!
Setting Up Your Java Environment
Before we start coding, we need to make sure that Java is correctly set up on our computer. This is like checking if we have all the right tools before starting a project.
First, let's open the Terminal. Look at the bottom of your WebIDE and you should see a tab that says "TERMINAL". Click on it to open the Terminal. You should see a prompt that ends with a
$symbol. This is where we'll type our commands.Now, we're going to check if Java is installed and what version we have. Type the following command exactly as you see it here and press Enter:
java -versionThis command is asking the computer "Hey, do you have Java installed, and if so, what version?"
Note: Click on the image to see a larger version.
After you press Enter, you should see something like this:
openjdk version "11.0.23" 2024-04-16
OpenJDK Runtime Environment (build 11.0.23+9-post-Ubuntu-1ubuntu122.04.1)
OpenJDK 64-Bit Server VM (build 11.0.23+9-post-Ubuntu-1ubuntu122.04.1, mixed mode, sharing)
Don't worry if the numbers are slightly different. The important thing is that you see "openjdk version" followed by some numbers. This means Java is installed!
Next, we need to check if we have the Java compiler installed. The compiler is what turns our human-readable Java code into something the computer can understand. Type this command and press Enter:
javac -versionYou should see something like:
javac 11.0.23Again, the exact numbers might be different, but as long as you see "javac" followed by some numbers, you're good to go!
If you've successfully run both these commands and seen similar output, congratulations! Your Java environment is set up and ready to go. If you encountered any errors or didn't see the expected output, don't worry. Ask for help, and we'll make sure everything is set up correctly before moving on.
Now that we've confirmed Java is ready, let's write our first program!
Creating Your First Java Program
Exciting times ahead! We're about to create your very first Java program. This program will be simple, but it's an important first step in your programming journey.
First, we need to make sure we're in the right place. In the Terminal, type the following command and press Enter:
cd ~/projectThis command changes our current directory (folder) to the
projectfolder in our home directory. Think of it as opening the right folder on your computer.Now, let's create a new file for our Java program. We'll call it
HelloJava.java. You can create this file in two ways:a. Using the WebIDE: Look at the File Explorer on the left. Right-click in the empty space, select "New File", and type
HelloJava.java.b. Using the Terminal: Type the following command and press Enter:
touch HelloJava.javaThe
touchcommand creates a new, empty file.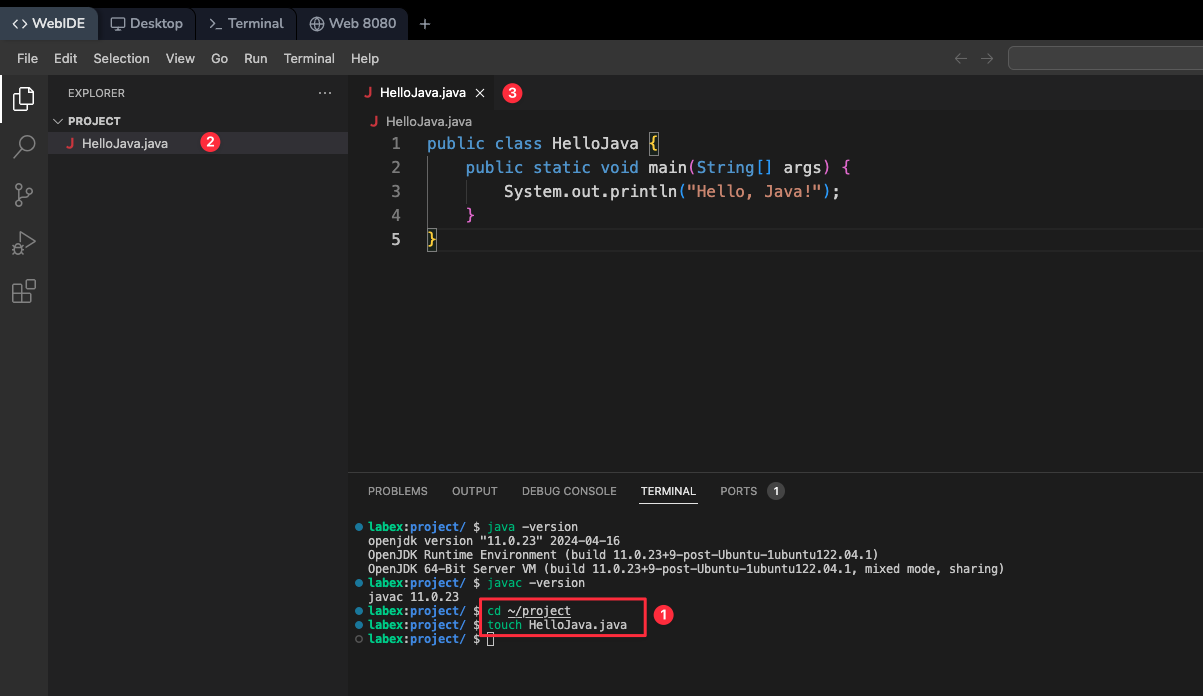
Now that we've created the file, let's open it in the Code Editor. In the File Explorer on the left, click on
HelloJava.java. The file should open in the main editor area.It's time to write our first Java code! Copy and paste the following code into the editor:
public class HelloJava {
    public static void main(String[] args) {
        System.out.println("Hello, Java!");
    }
}
Tips:
- You can also type the code manually if you prefer, but be careful to get it right!
- Copy and paste by right-clicking, if the usual shortcuts don't work.
Don't worry if this looks confusing - we'll explain what each part means:
public class HelloJava: This line declares a new class namedHelloJava. In Java, everything needs to be in a class, and the class name must match the file name (that's why we named our fileHelloJava.java).public static void main(String[] args): This is the main method. Every Java program starts running from this method. It's like the entry point of our program.System.out.println("Hello, Java!");: This line tells the computer to print the text "Hello, Java!" to the screen. It's how we make our program say hello!
After pasting the code, save the file. You can do this by pressing Ctrl+S (or Cmd+S on Mac), or by going to File > Save in the top menu.
Congratulations! You've just written your first Java program. In the next step, we'll learn how to run it and see it in action.
Compiling Your Java Program
Now that we've written our Java program, we need to compile it. Compiling is the process of translating our human-readable Java code into a language that the computer can understand and execute.
Make sure you're still in the right directory. If you're not sure, you can always use the
cd ~/projectcommand in the Terminal to get back to the right place.To compile our Java program, we use the
javaccommand, which stands for "Java compiler". Type the following command in the Terminal and press Enter:javac HelloJava.javaIf everything goes well, you won't see any output. In programming, no news is often good news!
To check if the compilation was successful, we can look for a new file that should have been created. Type this command and press Enter:
lsThis command lists all the files in the current directory. You should see both
HelloJava.javaandHelloJava.classin the output.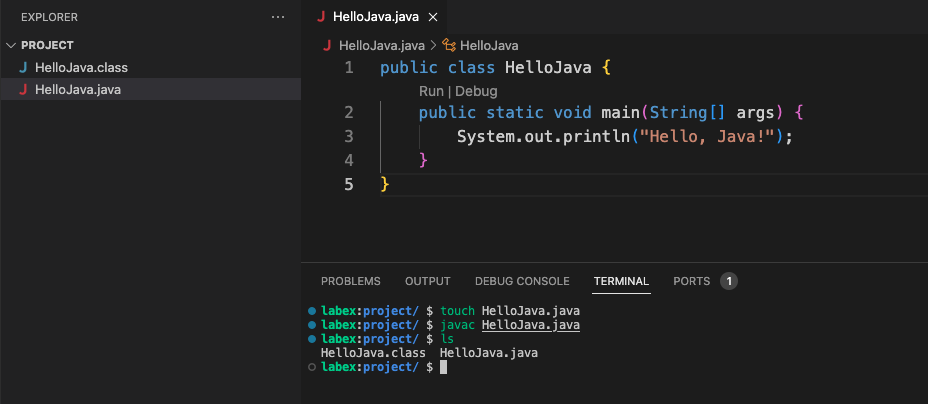
The
HelloJava.classfile is the compiled version of our program. It contains the bytecode that Java can run.
If you don't see the HelloJava.class file, or if you saw any error messages during compilation, don't panic! Here are a few things to check:
- Make sure you saved the
HelloJava.javafile after writing the code. - Check that the class name in your code (
HelloJava) matches the file name exactly. - Look for any typos in the code, especially missing semicolons (
;) at the end of lines.
If you're still having trouble, don't hesitate to ask for help. Debugging (fixing errors) is a normal part of programming, and even experienced programmers encounter compilation errors all the time!
Note: The
javaccommand is used to compile Java programs. It reads the source code (.javafiles) and generates bytecode (.classfiles) that can be executed by the Java Virtual Machine (JVM). The JVM is a program that runs Java bytecode on different platforms, making Java a "write once, run anywhere" language. You also can ask Labby (Our AI Assistant) to get more information about thejavaccommand.
Running Your Java Program
Now comes the exciting part - running your program and seeing it in action!
First, make sure you're still in the right directory. You can use the
cd ~/projectcommand if you're not sure.To run a Java program, we use the
javacommand followed by the name of our class (without the.javaor.classextension). Type this command and press Enter:java HelloJavaIf everything works correctly, you should see the following output:
Hello, Java!Congratulations! You've just run your first Java program. The computer has executed the instructions we wrote, printing "Hello, Java!" to the screen.
If you don't see the expected output, or if you get an error message, here are a few things to check:
- Make sure you successfully compiled the program in the previous step (you should have a
HelloJava.classfile). - Check that you're running
java HelloJavaand notjava HelloJava.javaorjava HelloJava.class. - Ensure you're in the correct directory (the same directory where
HelloJava.classis located).
Remember, it's normal to encounter errors when you're learning programming. Each error is an opportunity to learn something new!
Modifying Your Java Program
Now that we've successfully created and run a simple Java program, let's make it a bit more interesting by adding some interactivity.
Open the
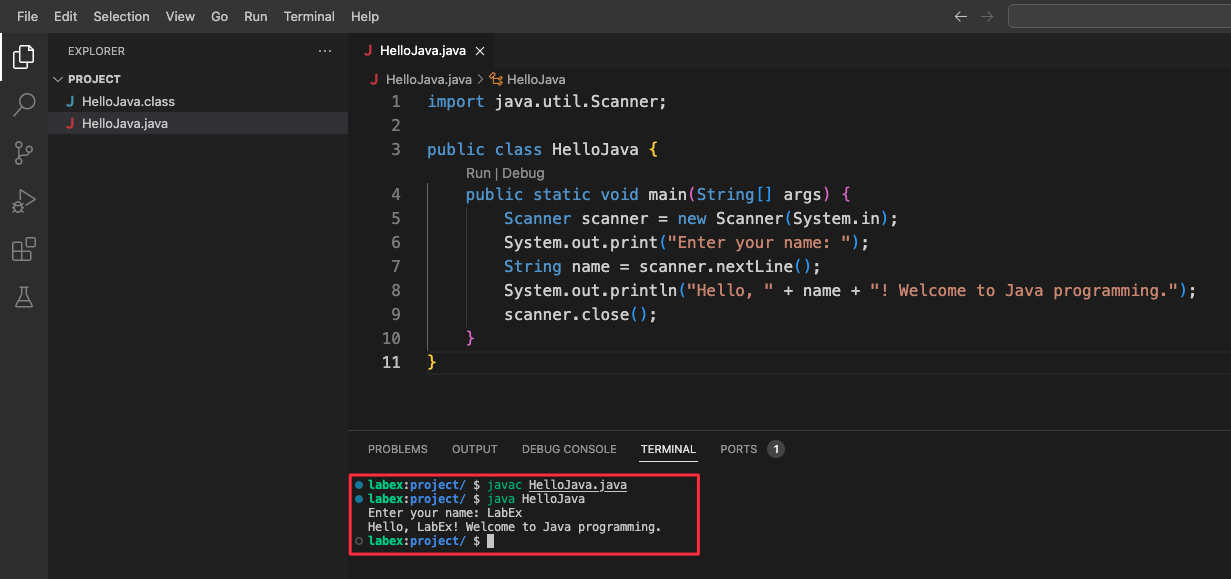
HelloJava.javafile in the WebIDE editor if it's not already open.Replace the entire contents of the file with this new code:
import java.util.Scanner;

public class HelloJava {
    public static void main(String[] args) {
        Scanner scanner = new Scanner(System.in);
        System.out.print("Enter your name: ");
        String name = scanner.nextLine();
        System.out.println("Hello, " + name + "! Welcome to Java programming.");
        scanner.close();
    }
}
Let's break down what's new in this code:
import java.util.Scanner;: This line tells Java that we want to use something called a Scanner, which allows us to get input from the user.Scanner scanner = new Scanner(System.in);: This creates a new Scanner that will read input from the system's standard input (usually the keyboard). Remember this line, it will be important for the next challenge.System.out.print("Enter your name: ");: This prints a prompt for the user to enter their name. We useprintinstead ofprintlnso the user can type on the same line.String name = scanner.nextLine();: This reads the name that the user types and stores it in a variable calledname.System.out.println("Hello, " + name + "! Welcome to Java programming.");: This prints a greeting using the name the user entered.scanner.close();: This closes the Scanner. It's a good practice to close resources when we're done using them.
Save the file (Ctrl+S or Cmd+S).
Now, let's compile our modified program. In the Terminal, run:
javac HelloJava.javaIf the compilation is successful (no error messages), let's run our new program:
java HelloJavaThe program will now ask you to enter your name. Type your name and press Enter. You should see a personalized greeting!
Congratulations! You've just created an interactive Java program that takes user input and responds to it. This is a fundamental concept in programming and forms the basis for more complex interactions in larger programs.
Summary
In this lab, you've taken your first steps into the world of Java programming. Let's recap what you've learned:
- You've gained an understanding of what Java is and why it's important in the world of programming.
- You've learned about the WebIDE and how to navigate its different parts.
- You've set up and verified your Java development environment.
- You've created your first Java program and learned about the basic structure of a Java file.
- You've compiled Java code using
javacand learned what compilation means. - You've run Java programs using the
javacommand and seen your code in action. - You've modified your program to include user input, making it interactive.
These fundamental skills form the foundation of Java programming and will be essential as you continue your journey in software development. Remember, programming is a skill that improves with practice. Don't be afraid to experiment with the concepts you've learned here. Try modifying the program further, maybe ask for more information from the user or perform some simple calculations with the input.