
Introduction
In this lab, you will learn the fundamentals of network communication using Netcat, a versatile networking tool often referred to as the "Swiss Army knife" of networking. You'll discover how this powerful utility enables reading and writing data across network connections using TCP or UDP protocols.
Through hands-on practice, you will explore client-server communication basics, create a simple chat system, and understand essential networking concepts like ports. The lab will also introduce basic encryption techniques for secure data transmission.
Installing Netcat
Before we can start our secret agent communication, we need to equip ourselves with the right tool. Netcat is often called the "Swiss Army knife" of networking tools because it can handle many different network tasks. Let's install Netcat on our system step by step.
- First, let's open the terminal. On your desktop, locate and open the Xfce Terminal. The terminal is where we'll type all our commands to work with Netcat.

Note: Free users can't connect to the internet, so Netcat is already pre-installed in the lab environment, You can jump to item 4 in the list (check if Netcat is installed). Upgrade to a pro user to practice installing Netcat by yourself.
Pro Users Only
- Once the terminal is open, we need to update the package lists. This ensures we get the latest version of Netcat. Type the following command and press Enter:
sudo apt update
The system might ask for your password. Type it in (you won't see the characters as you type) and press Enter. The sudo part means we're running this command with administrator privileges.
- Now that our package lists are up-to-date, let's install Netcat. The package manager will handle all the dependencies automatically. Enter the following command:
sudo apt install netcat -y
The -y flag automatically answers "yes" to any prompts, making the installation smoother. This is helpful when you're sure you want to install the package.
nc -h
You should see output that starts with "OpenBSD netcat" followed by a list of options. This means Netcat is installed and ready to use. The -h flag shows the help information, which is a good way to test if a program is working.
- Congratulations! You've just installed a powerful networking tool. Netcat has many features, from simple file transfer to creating network connections. In this lab, we'll focus on its basic usage to help you understand its capabilities. Think of Netcat as a simple way to connect computers and send information between them.
Understanding Ports and Creating a Listener
Now that we have our communication tool ready, let's learn about ports and set up a listener. In networking, ports are like different channels on a radio - they allow multiple communications to happen simultaneously on the same device. Think of them as numbered doors where each door leads to a different service or application on your computer.
Let's create a listener. We'll use port 12345 for our communication. Port numbers range from 0 to 65535, and we're choosing 12345 because it's easy to remember and typically not used by system services. In the terminal, type:
nc -l 12345This command tells Netcat to listen (
-lflag) on port 12345. The-lstands for "listen" mode, which means your computer will wait for incoming connections on this port.The terminal will seem to hang. Don't worry! This is expected behavior because Netcat is now actively listening and waiting for someone to connect to port 12345. The cursor blinking means the program is running properly in listening mode.
To test our listener, we need to open another terminal window. You can do this by right-clicking on the terminal icon and selecting "New Terminal" or using the shortcut Ctrl+Shift+N. This second terminal will act as our "client" that connects to the listener.
In this new terminal, we'll connect to our listener. Type:
nc localhost 12345This command tells Netcat to connect to
localhost(which means your own computer) on port 12345. Thelocalhostis a special hostname that always refers to your current machine.Now, type a simple message like "Hello" in this second terminal and press Enter. You should see the message appear in the first terminal where the listener is running. This demonstrates how data travels from the connecting terminal to the listening terminal through the network port.
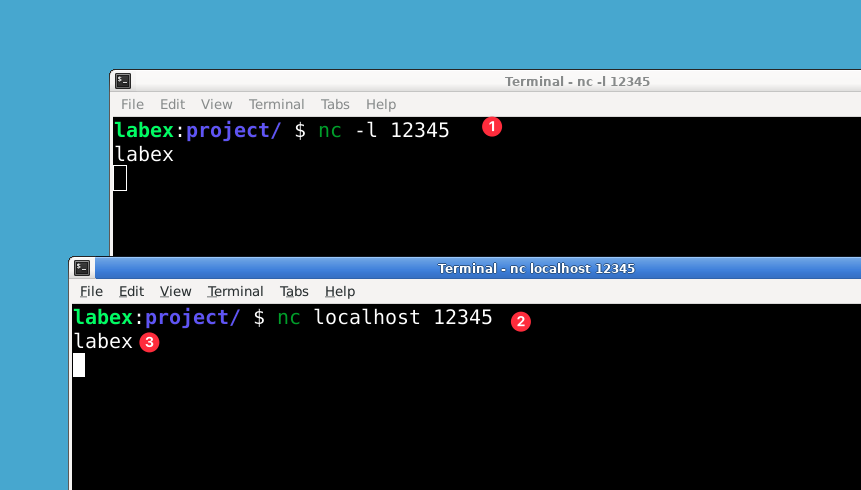
You can continue typing messages in either terminal, and they will appear in the other. This shows Netcat's full-duplex capability - meaning communication can flow both ways simultaneously. Try sending a few messages back and forth to see how it works.
To end the connection, press Ctrl+C in both terminals. This keyboard shortcut sends an interrupt signal that closes the Netcat sessions cleanly. It's important to close connections properly when you're done testing.
File Transfer with Netcat
Now that we've learned how to establish basic network communication with Netcat, let's explore one of its most practical applications: transferring files between systems. This simple yet powerful capability makes Netcat a valuable tool for system administrators and network engineers.
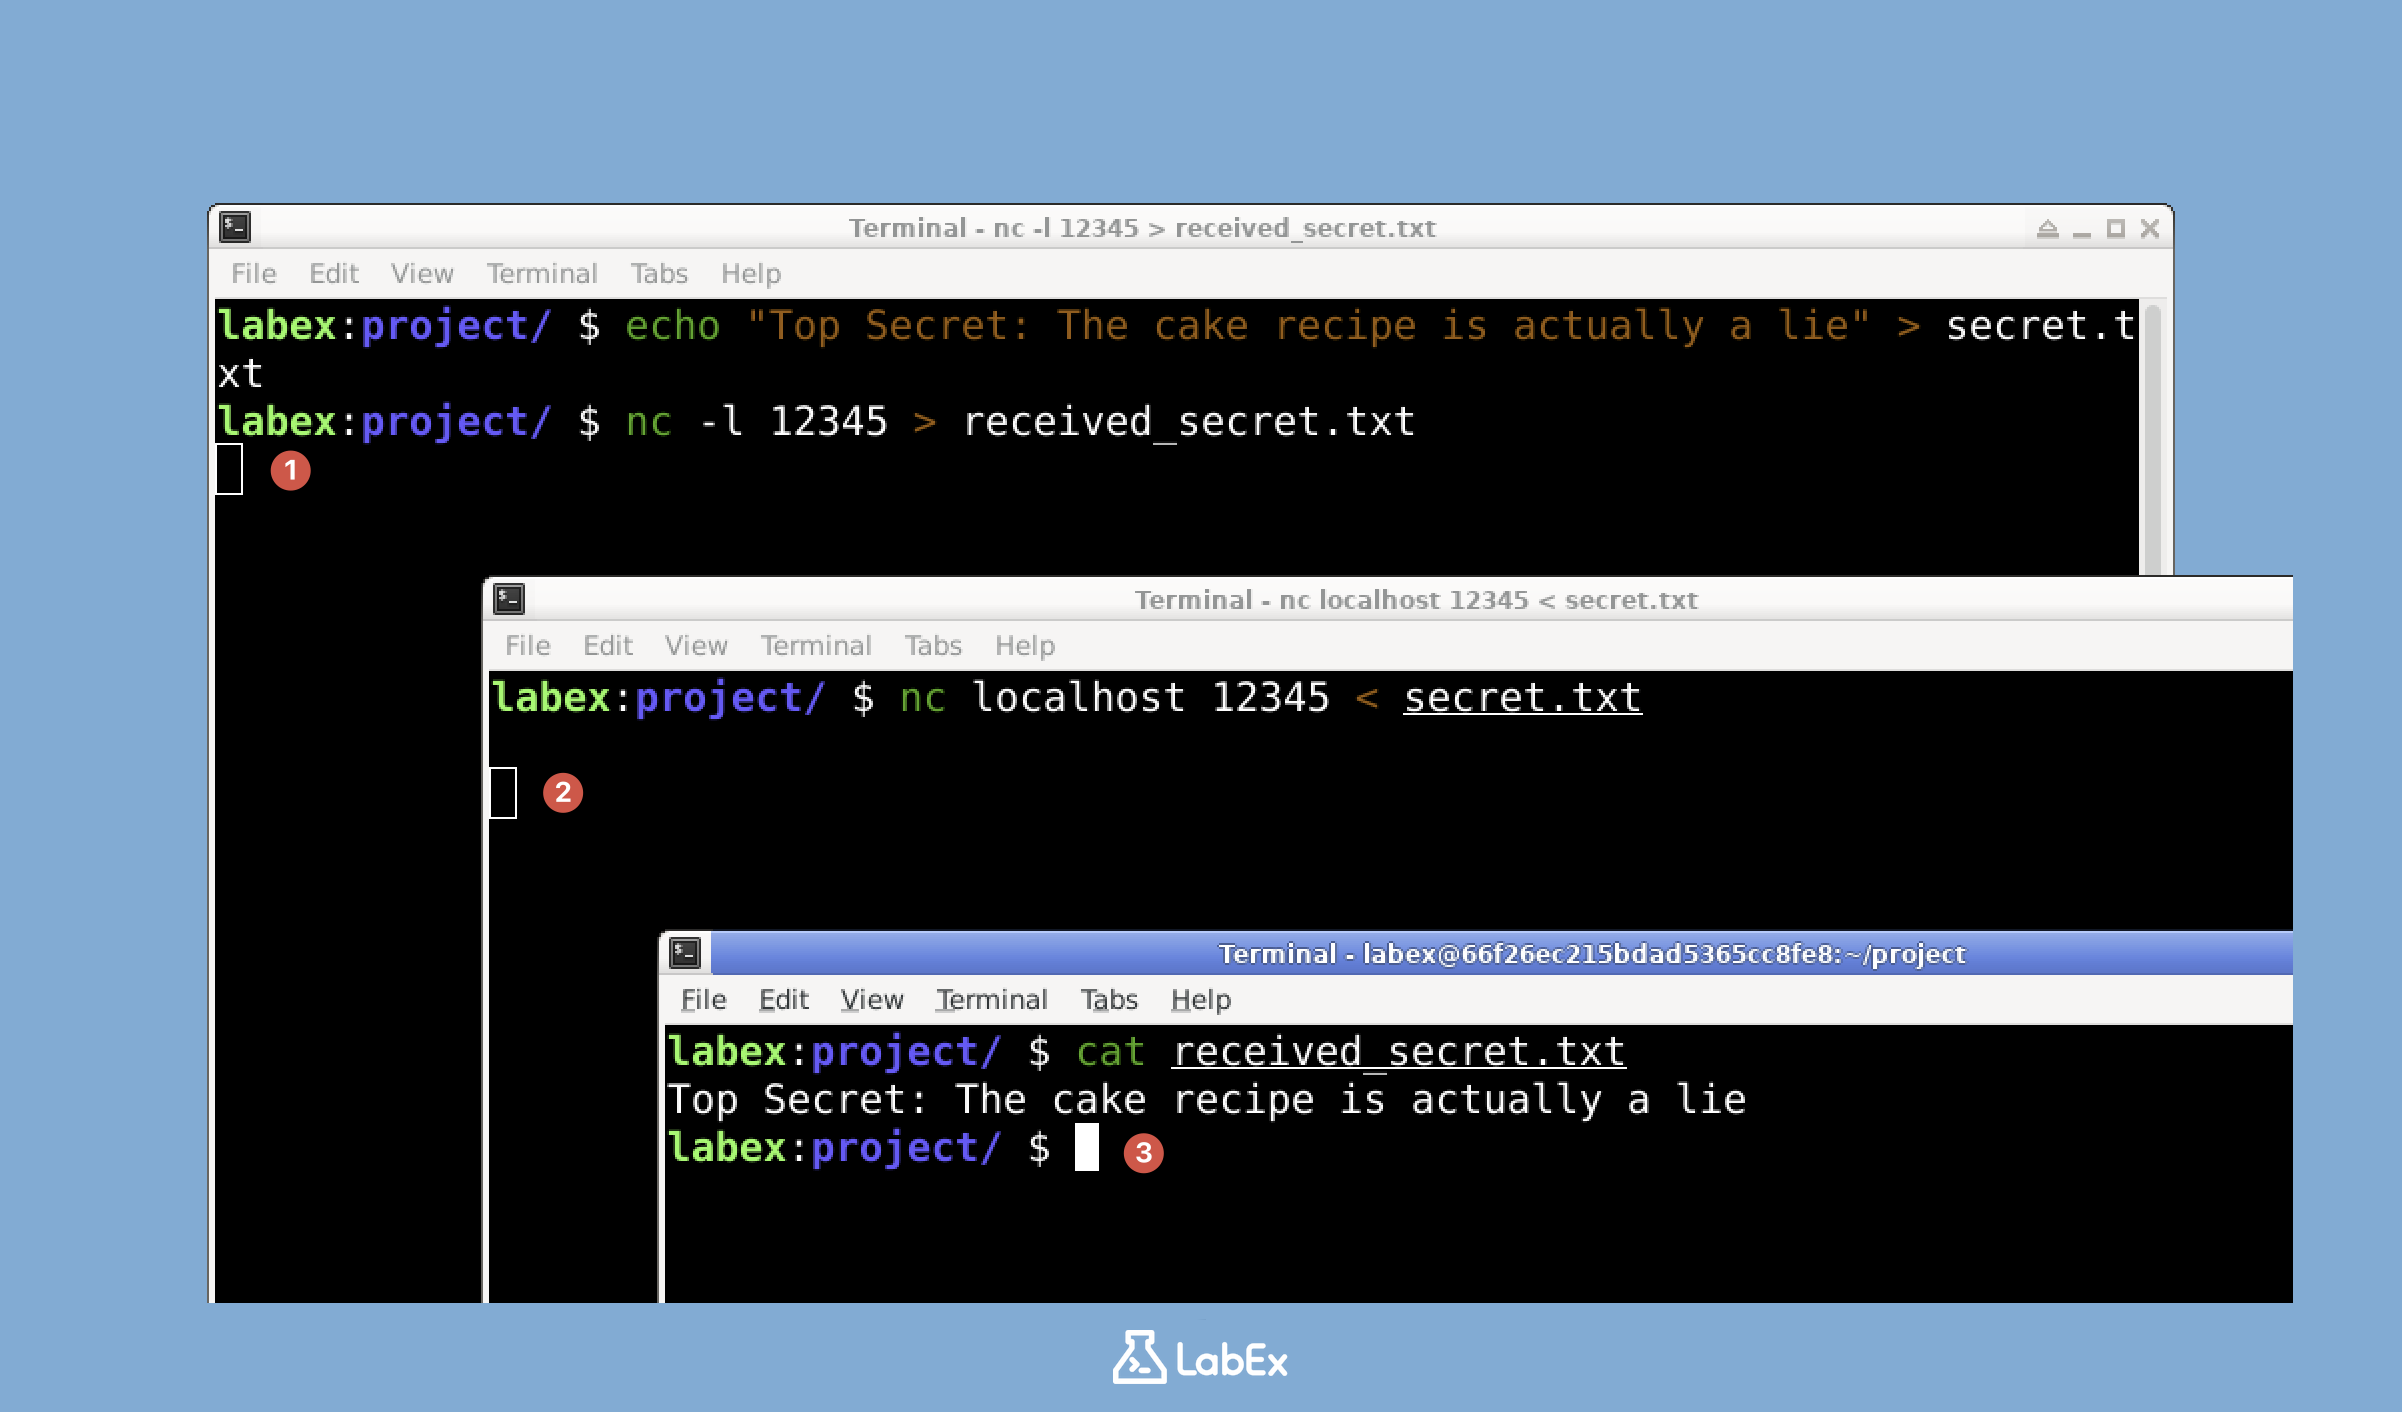
First, we'll create a sample file to transfer. In your terminal, type:
cd ~/project
echo "Top Secret: The cake recipe is actually a lie" > secret.txt
This command does two things: changes to your project directory and creates a new file called
secret.txtcontaining our example message. The>symbol redirects the output of theechocommand into a file.Now we'll set up the receiving end of our file transfer. Open a terminal window and run:
cd ~/project
nc -l 12345 > received_secret.txt
Here,
nc -l 12345starts Netcat in listen mode on port 12345. The>redirects any incoming data to a new file calledreceived_secret.txt. This terminal will now wait silently for incoming connections.In a separate terminal window (while keeping the first one running), we'll send our file:
cd ~/project
nc localhost 12345 < secret.txt
This command uses Netcat to connect to our listener (
localhostmeans "this same computer") on port 12345. The<symbol tells Netcat to usesecret.txtas its input, effectively sending the file's contents through the network connection.The transfer happens instantly because both ends are on the same machine. To verify the successful transfer, check the received file's contents:
cat received_secret.txtThe
catcommand displays the file's contents, which should match our original secret message exactly.
- Congratulations! You've successfully transferred a file using Netcat. While we used
localhostfor this demonstration, the same process works between different computers on a network - just replacelocalhostwith the receiving computer's IP address. This simple method can be incredibly useful for quick file transfers when more complex protocols aren't available.
Implementing Encrypted Communication
In our final step, let's add a layer of security to our communication by implementing encryption using OpenSSL and integrating it with Netcat. Encryption is essential for protecting sensitive information from being intercepted and read by unauthorized parties during network transmission.
We have already learned how to use OpenSSL in the previous labs. OpenSSL provides robust cryptographic functions that we'll leverage to secure our messages. Specifically, we'll use the openssl enc command to encrypt and decrypt messages using the AES-256-CBC cipher, which is a strong symmetric encryption algorithm. We'll also use a passphrase to derive the encryption key - think of this as a shared secret between the sender and receiver.
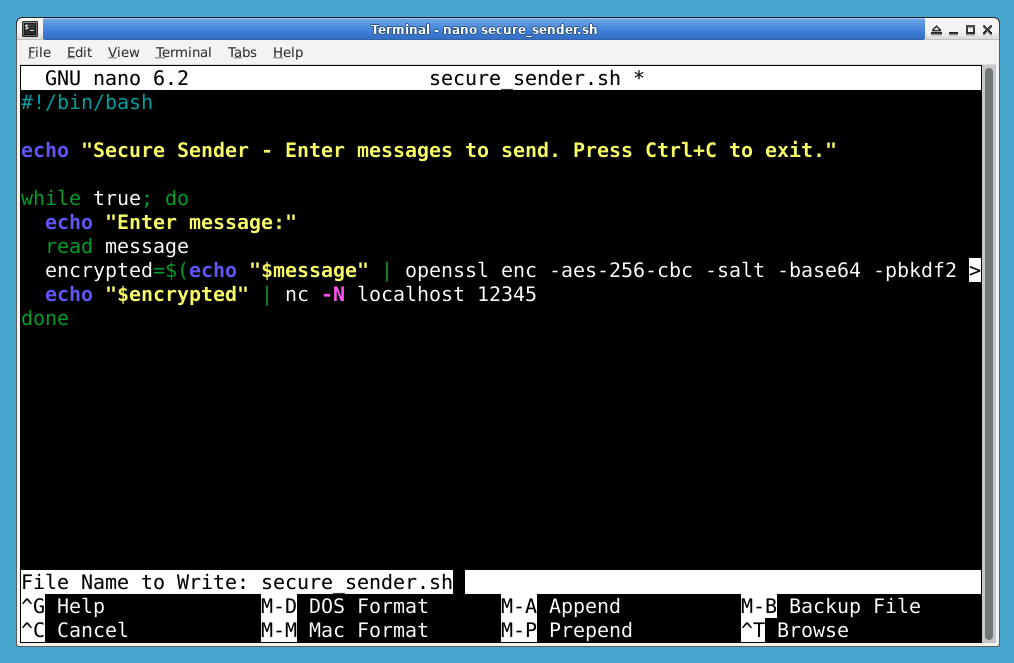
First, let's create the sender script. This script will handle encrypting and sending messages. Open a new file named
secure_sender.sh:nano secure_sender.shAdd the following content to the file (You can copy and paste the content):
#!/bin/bash

echo "Secure Sender - Enter messages to send. Press Ctrl+C to exit."

while true; do
  echo "Enter message:"
  read message
  encrypted=$(echo "$message" | openssl enc -aes-256-cbc -salt -base64 -pbkdf2 -iter 10000 -pass pass:secretpassword 2> /dev/null)
  echo "$encrypted" | nc -N localhost 12345
done
This script works by:
- Continuously prompting you for messages in a loop
- Taking your input and piping it through OpenSSL for encryption
- Using Netcat (
nc) to send the encrypted data to port 12345 on localhost - The encryption parameters include salt for added security, base64 encoding for safe transmission, and PBKDF2 key derivation with 10,000 iterations
Press
Ctrl+X, thenY, andEnterto save and exit the file. Make the script executable:chmod +x secure_sender.shNow, let's create the receiver script. This script will listen for and decrypt incoming messages. Open a new file named
secure_receiver.sh:nano secure_receiver.shAdd the following content:
#!/bin/bash

echo "Secure Receiver - Waiting for messages. Press Ctrl+C to exit."

while true; do
  encrypted=$(nc -l 12345)
  if [ ! -z "$encrypted" ]; then
    decrypted=$(echo "$encrypted" | openssl enc -aes-256-cbc -d -salt -base64 -pbkdf2 -iter 10000 -pass pass:secretpassword 2> /dev/null)
    echo "Received message: $decrypted"
  fi
done
On the Ubuntu 22.04 environment used by this lab, the default OpenBSD Netcat listener syntax is
nc -l 12345. Do not add-pwhen using-lhere.This script:
- Continuously listens on port 12345 for incoming data
- When data is received, pipes it through OpenSSL for decryption
- Uses the same encryption parameters as the sender to properly decrypt the message
- Displays the original plaintext message
Press
Ctrl+X, thenY, andEnterto save and exit the file. Make the script executable:chmod +x secure_receiver.shNow, let's test our encrypted communication system. You'll need two terminal windows open simultaneously - one for the receiver and one for the sender.
In the first terminal, start the receiver:
./secure_receiver.shYou'll see a message indicating that the receiver is waiting for messages. The receiver is now actively listening on port 12345.
In the second terminal, start the sender:
./secure_sender.shYou'll be prompted to enter messages. Anything you type here will be encrypted before being sent over the network.
In the sender terminal, type a message and press Enter. You should see the encrypted message being sent (though you'll only see the encrypted version briefly as it's transmitted).
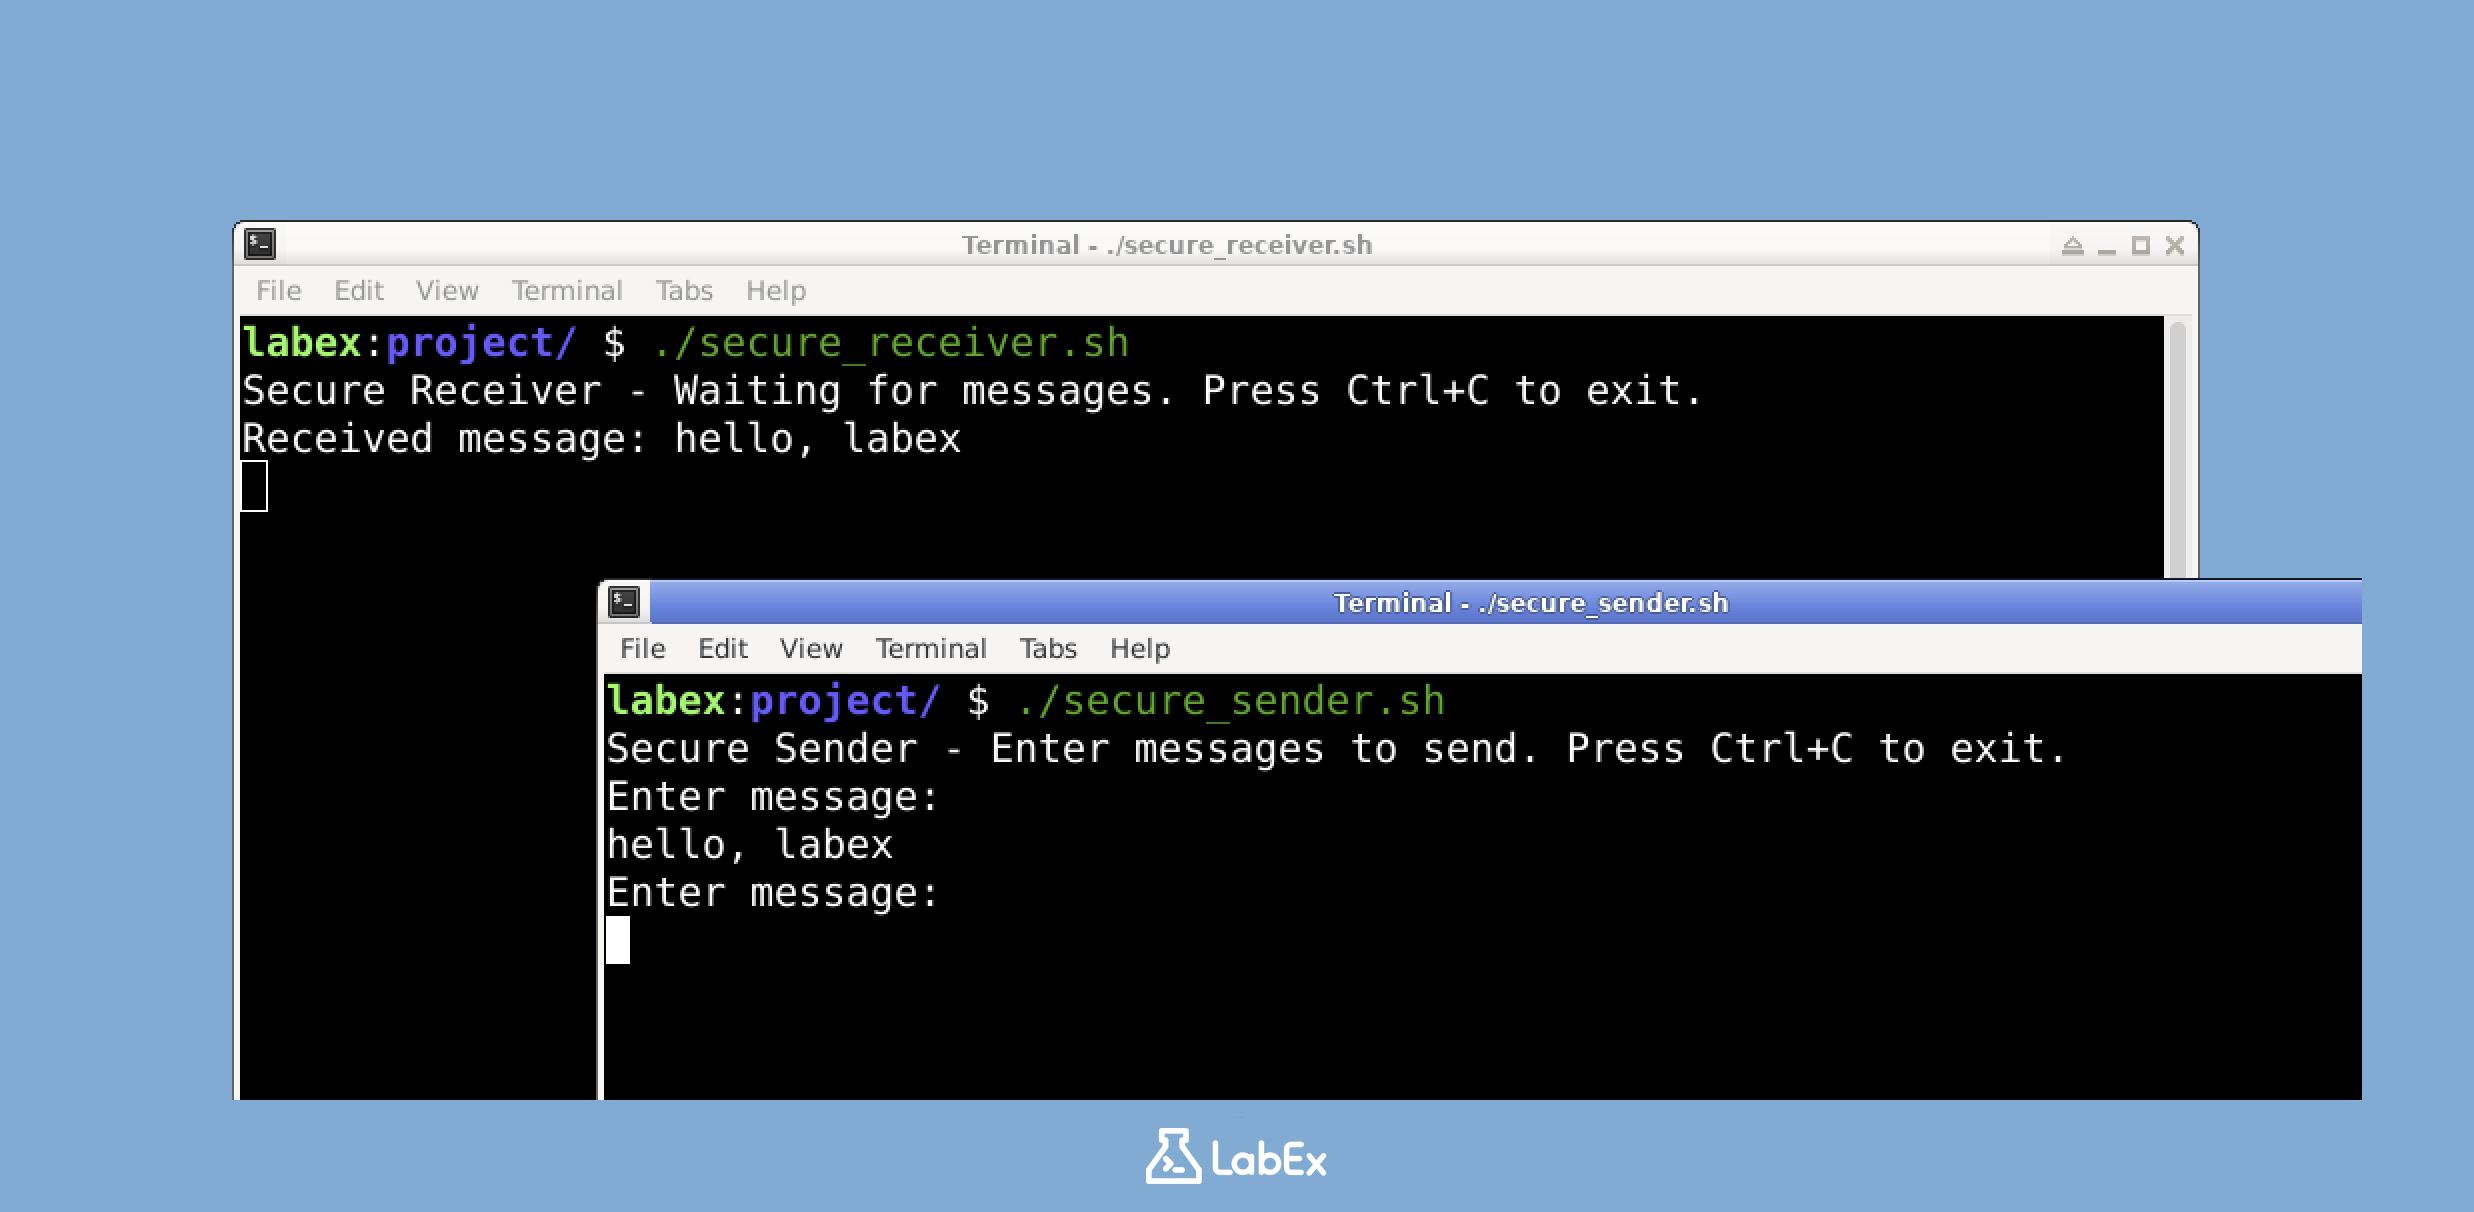
In the receiver terminal, you should see the decrypted message appear exactly as you typed it in the sender terminal.
You can continue sending messages from the sender terminal, and they will be automatically encrypted, sent, received, and decrypted in the receiver terminal. This demonstrates a complete secure communication loop.
To end the communication, press Ctrl+C in both terminals. This safely terminates both scripts.
This setup demonstrates a simple yet effective encrypted communication system. While we're using localhost for testing, this same approach works across networks. The messages are automatically encrypted before transmission and decrypted upon receipt, providing a secure channel for communication. Remember that in real-world applications, you would want to use more secure methods for key exchange than a hardcoded password.
Summary
In this lab, you have learned the fundamentals of network communication using Netcat and explored basic encryption techniques for secure data transfer. You've practiced installing Netcat, establishing connections through specific ports, and transferring files between systems.
This hands-on experience demonstrated the importance of encryption in network communications through practical implementation with OpenSSL. These foundational skills provide a solid starting point for understanding more complex cybersecurity concepts and secure communication protocols.


