
Introduction
In this lab, you will learn how to transform a standard, unstyled HTML list into a visually appealing horizontal navigation menu using CSS. By default, HTML lists (<ul>) are displayed vertically with bullet points. We will use several fundamental CSS properties to remove the default styling and create a clean, modern navigation bar.
You will learn to use the following CSS properties:
list-style-typepaddingdisplaybackground-colormargin
By the end of this lab, you will have a solid understanding of how to style lists, a common task in web development for creating menus, item lists, and more.
Set list-style-type none on ul element
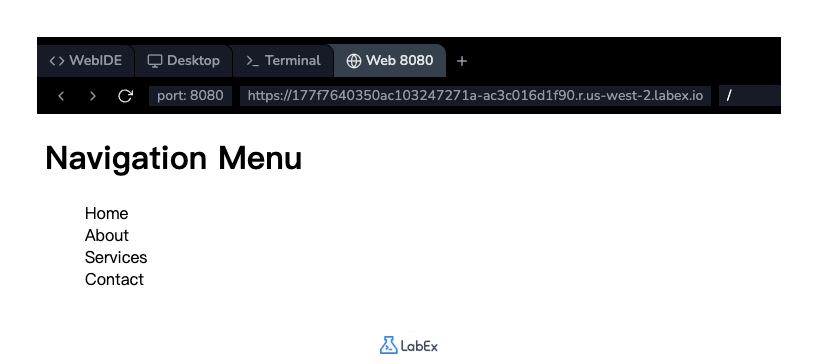
In this step, you will begin by removing the default bullet points from the unordered list. The list-style-type property in CSS is used to control the appearance of the list item marker.
First, locate the styles.css file in the file explorer on the left side of the WebIDE and open it. The file is currently empty.
Now, add the following CSS rule to styles.css. This rule targets the <ul> element and sets its list-style-type to none, which will hide the bullet points.
ul {
  list-style-type: none;
}
After adding the code, save the styles.css file. To see the result, click on the "Web 8080" tab at the top of the LabEx interface. You should see the list of items without the bullets.
Apply padding 0 to remove default indent
In this step, you will remove the default indentation that browsers automatically apply to unordered lists. This indentation is actually a padding on the left side of the <ul> element.
To remove it, you will update the existing ul rule in your styles.css file. Add the padding: 0; property to the rule. This sets the padding on all four sides of the element to zero, effectively removing the left-side indent.
Update your styles.css file to look like this:
ul {
  list-style-type: none;
  padding: 0;
}
Save the file and switch to the "Web 8080" tab to preview your changes. You will notice that the list is now aligned to the far left of its container.
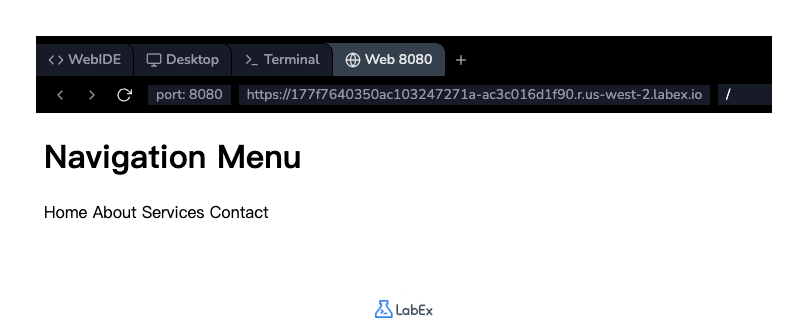
Use display inline-block for horizontal list
In this step, you will change the layout of the list items from vertical to horizontal. By default, list items (<li>) are block-level elements, meaning each one takes up the full width available and starts on a new line.
To place them side-by-side, you can change their display property. We will use the value inline-block, which allows elements to sit next to each other like inline elements, but retain block-level properties like width, height, and padding.
Add a new CSS rule for the li element in your styles.css file.
li {
  display: inline-block;
}
Your full styles.css file should now look like this:
ul {
  list-style-type: none;
  padding: 0;
}

li {
  display: inline-block;
}
Save the file and check the "Web 8080" tab. The list items should now be arranged in a single horizontal line.
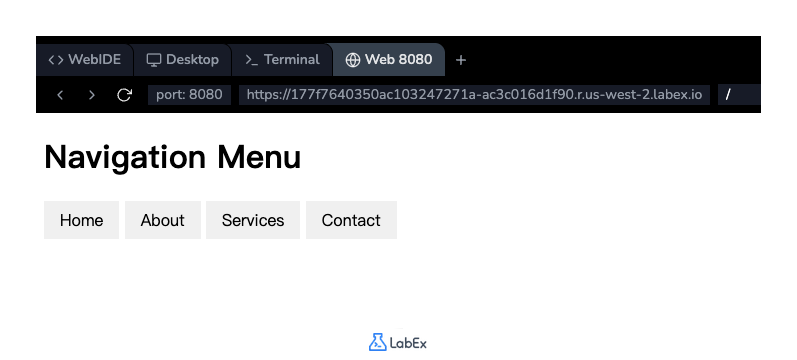
Add background-color to li elements
In this step, you will add some visual styling to the list items to make them look more like navigation buttons. We'll add a background color and some internal padding.
The background-color property sets the background color of an element, and the padding property adds space inside the element's border.
Modify the existing li rule in styles.css to include these new properties.
li {
  display: inline-block;
  background-color: #f2f2f2;
  padding: 8px 16px;
}
Here, background-color: #f2f2f2; sets a light gray background. padding: 8px 16px; adds 8 pixels of padding to the top and bottom, and 16 pixels to the left and right of the text within each list item.
Save the file and refresh the "Web 8080" tab. You will see that each list item now has a gray background and more space around the text, making them look like distinct buttons.
Implement margin between li items
In this final styling step, you will add some space between the list items to prevent them from touching. The margin property is used to create space around an element, outside of its border.
To add space only between the items, we can apply a margin to the right side of each list item using the margin-right property.
Update the li rule in your styles.css file one last time:
li {
  display: inline-block;
  background-color: #f2f2f2;
  padding: 8px 16px;
  margin-right: 5px;
}
This adds a 5-pixel margin to the right of each list item, separating them from each other. The last item will also have a margin, but it won't be visible as there is no element next to it.
Save the file and view the "Web 8080" tab. Your horizontal navigation menu is now complete, with proper spacing between each button.
Summary
Congratulations! You have successfully completed this lab on styling CSS lists.
You started with a standard vertical HTML list and transformed it into a styled, horizontal navigation menu. Along the way, you learned and applied several essential CSS properties:
list-style-typeto remove the default list bullets.paddingto remove the default list indentation.display: inline-blockto arrange list items horizontally.background-colorandpaddingto style the items as buttons.margin-rightto create space between the items.
These techniques are fundamental for building navigation bars and other list-based components on modern websites.


