
Introduction
In this comprehensive lab, you will master the automation of critical Linux administration tasks using Ansible. Building upon your foundation in file management, you will now explore how to manage the complete lifecycle of system administration, from software installation to user management, service configuration, storage provisioning, and network setup.
You will begin by automating software package management and repository configuration using modules like ansible.builtin.dnf, ansible.builtin.yum_repository, and ansible.builtin.rpm_key. Next, you will create and manage user accounts, configure SSH access, and set up sudo privileges. The lab progresses to service management, scheduled tasks with cron and systemd, before advancing to storage management using LVM and filesystem operations. Finally, you will configure network interfaces and collect system information.
This lab emphasizes real-world scenarios commonly encountered in enterprise Linux environments, preparing you to implement Infrastructure as Code practices effectively.
Configure Repository and Manage Software Packages
In this step, you will learn how to automate software package management on RHEL systems using Ansible. You will configure a Yum repository, manage RPM GPG keys, and gather package information on managed hosts. This is essential for maintaining consistent software installations across your infrastructure.
You will use several key modules: ansible.builtin.yum_repository for repository management, ansible.builtin.rpm_key for GPG key handling, ansible.builtin.package_facts for gathering package information, and ansible.builtin.dnf for package installation.
First, set up the project environment and install Ansible.
Install the
ansible-corepackage and navigate to the project directory.sudo dnf install -y ansible-core cd ~/project mkdir system-software cd system-softwareCreate an Ansible inventory file to define our managed hosts. For this lab, we will manage the local machine.
cat << EOF > inventory.ini
[webservers]
localhost ansible_connection=local

[all:children]
webservers
EOF
Create the main playbook
repo_playbook.ymlthat will manage repository configuration and package installation. This playbook demonstrates a complete software management workflow.nano repo_playbook.ymlAdd the following content to create a comprehensive software management playbook:
---
- name: Repository Configuration and Software Management
  hosts: all
  become: true
  vars:
    custom_pkg: httpd
  tasks:
    - name: Gather Package Facts
      ansible.builtin.package_facts:
        manager: auto

    - name: Show Package Facts for the custom package (initial check)
      ansible.builtin.debug:
        var: ansible_facts['packages'][custom_pkg]
      when: custom_pkg in ansible_facts['packages']

    - name: Ensure EPEL repository is configured
      ansible.builtin.yum_repository:
        name: epel
        description: Extra Packages for Enterprise Linux 9
        file: epel
        baseurl: https://download.fedoraproject.org/pub/epel/9/Everything/x86_64/
        gpgcheck: yes
        gpgkey: https://download.fedoraproject.org/pub/epel/RPM-GPG-KEY-EPEL-9
        enabled: yes
        state: present

    - name: Import EPEL GPG key
      ansible.builtin.rpm_key:
        state: present
        key: https://download.fedoraproject.org/pub/epel/RPM-GPG-KEY-EPEL-9

    - name: Install the custom package
      ansible.builtin.dnf:
        name: "{{ custom_pkg }}"
        state: present

    - name: Gather Package Facts (after installation)
      ansible.builtin.package_facts:
        manager: auto

    - name: Show Package Facts for the custom package (post-installation)
      ansible.builtin.debug:
        var: ansible_facts['packages'][custom_pkg]
      when: custom_pkg in ansible_facts['packages']

    - name: Display installed package version
      ansible.builtin.debug:
        msg: "{{ custom_pkg }} version {{ ansible_facts['packages'][custom_pkg][0]['version'] }} is installed"
      when: custom_pkg in ansible_facts['packages']
Note: The configuration file in this lab is quite lengthy, so we won't provide detailed explanations here to keep the documentation concise. If you need clarification on any part, click the "Explain Code" button in the bottom-left corner of the code block for detailed explanations by Labby.
This playbook demonstrates several important concepts:
- Package fact gathering: Shows how to collect information about installed packages
- Repository management: Configures the EPEL repository with proper GPG validation
- GPG key management: Imports the repository's GPG key for security
- Package installation: Installs the specified package using the dnf module
- Verification: Confirms the package installation with updated facts
Execute the playbook to see the complete software management workflow in action.
ansible-playbook -i inventory.ini repo_playbook.ymlYou should see output showing:
- Initial package check (likely skipped since httpd isn't installed)
- Repository configuration
- GPG key import
- Package installation
- Final verification showing the installed package
Verify the repository configuration by checking the created repository file.
cat /etc/yum.repos.d/epel.repoYou should see the EPEL repository configuration with the baseurl, gpgcheck, and gpgkey settings.
Test package management idempotency by running the playbook again.
ansible-playbook -i inventory.ini repo_playbook.ymlNotice that Ansible reports "ok" for tasks that don't need changes, demonstrating idempotency.
You have successfully automated software package management, including repository configuration, GPG key management, and package installation verification using Ansible.
Automate User Management and SSH Configuration
In this step, you will learn how to automate user account management, SSH configuration, and sudo privileges using Ansible. This is crucial for maintaining consistent user access and security policies across your infrastructure.
You will use modules like ansible.builtin.user for user management, ansible.builtin.group for group creation, ansible.posix.authorized_key for SSH key management, and ansible.builtin.lineinfile for configuration file modification.
Navigate to a new project directory for user management tasks.
cd ~/project
mkdir system-users
cd system-users
Install the
ansible.posixcollection.ansible-galaxy collection install ansible.posixCreate the inventory file for this exercise.
cat << EOF > inventory.ini
[webservers]
localhost ansible_connection=local
EOF
Create a variables file to define the users and groups we want to manage.
mkdir vars
nano vars/users_vars.yml
Add the following content to define user accounts and their group memberships:
---
users:
  - username: webuser1
    groups: webadmin
  - username: webuser2
    groups: webadmin
  - username: devuser1
    groups: webadmin
Generate SSH key pairs for our users. In a real environment, users would provide their public keys.
mkdir files

## Generate SSH keys for each user
ssh-keygen -t rsa -b 2048 -f files/webuser1.key -N "" -C "webuser1@example.com"
ssh-keygen -t rsa -b 2048 -f files/webuser2.key -N "" -C "webuser2@example.com"
ssh-keygen -t rsa -b 2048 -f files/devuser1.key -N "" -C "devuser1@example.com"
Create the main user management playbook
users.yml. This playbook will create groups, users, distribute SSH keys, and configure sudo access.nano users.ymlAdd the following comprehensive user management playbook:
---
- name: Create and manage user accounts
  hosts: webservers
  become: true
  vars_files:
    - vars/users_vars.yml
  tasks:
    - name: Create webadmin group
      ansible.builtin.group:
        name: webadmin
        state: present

    - name: Create user accounts
      ansible.builtin.user:
        name: "{{ item['username'] }}"
        groups: "{{ item['groups'] }}"
        shell: /bin/bash
        create_home: yes
        state: present
      loop: "{{ users }}"

    - name: Set up SSH authorized keys
      ansible.posix.authorized_key:
        user: "{{ item['username'] }}"
        key: "{{ lookup('file', 'files/' + item['username'] + '.key.pub') }}"
        state: present
      loop: "{{ users }}"

    - name: Configure sudo access for webadmin group
      ansible.builtin.lineinfile:
        path: /etc/sudoers.d/webadmin
        state: present
        create: yes
        mode: "0440"
        line: "%webadmin ALL=(ALL) NOPASSWD: ALL"
        validate: /usr/sbin/visudo -cf %s

    - name: Configure SSH to disable root login
      ansible.builtin.lineinfile:
        dest: /etc/ssh/sshd_config
        regexp: "^PermitRootLogin"
        line: "PermitRootLogin no"
        backup: yes
      notify: restart sshd

    - name: Configure SSH to disable password authentication
      ansible.builtin.lineinfile:
        dest: /etc/ssh/sshd_config
        regexp: "^PasswordAuthentication"
        line: "PasswordAuthentication no"
        backup: yes
      notify: restart sshd

  handlers:
    - name: restart sshd
      ansible.builtin.service:
        name: sshd
        state: restarted
This playbook demonstrates several user management best practices:
- Group management: Creates administrative groups
- User creation: Sets up user accounts with proper home directories
- SSH key management: Distributes public keys for key-based authentication
- Sudo configuration: Grants administrative privileges safely
- SSH hardening: Disables root login and password authentication
- Service management: Restarts SSH service when configuration changes
Execute the user management playbook.
ansible-playbook -i inventory.ini users.ymlThe playbook will create users, set up SSH keys, configure sudo access, and harden SSH configuration.
Verify user creation and group membership.
## Check if users were created
getent passwd webuser1 webuser2 devuser1

## Check group membership
groups webuser1
groups webuser2
groups devuser1

## Verify webadmin group exists
getent group webadmin
Test SSH key authentication for one of the created users.
## Test SSH key authentication (this will connect to localhost)
ssh -i files/webuser1.key webuser1@localhost "whoami"
Verify sudo configuration by testing passwordless sudo access.
## Test sudo access for webuser1
ssh -i files/webuser1.key webuser1@localhost "sudo whoami"
Check the SSH configuration changes.
## Verify SSH configuration
sudo grep "PermitRootLogin\|PasswordAuthentication" /etc/ssh/sshd_config

## Check sudo configuration
sudo cat /etc/sudoers.d/webadmin
You have successfully automated user account creation, SSH key distribution, and security configuration using Ansible, establishing a foundation for secure user management across your infrastructure.
Automate Service Management and Task Scheduling
In this step, you will learn how to manage systemd services, schedule cron jobs, and configure system boot targets using Ansible. This is essential for maintaining service availability and automating routine tasks across your infrastructure.
You will use modules like ansible.builtin.service for service management, ansible.builtin.cron for scheduling tasks, ansible.posix.at for one-time tasks, and ansible.builtin.systemd for system target management.
Navigate to a new project directory for service and process management.
cd ~/project
mkdir system-process
cd system-process
Create the inventory file for this exercise.
cat << EOF > inventory.ini
[webservers]
localhost ansible_connection=local
EOF
Create a playbook to manage the Apache HTTP server service. This will demonstrate basic service management.
nano service_management.ymlAdd the following content:
---
- name: Manage Apache HTTP Server Service
  hosts: webservers
  become: true
  tasks:
    - name: Start and enable httpd service
      ansible.builtin.service:
        name: httpd
        state: started
        enabled: yes

    - name: Create a simple index.html
      ansible.builtin.copy:
        content: |
          <html>
          <head><title>Ansible Managed Server</title></head>
          <body>
          <h1>Welcome to Ansible Managed Apache Server</h1>
          <p>This server is configured and managed by Ansible.</p>
          <p>Service started at: $(date)</p>
          </body>
          </html>
        dest: /var/www/html/index.html
        owner: apache
        group: apache
        mode: "0644"

    - name: Verify httpd service is running
      ansible.builtin.service_facts:

    - name: Display httpd service status
      ansible.builtin.debug:
        var: ansible_facts.services['httpd.service']
Create a playbook for scheduling cron jobs. This demonstrates automated task scheduling.
nano create_crontab_file.ymlAdd the following content:
---
- name: Schedule recurring cron jobs
  hosts: webservers
  become: true
  tasks:
    - name: Create labex user for cron jobs
      ansible.builtin.user:
        name: labex
        state: present
        create_home: yes

    - name: Schedule system monitoring cron job
      ansible.builtin.cron:
        name: System monitoring log
        job: "date >> /home/labex/system_monitor.log && df -h >> /home/labex/system_monitor.log"
        minute: "*/5"
        hour: "*"
        user: labex
        cron_file: system-monitoring
        state: present

    - name: Schedule daily log rotation
      ansible.builtin.cron:
        name: Daily log cleanup
        job: "find /home/labex -name '*.log' -mtime +7 -delete"
        minute: "0"
        hour: "2"
        weekday: "*"
        user: labex
        cron_file: log-cleanup
        state: present

    - name: Schedule weekly system update check
      ansible.builtin.cron:
        name: Weekly update check
        job: "dnf check-update > /home/labex/update_check.log 2>&1"
        minute: "0"
        hour: "3"
        weekday: "0"
        user: labex
        cron_file: update-check
        state: present
Create a playbook for one-time task scheduling using
at.nano schedule_at_task.ymlAdd the following content:
---
- name: Schedule one-time tasks with at
  hosts: webservers
  become: true
  become_user: labex
  tasks:
    - name: Schedule immediate system info collection
      ansible.posix.at:
        command: "uname -a > ~/system_info_$(date +%Y%m%d_%H%M%S).txt"
        count: 2
        units: minutes
        unique: yes
        state: present

    - name: Schedule delayed service status check
      ansible.posix.at:
        command: "systemctl status httpd > ~/httpd_status_$(date +%Y%m%d_%H%M%S).txt"
        count: 5
        units: minutes
        unique: yes
        state: present
Create a playbook to manage system boot targets.
nano boot_target_management.ymlAdd the following content:
---
- name: Manage system boot targets
  hosts: webservers
  become: true
  tasks:
    - name: Check current default target
      ansible.builtin.command:
        cmd: systemctl get-default
      register: current_target
      changed_when: false

    - name: Display current boot target
      ansible.builtin.debug:
        msg: "Current default boot target: {{ current_target.stdout }}"

    - name: Set default boot target to multi-user
      ansible.builtin.systemd:
        name: multi-user.target
        enabled: yes
      when: current_target.stdout != "multi-user.target"

    - name: Verify the boot target change
      ansible.builtin.command:
        cmd: systemctl get-default
      register: new_target
      changed_when: false

    - name: Display new boot target
      ansible.builtin.debug:
        msg: "New default boot target: {{ new_target.stdout }}"
Execute the service management playbook.
ansible-playbook -i inventory.ini service_management.ymlThis will start the httpd service and create a welcome page.
Execute the cron job scheduling playbook.
ansible-playbook -i inventory.ini create_crontab_file.ymlThis will create several scheduled tasks for system monitoring and maintenance.
Execute the one-time task scheduling playbook.
ansible-playbook -i inventory.ini schedule_at_task.ymlThis will schedule immediate tasks using the
atcommand.Execute the boot target management playbook.
ansible-playbook -i inventory.ini boot_target_management.ymlThis will check and potentially modify the system's default boot target.
Verify the scheduled tasks and services.
## Check cron jobs
sudo cat /etc/cron.d/system-monitoring
sudo cat /etc/cron.d/log-cleanup
sudo cat /etc/cron.d/update-check

## Check at jobs
sudo atq

## Check httpd service status
sudo systemctl status httpd

## Test the web server
curl localhost

## Check system monitoring log (wait a few minutes for cron to run)
sudo cat /home/labex/system_monitor.log
Create a cleanup playbook to remove scheduled tasks when needed.
nano remove_scheduled_tasks.ymlAdd the following content:
---
- name: Remove scheduled tasks
  hosts: webservers
  become: true
  tasks:
    - name: Remove system monitoring cron job
      ansible.builtin.cron:
        name: System monitoring log
        user: labex
        cron_file: system-monitoring
        state: absent

    - name: Remove log cleanup cron job
      ansible.builtin.cron:
        name: Daily log cleanup
        user: labex
        cron_file: log-cleanup
        state: absent

    - name: Remove update check cron job
      ansible.builtin.cron:
        name: Weekly update check
        user: labex
        cron_file: update-check
        state: absent
You have successfully automated service management, task scheduling, and system configuration using Ansible, providing the foundation for maintaining and monitoring your infrastructure automatically.
Automate Storage Management with LVM and Filesystems
In this step, you will learn how to automate storage management using Ansible to create LVM physical volumes, volume groups, logical volumes, and filesystems. This is crucial for managing storage resources across your infrastructure in a consistent and scalable manner.
You will use modules like ansible.builtin.lvg for volume group management, ansible.builtin.lvol for logical volume creation, ansible.builtin.filesystem for filesystem creation, and ansible.posix.mount for mount point management.
Navigate to a new project directory for storage management.
cd ~/project
mkdir system-storage
cd system-storage
Create the inventory file for this exercise.
cat << EOF > inventory.ini
[webservers]
localhost ansible_connection=local
EOF
Create a loop device to simulate additional storage since we're working in a virtual environment.
## Create a 1GB file to use as a virtual disk
sudo dd if=/dev/zero of=/tmp/virtual_disk bs=1M count=1024

## Set up loop device
sudo losetup /dev/loop0 /tmp/virtual_disk

## Verify the loop device
lsblk | grep loop0
Create a comprehensive storage management playbook. This will demonstrate LVM operations and filesystem management.
nano storage.ymlAdd the following content:
---
- name: Configure LVM storage and filesystems
  hosts: webservers
  become: true
  vars:
    storage_device: /dev/loop0
    volume_group: apache-vg
    content_lv: content-lv
    logs_lv: logs-lv
    backup_lv: backup-lv
  tasks:
    - name: Install LVM utilities
      ansible.builtin.dnf:
        name: lvm2
        state: present

    - name: Create physical volume
      community.general.lvg:
        vg: "{{ volume_group }}"
        pvs: "{{ storage_device }}"
        state: present

    - name: Create logical volume for web content
      community.general.lvol:
        vg: "{{ volume_group }}"
        lv: "{{ content_lv }}"
        size: 256m
        state: present

    - name: Create logical volume for logs
      community.general.lvol:
        vg: "{{ volume_group }}"
        lv: "{{ logs_lv }}"
        size: 256m
        state: present

    - name: Create logical volume for backup
      community.general.lvol:
        vg: "{{ volume_group }}"
        lv: "{{ backup_lv }}"
        size: 256m
        state: present

    - name: Create XFS filesystem on content volume
      community.general.filesystem:
        fstype: xfs
        dev: "/dev/{{ volume_group }}/{{ content_lv }}"
        force: no

    - name: Create XFS filesystem on logs volume
      community.general.filesystem:
        fstype: xfs
        dev: "/dev/{{ volume_group }}/{{ logs_lv }}"
        force: no

    - name: Create ext4 filesystem on backup volume
      community.general.filesystem:
        fstype: ext4
        dev: "/dev/{{ volume_group }}/{{ backup_lv }}"
        force: no

    - name: Create mount points
      ansible.builtin.file:
        path: "{{ item }}"
        state: directory
        mode: "0755"
      loop:
        - /var/www
        - /var/log/httpd
        - /backup

    - name: Mount web content volume
      ansible.posix.mount:
        path: /var/www
        src: "/dev/{{ volume_group }}/{{ content_lv }}"
        fstype: xfs
        opts: defaults
        state: mounted

    - name: Mount logs volume
      ansible.posix.mount:
        path: /var/log/httpd
        src: "/dev/{{ volume_group }}/{{ logs_lv }}"
        fstype: xfs
        opts: defaults
        state: mounted

    - name: Mount backup volume
      ansible.posix.mount:
        path: /backup
        src: "/dev/{{ volume_group }}/{{ backup_lv }}"
        fstype: ext4
        opts: defaults
        state: mounted

    - name: Set appropriate ownership for web content
      ansible.builtin.file:
        path: /var/www
        owner: apache
        group: apache
        recurse: yes

    - name: Set appropriate ownership for httpd logs
      ansible.builtin.file:
        path: /var/log/httpd
        owner: apache
        group: apache
        recurse: yes

    - name: Create html directory for web content
      ansible.builtin.file:
        path: /var/www/html
        state: directory
        owner: apache
        group: apache
        mode: "0755"

    - name: Create sample web content
      ansible.builtin.copy:
        content: |
          <html>
          <head><title>Storage Management Demo</title></head>
          <body>
          <h1>LVM Storage Configuration</h1>
          <p>This content is served from an LVM logical volume managed by Ansible.</p>
          <p>Volume Group: {{ volume_group }}</p>
          <p>Logical Volume: {{ content_lv }}</p>
          <p>Filesystem: XFS</p>
          </body>
          </html>
        dest: /var/www/html/storage.html
        owner: apache
        group: apache
        mode: "0644"
Install the required Ansible collection for LVM management.
ansible-galaxy collection install community.generalExecute the storage management playbook.
ansible-playbook -i inventory.ini storage.ymlThis will create the LVM structure, filesystems, and mount points.
Create a playbook to gather and display storage information.
nano get-storage.ymlAdd the following content:
---
- name: Gather storage information
  hosts: webservers
  become: true
  tasks:
    - name: Gather disk facts
      ansible.builtin.setup:
        gather_subset:
          - hardware

    - name: Display volume group information
      ansible.builtin.command:
        cmd: vgdisplay apache-vg
      register: vg_info
      changed_when: false

    - name: Display logical volume information
      ansible.builtin.command:
        cmd: lvdisplay apache-vg
      register: lv_info
      changed_when: false

    - name: Display filesystem information
      ansible.builtin.command:
        cmd: df -h /var/www /var/log/httpd /backup
      register: fs_info
      changed_when: false

    - name: Display mount information
      ansible.builtin.command:
        cmd: cat /proc/mounts
      register: mount_info
      changed_when: false

    - name: Show volume group details
      ansible.builtin.debug:
        var: vg_info.stdout_lines

    - name: Show logical volume details
      ansible.builtin.debug:
        var: lv_info.stdout_lines

    - name: Show filesystem usage
      ansible.builtin.debug:
        var: fs_info.stdout_lines

    - name: Show fstab entries
      ansible.builtin.command:
        cmd: grep apache-vg /etc/fstab
      register: fstab_entries
      changed_when: false
      failed_when: false

    - name: Display fstab entries
      ansible.builtin.debug:
        var: fstab_entries.stdout_lines
Execute the storage information gathering playbook.
ansible-playbook -i inventory.ini get-storage.ymlThis will display detailed information about the created storage structure.
Verify the storage configuration manually.
## Check LVM structure
sudo vgs apache-vg
sudo lvs apache-vg
sudo pvs /dev/loop0

## Check filesystems
df -h /var/www /var/log/httpd /backup

## Check mount points
mount | grep apache-vg

## Check fstab entries
grep apache-vg /etc/fstab

## Test the web content
cat /var/www/html/storage.html
Create a storage expansion playbook to demonstrate scaling operations.
nano expand_storage.ymlAdd the following content:
---
- name: Expand storage volumes
  hosts: webservers
  become: true
  vars:
    volume_group: apache-vg
    content_lv: content-lv
  tasks:
    - name: Extend content logical volume
      community.general.lvol:
        vg: "{{ volume_group }}"
        lv: "{{ content_lv }}"
        size: 400m
        state: present

    - name: Extend XFS filesystem
      community.general.filesystem:
        fstype: xfs
        dev: "/dev/{{ volume_group }}/{{ content_lv }}"
        resizefs: yes

    - name: Display updated filesystem size
      ansible.builtin.command:
        cmd: df -h /var/www
      register: new_size
      changed_when: false

    - name: Show new filesystem size
      ansible.builtin.debug:
        var: new_size.stdout_lines
Test the storage expansion.
## Check current size before expansion
df -h /var/www

## Run the expansion playbook
ansible-playbook -i inventory.ini expand_storage.yml

## Verify the expansion
df -h /var/www
sudo lvs apache-vg/content-lv
You have successfully automated LVM storage management, including physical volume creation, logical volume management, filesystem creation, and mount point configuration using Ansible.
Automate Network Configuration and Information Gathering
In this final step, you will learn how to automate network interface configuration and gather comprehensive system information using Ansible. This completes the full spectrum of system administration automation, from software to storage to networking.
You will use modules like ansible.builtin.template for network configuration files, gather network facts, and create comprehensive system reports.
Navigate to a new project directory for network management.
cd ~/project
mkdir system-network
cd system-network
Create the inventory file for this exercise.
cat << EOF > inventory.ini
[webservers]
localhost ansible_connection=local
EOF
Create a comprehensive network and system information gathering playbook.
nano network_info.ymlAdd the following content:
---
- name: Gather comprehensive system information
  hosts: webservers
  become: true
  tasks:
    - name: Gather all system facts
      ansible.builtin.setup:

    - name: Create system report directory
      ansible.builtin.file:
        path: /tmp/system_reports
        state: directory
        mode: "0755"

    - name: Generate system information report
      ansible.builtin.template:
        src: system_report.j2
        dest: /tmp/system_reports/system_info_{{ ansible_facts['hostname'] }}.html
        mode: "0644"

    - name: Generate network configuration report
      ansible.builtin.template:
        src: network_report.j2
        dest: /tmp/system_reports/network_info_{{ ansible_facts['hostname'] }}.html
        mode: "0644"

    - name: Collect network interface information
      ansible.builtin.command:
        cmd: ip addr show
      register: ip_info
      changed_when: false

    - name: Collect routing information
      ansible.builtin.command:
        cmd: ip route show
      register: route_info
      changed_when: false

    - name: Collect DNS configuration
      ansible.builtin.command:
        cmd: cat /etc/resolv.conf
      register: dns_info
      changed_when: false

    - name: Display network summary
      ansible.builtin.debug:
        msg: |
          System: {{ ansible_facts['hostname'] }}
          OS: {{ ansible_facts['distribution'] }} {{ ansible_facts['distribution_version'] }}
          Kernel: {{ ansible_facts['kernel'] }}
          Default IPv4: {{ ansible_facts['default_ipv4']['address'] | default('N/A') }}
          Default Interface: {{ ansible_facts['default_ipv4']['interface'] | default('N/A') }}
          Total Memory: {{ ansible_facts['memtotal_mb'] }}MB
          CPU Cores: {{ ansible_facts['processor_vcpus'] }}
Create template directories and files for the reports.
mkdir templates
nano templates/system_report.j2
Add the following content for the system report template:
<!doctype html>
<html>
  <head>
    <title>System Report - {{ ansible_facts['hostname'] }}</title>
    <style>
      body {
        font-family: Arial, sans-serif;
        margin: 20px;
      }
      .section {
        margin-bottom: 20px;
        padding: 10px;
        border: 1px solid #ccc;
      }
      .header {
        background-color: #f5f5f5;
        padding: 10px;
      }
      table {
        border-collapse: collapse;
        width: 100%;
      }
      th,
      td {
        border: 1px solid #ddd;
        padding: 8px;
        text-align: left;
      }
      th {
        background-color: #f2f2f2;
      }
    </style>
  </head>
  <body>
    <div class="header">
      <h1>System Report for {{ ansible_facts['hostname'] }}</h1>
      <p>
        Generated on: {{ ansible_date_time.date }} {{ ansible_date_time.time
        }}
      </p>
    </div>

    <div class="section">
      <h2>System Information</h2>
      <table>
        <tr>
          <th>Property</th>
          <th>Value</th>
        </tr>
        <tr>
          <td>Hostname</td>
          <td>{{ ansible_facts['hostname'] }}</td>
        </tr>
        <tr>
          <td>FQDN</td>
          <td>{{ ansible_facts['fqdn'] }}</td>
        </tr>
        <tr>
          <td>Operating System</td>
          <td>
            {{ ansible_facts['distribution'] }} {{
            ansible_facts['distribution_version'] }}
          </td>
        </tr>
        <tr>
          <td>Kernel</td>
          <td>{{ ansible_facts['kernel'] }}</td>
        </tr>
        <tr>
          <td>Architecture</td>
          <td>{{ ansible_facts['architecture'] }}</td>
        </tr>
        <tr>
          <td>CPU Cores</td>
          <td>{{ ansible_facts['processor_vcpus'] }}</td>
        </tr>
        <tr>
          <td>Total Memory</td>
          <td>{{ ansible_facts['memtotal_mb'] }}MB</td>
        </tr>
        <tr>
          <td>Uptime</td>
          <td>{{ ansible_facts['uptime_seconds'] }} seconds</td>
        </tr>
      </table>
    </div>

    <div class="section">
      <h2>Storage Information</h2>
      <table>
        <tr>
          <th>Mount Point</th>
          <th>Filesystem</th>
          <th>Size</th>
          <th>Used</th>
          <th>Available</th>
        </tr>
        {% for mount in ansible_facts['mounts'] %}
        <tr>
          <td>{{ mount.mount }}</td>
          <td>{{ mount.fstype }}</td>
          <td>
            {{ (mount.size_total / 1024 / 1024 / 1024) | round(2) }}GB
          </td>
          <td>
            {{ ((mount.size_total - mount.size_available) / 1024 / 1024 /
            1024) | round(2) }}GB
          </td>
          <td>
            {{ (mount.size_available / 1024 / 1024 / 1024) | round(2) }}GB
          </td>
        </tr>
        {% endfor %}
      </table>
    </div>

    <div class="section">
      <h2>Services Status</h2>
      <table>
        <tr>
          <th>Service</th>
          <th>Status</th>
        </tr>
        <tr>
          <td>httpd</td>
          <td>
            {{ ansible_facts.services['httpd.service']['state'] |
            default('not installed') }}
          </td>
        </tr>
        <tr>
          <td>sshd</td>
          <td>
            {{ ansible_facts.services['sshd.service']['state'] |
            default('unknown') }}
          </td>
        </tr>
        <tr>
          <td>NetworkManager</td>
          <td>
            {{ ansible_facts.services['NetworkManager.service']['state'] |
            default('unknown') }}
          </td>
        </tr>
      </table>
    </div>
  </body>
</html>
Create the network report template.
nano templates/network_report.j2Add the following content:
<!doctype html>
<html>
  <head>
    <title>Network Report - {{ ansible_facts['hostname'] }}</title>
    <style>
      body {
        font-family: Arial, sans-serif;
        margin: 20px;
      }
      .section {
        margin-bottom: 20px;
        padding: 10px;
        border: 1px solid #ccc;
      }
      .header {
        background-color: #f5f5f5;
        padding: 10px;
      }
      table {
        border-collapse: collapse;
        width: 100%;
      }
      th,
      td {
        border: 1px solid #ddd;
        padding: 8px;
        text-align: left;
      }
      th {
        background-color: #f2f2f2;
      }
      pre {
        background-color: #f9f9f9;
        padding: 10px;
        overflow-x: auto;
      }
    </style>
  </head>
  <body>
    <div class="header">
      <h1>Network Configuration Report</h1>
      <p>Host: {{ ansible_facts['hostname'] }}</p>
      <p>
        Generated on: {{ ansible_date_time.date }} {{ ansible_date_time.time
        }}
      </p>
    </div>

    <div class="section">
      <h2>Network Interfaces</h2>
      <table>
        <tr>
          <th>Interface</th>
          <th>IPv4 Address</th>
          <th>IPv6 Address</th>
          <th>MAC Address</th>
          <th>Status</th>
        </tr>
        {% for interface_name in ansible_facts['interfaces'] %} {% if
        interface_name != 'lo' %} {% set interface_facts =
        ansible_facts[interface_name] %}
        <tr>
          <td>{{ interface_name }}</td>
          <td>
            {{ interface_facts.get('ipv4', {}).get('address', 'N/A') }}
          </td>
          <td>
            {{ interface_facts.get('ipv6', [{}])[0].get('address', 'N/A') if
            interface_facts.get('ipv6') else 'N/A' }}
          </td>
          <td>{{ interface_facts.get('macaddress', 'N/A') }}</td>
          <td>
            {{ interface_facts.get('active', false) | ternary('Active',
            'Inactive') }}
          </td>
        </tr>
        {% endif %} {% endfor %}
      </table>
    </div>

    <div class="section">
      <h2>Default Gateway</h2>
      <table>
        <tr>
          <th>Property</th>
          <th>Value</th>
        </tr>
        <tr>
          <td>Default IPv4 Address</td>
          <td>
            {{ ansible_facts['default_ipv4']['address'] | default('N/A') }}
          </td>
        </tr>
        <tr>
          <td>Default Interface</td>
          <td>
            {{ ansible_facts['default_ipv4']['interface'] | default('N/A')
            }}
          </td>
        </tr>
        <tr>
          <td>Default Gateway</td>
          <td>
            {{ ansible_facts['default_ipv4']['gateway'] | default('N/A') }}
          </td>
        </tr>
      </table>
    </div>

    <div class="section">
      <h2>DNS Configuration</h2>
      <table>
        <tr>
          <th>DNS Servers</th>
        </tr>
        {% for dns in ansible_facts['dns']['nameservers'] %}
        <tr>
          <td>{{ dns }}</td>
        </tr>
        {% endfor %}
      </table>
    </div>
  </body>
</html>
Create a network interface configuration playbook.
nano configure_network.ymlAdd the following content:
---
- name: Configure network settings
  hosts: webservers
  become: true
  tasks:
    - name: Install NetworkManager if not present
      ansible.builtin.dnf:
        name: NetworkManager
        state: present

    - name: Ensure NetworkManager is running
      ansible.builtin.service:
        name: NetworkManager
        state: started
        enabled: yes

    - name: Configure hosts file with system information
      ansible.builtin.lineinfile:
        path: /etc/hosts
        line: "{{ ansible_facts['default_ipv4']['address'] }} {{ ansible_facts['hostname'] }}.lab.example.com {{ ansible_facts['hostname'] }}"
        regexp: ".*{{ ansible_facts['hostname'] }}.*"
        backup: yes

    - name: Create network monitoring script
      ansible.builtin.copy:
        content: |
          #!/bin/bash
          ## Network monitoring script generated by Ansible
          echo "=== Network Status Report ==="
          echo "Generated at: $(date)"
          echo
          echo "=== Interface Status ==="
          ip addr show
          echo
          echo "=== Routing Table ==="
          ip route show
          echo
          echo "=== DNS Configuration ==="
          cat /etc/resolv.conf
          echo
          echo "=== Network Connectivity Test ==="
          ping -c 3 8.8.8.8
        dest: /usr/local/bin/network-status.sh
        mode: "0755"

    - name: Create network information gathering cron job
      ansible.builtin.cron:
        name: Network status monitoring
        job: "/usr/local/bin/network-status.sh >> /var/log/network-status.log 2>&1"
        minute: "*/15"
        user: root
        cron_file: network-monitoring
        state: present
Execute the network information gathering playbook.
ansible-playbook -i inventory.ini network_info.ymlThis will generate comprehensive system and network reports.
Execute the network configuration playbook.
ansible-playbook -i inventory.ini configure_network.ymlThis will configure network settings and monitoring.
View the generated reports.
## List generated reports
ls -la /tmp/system_reports/

## View the system report (you can also open in a browser)
cat /tmp/system_reports/system_info_*.html

## Check the network monitoring script
cat /usr/local/bin/network-status.sh

## Test the network monitoring script
sudo /usr/local/bin/network-status.sh

## Check the network monitoring cron job
sudo cat /etc/cron.d/network-monitoring
Create a final comprehensive playbook that combines all learned concepts.
nano complete_system_setup.ymlAdd the following content:
---
- name: Complete system setup and configuration
  hosts: webservers
  become: true
  vars:
    admin_users:
      - webuser1
      - webuser2
  tasks:
    - name: Ensure all required packages are installed
      ansible.builtin.dnf:
        name:
          - httpd
          - lvm2
          - NetworkManager
          - cronie
        state: present

    - name: Ensure all services are running
      ansible.builtin.service:
        name: "{{ item }}"
        state: started
        enabled: yes
      loop:
        - httpd
        - NetworkManager
        - crond

    - name: Generate final system status report
      ansible.builtin.template:
        src: system_report.j2
        dest: /tmp/final_system_report.html
        mode: "0644"

    - name: Display completion message
      ansible.builtin.debug:
        msg: |
          ============================================
          RHEL System Administration Automation Complete!
          ============================================

          Summary of configured components:
          - Software: EPEL repository and packages installed
          - Users: {{ admin_users | length }} administrative users created
          - Services: httpd, NetworkManager, and crond configured
          - Storage: LVM volumes and filesystems configured
          - Network: Interface configuration and monitoring set up
          - Scheduling: Cron jobs and at tasks configured

          Reports available at:
          - /tmp/system_reports/
          - /tmp/final_system_report.html

          Your RHEL system is now fully automated with Ansible!
Execute the final comprehensive setup.
ansible-playbook -i inventory.ini complete_system_setup.yml
You have successfully completed a comprehensive automation of RHEL system administration tasks using Ansible, covering software management, user administration, service management, storage configuration, and network setup.
Preview the generated reports in a web browser.
Navigate to the reports directory:
cd /tmp/system_reportsStart a temporary web server using Python:
python -m http.server 8000To preview the reports in your browser:
- Click the + button in the top menu bar
- Select Web Service
- Enter port number 8000
- You can now view the generated HTML reports online
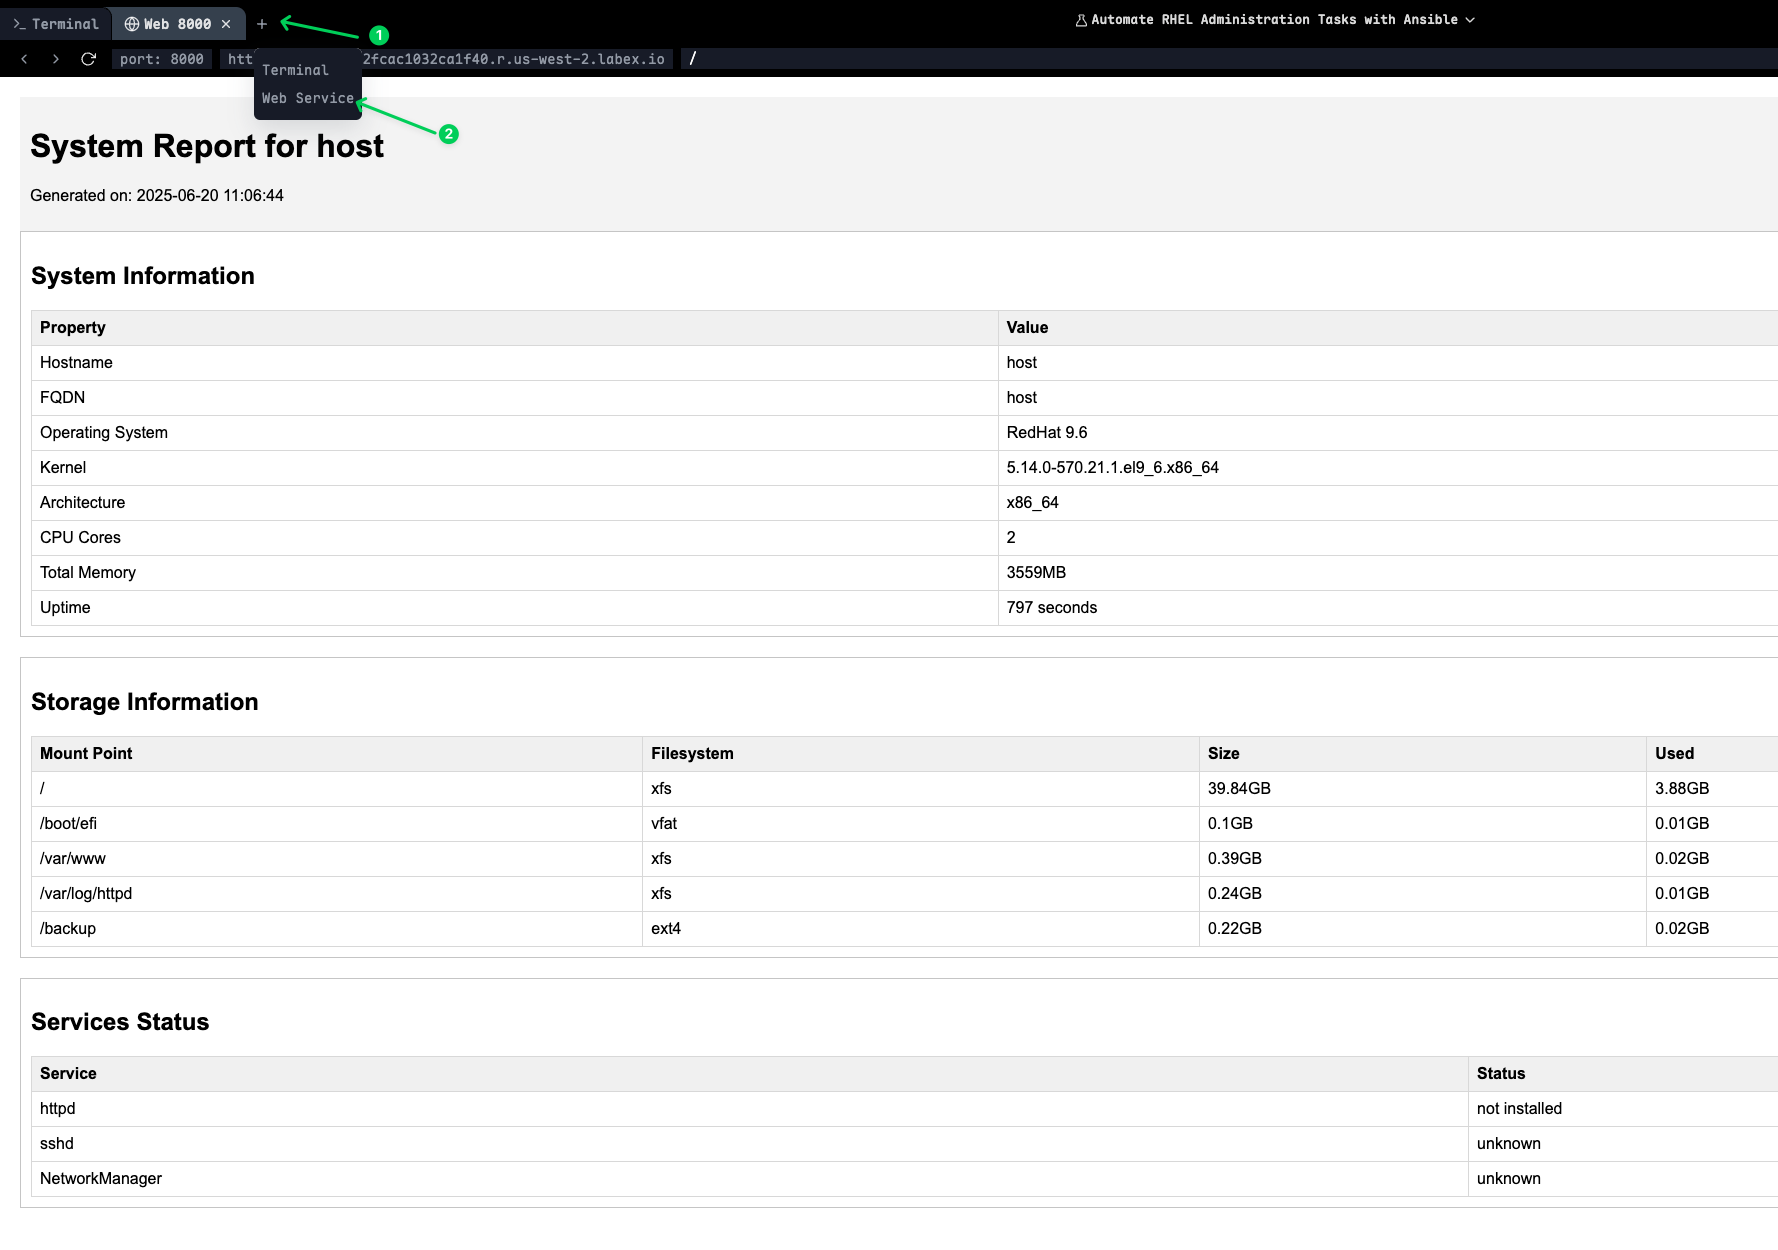
The web server will display a directory listing where you can click on the HTML files to view the comprehensive system and network reports generated by your Ansible playbooks.
Note: Press
Ctrl+Cto stop the web server when you're finished viewing the reports.
Summary
In this comprehensive lab, you have mastered the automation of essential Red Hat Enterprise Linux (RHEL) administration tasks using Ansible. You started with software package management, learning to configure repositories, manage GPG keys, and install packages while gathering system information through package facts. This provided the foundation for consistent software deployment across your infrastructure.
You then progressed to user management and authentication, where you automated the creation of user accounts, configured SSH key-based authentication, set up sudo privileges, and hardened SSH configurations. This established secure and standardized user access policies that are crucial for enterprise environments.
The lab continued with service management and task scheduling, where you learned to manage systemd services, create recurring cron jobs, schedule one-time tasks with at, and configure system boot targets. These skills are essential for maintaining service availability and automating routine maintenance tasks.
Storage management was covered through comprehensive LVM automation, including physical volume creation, volume group management, logical volume provisioning, filesystem creation, and mount point configuration. You also learned to expand storage volumes dynamically, which is critical for scalable infrastructure management.
Finally, you completed network configuration automation and comprehensive system monitoring. You learned to gather network facts, configure interfaces, create detailed system reports using Jinja2 templates, and set up automated monitoring scripts. This provided the complete picture of system state management and reporting.
Throughout this lab, you have applied Infrastructure as Code (IaC) principles, ensuring that all system configurations are reproducible, version-controlled, and consistently deployable. You now have the skills to automate the complete lifecycle of RHEL system administration, from initial deployment to ongoing maintenance and monitoring.

