
Introduction
In this lab, you will learn how to decrypt SSL/TLS traffic using Wireshark, a well - known network protocol analyzer. SSL/TLS encryption is commonly used to safeguard internet communications. However, in some cases like troubleshooting or security analysis, decrypting the encrypted traffic becomes essential.
This lab will lead you through the process of configuring Wireshark to decrypt SSL/TLS traffic. It offers you hands - on experience within a controlled environment.
Configuring SSL/TLS Decryption in Wireshark
In this step, we're going to configure Wireshark to decrypt SSL/TLS traffic. But first, let's understand a bit about what we're doing. SSL/TLS is a protocol used to secure internet communications. When data is sent over the internet using SSL/TLS, it's encrypted to protect its confidentiality. To decrypt this traffic and see the actual data, Wireshark needs access to the encryption keys. These keys are stored in a special file called a pre - master secret log file. We'll create this file now.
Wireshark needs access to the encryption keys to decrypt TLS traffic. These keys are stored in what's called a pre - master secret log file, which we'll create now.
Open a terminal. A terminal is a text - based interface where you can enter commands to interact with your computer's operating system. Once the terminal is open, we'll create a new file named
pre_master_secret.login the/home/labex/project/directory. This file will be used to store the TLS session keys that are necessary for decryption. To create the file, enter the following command in the terminal:touch /home/labex/project/pre_master_secret.logThis command creates an empty file that will later store the TLS session keys needed for decryption.
Now that we have the log file ready, we need to configure Wireshark to use it. First, open Wireshark by typing the following command in the terminal:
wiresharkAfter Wireshark opens, you'll see a menu bar at the top. Click on
Edit > Preferences. This will open a window where you can customize various settings in Wireshark. In the Preferences window, look at the left panel. There's a section calledProtocols. Click on it and then scroll down until you findTLS.In the TLS settings, there's a field labeled
(Pre)-Master-Secret log filename. This is where we tell Wireshark the location of the pre - master key log file we just created. Enter the full path to the file:/home/labex/project/pre_master_secret.logConfirm that the TLS preferences page now points to the log file path you entered.
Once you've entered the path, click
OKto save the changes. Now, Wireshark is configured to use this file for decrypting TLS traffic. This means that when you capture SSL/TLS traffic, Wireshark will be able to use the keys in the log file to decrypt the data and show you the actual content.
Capturing The SSL/TLS Traffic
In this step, we will capture SSL/TLS traffic using Wireshark and generate secure traffic with a Python script. SSL/TLS is a protocol that provides secure communication over a network. Capturing this traffic allows us to analyze it later, which is important for tasks like debugging network issues or detecting security threats.
Let's start by capturing network traffic. In Wireshark, network interfaces are the connections through which your computer sends and receives data. You need to select the appropriate interface to capture the traffic you're interested in. Look for the list of available network interfaces. Click on the
eth1interface to select it. This interface is where the traffic we want to capture will pass through. Then, click theStartbutton (the blue shark fin icon) in the toolbar to begin capturing packets.Wireshark will now capture all network traffic on the selected interface. As it captures, you'll see packets start to appear in the main window. Each packet represents a small unit of data being transmitted over the network.
Now, we need to generate some SSL/TLS traffic that we can analyze. Open a new terminal window. The terminal is a command - line interface where you can run commands to interact with your computer. Navigate to the project directory using the following command:
cd /home/labex/project/This command changes the current working directory to the project directory. We'll create a Python script that establishes a secure connection to a website. Python is a programming language that allows us to write scripts to perform various tasks. Create a new file named
tls_client.pyusing the nano text editor:nano tls_client.pyThe nano text editor is a simple and easy - to - use text editor in the terminal. Copy and paste the following Python code into the editor:
#!/usr/bin/env python3

import ssl
import socket
import os

HOST = "example.com"
PORT = 443

## Set the path for the pre-master secret log file
os.environ['SSLKEYLOGFILE'] = '/home/labex/project/pre_master_secret.log'

## Create an SSL/TLS context
context = ssl.create_default_context(ssl.Purpose.SERVER_AUTH)

## Create a socket and wrap it with SSL/TLS
with socket.socket(socket.AF_INET, socket.SOCK_STREAM) as sock:
    with context.wrap_socket(sock, server_hostname=HOST) as ssock:
        ssock.connect((HOST, PORT))

        ## Send a simple HTTP GET request
        request = "GET / HTTP/1.1\r\nHost: example.com\r\n\r\n"
        ssock.sendall(request.encode())

        ## Receive the response and print all the received data
        data = ssock.recv(4096)
        print(data.decode())
This script does the following:
- Sets an environment variable to specify where to save the TLS session keys. These keys are crucial for decrypting the SSL/TLS traffic later.
- Creates a secure connection to example.com. The
sslandsocketlibraries are used to establish this connection. - Sends a basic HTTP request. This request asks the server for the main page of example.com.
- Receives and displays the server's response.
Save the file by pressing
Ctrl+O, thenEnter, and exit nano by pressingCtrl+X.Now run the script to generate the TLS traffic:
python3 tls_client.pyYou should see an HTTP response from example.com, which confirms that the script successfully established a secure connection. The script also wrote the TLS session keys to our pre - master secret log file, which Wireshark will use for decryption.
The output will look something like this:
HTTP/1.1 200 OK
Age: 558804
Cache-Control: max-age=604800
Content-Type: text/html; charset=UTF-8
Date: ...
...
Now that we've generated the TLS traffic, go back to Wireshark and stop the capture by clicking the red
Stopbutton in the toolbar. Stopping the capture is necessary so that we can save the captured traffic.To save the captured traffic for analysis, click on
Filein the menu bar, then selectSave As.... In the save dialog, navigate to/home/labex/project/, name the filetls_traffic.pcapng, and clickSave. The.pcapngfile format is a standard format for saving network traffic captures.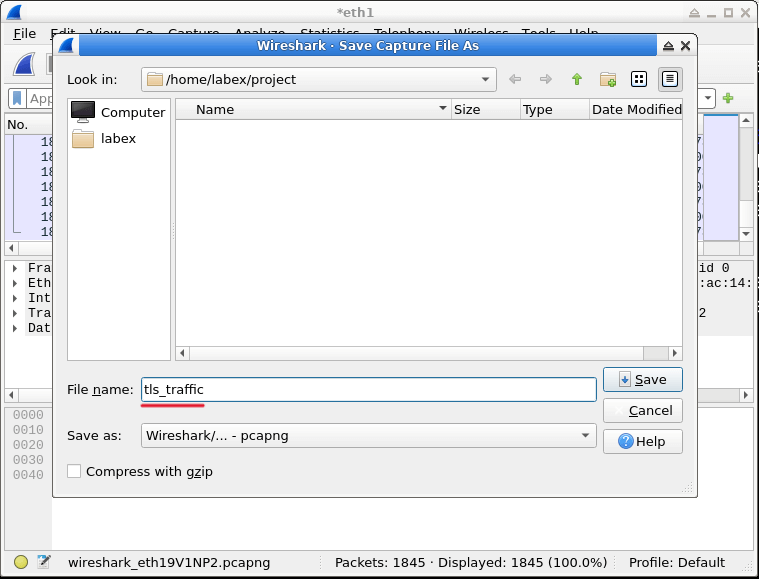
Your captured traffic is now saved and ready for analysis in the next step.
Analyzing Decrypted SSL/TLS Traffic
In this step, we will analyze the decrypted SSL/TLS traffic using Wireshark's filtering and analysis tools. These tools are essential for extracting meaningful information from the large amount of network traffic data.
First, let's apply a filter to focus on specific parts of the TLS handshake. The TLS handshake is a crucial initial process in establishing a secure connection between a client and a server. During this process, the client and server exchange information to agree on encryption algorithms, keys, and other security parameters.
In the filter toolbar (the text input field at the top of the Wireshark window), enter the following expression:
tls.handshake.type == 1This filter expression is used to select packets based on the type of the TLS handshake. The value
1corresponds to theClient Hellopackets. PressEnterto apply the filter. After applying the filter, Wireshark will only display theClient Hellopackets, which are the initial packets sent by the client to start the TLS handshake.You should now see only the packets matching this filter. By narrowing down the displayed packets, it becomes easier to focus on the beginning of the TLS connection and understand how the secure communication starts.
To view the decrypted content, let's follow the TLS stream. Right - click on any packet in the filtered list and select
Follow>TLS Streamfrom the context menu. This action tells Wireshark to reconstruct the entire TLS session based on the selected packet and display the decrypted data.A new window will open showing the decrypted data. This data represents the actual HTTP communication that was transmitted over the secure connection. Thanks to the TLS session keys stored in our pre - master secret log file, Wireshark can decrypt and display this data that would normally be encrypted.
The decrypted data will show both the HTTP request sent by our Python script and the HTTP response from the server. You can see headers, content types, and the actual HTML content of the response. This information is valuable for understanding the communication between the client and the server, such as what data is being requested and what is being returned.
Let's save this decrypted data for further analysis. In the "Follow TLS Stream" window, click on the
Save as...button. Saving the data allows you to review it later, share it with others, or perform additional analysis.In the save dialog, navigate to
/home/labex/project/, name the filedecrypted_data.txt, and clickSave.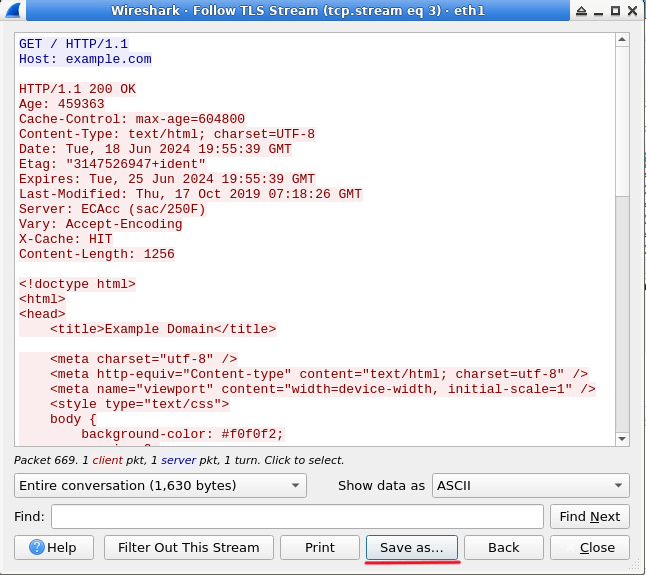
You have now successfully captured, decrypted, and saved TLS traffic for analysis. The decrypted data file contains the full HTTP communication that was originally encrypted with TLS.
You can close the "Follow TLS Stream" window when you're done. If you want to explore further, try different Wireshark filters to examine other aspects of the captured traffic. For example, the filter
httpwill show you just the HTTP traffic after decryption. This way, you can dig deeper into the specific types of data being transmitted over the network.
Summary
In this lab, you have learned how to decrypt SSL/TLS traffic using Wireshark. You created a pre - master secret log file to store TLS session keys, configured Wireshark to use this file for decryption, and generated SSL/TLS traffic with a Python script. Then, you analyzed the decrypted traffic using Wireshark's filtering and stream following features.
These skills are crucial for network troubleshooting, security analysis, and understanding secure communications. Decrypting and analyzing TLS traffic in a controlled setting helps you better understand network protocols and spot issues in encrypted communications. Remember, in real - world situations, decrypting TLS traffic needs proper authorization and should only be done on authorized networks to avoid violating privacy laws.

