Introduction
In this lab, you will learn how to set up SQLite on a Linux system using the LabEx VM environment. SQLite is a lightweight, file-based relational database management system (RDBMS) that is ideal for small to medium-sized applications and perfect for beginners due to its simplicity and ease of use.
The lab guides you through the essential steps, including installing SQLite on Linux, verifying the installation, accessing the SQLite command-line interface (CLI), and running basic commands like .help and .exit. Using the Linux package manager in the provided ~/project directory, you will update package lists and install SQLite3, setting the foundation for exploring database concepts with hands-on practice.
Install SQLite on Linux
In this step, you will learn how to install SQLite on a Linux system using the LabEx VM environment. SQLite is a lightweight, file-based database management system that is widely used for small to medium-sized applications. It doesn't require a separate server process and is embedded directly into applications, making it an excellent choice for learning database concepts.
Before we begin, let's understand what SQLite is. SQLite is a relational database management system (RDBMS) that stores data in a single file. It is easy to set up and use, which makes it perfect for beginners who are just starting with databases. In this lab, we will install SQLite, verify its installation, and perform basic operations using its command-line interface (CLI).
Now, let's proceed with the installation process. The LabEx VM environment is based on a Linux distribution, and we will use the package manager to install SQLite. Follow the steps below carefully to ensure a successful installation. All operations will be performed in the default directory ~/project, which is already set up for you.
First, update the package list to ensure you have the latest information about available packages. Open your terminal and run the following command:
sudo apt updateThis command fetches the latest package information from the repositories. You should see output indicating that the package lists are being updated. Wait for the process to complete.
Next, install SQLite3, which is the package name for SQLite in most Linux distributions. Run the following command:
sudo apt install -y sqlite3The
-yflag automatically answers "yes" to any prompts during the installation, making the process smoother. You will see output showing the installation progress, including downloading and setting up the SQLite3 package. Once completed, SQLite will be installed on your system.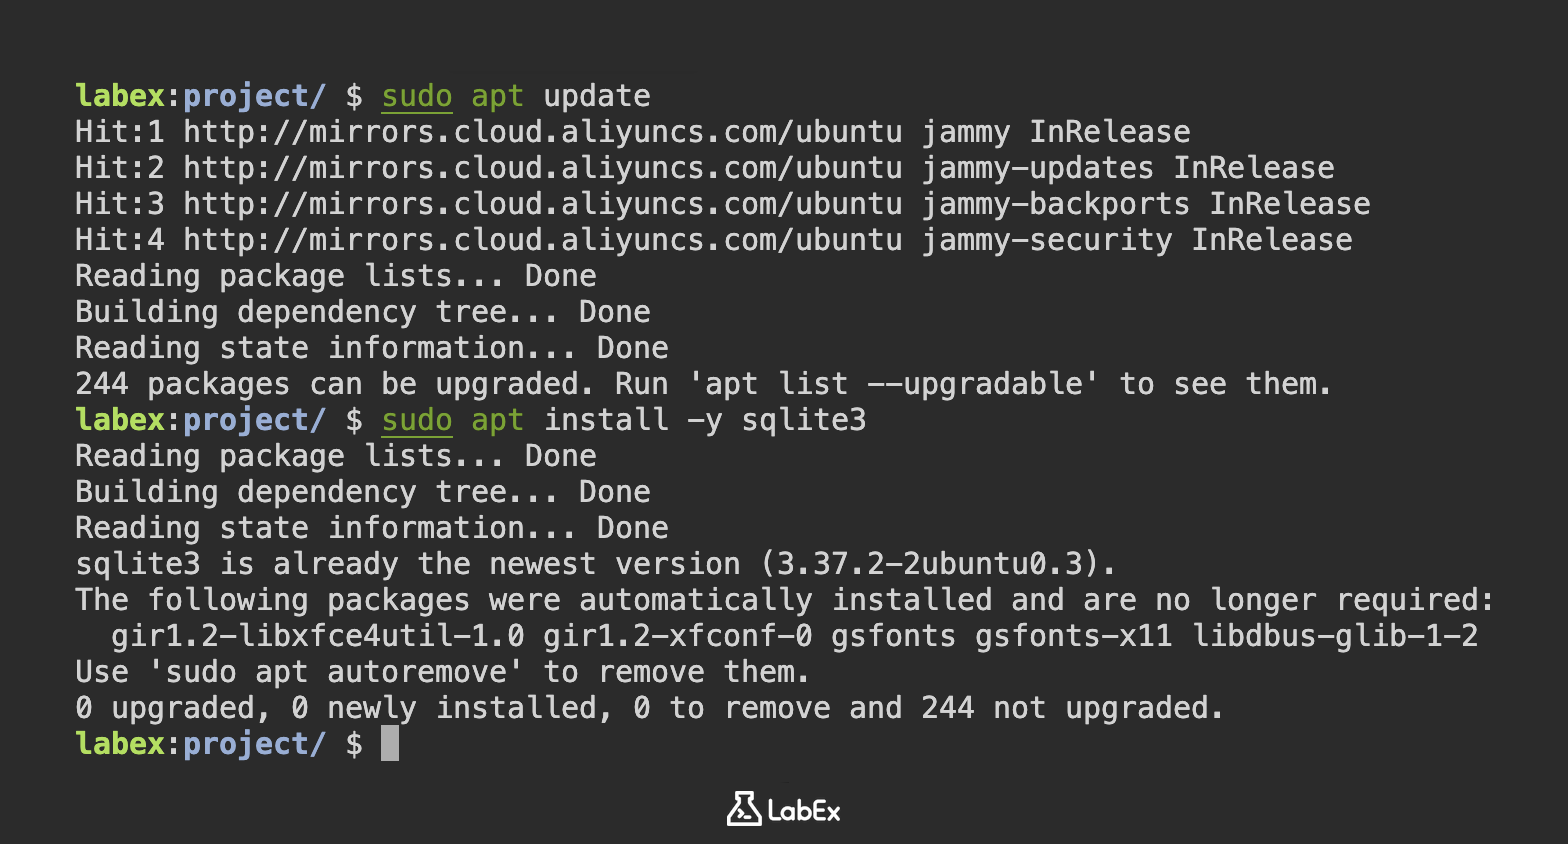
After the installation, let's confirm that SQLite has been installed correctly by checking its version. Run the following command:
sqlite3 --versionYou should see output similar to this:
3.37.2 2022-01-06 13:25:41 872ba256cbf61d9290b571c0e6d82a20c224ca3ad82971edc46b29818d5dalt1The exact version number may vary depending on the package available in the repository, but seeing this output confirms that SQLite is installed on your system.
By completing these steps, you have successfully installed SQLite on your Linux system in the LabEx VM environment. In the next steps, we will verify the installation further and explore how to access and use the SQLite CLI to run basic commands.
Verify SQLite Installation
In this step, you will verify that SQLite has been correctly installed on your Linux system in the LabEx VM environment. Verifying the installation is an important step to ensure that the software is ready for use before proceeding to more advanced operations. This process will help you confirm that the SQLite command-line tool is accessible and functioning as expected.
To make sure you understand the purpose of this step, let's briefly discuss why verification is necessary. After installing any software, it's a good practice to check if the installation was successful. For SQLite, this means ensuring that the sqlite3 command-line tool is available in your terminal and can be executed without errors. This step builds on the previous installation process and prepares you for accessing the SQLite CLI in the next step.
All operations will be performed in the default directory ~/project, which is your working directory in the LabEx VM. Follow the instructions below to verify the SQLite installation.
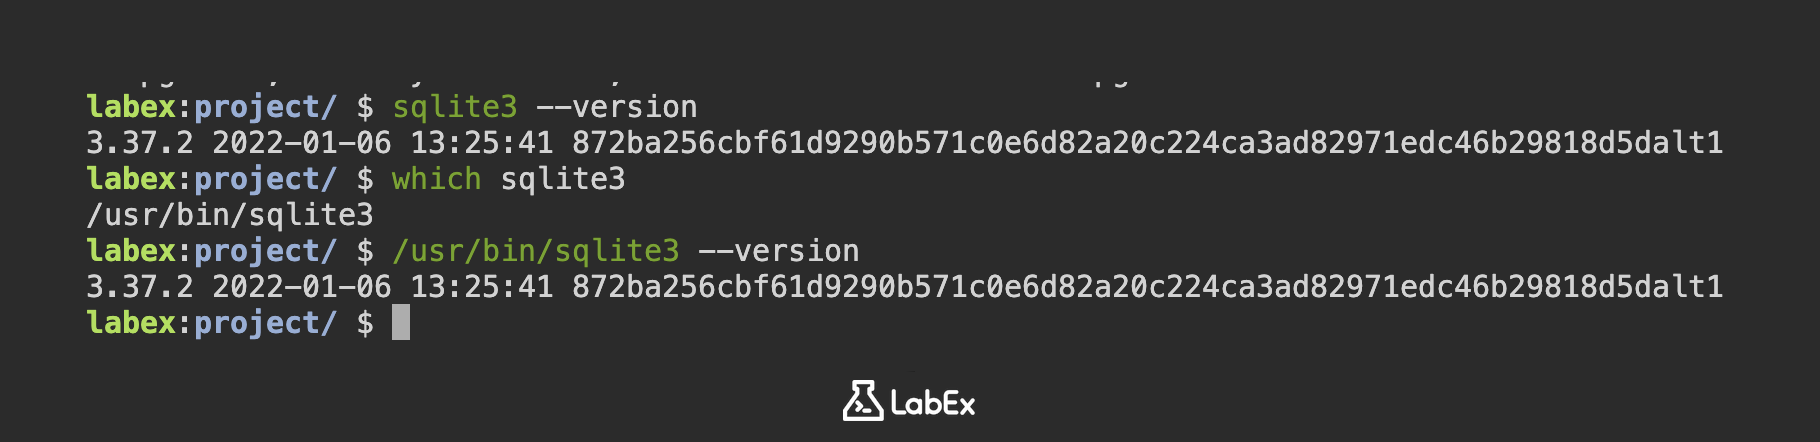
First, let's check if the
sqlite3command is recognized by the system. Open your terminal and run the following command:which sqlite3This command will return the path to the SQLite executable if it is installed correctly. You should see output similar to:
/usr/bin/sqlite3If you see a path like this, it means SQLite is installed and accessible in your system.
Next, let's double-check the version of SQLite installed on your system to confirm it matches what was installed. Run the following command:
/usr/bin/sqlite3 --versionYou should see output similar to what you observed during the installation step, for example:
3.37.2 2022-01-06 13:25:41 872ba256cbf61d9290b571c0e6d82a20c224ca3ad82971edc46b29818d5dalt1The exact version number may vary, but seeing this output confirms that SQLite is installed and the command-line tool is working correctly.
By completing these steps, you have verified that SQLite is properly installed on your system. If you encountered any issues, such as the sqlite3 command not being found, revisit the previous step to ensure the installation was done correctly. In the next step, we will access the SQLite CLI to start interacting with databases.
Access the SQLite CLI
In this step, you will learn how to access the SQLite Command Line Interface (CLI) in the LabEx VM environment. The SQLite CLI is a powerful tool that allows you to interact directly with SQLite databases, create tables, insert data, and run queries. This is an essential skill for working with SQLite, as it provides a hands-on way to manage and manipulate databases.
Before diving into the practical steps, let's briefly explain what the SQLite CLI is. The CLI, or Command Line Interface, is a text-based interface where you can type commands to interact with SQLite. Unlike graphical tools, the CLI operates entirely through the terminal, making it lightweight and efficient. Accessing the CLI is the first step to performing database operations, and in this step, we will focus on launching it and understanding its basic environment.
All operations will be performed in the default directory ~/project, which is your working directory in the LabEx VM. Follow the instructions below to access the SQLite CLI.
Open your terminal in the LabEx VM environment. Ensure you are in the
~/projectdirectory. You can confirm this by running the following command:pwdYou should see the output:
/home/labex/projectIf you are not in the
~/projectdirectory, navigate to it using:cd ~/projectNow, let's launch the SQLite CLI. To do this, simply run the following command in your terminal:
sqlite3After running this command, you should see the SQLite CLI prompt, which looks like this:
SQLite version 3.37.2 2022-01-06 13:25:41
Enter ".help" for usage hints.
Connected to a transient in-memory database.
Use ".open FILENAME" to reopen on a persistent database.
sqlite>
The
sqlite>prompt indicates that you are now inside the SQLite CLI environment. This is where you can type SQLite commands to manage databases. For now, we are connected to a temporary in-memory database, which means any changes you make will not be saved after you exit the CLI.To exit the SQLite CLI and return to your regular terminal prompt, type the following command at the
sqlite>prompt and press Enter:.exitIMPORTANT: Make sure
.exitbefore you click the "Continue" button. Otherwise, the step cannot be verified because the sqlite history will not be recorded.You should now be back to your regular terminal prompt in the
~/projectdirectory.
By completing these steps, you have successfully accessed the SQLite CLI and learned how to enter and exit it. This is a foundational skill for working with SQLite databases. In the next step, we will explore running basic SQLite commands within the CLI to get more familiar with its functionality.
Run Basic SQLite Commands (.help, .exit)
In this step, you will learn how to run basic SQLite commands within the SQLite Command Line Interface (CLI) in the LabEx VM environment. Understanding these fundamental commands is crucial for navigating and managing SQLite databases effectively. We will focus on two essential commands, .help and .exit, to get you started with using the CLI.
Before we begin, let's clarify what SQLite commands are. In the SQLite CLI, commands are instructions that you type to interact with the database or control the CLI environment. Commands starting with a dot (.) are special SQLite meta-commands that manage the CLI itself rather than manipulating data in a database. This step builds on the previous one, where you learned to access the SQLite CLI, and prepares you for more advanced database operations in future labs.
All operations will be performed in the default directory ~/project, which is your working directory in the LabEx VM. Follow the instructions below to run basic SQLite commands.
Open your terminal in the LabEx VM environment. Ensure you are in the
~/projectdirectory. You can confirm this by running the following command:pwdYou should see the output:
/home/labex/projectIf you are not in the
~/projectdirectory, navigate to it using:cd ~/projectLaunch the SQLite CLI by running the following command in your terminal:
sqlite3After running this command, you should see the SQLite CLI prompt, which looks like this:
SQLite version 3.31.1 2020-01-27 19:55:54
Enter ".help" for usage hints.
Connected to a transient in-memory database.
Use ".open FILENAME" to reopen on a persistent database.
sqlite>
The
sqlite>prompt indicates that you are now inside the SQLite CLI environment.Let's explore the
.helpcommand to see a list of available SQLite meta-commands. At thesqlite>prompt, type the following command and press Enter:.helpYou should see a long list of commands with brief descriptions, starting with something like:
.backup ?DB? FILE      Backup DB (default "main") to FILE
.bail on|off           Stop after hitting an error.  Default OFF
.binary on|off         Turn binary output on or off.  Default OFF
...
This output provides a reference for all the meta-commands you can use in the SQLite CLI. Feel free to scroll through the list to get an idea of the available options. You don't need to memorize them now; you can always refer back to
.helpwhen needed.Finally, let's use the
.exitcommand to leave the SQLite CLI and return to your regular terminal prompt. At thesqlite>prompt, type the following command and press Enter:.exitIMPORTANT: Make sure
.exitbefore you click the "Continue" button. Otherwise, the step cannot be verified because the sqlite history will not be recorded.You should now be back to your regular terminal prompt in the
~/projectdirectory.
By completing these steps, you have successfully run basic SQLite commands within the CLI. The .help command is a valuable resource for learning about other commands, and the .exit command allows you to leave the CLI environment. This foundational knowledge will help you as you progress to more complex database operations in future labs.
Summary
In this lab, you learned how to set up SQLite on a Linux system using the LabEx VM environment. SQLite, a lightweight and file-based relational database management system, is ideal for beginners due to its simplicity and embedded nature, requiring no separate server process. The lab guided you through the essential steps of updating the package list with sudo apt update and installing SQLite3 using sudo apt install -y sqlite3, ensuring a smooth installation process in the default ~/project directory.
Additionally, the lab covered verifying the installation and accessing the SQLite command-line interface (CLI) to run basic commands like .help and .exit. These steps provided a foundational understanding of working with SQLite, preparing you for further exploration of database concepts and operations in a Linux environment.