
Introduction
In this lab, you will gain hands-on experience managing files and directories using essential command-line tools in a RHEL environment. You will learn to explore your current location and list contents with pwd and ls, navigate directories and create files using cd and touch, and organize files and directories effectively with mkdir, cp, mv, and rm.
Furthermore, you will discover how to create links between files using ln (both hard and symbolic links) and efficiently select files with shell expansions, equipping you with fundamental skills for command-line file management.
Explore Your Current Location and List Contents with pwd and ls
In this step, you will learn how to explore your current location within the file system and list its contents using the pwd and ls commands. Understanding your current working directory and being able to view its contents are fundamental skills for navigating and managing files from the command line.
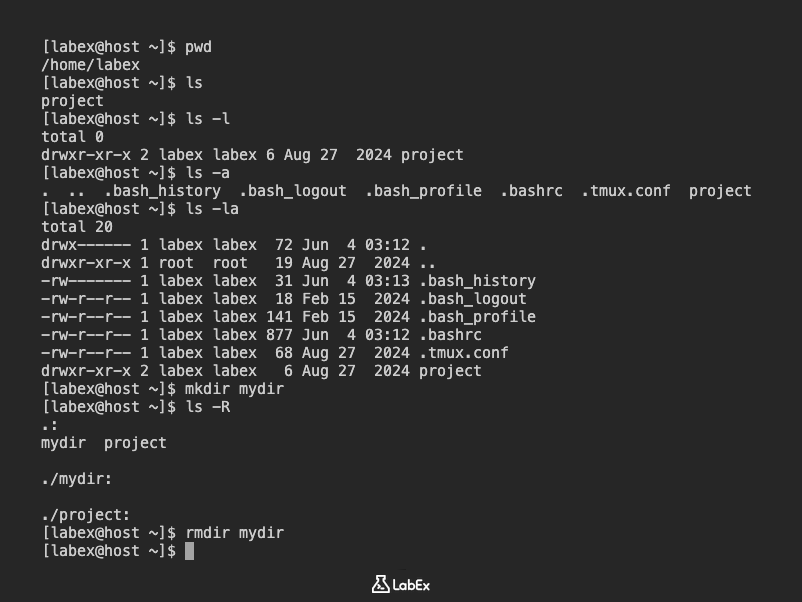
First, let's determine your current working directory using the pwd command. pwd stands for "print working directory" and it displays the full path name of your current location in the file system.
pwd
You should see output similar to this, indicating your current directory:
/home/labex
Next, you will use the ls command to list the contents of your current directory. ls stands for "list" and it lists directory contents for the specified directory or, if no directory is given, for the current working directory.
ls
You should see output showing the contents of your home directory:
project
The ls command has several useful options to display more information about files and directories.
The
-loption (long listing format) provides detailed information about each file and directory, including permissions, number of hard links, owner, group, size, and last modification time.ls -lYou should see output similar to this:
total 0
drwxr-xr-x 2 labex labex 6 Aug 27  2024 project
The
-aoption (all files) lists all files, including hidden files. In Linux, file names that begin with a dot (.) are considered hidden. Also,.refers to the current directory, and..refers to the parent directory.ls -aYou should see output similar to this, including hidden configuration files:
. .. .bash_history .bash_logout .bash_profile .bashrc .tmux.conf projectCombining
-land-aas-lagives a long listing of all files, including hidden ones.ls -laThis will show detailed information for all files and directories, including hidden ones:
total 20
drwx------ 1 labex labex  72 Jun  4 03:12 .
drwxr-xr-x 1 root  root   19 Aug 27  2024 ..
-rw------- 1 labex labex  31 Jun  4 03:13 .bash_history
-rw-r--r-- 1 labex labex  18 Feb 15  2024 .bash_logout
-rw-r--r-- 1 labex labex 141 Feb 15  2024 .bash_profile
-rw-r--r-- 1 labex labex 877 Jun  4 03:12 .bashrc
-rw-r--r-- 1 labex labex  68 Aug 27  2024 .tmux.conf
drwxr-xr-x 2 labex labex   6 Aug 27  2024 project
The
-Roption (recursive) lists the contents of all subdirectories recursively. To demonstrate this, let's first create a subdirectory.mkdir mydirNow, use
ls -Rto see the recursive listing.ls -RYou should see both
mydirandprojectdirectories listed, followed by their contents:.: mydir project ./mydir: ./project:Finally, let's remove the
mydirdirectory to clean up the environment for the next steps.rmdir mydirThis command only works for empty directories. You will learn more about
rmdirandrmin a later step.
Navigate Directories and Create Files with cd and touch
In this step, you will learn how to change your current working directory using the cd command and create empty files using the touch command. These commands are essential for organizing your files and navigating through the file system efficiently.
First, let's verify your current location and navigate to the project directory that was shown in step 1.
pwd
You should see /home/labex as the output (your home directory).
Now, let's navigate to the project directory using the cd command:
cd project
Verify your new location:
pwd
You should now see /home/labex/project as the output.
Now, let's create a new directory named documents inside your current project directory. You will use the mkdir command, which you briefly encountered in the previous step.
mkdir documents
Verify that the documents directory has been created:
ls
You should see documents listed in the output.
Next, you will use the cd command to change your shell's current working directory to the newly created documents directory.
cd documents
After changing the directory, it's good practice to confirm your new location using pwd:
pwd
The output should now be /home/labex/project/documents.
The cd command offers several convenient options for navigation:
cd -: This command changes to the previous directory you were in. Let's try it.cd -You should be back in
/home/labex/project. Verify withpwd:pwdNow, use
cd -again to return to/home/labex/project/documents:cd -And verify with
pwd:pwdcd ..: This command uses the..(two dots) hidden directory to move up one level to the parent directory, without needing to know the exact parent name.cd ..You should now be in
/home/labex/project. Verify withpwd:pwdYou can chain
..to move up multiple levels. For example, to go to/home/labexfrom/home/labex/project:cd ../Verify your location:
pwdYou should be in
/home/labex.cd(without any arguments): This command will always take you back to your home directory, which is/home/labexfor thelabexuser.cdVerify your location:
pwdYou should be in
/home/labex.
Now, let's navigate back to your ~/project/documents directory to create some files.
cd ~/project/documents
Verify your location:
pwd
The output should be /home/labex/project/documents.
You will now use the touch command. The touch command updates the timestamp of a file to the current date and time without otherwise modifying it. This command is also very useful for creating empty files.
Let's create two empty files named report.txt and notes.txt in the ~/project/documents directory.
touch report.txt notes.txt
Verify that the files have been created using ls -l:
ls -l
You should see output similar to this, showing the newly created files:
total 0
-rw-rw-r--. 1 labex labex 0 Mar  7 HH:MM report.txt
-rw-rw-r--. 1 labex labex 0 Mar  7 HH:MM notes.txt
Finally, let's create a new directory called drafts inside ~/project/documents and then create a file inside it.
mkdir drafts
cd drafts
touch draft_v1.txt
Verify the file creation:
ls -l
You should see draft_v1.txt listed.
Now, navigate back to your ~/project directory using a single cd command.
cd ~/project
Verify your location:
pwd
The output should be /home/labex/project.
Organize Files and Directories with mkdir, cp, mv, and rm
In this step, you will learn how to organize your files and directories effectively using mkdir (make directory), cp (copy), mv (move/rename), and rm (remove) commands. These commands are crucial for maintaining a clean and structured file system.
First, ensure you are in your ~/project directory.
cd ~/project
Verify your current location:
pwd
The output should be /home/labex/project.
mkdir: Creating Directories
You've already used mkdir to create a single directory. Now, let's explore more advanced mkdir options.
You can create multiple directories at once by listing them as arguments:
mkdir reports presentations
Verify their creation:
ls
You should see documents, presentations, and reports listed.
The mkdir command's -p (parents) option is very useful for creating any missing parent directories for the requested destination. This prevents errors if you try to create a subdirectory within a non-existent parent directory.
Let's create a nested directory structure: projects/alpha/docs.
mkdir -p projects/alpha/docs
Now, use ls -R to see the newly created nested structure:
ls -R projects
You should see:
projects:
alpha

projects/alpha:
docs

projects/alpha/docs:
cp: Copying Files and Directories
The cp command copies files and directories. When copying a file, it creates a duplicate either in the current directory or in a different specified directory.
Let's copy report.txt from documents to the reports directory.
cp documents/report.txt reports/
Verify the copy by listing the contents of the reports directory:
ls reports
You should see report.txt in the reports directory.
If a file with the same name exists in the target directory, cp will overwrite it by default.
To copy a directory and its contents, you must use the -r (recursive) option. By default, cp ignores directories if -r is not specified.
Let's copy the entire documents directory into projects/alpha/.
cp -r documents projects/alpha/
Verify the recursive copy:
ls -R projects/alpha/documents
You should see the contents of the documents directory (including notes.txt, drafts, and drafts/draft_v1.txt) now duplicated inside projects/alpha/documents.
projects/alpha/documents:
drafts  notes.txt  report.txt

projects/alpha/documents/drafts:
draft_v1.txt
mv: Moving and Renaming Files and Directories
The mv command moves files from one location to another. It can also be used to rename files or directories. If you think of the absolute path to a file as its full name, then moving a file is effectively the same as renaming a file. The content of the files that are moved remain unchanged.
Let's rename notes.txt in the documents directory to meeting_notes.txt.
mv documents/notes.txt documents/meeting_notes.txt
Verify the rename:
ls documents
You should now see meeting_notes.txt instead of notes.txt.
Now, let's move report.txt from the reports directory into documents/drafts.
mv reports/report.txt documents/drafts/
Verify the move:
ls reports
The reports directory should now be empty.
ls documents/drafts
You should see draft_v1.txt and report.txt in the documents/drafts directory.
The -v option for mv displays a detailed output of the command operations, which can be helpful for confirmation.
mv -v documents/meeting_notes.txt documents/final_notes.txt
You will see output like:
renamed 'documents/meeting_notes.txt' -> 'documents/final_notes.txt'
rm: Removing Files and Directories
The rm command removes files. Be careful with rm, as deleted files are typically not recoverable from the command line.
Let's create a temporary file to practice rm.
touch temp_file.txt
Now, remove temp_file.txt:
rm temp_file.txt
Verify its removal:
ls
temp_file.txt should no longer be listed.
By default, rm does not remove directories. If you try to remove a non-empty directory without the correct option, you will get an error.
rm presentations
You will see an error:
rm: cannot remove 'presentations': Is a directory
To remove directories and their contents, you must use the -r (recursive) option. The rm -r command traverses each subdirectory first and individually removes their files before removing each directory.
Let's remove the presentations directory and its contents (which is currently empty, but -r is still required for directories).
rm -r presentations
Verify its removal:
ls
presentations should no longer be listed.
The -i option for rm interactively prompts for confirmation before deleting each file. This is a good safety measure.
Let's create a few more temporary files and then remove them interactively.
touch file1.txt file2.txt
rm -i file1.txt file2.txt
You will be prompted for each file:
rm: remove regular empty file 'file1.txt'? y
rm: remove regular empty file 'file2.txt'? y
Type y and press Enter for each prompt to confirm deletion.
The -f option (force) forces the removal without prompting the user for confirmation. If you specify both -i and -f, -f takes priority. Use -f with extreme caution.
Finally, let's clean up the projects directory.
rm -r projects
Verify that projects is gone:
ls
rmdir: Removing Empty Directories
You can also use the rmdir command to remove empty directories. It will fail if the directory is not empty.
Let's create an empty directory and remove it with rmdir.
mkdir empty_dir
rmdir empty_dir
Verify its removal:
ls
empty_dir should no longer be listed.
If you try to remove a non-empty directory with rmdir, it will fail:
mkdir test_dir
touch test_dir/test_file.txt
rmdir test_dir
You will see an error:
rmdir: failed to remove 'test_dir': Directory not empty
Remember to use rm -r for non-empty directories.
rm -r test_dir
Create Links Between Files with ln (Hard and Symbolic Links)
In this step, you will learn about creating links between files using the ln command. Linux file systems support two types of links: hard links and symbolic (or soft) links. Understanding the difference between them is crucial for effective file management.
First, ensure you are in your ~/project directory.
cd ~/project
Verify your current location:
pwd
The output should be /home/labex/project.
Let's create a new file named original_file.txt with some content to work with.
echo "This is the content of the original file." > original_file.txt
Verify the file content:
cat original_file.txt
Hard Links
A hard link is essentially another name for an existing file. It points directly to the same data (inode) on the storage device as the original file. After a hard link is created, you cannot tell the difference between the new hard link and the original name of the file; they are equally valid ways to access the same data.
You can determine whether a file has multiple hard links by using the ls -l command. The second column in the ls -l output shows the number of hard links to the file.
Initially, original_file.txt has one hard link (itself):
ls -l original_file.txt
You should see output similar to this, where the number 1 indicates one hard link:
-rw-rw-r--. 1 labex labex 35 Mar 7 HH:MM original_file.txt
Now, let's create a hard link to original_file.txt named hard_link.txt using the ln command.
ln original_file.txt hard_link.txt
Check the hard link count for both files:
ls -l original_file.txt hard_link.txt
You should now see the hard link count as 2 for both files, indicating they point to the same data:
-rw-rw-r--. 2 labex labex 35 Mar  7 HH:MM hard_link.txt
-rw-rw-r--. 2 labex labex 35 Mar  7 HH:MM original_file.txt
To confirm that they point to the same data, you can use the ls -i option to list each file's inode number. If the files are on the same file system and their inode numbers are the same, then the files are hard links that point to the same data file content.
ls -i original_file.txt hard_link.txt
The inode numbers should be identical:
1234567 original_file.txt 1234567 hard_link.txt
If you modify the content of one file, the changes will be reflected in the other, because they are the same underlying data.
echo "Adding new line." >> hard_link.txt
cat original_file.txt
You will see:
This is the content of the original file.
Adding new line.
Even if the original file is deleted, you can still access the contents of the file provided that at least one other hard link exists. Data is deleted from storage only when the last hard link is deleted, making the file contents unreferenced by any hard link.
Let's remove original_file.txt:
rm original_file.txt
Now, try to access hard_link.txt:
cat hard_link.txt
You will still see the content:
This is the content of the original file.
Adding new line.
The hard link count for hard_link.txt should now be 1:
ls -l hard_link.txt
Limitations of Hard Links:
- You can only use hard links with regular files. You cannot use the
lncommand to create a hard link to a directory or special file. - You can use hard links only if both files are on the same file system. You can use the
dfcommand to list the file systems.
Symbolic Links
A symbolic link (also called a "soft link" or "symlink") is a special type of file that points to another file or directory by its path. It's similar to a shortcut in Windows. Unlike hard links, symbolic links do not point directly to the data; they point to the name of the target file or directory.
Let's create a new file named target_file.txt for our symbolic link.
echo "This is the target file for the symbolic link." > target_file.txt
Now, create a symbolic link named sym_link.txt pointing to target_file.txt using the ln -s command.
ln -s target_file.txt sym_link.txt
Check the details of the symbolic link using ls -l:
ls -l target_file.txt sym_link.txt
You will notice a few differences:
- The first character of the long listing for
sym_link.txtisl(letterl), indicating it's a symbolic link. - The output shows
sym_link.txt -> target_file.txt, explicitly showing what it points to. - The size of the symbolic link is very small (it's just the length of the target path), not the size of the target file.
- The hard link count for
sym_link.txtis1.
-rw-rw-r--. 1 labex labex 45 Mar  7 HH:MM target_file.txt
lrwxrwxrwx. 1 labex labex 14 Mar  7 HH:MM sym_link.txt -> target_file.txt
You can access the content of target_file.txt through sym_link.txt:
cat sym_link.txt
You will see:
This is the target file for the symbolic link.
Key differences and behaviors of Symbolic Links:
Cross-filesystem linking: Symbolic links can link two files on different file systems.
Linking to directories: Symbolic links can point to a directory, not just to a regular file. Let's create a symbolic link to your
documentsdirectory.ln -s documents doc_shortcutNow, you can
cdintodoc_shortcutas if it were thedocumentsdirectory itself:cd doc_shortcutVerify your location. Notice that
pwdby default shows the symbolic link path:pwdOutput:
/home/labex/project/doc_shortcutIf you want
pwdto show the actual path of the directory the symbolic link points to, use the-Poption:pwd -POutput:
/home/labex/project/documentsNow, go back to
~/project:cd ~/projectDangling symbolic links: When the original regular file (the target) is deleted, the symbolic link still exists but points to a missing file. This is called a "dangling symbolic link".
Let's remove
target_file.txt:rm target_file.txtNow, check
sym_link.txtwithls -l:ls -l sym_link.txtYou will see that
sym_link.txtstill exists, but its targettarget_file.txtis shown in red or a different color (depending on your terminal's configuration) to indicate it's broken:lrwxrwxrwx. 1 labex labex 14 Mar 7 HH:MM sym_link.txt -> target_file.txtIf you try to
catthe dangling symbolic link, it will fail:cat sym_link.txtOutput:
cat: sym_link.txt: No such file or directory
Finally, let's clean up the files and links created in this step.
rm hard_link.txt sym_link.txt doc_shortcut
ls
You should only see documents and reports directories remaining from previous steps.
Efficiently Select Files with Shell Expansions
In this step, you will learn how to efficiently select files and directories using various shell expansion features, including pattern matching (globbing), tilde expansion, brace expansion, variable expansion, and command substitution. These features allow you to perform operations on multiple files with concise commands.
First, ensure you are in your ~/project directory.
cd ~/project
Verify your current location:
pwd
The output should be /home/labex/project.
To demonstrate shell expansions, let's create a set of files and directories.
mkdir data
cd data
touch file1.txt file2.log file_a.txt file_b.log report_2023.txt report_2024.log
touch image.jpg document.pdf archive.zip
mkdir dir1 dir2 dir3
cd ..
Now, list the contents of the data directory to see the files you've created:
ls data
You should see:
archive.zip dir1 dir2 dir3 document.pdf file1.txt file2.log file_a.txt file_b.log image.jpg report_2023.txt report_2024.log
Pattern Matching (Globbing)
Pattern matching, also known as globbing, allows you to select files based on patterns using special characters called metacharacters.
| Metacharacter | Matches | Example |
|---|---|---|
* |
Any string of zero or more characters. | *.txt matches all files ending with .txt. |
? |
Any single character. | file?.txt matches file1.txt, fileA.txt, etc. |
[abc...] |
Any one character in the enclosed class. | file[12].txt matches file1.txt or file2.txt. |
[!abc...] |
Any one character not in the enclosed class. | file[!1].txt matches fileA.txt but not file1.txt. |
[[:alpha:]] |
Any alphabetic character. | file[[:alpha:]].txt matches fileA.txt. |
[[:digit:]] |
Any single digit from 0 to 9. | file[[:digit:]].txt matches file1.txt. |
Let's try some examples within the data directory.
Using
*: List all files ending with.txt:ls data/*.txtOutput:
data/file1.txt data/file_a.txt data/report_2023.txtList all files containing
filein their name:ls data/*file*Output:
data/file1.txt data/file2.log data/file_a.txt data/file_b.logUsing
?: List files that have exactly one character before.log:ls data/file?.logOutput:
data/file2.logUsing
[]for character sets: List files that start withreport_and have either2023or2024in their name:ls data/report_[2][0][2][34].*Output:
data/report_2023.txt data/report_2024.logUsing
{}for brace expansion: List files starting withfileand ending with.txtor.log:ls data/file*.{txt,log}Output:
data/file1.txt data/file2.log data/file_a.txt data/file_b.log
Tilde Expansion ~
The tilde (~) character expands to the current user's home directory (/home/labex). When followed by a username, it expands to that user's home directory.
echo ~
Output:
/home/labex
echo ~root
Output:
/root
echo ~/project/data
Output:
/home/labex/project/data
Brace Expansion {}
Brace expansion generates arbitrary strings. It's useful for creating lists of files or directories with similar names without typing each one individually.
Comma-separated list: Create files
report_jan.txt,report_feb.txt,report_mar.txt:touch data/report_{jan,feb,mar}.txtList them:
ls data/report_*.txtOutput:
data/report_2023.txt data/report_jan.txt data/report_feb.txt data/report_mar.txtRange of numbers or letters: Create files
doc1.txt,doc2.txt,doc3.txt:touch data/doc{1..3}.txtList them:
ls data/doc*.txtOutput:
data/doc1.txt data/doc2.txt data/doc3.txtCreate directories
chapterA,chapterB,chapterC:mkdir data/chapter{A..C}List them:
ls data/chapter*Output:
data/chapterA data/chapterB data/chapterC
Variable Expansion
Shell variables store values that can be expanded in commands. You define a variable using VARNAME=value and access its value using $VARNAME or ${VARNAME}.
MY_DIR=data
echo "My directory is: $MY_DIR"
Output:
My directory is: data
You can use variables in commands:
ls $MY_DIR
Output will be the contents of the data directory.
Command Substitution
Command substitution allows you to use the output of a command as part of another command. This is done by enclosing the command in $(command) or backticks `command`. The $(command) syntax is generally preferred as it can be nested.
Let's get the current date and use it in a file name.
touch data/log_$(date +%Y-%m-%d).txt
List the data directory to see the new file:
ls data/log_*.txt
Output will be similar to:
data/log_2024-03-07.txt
You can also use it to count files:
echo "There are $(ls data | wc -l) items in the data directory."
Output will be similar to:
There are 19 items in the data directory.
Protecting Arguments from Expansion
Sometimes, you want to prevent the shell from expanding certain characters. You can do this using:
Backslash (
\): Escapes the next single character.echo "The value of \$HOME is your home directory."Output:
The value of $HOME is your home directory.Single quotes (
''): Prevent all shell expansion within the quotes.echo 'The current date is $(date +%Y-%m-%d).'Output:
The current date is $(date +%Y-%m-%d).Double quotes (
""): Prevent most shell expansion, but allow variable expansion ($VAR) and command substitution ($()).MY_DATE=$(date +%Y-%m-%d) echo "Today's date is $MY_DATE."Output:
Today's date is 2024-03-07.Compare with single quotes:
echo 'Today is $MY_DATE.'Output:
Today's date is $MY_DATE.
Finally, let's clean up the data directory.
rm -r data
Summary
In this lab, you learned fundamental command-line tools for managing files and directories in RHEL. You began by mastering pwd to identify your current working directory and ls to list directory contents, including using options like -l for detailed information and -a to reveal hidden files. You then progressed to navigating the file system with cd and creating new files with touch.
Furthermore, you gained proficiency in organizing your file system using mkdir to create directories, cp to copy files and directories, mv to move or rename them, and rm to remove them. The lab also covered the creation of hard and symbolic links using ln, and how to efficiently select files using shell expansions, enhancing your ability to manage files and directories effectively from the command line.


