Introduction
In this lab, you will learn the fundamental key-value operations in Redis. We'll use the redis-cli command-line interface to interact with the Redis server and perform basic operations like setting, getting, checking existence, deleting, and setting expiration times for keys. By the end of this lab, you'll have a solid understanding of how to use Redis as a simple data store.
Setting and Retrieving Key-Value Pairs
In this step, we'll focus on the core operations of setting and retrieving key-value pairs in Redis. This is the foundation for using Redis as a data store.
Redis stores data as key-value pairs, similar to a dictionary. The key is a unique identifier, and the value is the data associated with that key.
Connect to Redis:
Open a terminal in the LabEx VM. You should already be in the
~/projectdirectory. Connect to the Redis server using theredis-clicommand:redis-cliYou should see the Redis prompt:
127.0.0.1:6379>. This indicates a successful connection to the Redis server.Set a Key-Value Pair:
Let's set a key-value pair using the
SETcommand. We'll set the keymykeyto the valuemyvalue.SET mykey myvalueRedis will respond with:
OKThis confirms that the key-value pair has been successfully stored.
Get the Value of a Key:
To retrieve the value associated with a key, use the
GETcommand. Let's retrieve the value ofmykey:GET mykeyRedis will respond with:
"myvalue"This shows that we have successfully retrieved the value associated with the key
mykey.Set Another Key-Value Pair:
Let's set another key-value pair with a different key and value. This time, we'll use
user:1001as the key andJohnas the value.SET user:1001 JohnRedis will respond with:
OKGet the Value of the New Key:
Now, let's retrieve the value of the
user:1001key:GET user:1001Redis will respond with:
"John"You have now successfully set and retrieved key-value pairs in Redis.
Exit Redis CLI:
It's important to exit the Redis CLI after each step so that the commands are logged correctly. Type:
exit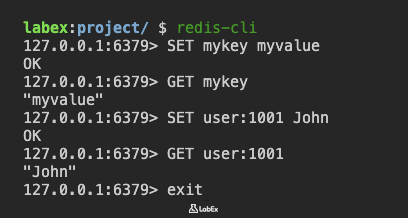
Checking Key Existence
In this step, we'll learn how to check if a key exists in Redis using the EXISTS command. This is useful for determining whether a key has been set before attempting to retrieve its value or perform other operations.
Connect to Redis:
Connect to the Redis server using the
redis-clicommand:redis-cliYou should see the Redis prompt:
127.0.0.1:6379>.Check Existence of an Existing Key:
In the previous step, we set the key
mykey. Let's check if it exists using theEXISTScommand:EXISTS mykeyRedis will respond with:
(integer) 1A response of
1indicates that the keymykeyexists in Redis.Check Existence of a Non-Existent Key:
Now, let's check if a key that we haven't set exists. For example, let's check for a key named
nonexistentkey:EXISTS nonexistentkeyRedis will respond with:
(integer) 0A response of
0indicates that the keynonexistentkeydoes not exist in Redis.Exit Redis CLI:
Exit the Redis CLI to ensure the commands are logged:
exit
Deleting Keys
In this step, we'll learn how to delete keys from Redis using the DEL command. This is essential for managing data and removing obsolete or unwanted entries.
Connect to Redis:
Connect to the Redis server using the
redis-clicommand:redis-cliYou should see the Redis prompt:
127.0.0.1:6379>.Delete an Existing Key:
In the previous steps, we set the key
mykey. Let's delete it using theDELcommand:DEL mykeyRedis will respond with:
(integer) 1A response of
(integer) 1indicates that one key was successfully deleted.Delete a Non-Existent Key:
Let's try to delete a key that doesn't exist, such as
nonexistentkey:DEL nonexistentkeyRedis will respond with:
(integer) 0A response of
(integer) 0indicates that no keys were deleted (because the key didn't exist).Delete Multiple Keys:
The
DELcommand can also be used to delete multiple keys at once. Let's delete theuser:1001key we created earlier, and also try to deletenonexistentkeyagain in the same command:DEL user:1001 nonexistentkeyRedis will respond with:
(integer) 1A response of
(integer) 1indicates that one key was successfully deleted (user:1001), and the attempt to deletenonexistentkeywas ignored since it didn't exist.Exit Redis CLI:
Exit the Redis CLI:
exit
Setting Key Expiration
In this step, we'll learn how to set an expiration time for a key in Redis using both the EXPIRE command and the SET command with the EX parameter. This is useful for automatically removing data after a certain period, such as session data or temporary caches.
Connect to Redis:
Connect to the Redis server using the
redis-clicommand:redis-cliYou should see the Redis prompt:
127.0.0.1:6379>.Set a Key-Value Pair with Expiration (Method 1: SET with EX parameter):
Redis allows you to set a key-value pair with an expiration time in a single command using the
EXparameter. Let's set the keysessionkeyto the valuesessionvaluewith an expiration time of 15 seconds:SET sessionkey sessionvalue EX 15Redis will respond with:
OKThis command sets the key-value pair and the expiration time in one operation, which is more efficient than using separate commands.
Check the TTL of the Key Set with EX:
Let's check the remaining time to live (TTL) for the
sessionkey:TTL sessionkeyRedis will respond with the number of seconds remaining until the key expires (e.g.,
(integer) 14). The value will be slightly less than 15 due to the time elapsed since setting the key.Set a Key-Value Pair (Method 2: Using EXPIRE command separately):
Alternatively, you can set a key-value pair first and then set its expiration time separately. Let's set the key
tempkeyto the valuetempvalue:SET tempkey tempvalueRedis will respond with:
OKSet Expiration Time Using EXPIRE Command:
Now, let's set an expiration time of 10 seconds for the
tempkeyusing theEXPIREcommand:EXPIRE tempkey 10Redis will respond with:
(integer) 1A response of
(integer) 1indicates that the expiration time was successfully set.Check Remaining Time To Live (TTL):
To check the remaining time to live (TTL) for the
tempkey, use theTTLcommand:TTL tempkeyRedis will respond with the number of seconds remaining until the key expires (e.g.,
(integer) 9). The value might be slightly less than 10 due to the time elapsed since setting the expiration. If the key doesn't exist or doesn't have an expiration,TTLreturns-2or-1respectively.Exit Redis CLI:
Exit the Redis CLI:
exit
Summary
In this lab, you have learned the fundamental key-value operations in Redis using the redis-cli command-line interface. You learned how to connect to the Redis server and use the SET command to store data as key-value pairs. You also practiced retrieving values using the GET command. Furthermore, you learned how to check for the existence of keys using the EXISTS command, delete keys using the DEL command, and set expiration times for keys using both the SET command with the EX parameter and the EXPIRE command. The SET command with EX parameter is particularly useful as it allows you to set a key-value pair with expiration time in a single, efficient operation. These are the building blocks for using Redis as a simple and efficient data store.