Introduction
In web development, event handling is the process of responding to user actions like clicks, key presses, or mouse movements. React provides a simple and declarative way to handle these events, making your applications interactive.
React's event system is a wrapper around the browser's native event system. The event names are written in camelCase, such as onClick instead of onclick. You pass a function as the event handler, rather than a string.
In this lab, you will learn the basics of event handling in React. You will start with a simple button and progressively add functionality to handle click events, access event data, and control default browser behavior.
By the end of this lab, you will be able to:
- Attach an
onClickevent handler to a button. - Define a handler function within a component.
- Pass the handler function to the event attribute correctly.
- Access the event object to get information about the event.
- Prevent the default browser action using
event.preventDefault().
Add onClick attribute to button element
In this step, you will begin by setting up the development environment and then add an onClick attribute to a button element. This is the first step in making an element interactive in React.
First, let's navigate to the project directory, install the necessary dependencies, and start the development server.
Open a terminal in the WebIDE and run the following commands one by one:
cd my-app
npm install
npm run dev -- --host 0.0.0.0 --port 8080
After running npm run dev, you will see output indicating that the development server is running. You can now view your application by switching to the Web 8080 tab in the LabEx interface. You should see a simple "Click me" button.
Now, let's add the event handler. Open the src/App.jsx file from the file explorer on the left side of the WebIDE.
Your src/App.jsx file currently looks like this:
function App() {
  return <button>Click me</button>;
}

export default App;
To respond to a click, you need to add the onClick attribute to the <button> element. In React, event attributes are written in camelCase. For now, we'll pass an empty inline arrow function to it.
Modify the <button> element in src/App.jsx as shown below:
function App() {
  return <button => {}}>Click me</button>;
}

export default App;
Save the file. Although clicking the button won't do anything visible yet, you have successfully attached an event listener to it.
Define handler function inside component
In this step, you will define a dedicated function inside your component to handle the click event. This is a common practice that keeps your JSX clean and your logic organized.
Instead of writing the logic directly inside the JSX onClick attribute, it's better to define a separate function. Let's create a function called handleClick.
In your src/App.jsx file, define the handleClick function inside the App component, before the return statement. For now, this function will simply log a message to the console.
Update your src/App.jsx file with the following code:
function App() {
  function handleClick() {
    console.log("Button was clicked!");
  }

  return <button => {}}>Click me</button>;
}

export default App;
At this point, you have defined the handleClick function, but it is not yet connected to the button's onClick event. In the next step, you will learn how to pass this function to the onClick attribute.
Pass handler to onClick without parentheses
In this step, you will connect the handleClick function you defined to the button's onClick event. It's very important to pass the function reference itself, not the result of calling the function.
To use your handleClick function as the event handler, you need to pass it to the onClick attribute inside curly braces {}.
Modify the <button> element in src/App.jsx to pass handleClick to onClick:
function App() {
  function handleClick() {
    console.log("Button was clicked!");
  }

  return <button me</button>;
}

export default App;
Notice that we are writing onClick={handleClick}, not onClick={handleClick()}.
onClick={handleClick}passes the function itself. React will call this function when the button is clicked.onClick={handleClick()}would call the function immediately when the component renders and pass its return value (which isundefined) toonClick. This is a common mistake for beginners.
Now, let's test it.
- Save the
src/App.jsxfile. - Go to the Web 8080 tab.
- Open the browser's developer console. You can do this by right-clicking on the page, selecting "Inspect", and then clicking the "Console" tab.
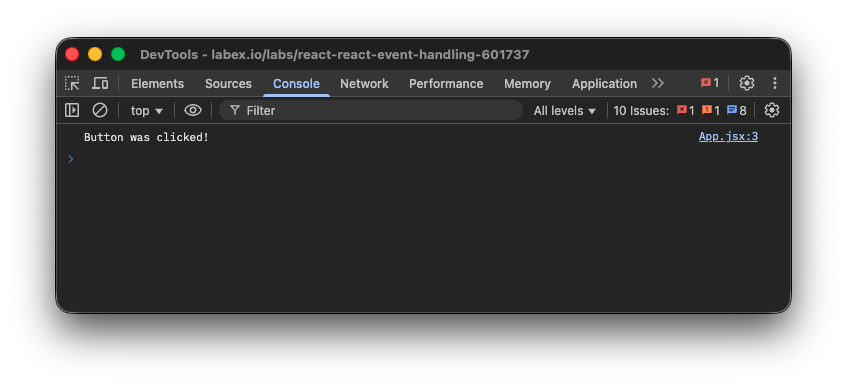
- Click the "Click me" button.
You should see the message "Button was clicked!" appear in the console every time you click the button.
Access event object in handler parameter
In this step, you will learn how to access the event object that React automatically passes to your event handler. This object contains useful information about the user's interaction.
React passes a "synthetic event" object to every event handler as its first argument. This object is a cross-browser wrapper around the browser's native event, providing a consistent API.
To access it, you need to add a parameter to your handleClick function. It's conventionally named event or e. Let's modify the function to accept this parameter and log it to the console.
Update your src/App.jsx file:
function App() {
  function handleClick(event) {
    console.log(event);
  }

  return <button me</button>;
}

export default App;
Now, save the file and go back to the Web 8080 tab. Make sure your developer console is still open. When you click the button, you will no longer see a simple string. Instead, you will see a SyntheticBaseEvent object logged to the console.
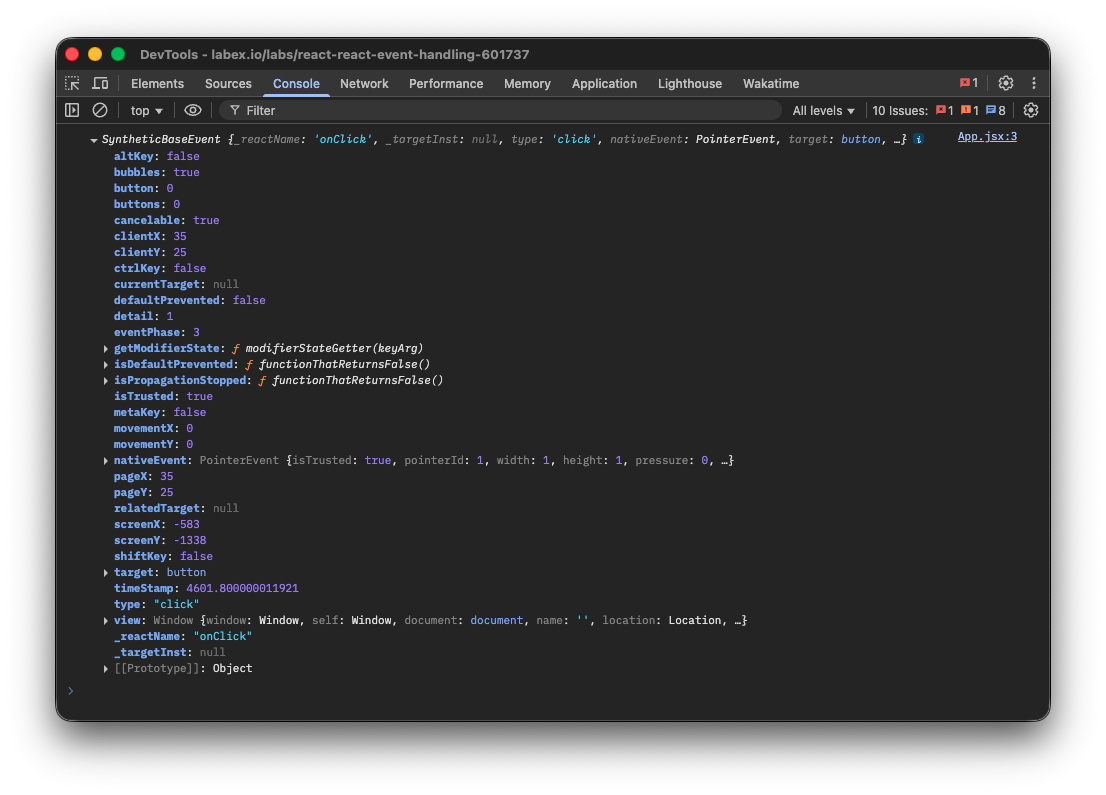
You can expand this object in the console to inspect its properties. For example, you can find:
event.type: The type of event (e.g., "click").event.target: The DOM element that triggered the event (the<button>).
This event object is powerful and allows you to read information and control the event's behavior.
Prevent default with event.preventDefault()
In this step, you will learn how to prevent the default browser behavior associated with an event. This is a common requirement, especially when handling form submissions.
Some browser events have a default action. For example, clicking a link navigates to a new page, and clicking a submit button inside a <form> submits the form, which usually causes a page reload.
To demonstrate this, let's wrap our button in a <form> element. By default, clicking a button inside a form will trigger a form submission.
Update your src/App.jsx to include a <form> tag:
function App() {
  function handleClick(event) {
    console.log(event);
  }

  return (
    <form>
      <button me</button>
    </form>
  );
}

export default App;
If you save this and click the button now, you'll notice the page reloads, and you might briefly see the console log before it disappears. This is the form's default submission behavior.
To prevent this, you can call event.preventDefault() inside your handler. This method tells the browser not to perform its default action.
Modify the handleClick function to call event.preventDefault():
function App() {
  function handleClick(event) {
    event.preventDefault();
    console.log("Form submission prevented!");
  }

  return (
    <form>
      <button me</button>
    </form>
  );
}

export default App;
Save the file and try again. Now when you click the button in the Web 8080 tab, the page will not reload. You will see the message "Form submission prevented!" logged consistently in the console. You have successfully taken control of the event's behavior.
Summary
Congratulations on completing the lab! You have learned the fundamental concepts of event handling in React.
In this lab, you practiced how to:
- Use the
onClickattribute in JSX to listen for user clicks. - Define event handler functions inside your components to keep your code organized.
- Correctly pass a function reference to an event handler prop, avoiding the common pitfall of calling the function during render.
- Access the synthetic event object that React provides, which contains valuable information about the user's interaction.
- Use
event.preventDefault()to stop the browser's default action, giving you full control over the user experience.
These skills are essential for building interactive and dynamic user interfaces with React. You can apply these same principles to handle other events like onChange for inputs, onMouseOver for hover effects, and many more.