Introduction
In this lab, we will install and perform the initial setup of PostgreSQL on the LabEx VM. The goal is to get PostgreSQL up and running and verify its basic functionality.
We will begin by updating the package lists and installing the PostgreSQL server along with the postgresql-contrib package. After installation, we will verify that the PostgreSQL service is running and accepting connections using the pg_isready command. Finally, we will explore default databases and check server status and basic configuration.
Install PostgreSQL and Verify Installation
In this step, we will install PostgreSQL on the LabEx VM and verify that the installation was successful. PostgreSQL is a powerful, open-source relational database management system (RDBMS).
First, let's update the package lists for upgrades and new installations. Open a terminal in the LabEx VM. You can find the terminal icon on the desktop.
Execute the following command:
sudo apt update
This command updates the list of available packages and their versions, but it does not install or upgrade any packages. You should see output indicating that the package lists are being updated.
Next, install the PostgreSQL server and the postgresql-contrib package. The postgresql-contrib package provides additional utilities and functionality that are often useful.
Execute the following command:
sudo apt install postgresql postgresql-contrib -y
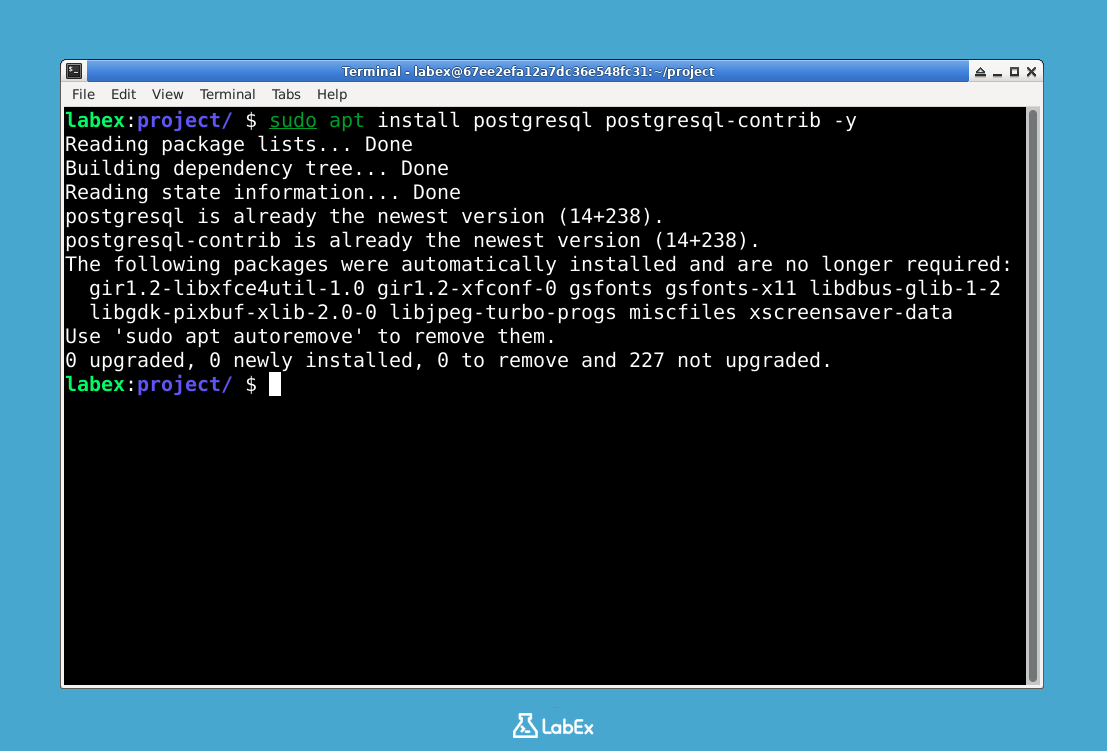
The -y flag automatically answers "yes" to any prompts during the installation process. This command will download and install PostgreSQL and its related packages. You will see a lot of output as the packages are downloaded and installed.
After the installation is complete, we need to verify that PostgreSQL is running. PostgreSQL should start automatically after installation.
To check the status of the PostgreSQL service, execute the following command:
sudo service postgresql status
We also can use the pg_isready command to check if the PostgreSQL server is running and accepting connections.
Execute the following command:
pg_isready
If PostgreSQL is running, you should see the following output:
/var/run/postgresql:5432 - accepting connections
If PostgreSQL is not running, you might see an error message like:
/var/run/postgresql:5432 - no response
If you encounter the "no response" error, try restarting the PostgreSQL service. You can try the following command:
sudo service postgresql restart
Then, run pg_isready again to check the status.
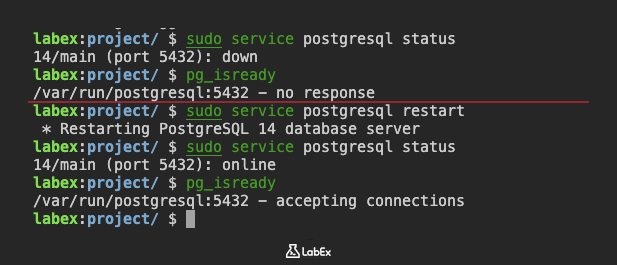
If pg_isready shows "accepting connections", it confirms that PostgreSQL is successfully installed and running.
Access the PostgreSQL Shell (psql)
In this step, we will access the PostgreSQL shell, psql, which is a command-line tool for interacting with PostgreSQL databases. psql allows you to execute SQL queries, manage databases, and perform other administrative tasks.
By default, PostgreSQL creates a Unix user named postgres that corresponds to the PostgreSQL superuser. To access the psql shell, you can either switch to the postgres user or use sudo to run commands as the postgres user.
First, let's switch to the postgres user. Execute the following command:
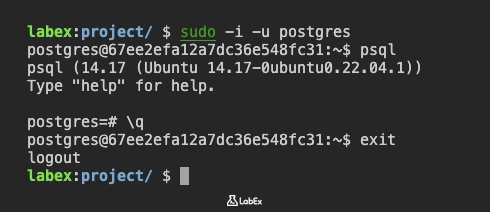
sudo -i -u postgres
This command switches the current user to postgres. You will notice that the prompt changes to reflect the new user.
Now that you are logged in as the postgres user, you can access the psql shell. Execute the following command:
psql
This command will open the psql shell. You should see a prompt that looks like this:
postgres=#
This indicates that you are connected to the PostgreSQL server and can now execute SQL commands.
To exit the psql shell, type \q and press Enter:
postgres=## \q
This will return you to the postgres user's shell.
To exit the postgres user's shell and return to your original user (labex), type exit and press Enter:
exit
Alternatively, you can access the psql shell directly as the labex user using sudo. This avoids the need to switch users.
Execute the following command:
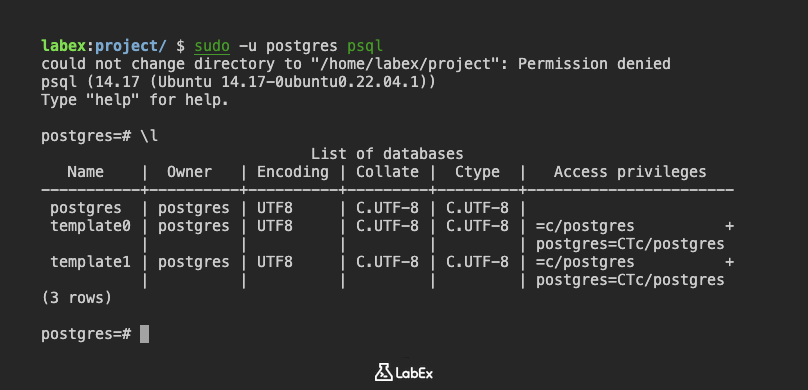
sudo -u postgres psql
This command runs the psql command as the postgres user. You will be directly connected to the psql shell.
Again, to exit the psql shell, type \q and press Enter:
postgres=## \q
This will return you to the labex user's shell.
In summary, you have learned two ways to access the psql shell: switching to the postgres user and using sudo. Both methods achieve the same result, but using sudo can be more convenient in some cases.
Explore Default Databases
In this step, we will explore the default databases that are created when you install PostgreSQL. These databases provide essential functionality and information about the PostgreSQL server.
First, access the psql shell as the postgres user. You can use the following command:
sudo -u postgres psql
Once you are in the psql shell, you can list the available databases using the \l command. Execute the following command:
postgres=## \l
This command will display a list of databases, along with information about their owners, encodings, and access privileges. You should see at least three databases:
postgres: This is the default database that you connect to when you first access thepsqlshell. It is often used for administrative tasks.template0: This database is used as a template for creating new databases. You should not modify this database.template1: This is another template database that is used for creating new databases. It is a standard template and can be customized.
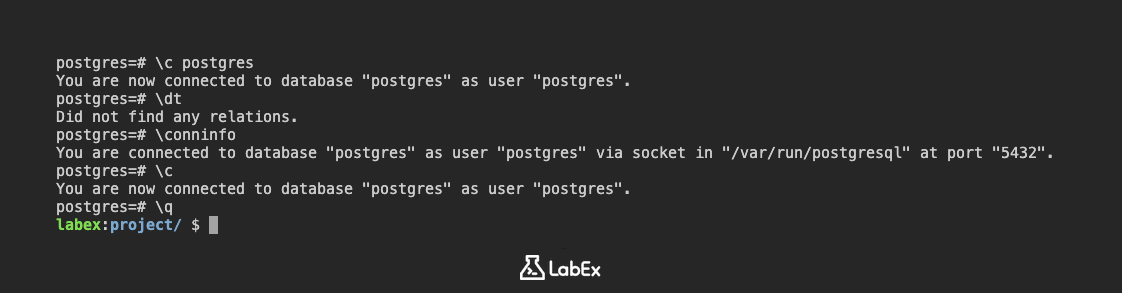
To connect to a specific database, you can use the \c command followed by the database name. For example, to connect to the postgres database, execute the following command:
postgres=## \c postgres
You should see a message indicating that you are now connected to the postgres database:
You are now connected to database "postgres" as user "postgres".
Now that you are connected to the postgres database, you can explore its contents. For example, you can list the tables in the database using the \dt command:
postgres=## \dt
This command will display a list of tables in the current database. Since the postgres database is primarily used for administrative tasks, it may not contain any user-defined tables.
You can also view information about the current database connection using the \conninfo command:
postgres=## \conninfo
This command will display information such as the database name, user, host, and port.
To disconnect from the current database and return to the default connection, you can use the \c command without specifying a database name:
postgres=## \c
This will connect you back to the default database, which is usually the postgres database.
Finally, exit the psql shell by typing \q and pressing Enter:
postgres=## \q
This will return you to the labex user's shell.
In this step, you have learned how to list the available databases, connect to a specific database, and explore its contents using the psql shell.
Check Server Status and Basic Configuration
In this step, we will check the PostgreSQL server status and explore some basic configuration settings.
As mentioned before, because the LabEx VM runs in a Docker container, systemctl commands may not function as expected. We will primarily use pg_isready and psql to check the server status.
First, let's re-verify that the PostgreSQL server is running. Execute the following command:
pg_isready
If PostgreSQL is running, you should see the following output:
/var/run/postgresql:5432 - accepting connections
Next, let's check some basic configuration settings using the psql shell. Access the psql shell as the postgres user:
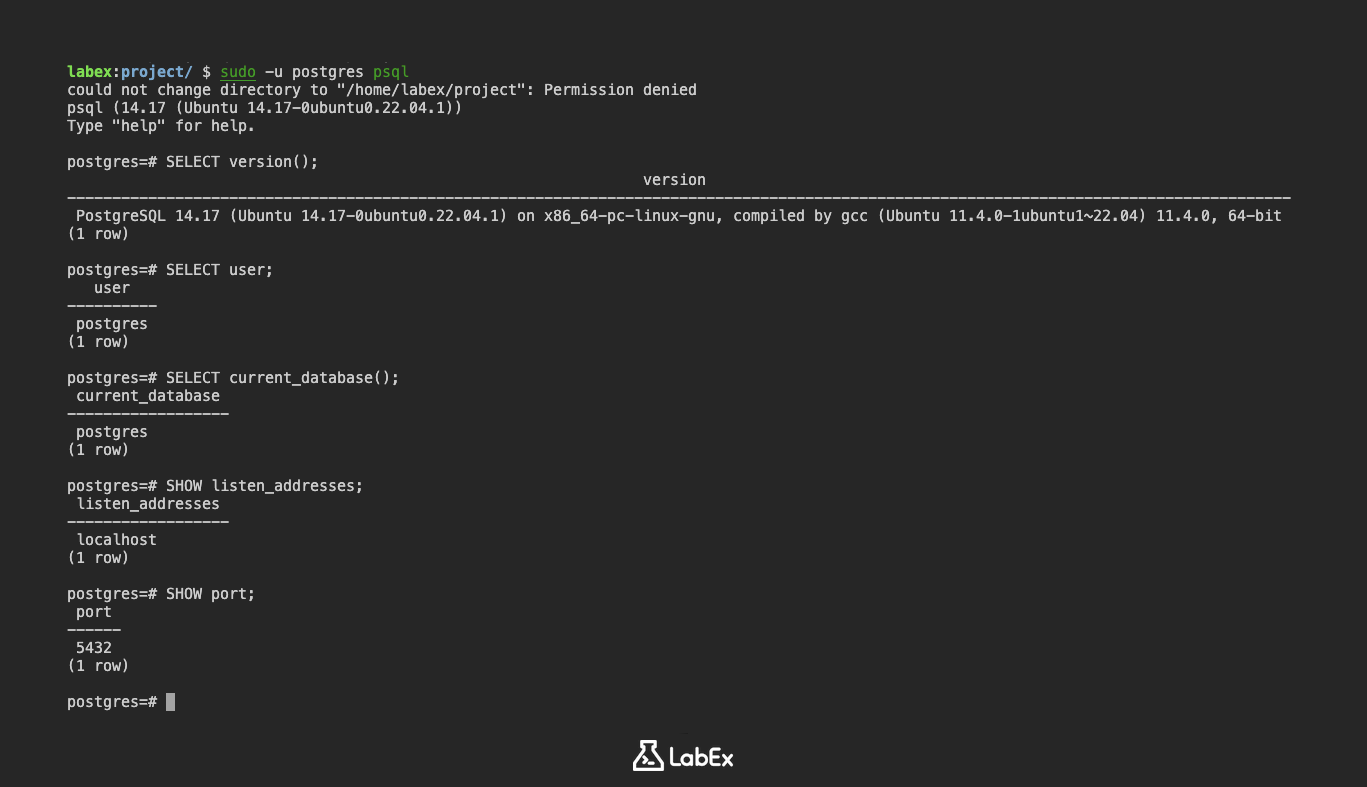
sudo -u postgres psql
Once you are in the psql shell, you can check the PostgreSQL version using the following SQL query:
SELECT version();
Execute this query in the psql shell. You should see output similar to:
                                                                version
----------------------------------------------------------------------------------------------------------------------------------------
 PostgreSQL 14.17 (Ubuntu 14.17-0ubuntu0.22.04.1) on x86_64-pc-linux-gnu, compiled by gcc (Ubuntu 11.4.0-1ubuntu1~22.04) 11.4.0, 64-bit
(1 row)
This shows the PostgreSQL version installed on the server.
You can also check the current database user:
SELECT user;
The output will be:
  user
----------
 postgres
(1 row)
To check the database name you are currently connected to, use:
SELECT current_database();
The output will be:
 current_database
------------------
 postgres
(1 row)
To view the configuration settings, you can use the SHOW command. For example, to check the listen_addresses setting, which specifies the IP addresses on which the server listens for connections, execute the following command:
SHOW listen_addresses;
The output will likely be:
 listen_addresses
--------------------
 localhost
(1 row)
The localhost indicates that the server is listening on the localhost.
Another useful setting to check is port, which specifies the port number on which the server listens for connections:
SHOW port;
The output will be:
 port
------
 5432
(1 row)
This indicates that the server is listening on port 5432, which is the default PostgreSQL port.
Finally, exit the psql shell by typing \q and pressing Enter:
postgres=## \q
This will return you to the labex user's shell.
In this step, you have learned how to check the PostgreSQL server status and explore some basic configuration settings using pg_isready and the psql shell.
Summary
In this lab, we installed the PostgreSQL RDBMS on the LabEx VM using apt update and apt install postgresql postgresql-contrib -y. The -y flag was used to automatically accept prompts during installation.
After installation, we verified that the PostgreSQL service was running and accepting connections. Due to the LabEx VM running in a Docker container, we used the pg_isready command instead of systemctl status postgresql to check the server status. The expected output of pg_isready when the server is running is /var/run/postgresql:5432 - accepting connections.