Introduction
In this lab, you will explore PostgreSQL transaction management, a crucial aspect of ensuring data integrity. You'll learn how to begin and commit transactions, treating a series of operations as a single unit of work. You'll also learn to roll back failed transactions, set isolation levels, and simulate locks with concurrent updates.
Begin and Commit a Transaction
In this step, you will learn how to begin and commit a transaction in PostgreSQL. Transactions ensure data integrity by treating a series of operations as a single unit of work. If any operation within the transaction fails, the entire transaction is rolled back, preventing partial updates and maintaining consistency.
First, connect to the PostgreSQL database as the postgres user. Open a terminal and use the following command:
sudo -u postgres psql
You should now see the postgres=# prompt.
Next, create a table named accounts to demonstrate transactions.
CREATE TABLE accounts (
    id SERIAL PRIMARY KEY,
    name VARCHAR(50),
    balance DECIMAL(10, 2)
);
Insert some initial data into the accounts table.
INSERT INTO accounts (name, balance) VALUES ('Alice', 100.00);
INSERT INTO accounts (name, balance) VALUES ('Bob', 50.00);
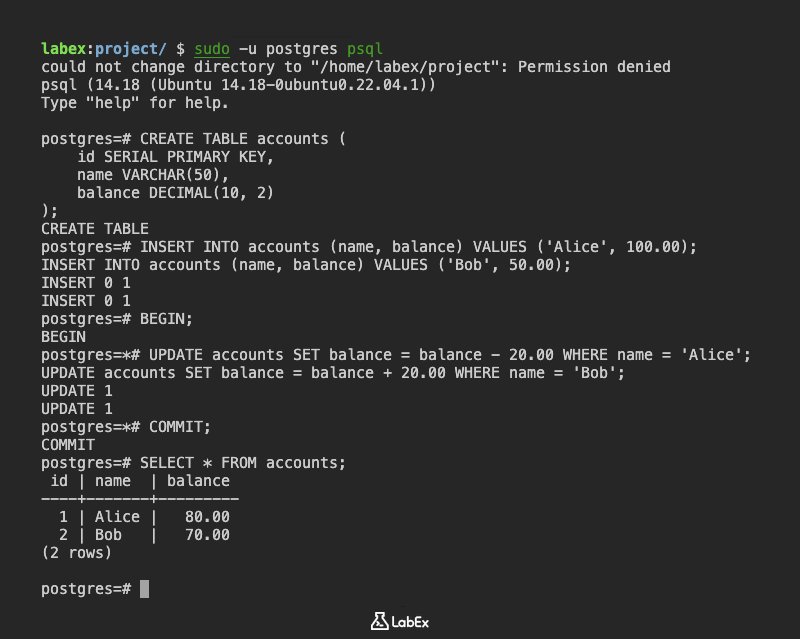
Now, let's start a transaction using the BEGIN command.
BEGIN;
Within the transaction, transfer $20 from Alice's account to Bob's account.
UPDATE accounts SET balance = balance - 20.00 WHERE name = 'Alice';
UPDATE accounts SET balance = balance + 20.00 WHERE name = 'Bob';
To make these changes permanent, commit the transaction using the COMMIT command.
COMMIT;
Verify that the transaction was successful by querying the accounts table.
SELECT * FROM accounts;
You should see that Alice's balance has decreased by $20, and Bob's balance has increased by $20.
Finally, exit the psql shell.
\q
Roll Back a Failed Transaction
In this step, you will learn how to roll back a failed transaction in PostgreSQL. Rolling back a transaction is crucial when an error occurs during a series of database operations, ensuring that the database remains in a consistent state.
You should still be connected to the PostgreSQL database from the previous step. If not, connect again using:
sudo -u postgres psql
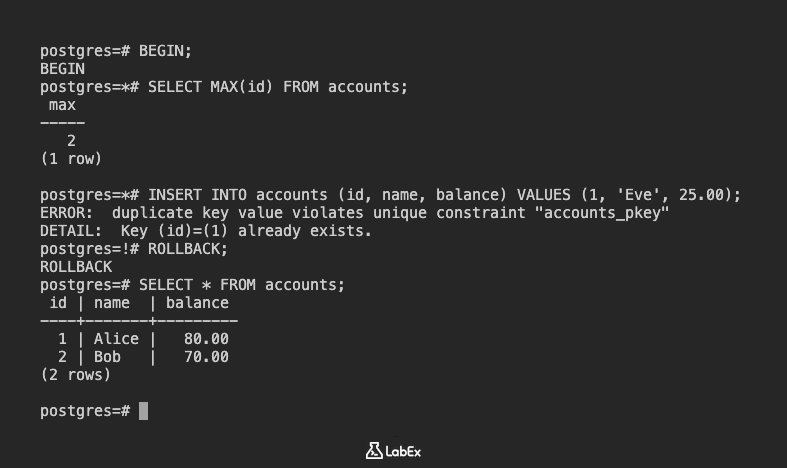
Let's begin a new transaction.
BEGIN;
Within this transaction, we'll attempt an operation that will intentionally fail. Let's try to insert a duplicate primary key. First, let's find the next available id value.
SELECT MAX(id) FROM accounts;
Let's assume the result is 2. Now, attempt to insert a new account with id = 1, which already exists.
INSERT INTO accounts (id, name, balance) VALUES (1, 'Eve', 25.00);
This command will result in a ERROR: duplicate key value violates unique constraint "accounts_pkey" error.
Since an error occurred within the transaction, roll back the transaction to discard any changes made. Use the ROLLBACK command.
ROLLBACK;
Verify that the ROLLBACK was successful by querying the accounts table.
SELECT * FROM accounts;
You should see that the table still contains only Alice and Bob's accounts with their balances from the end of Step 1. The failed INSERT operation was successfully rolled back.
Finally, exit the psql shell.
\q
Set and Test Isolation Levels
In this step, you will learn about transaction isolation levels in PostgreSQL and how to set and test them. Isolation levels control the degree to which concurrent transactions are isolated from each other. Higher isolation levels provide greater protection against data corruption but can reduce concurrency.
You should still be connected to the PostgreSQL database from the previous step. If not, connect again using:
sudo -u postgres psql
Open two separate terminal windows. In each terminal, connect to the PostgreSQL database as the postgres user. You should have two postgres=# prompts.
Terminal 1:
sudo -u postgres psql
Terminal 2:
sudo -u postgres psql
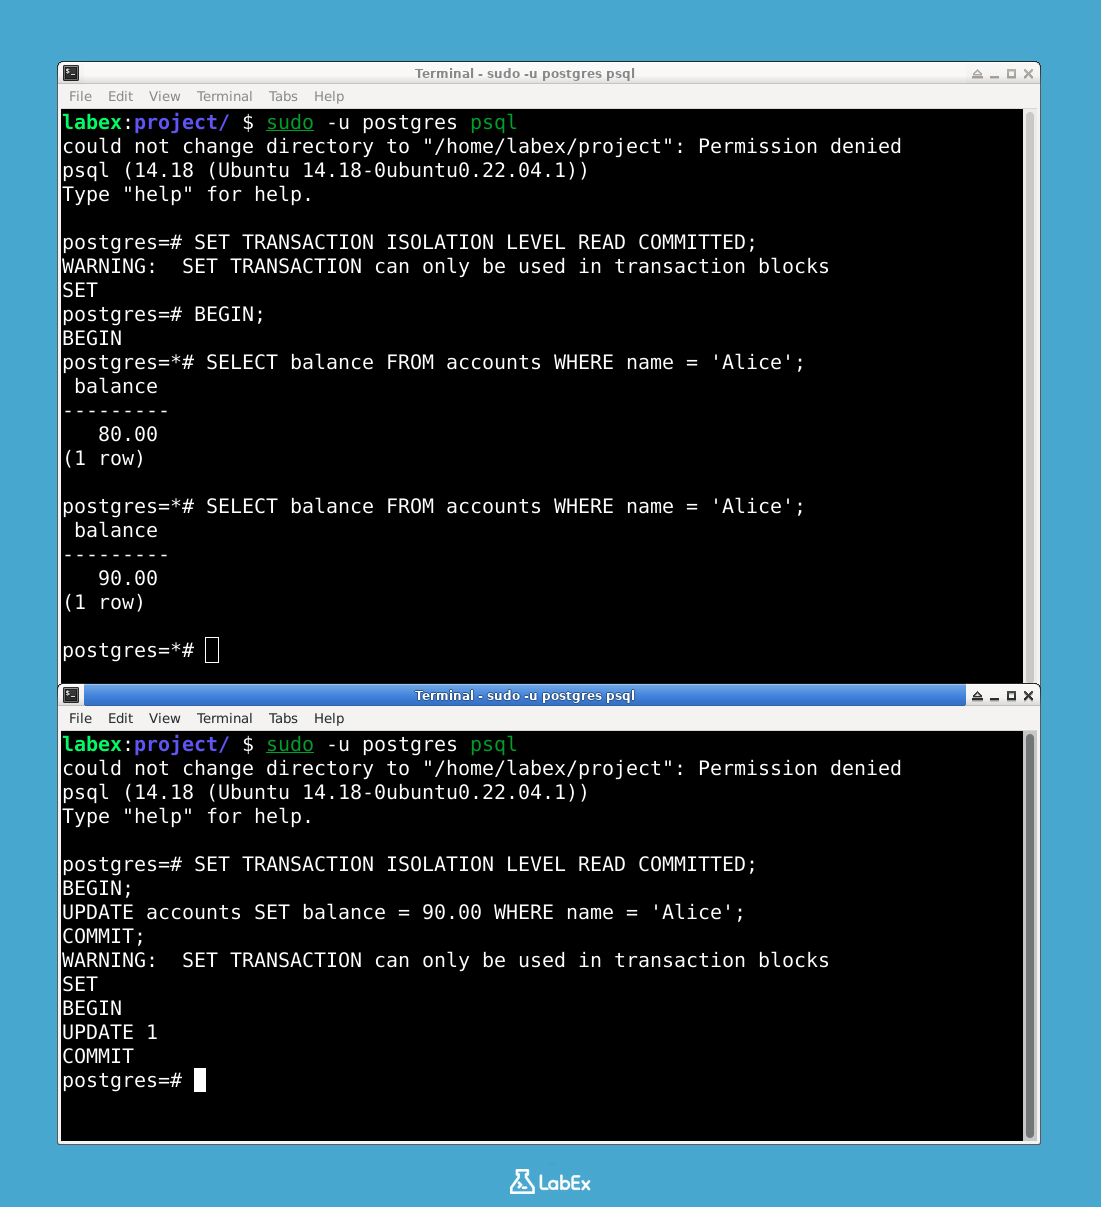
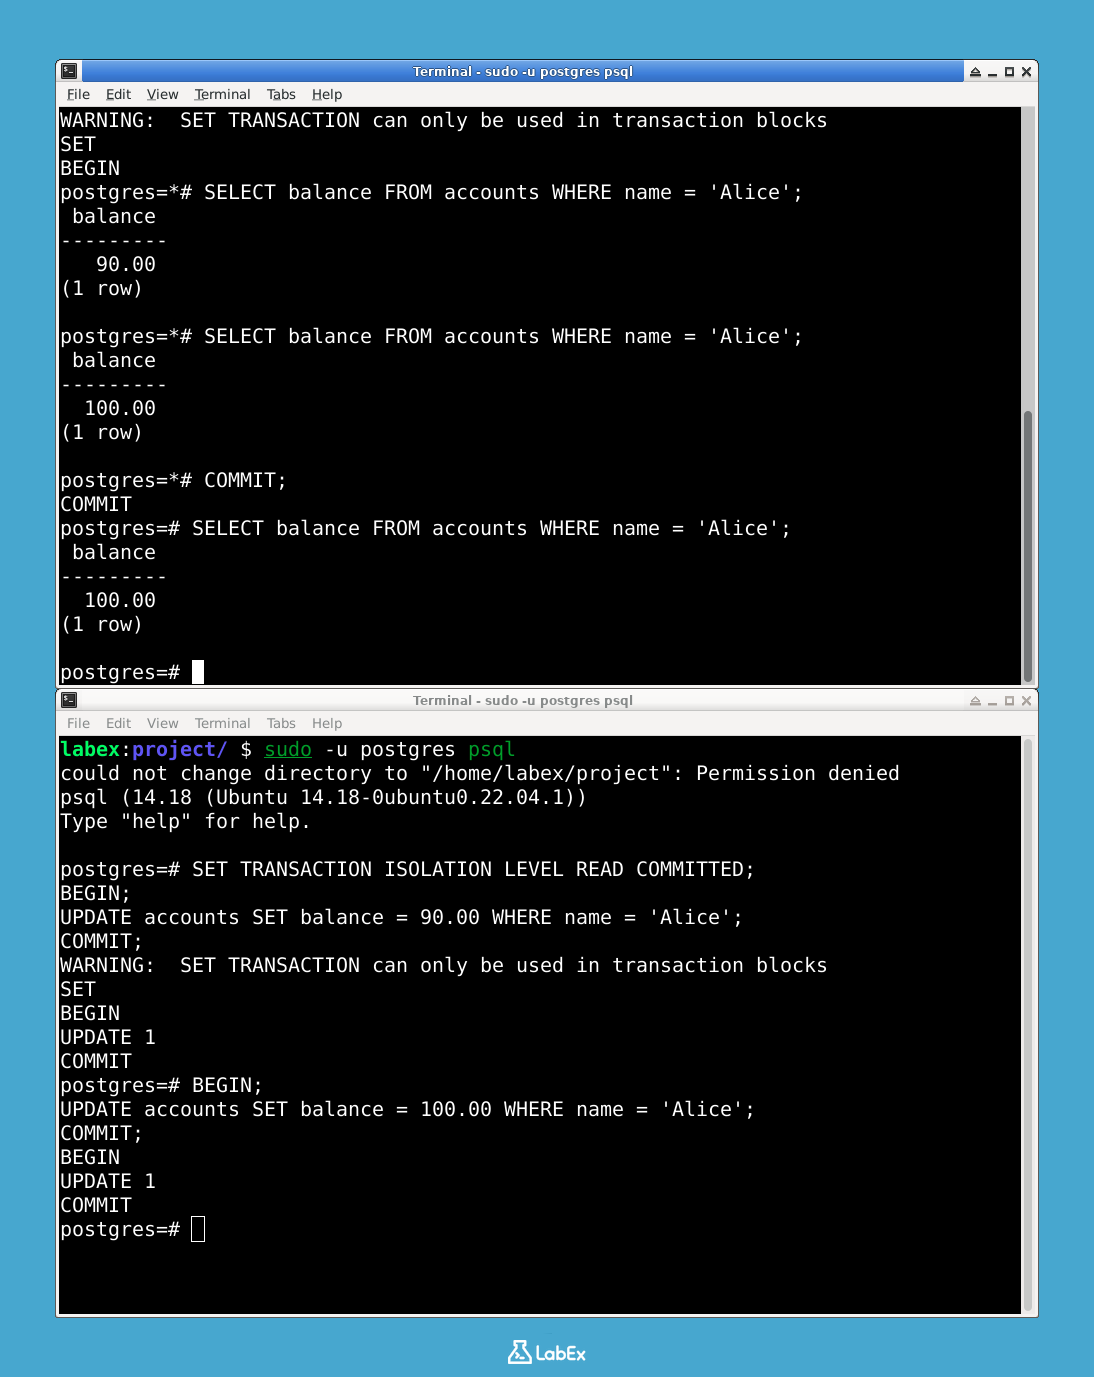
In Terminal 1, set the isolation level to READ COMMITTED (although this is the default, we'll set it explicitly for demonstration).
SET TRANSACTION ISOLATION LEVEL READ COMMITTED;
Then, begin a transaction.
BEGIN;
In Terminal 1, read Alice's balance.
SELECT balance FROM accounts WHERE name = 'Alice';
Note the balance. Now, in Terminal 2, begin a transaction and update Alice's balance.
SET TRANSACTION ISOLATION LEVEL READ COMMITTED;
BEGIN;
UPDATE accounts SET balance = 90.00 WHERE name = 'Alice';
COMMIT;
In Terminal 1, read Alice's balance again.
SELECT balance FROM accounts WHERE name = 'Alice';
Because the isolation level is READ COMMITTED, you will see the updated balance (90.00) committed by Terminal 2.
Now, let's test the REPEATABLE READ isolation level. In Terminal 1, roll back the current transaction and set the isolation level to REPEATABLE READ.
ROLLBACK;
SET TRANSACTION ISOLATION LEVEL REPEATABLE READ;
BEGIN;
In Terminal 1, read Alice's balance again.
SELECT balance FROM accounts WHERE name = 'Alice';
Note the balance. Now, in Terminal 2, begin a transaction and update Alice's balance again.
BEGIN;
UPDATE accounts SET balance = 100.00 WHERE name = 'Alice';
COMMIT;
In Terminal 1, read Alice's balance again.
SELECT balance FROM accounts WHERE name = 'Alice';
Because the isolation level is REPEATABLE READ, you will still see the original balance from when the transaction started, even though Terminal 2 has committed a new value.
Finally, in Terminal 1, commit the transaction.
COMMIT;
Now, if you read Alice's balance in Terminal 1 again, you will see the latest committed value (100.00).
Exit both psql shells.
\q
Simulate Locks with Concurrent Updates
In this step, you will simulate locks with concurrent updates in PostgreSQL. Locks are mechanisms used to prevent concurrent transactions from interfering with each other, ensuring data integrity.
You should still be connected to the PostgreSQL database from the previous step. If not, connect again using:
sudo -u postgres psql
Open two separate terminal windows. In each terminal, connect to the PostgreSQL database as the postgres user. You should have two postgres=# prompts.
Terminal 1:
sudo -u postgres psql
Terminal 2:
sudo -u postgres psql
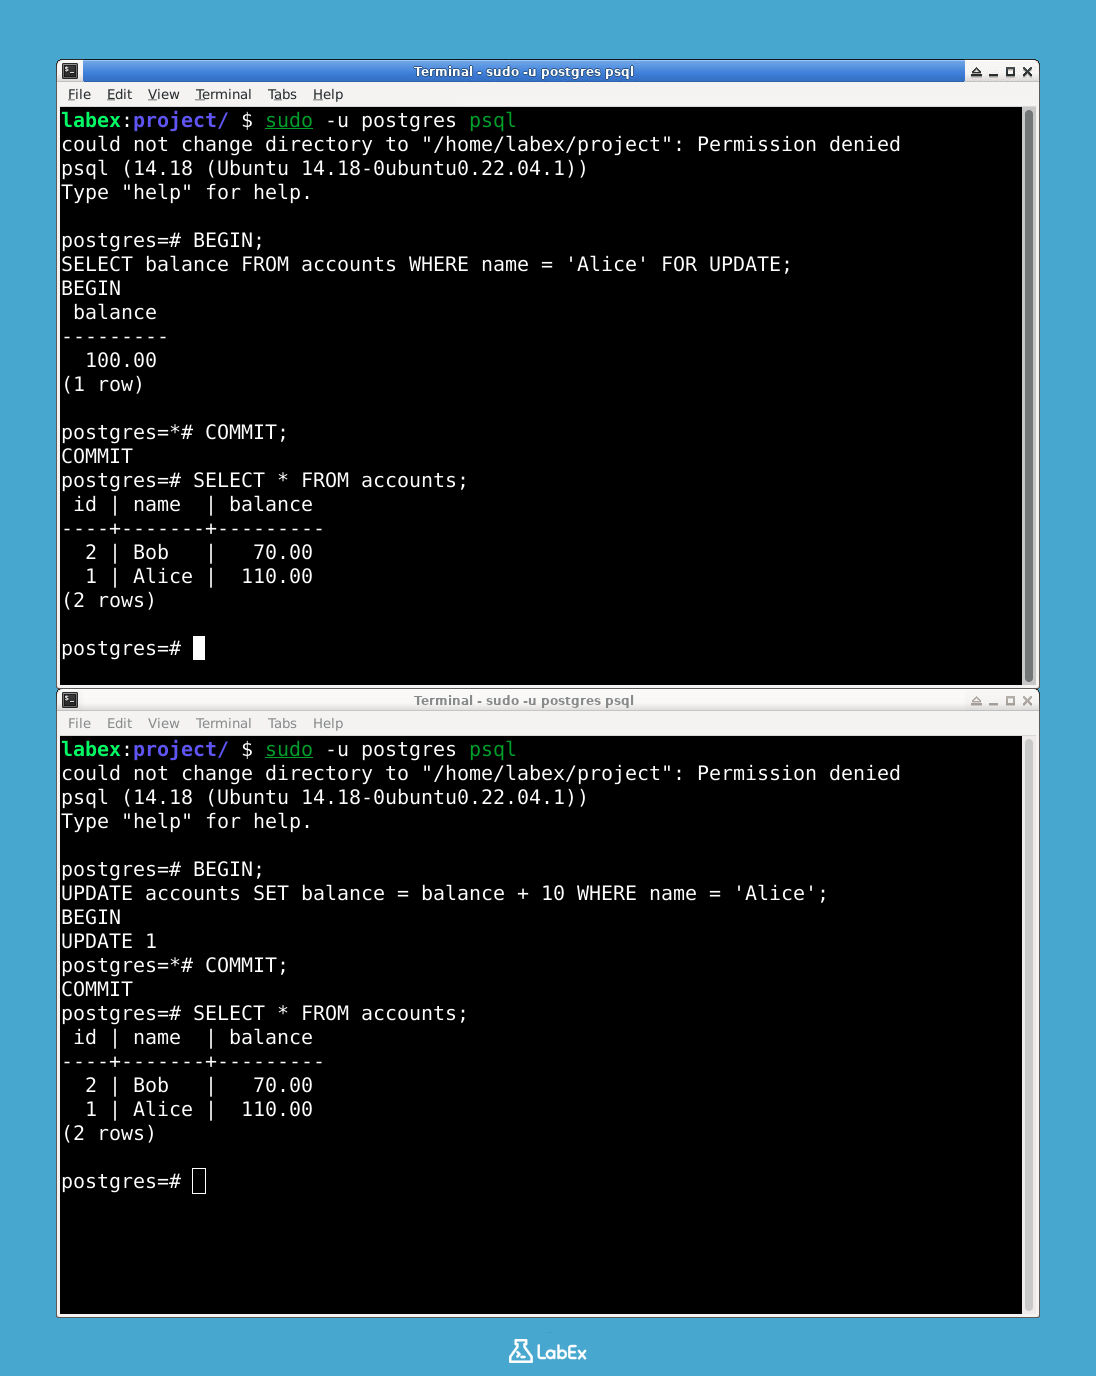
In Terminal 1, begin a transaction and update Alice's balance. Crucially, use SELECT ... FOR UPDATE to lock the row.
BEGIN;
SELECT balance FROM accounts WHERE name = 'Alice' FOR UPDATE;
This command retrieves Alice's balance and places a lock on the row, preventing other transactions from modifying it until this transaction is committed or rolled back.
In Terminal 2, begin a transaction and attempt to update Alice's balance.
BEGIN;
UPDATE accounts SET balance = balance + 10 WHERE name = 'Alice';
Notice that this command in Terminal 2 will appear to hang. This is because it is waiting for the lock held by Terminal 1 to be released.
Now, in Terminal 1, commit the transaction.
COMMIT;
After committing the transaction in Terminal 1, the UPDATE command in Terminal 2 will proceed.
In Terminal 2, commit the transaction.
COMMIT;
Now, in either terminal, query the accounts table to verify the changes.
SELECT * FROM accounts;
You should see that Alice's balance has been updated by the transaction in Terminal 2 after Terminal 1 released the lock.
Finally, exit both psql shells.
\q
This example demonstrates how SELECT ... FOR UPDATE can be used to simulate locks and prevent concurrent updates from interfering with each other. Without the lock, both transactions might read the same initial balance and apply their updates based on that value, leading to a lost update.
Summary
In this lab, you learned how to manage transactions in PostgreSQL. You started by connecting to the PostgreSQL database using psql and creating a sample accounts table with initial data.
You then focused on demonstrating the use of transactions. You learned how to initiate a transaction using the BEGIN command, perform multiple database operations (updating Alice's and Bob's balances), and then commit the transaction using the COMMIT command to make the changes permanent. This illustrated the fundamental principle of transactions: treating a series of operations as a single atomic unit. You also learned how to roll back transactions and set isolation levels. Finally, you simulated locks with concurrent updates to understand how to prevent data corruption.