Introduction
Welcome to this lab on the fundamentals of Jenkins Pipelines. Jenkins Pipeline is a powerful feature that allows you to define your entire build, test, and deployment process as code. This definition is stored in a text file called a Jenkinsfile, which is typically versioned alongside your application's source code. This practice is known as "Pipeline-as-Code".
In this lab, you will focus on the Declarative Pipeline syntax, which offers a structured and user-friendly way to create pipelines. By the end of this lab, you will be able to:
- Create a new Pipeline project in the Jenkins web interface.
- Write a basic
Jenkinsfileusing Declarative syntax. - Configure a project to use a
Jenkinsfilefrom a local Git repository. - Run a pipeline and inspect its output.
- Organize a pipeline into multiple stages.
- Use environment variables to manage configuration.
A Jenkins instance is already running in a container for you. Let's begin.
Create a Pipeline Project in Jenkins
Your first step is to create a new Pipeline project in Jenkins. This project type is specifically designed to execute pipelines defined in a Jenkinsfile.
- Open the Firefox browser from the desktop interface. The browser will automatically open to
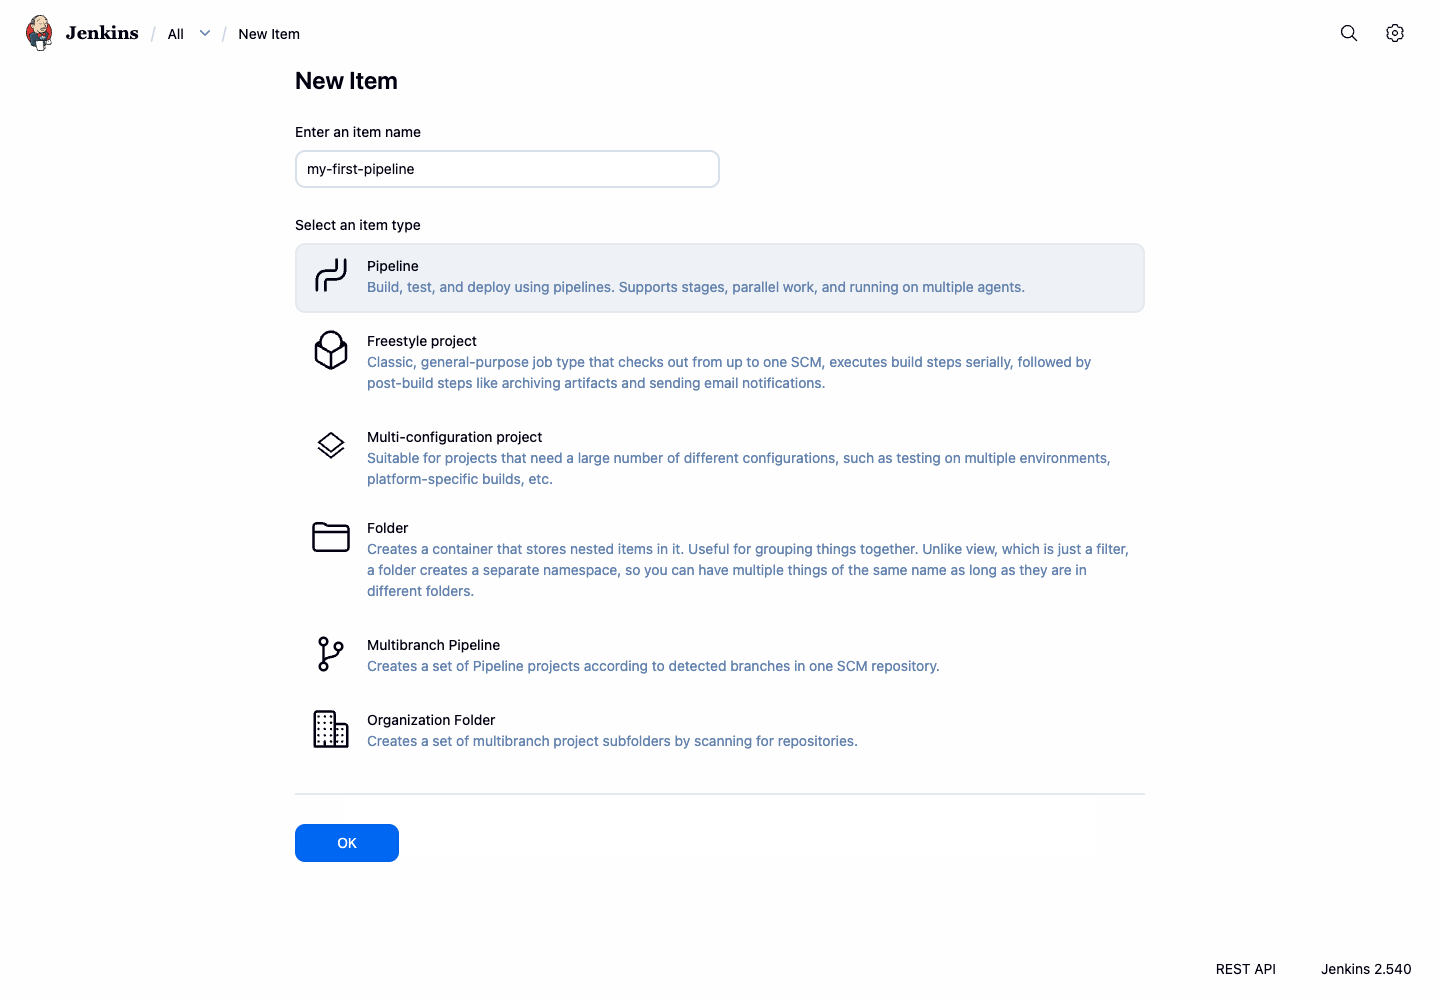
http://localhost:8080, so you don't need to manually enter the URL. No login is required. - On the Jenkins dashboard, click New Item in the left-hand menu.
- In the Enter an item name field, type
my-first-pipeline. - Select Pipeline from the list of project types.
- Click the OK button at the bottom of the page.
- You will be taken to the project's configuration page. For now, leave the settings as they are. Scroll to the bottom and click Save.
You have now created an empty Pipeline project. In the next step, you will create a Jenkinsfile and configure this project to use it.
Configure SCM to Use a Local Git Repository
Now you will configure your Jenkins project to retrieve its pipeline definition from a local Git repository served inside the Jenkins container. This keeps the lab independent from external network availability while still using the real Pipeline script from SCM workflow.
The demo repository is located at: git://localhost/pipeline-demo.git
Let's examine the Jenkinsfile that Jenkins will load from this repository:
pipeline {
    agent any
    environment {
        DEPLOY_TARGET = 'staging'
    }
    stages {
        stage('Build') {
            steps {
                echo 'Building the application...'
                sh 'echo "Compiling source code..."'
            }
        }
        stage('Test') {
            steps {
                echo 'Testing the application...'
                sh 'echo "Running unit tests..."'
            }
        }
        stage('Deploy') {
            steps {
                echo "Deploying the application to ${env.DEPLOY_TARGET}..."
                sh 'echo "Application deployed successfully!"'
            }
        }
    }
}
This Declarative Pipeline script includes multiple stages and demonstrates key concepts:
pipeline { ... }: The main block that defines the entire pipeline.agent any: Instructs Jenkins to run this pipeline on any available agent.environment { ... }: Defines environment variables that can be used throughout the pipeline.stages { ... }: A wrapper for all the stages in the pipeline.stage('...') { ... }: Defines specific stages. Stages help visualize the workflow.steps { ... }: Contains the actual commands to be executed in a stage.echo '...': A step that prints a message to the build log.sh '...': A step that executes shell commands.
Now, configure your Jenkins project to use this repository:
- Return to the Jenkins UI in your browser and navigate to the
my-first-pipelineproject page. - Click Configure in the left-hand menu.
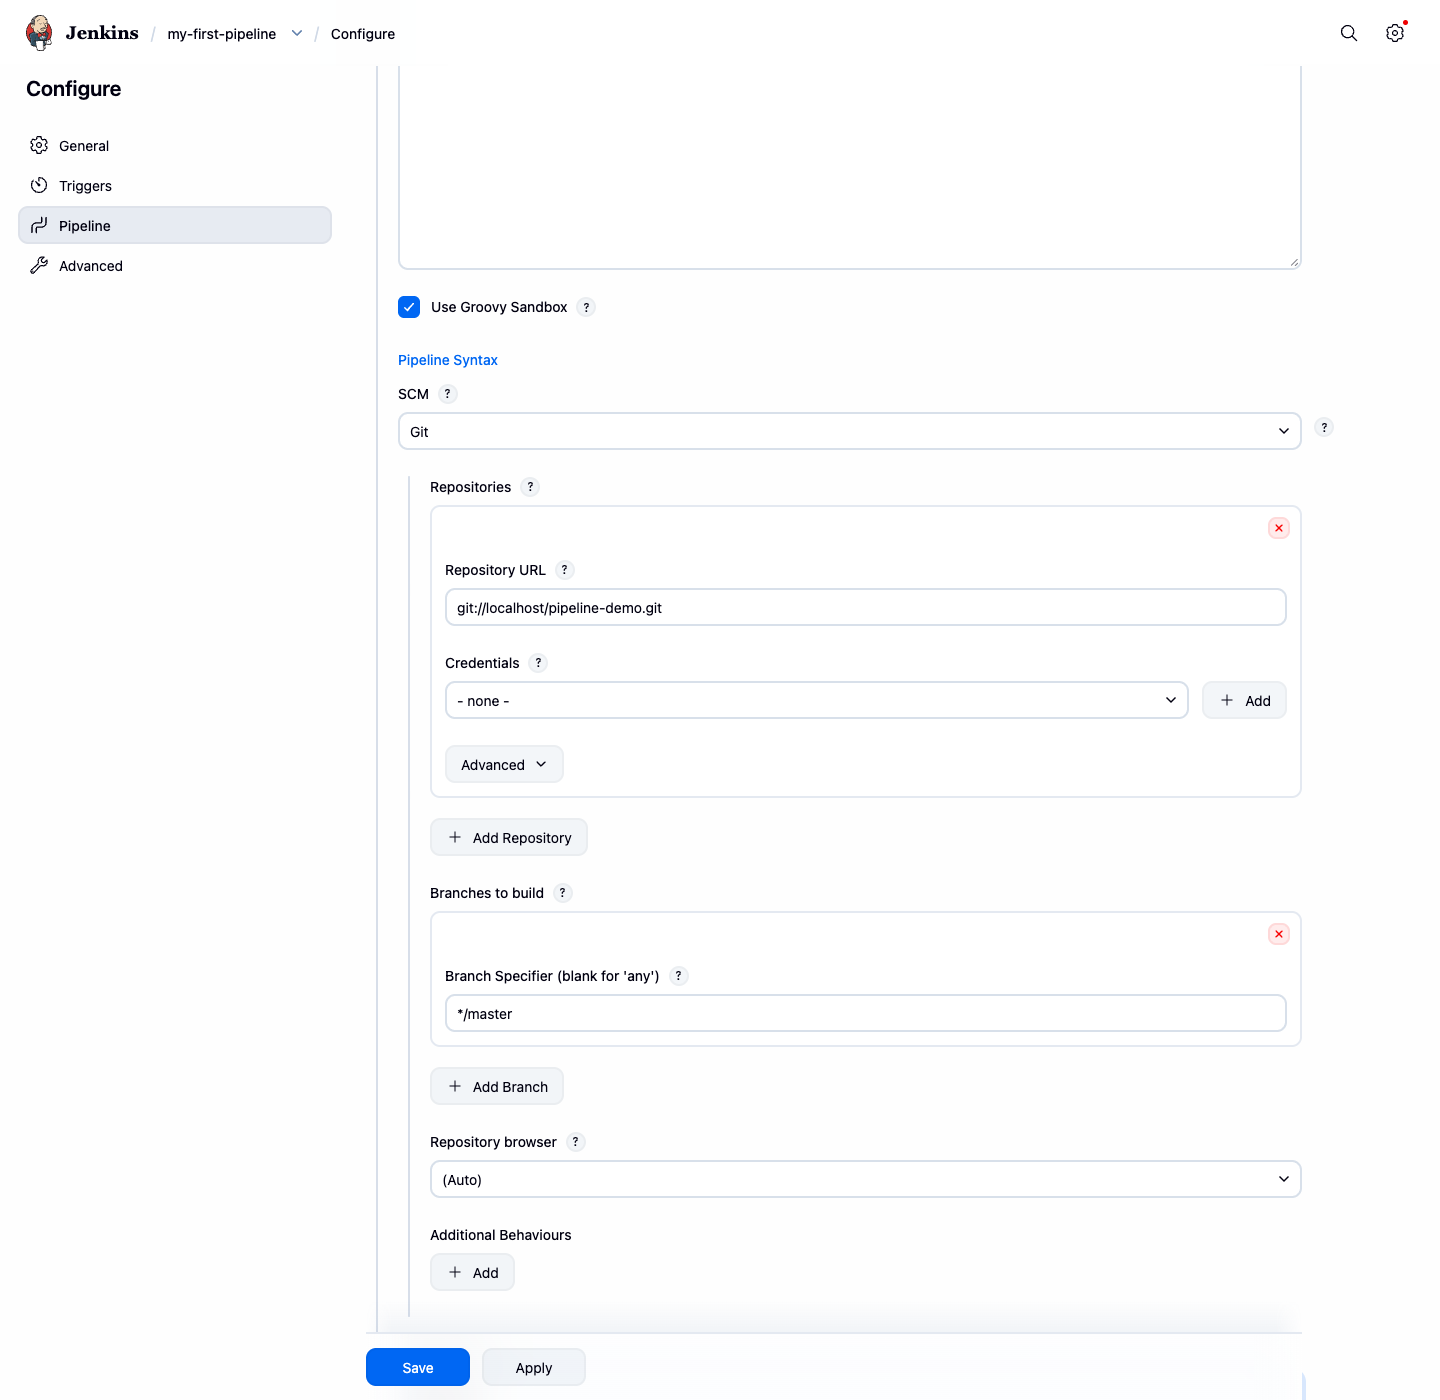
- Scroll down to the Pipeline section.
- Change the Definition dropdown from "Pipeline script" to Pipeline script from SCM.
- In the SCM dropdown that appears, select Git.
- In the Repository URL field, enter:
git://localhost/pipeline-demo.git - In the Script Path field, enter:
Jenkinsfile - Click Save.
Your project is now set up to execute the pipeline defined in the local Git repository.
Run the Pipeline and Check the Output
With your project configured, it's time to run the pipeline and see it in action.
On the project page for
my-first-pipeline, click Build Now in the left-hand menu.A new build will be scheduled and will appear in the Build History panel on the left. Below the history, the Stage View will show the "Build" stage running and then turning green upon completion.

To see the detailed output, click on the build number (e.g., #1) in the Build History.
On the build's summary page, click Console Output in the left-hand menu.
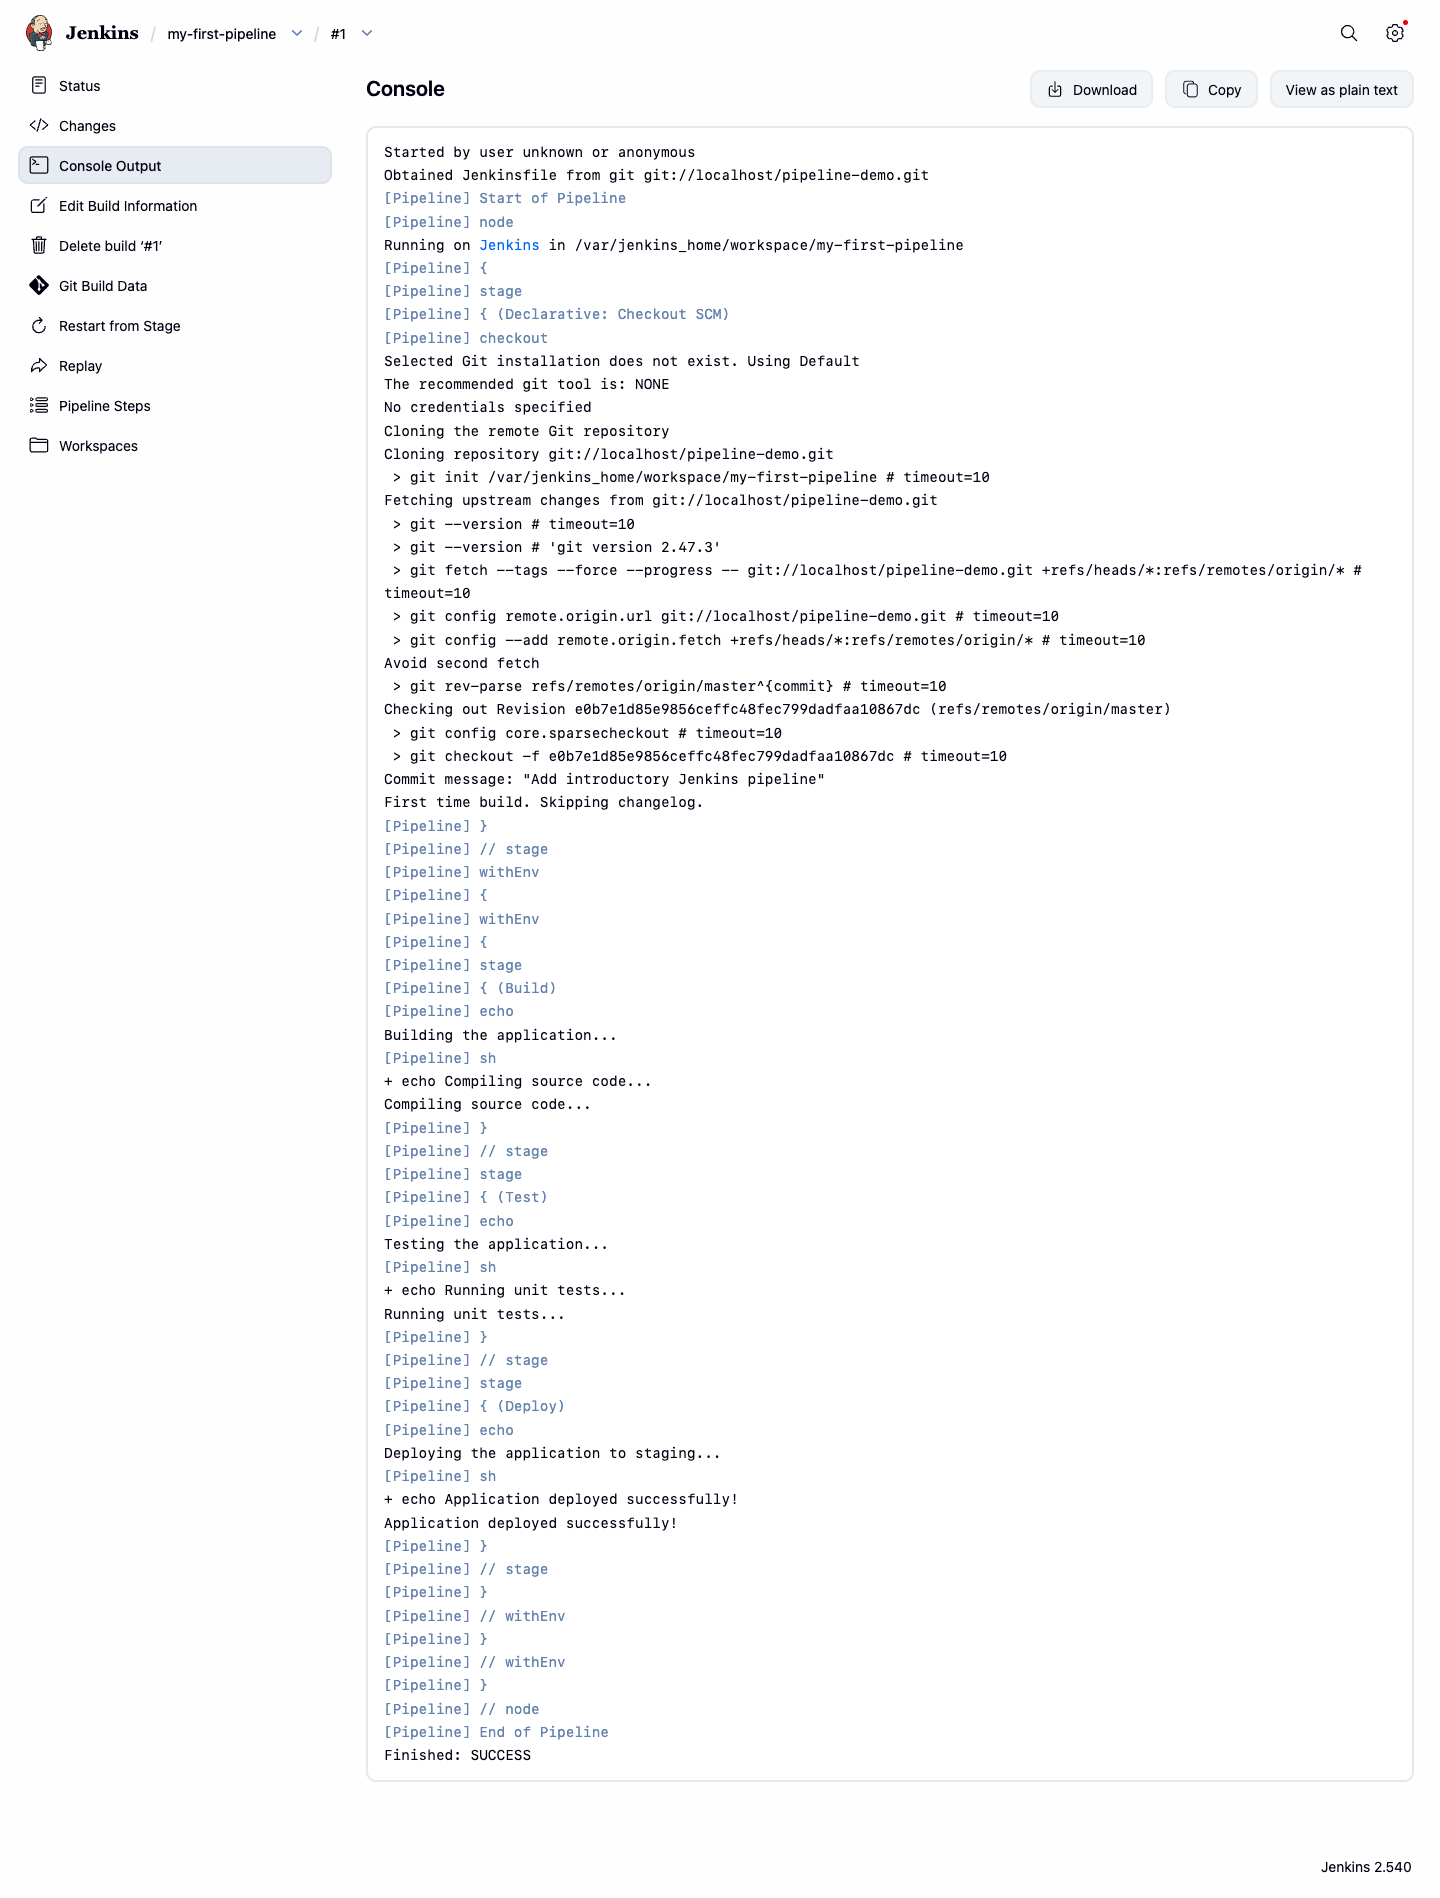
Scroll through the log. You will find the messages from your pipeline steps, confirming that your pipeline executed successfully.
...
[Pipeline] { (Build)
[Pipeline] echo
Building the application...
[Pipeline] sh
+ echo Compiling source code...
Compiling source code...
[Pipeline] } // stage
[Pipeline] { (Test)
[Pipeline] echo
Testing the application...
[Pipeline] sh
+ echo Running unit tests...
Running unit tests...
[Pipeline] } // stage
[Pipeline] { (Deploy)
[Pipeline] echo
Deploying the application to staging...
[Pipeline] sh
+ echo Application deployed successfully!
Application deployed successfully!
[Pipeline] } // stage
...
Finished: SUCCESS
You have successfully run your first pipeline and verified its output. Notice how the pipeline automatically executed all three stages (Build, Test, Deploy) that were defined in the repository's Jenkinsfile.
Understand Multiple Stages in the Pipeline
Real-world pipelines are composed of multiple stages, such as building, testing, and deploying an application. The Jenkinsfile from the local repository already includes these distinct stages, demonstrating this important concept.
Let's examine how the pipeline is structured with multiple stages:
stages {
    stage('Build') {
        steps {
            echo 'Building the application...'
            sh 'echo "Compiling source code..."'
        }
    }
    stage('Test') {
        steps {
            echo 'Testing the application...'
            sh 'echo "Running unit tests..."'
        }
    }
    stage('Deploy') {
        steps {
            echo "Deploying the application to ${env.DEPLOY_TARGET}..."
            sh 'echo "Application deployed successfully!"'
        }
    }
}
Go back to the Jenkins UI for the
my-first-pipelineproject and click Build Now to run the pipeline again if you haven't already.Observe the Stage View on the project dashboard. You will see three columns representing your "Build", "Test", and "Deploy" stages. Jenkins visualizes the progress as the build moves through each one.
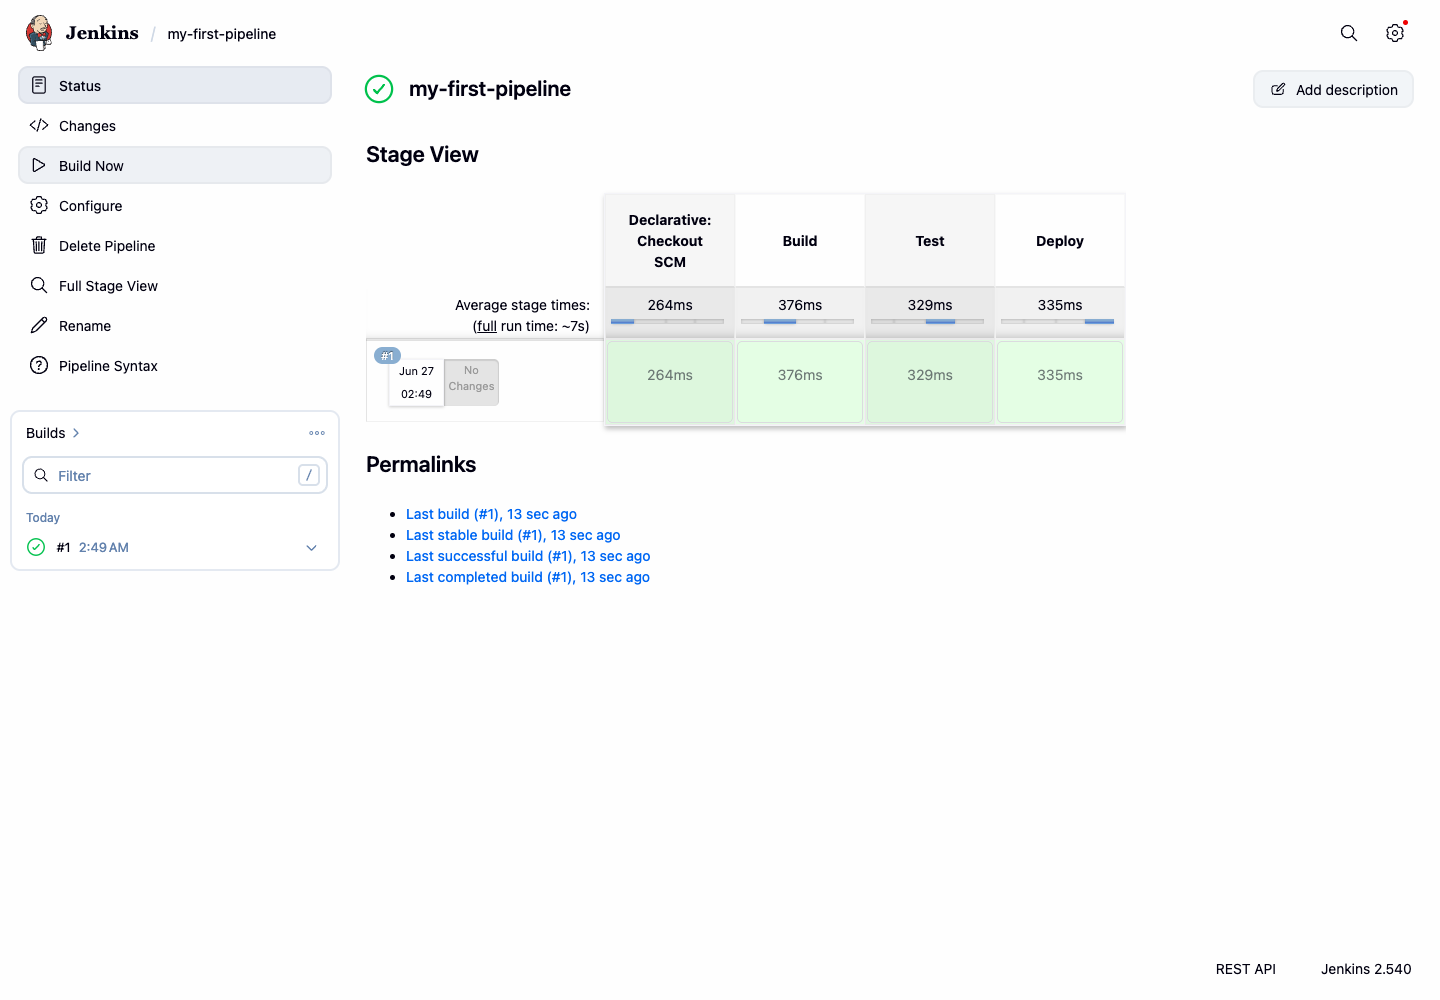
Click on any stage in the Stage View to see the detailed logs for that specific stage.
Notice how each stage executes sequentially - Jenkins waits for one stage to complete successfully before moving to the next stage.
By structuring your pipeline with stages, you create a clear and maintainable workflow that is easy to monitor. Each stage represents a logical phase in your CI/CD process, making it easy to identify where issues occur and to visualize the progress of your builds.
Understand Environment Variables in a Pipeline
In this final step, you will learn about environment variables. The environment directive allows you to define variables that can be used throughout your pipeline, which is ideal for managing configuration settings without hard-coding them in your steps.
The Jenkinsfile from the local repository already demonstrates this concept with an environment variable that specifies a deployment target.
Let's examine how environment variables are defined and used:
pipeline {
    agent any
    environment {
        DEPLOY_TARGET = 'staging'
    }
    stages {
        // ... other stages ...
        stage('Deploy') {
            steps {
                echo "Deploying the application to ${env.DEPLOY_TARGET}..."
                sh 'echo "Application deployed successfully!"'
            }
        }
    }
}
Key points about environment variables in Jenkins Pipelines:
- The
environment { ... }block defines variables that are available throughout the pipeline. - Variables are accessed using
${env.VARIABLE_NAME}syntax. - It is crucial to use double quotes (
") for strings with variable interpolation, as Groovy's variable interpolation only works inside double-quoted strings. - Environment variables make your pipelines more flexible and easier to maintain.
If you haven't already, trigger a new build in Jenkins by clicking Build Now.
After the build completes, check the Console Output for the build. In the log for the "Deploy" stage, you will see that the variable was correctly substituted:
...
[Pipeline] { (Deploy)
[Pipeline] echo
Deploying the application to staging...
[Pipeline] sh
+ echo Application deployed successfully!
Application deployed successfully!
[Pipeline] } // stage
...
Finished: SUCCESS
- Notice how the
DEPLOY_TARGETenvironment variable valuestagingwas automatically substituted into the echo statement.
Environment variables are essential for creating flexible pipelines that can be easily configured for different environments (development, staging, production) without modifying the pipeline code itself.
Summary
Congratulations! You have successfully completed this introduction to Jenkins Pipelines. You have learned the core concepts of defining a CI/CD workflow as code.
In this lab, you have practiced how to:
- Create a Pipeline project in the Jenkins UI.
- Configure a project to use a
Jenkinsfilefrom a local Git repository served to Jenkins. - Understand the structure of a Declarative Pipeline with multiple stages.
- Run a pipeline and inspect its console output.
- Observe how pipelines are structured into logical stages for clarity and organization.
- Understand how environment variables are defined and used to make pipelines more dynamic.
These foundational skills are essential for building sophisticated automation pipelines. You are now ready to explore more advanced topics, such as using parameters, managing credentials, and integrating with various build and deployment tools.