Introduction
In this lab, you will learn how to use additional password checks in Hydra, a powerful network login cracker. Specifically, you will set up a Telnet service on the LabEx VM and then use Hydra with the -e nsr option to perform password cracking attempts. This option allows Hydra to automatically try null passwords, the username itself as the password, and the reversed username as the password. This is a common technique used in penetration testing to quickly identify weak or default credentials.
The lab will guide you through installing and configuring the Telnet service on the LabEx VM. You will then use Hydra with the -e nsr flag to demonstrate how these additional checks can be used to find simple passwords. Finally, you will compare the results with using only the -e ns option to understand the impact of including the reversed username check.
Set Up Telnet Service
In this step, we will set up the Telnet service on the LabEx VM. Telnet is a network protocol that provides a command-line interface to a remote server. While Telnet is generally considered insecure for production environments because it transmits data in plaintext, it is suitable for demonstrating password cracking techniques in a controlled lab environment.
First, we need to create a test user account that will have a null password:
sudo useradd -m testuser
sudo passwd -d testuser
The passwd -d command removes the password for the user, effectively creating a null password.
We need to edit the Telnet configuration file, which is located at /etc/inetd.conf. Use the nano editor to open this file:
sudo nano /etc/inetd.conf
Inside the nano editor, find the line that starts with telnet. It should look similar to this:
telnet stream tcp nowait telnetd /usr/sbin/tcpd /usr/sbin/telnetd
Comment out this line by adding a # at the beginning of the line:
#telnet stream tcp nowait telnetd /usr/sbin/tcpd /usr/sbin/telnetd
Now, add the following line below the commented-out line. This new line configures Telnet to use the -i option, which disables authentication.
telnet stream tcp nowait telnetd /usr/sbin/in.telnetd -i
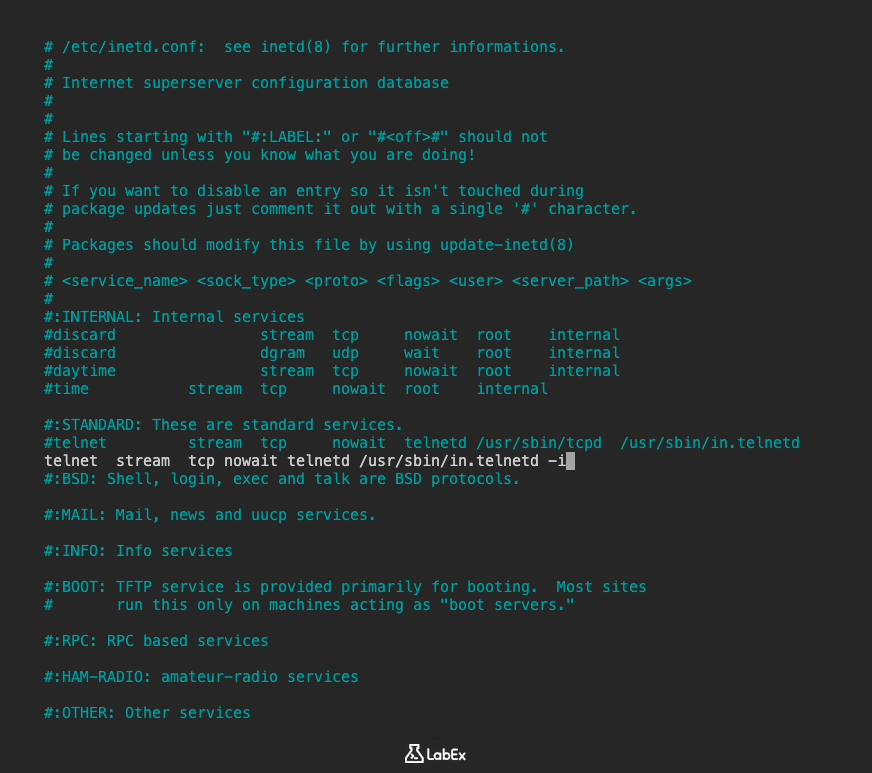
The relevant section of your /etc/inetd.conf file should now look like this:
#telnet  stream  tcp nowait telnetd /usr/sbin/tcpd  /usr/sbin/telnetd
telnet  stream  tcp nowait telnetd /usr/sbin/in.telnetd -i
Press Ctrl+X to exit nano. When prompted to save, press Y and then Enter to save the changes to /etc/inetd.conf.
Additionally, we need to verify that PAM is configured to allow null passwords for Telnet. Check the PAM configuration:
cat /etc/pam.d/common-auth | grep pam_unix.so
You should see a line like this:
auth [success=1 default=ignore] pam_unix.so nullok
If the line does not contain nullok, you need to add it. Edit the file:
sudo nano /etc/pam.d/common-auth
Find the line that contains pam_unix.so and add nullok to the end if it's not already present. Save and exit the file if you made any changes.
Finally, we need to restart the inetd service for the changes to take effect. Since we are in a Docker container environment, we will use the /etc/init.d script to restart the service:
sudo /etc/init.d/openbsd-inetd restart
You should see output indicating that the service is restarting:
* Restarting internet superserver inetd
The Telnet service is now set up and configured to allow logins without a password for the purpose of this lab.
Run Hydra with -e nsr Checks
In this step, we will use Hydra to perform a brute-force attack against the Telnet service. We will specifically use the -e nsr option to instruct Hydra to try null passwords, the username itself, and the reversed username as potential passwords.
Open your terminal in the ~/project directory and execute the following command:
hydra -l testuser -P ~/project/unix_passwords.txt -vV -e nsr telnet://localhost
Let's break down this command:
hydra: This is the command to run the Hydra tool.-l testuser: This specifies the username to use for the attack. We are targeting the test user we created, which has a null password.-P ~/project/unix_passwords.txt: This specifies a password list file to use in addition to the checks specified by-e. This file contains a list of common Unix passwords that we downloaded in the setup step.-vV: This option enables verbose output, showing each login attempt and its result.-e nsr: This is the key option for this step. It tells Hydra to perform additional checks:n: Try a null password (an empty string).s: Try the username (testuser) as the password.r: Try the reversed username (resutest) as the password.
telnet://localhost: This specifies the target service and address.telnetindicates the Telnet protocol, andlocalhostrefers to the local machine (the LabEx VM itself).
Execute the command. Hydra will start attempting to log in to the Telnet service on port 23 (the default Telnet port) using the specified username and the passwords from the list, as well as the null password, the username, and the reversed username.
You will see output similar to this as Hydra makes its attempts:
Hydra vX.Y (c) 2020 by van Hauser/THC - use allowed only for legal purposes.

Hydra is starting...

[DATA] 1 task, 1 server, XXXX service(s)
[DATA] attacking service telnet on port 23
[DATA] attacking target localhost
[ATTEMPT] target localhost - login: 'testuser' - pass: ''
[23][telnet] host: localhost   login: testuser   password:
[ATTEMPT] target localhost - login: 'testuser' - pass: 'testuser'
[ATTEMPT] target localhost - login: 'testuser' - pass: 'resutest'
...
Because we configured the test user to have a null password, Hydra should quickly find a successful login using the null password (the first attempt with an empty password).
Review Output for Successful Checks
In this step, we will examine the output from the Hydra command you just ran to identify the successful login attempts.
Scroll back through the output in your terminal. Look for lines that indicate a successful login. These lines are typically marked with the port number and service, followed by the host, login, and password.
Since we configured the Telnet service to allow logins without a password, you should see a line similar to this in the output:
[23][telnet] host: localhost login: testuser password:
This line confirms that Hydra successfully logged in to the Telnet service on localhost using the username testuser and a null password (indicated by the empty space after password:).
You might also see other successful logins if any of the passwords in the ~/project/unix_passwords.txt file match the actual password for the testuser user (although in this lab setup, the null password is the intended successful check).
The -vV option provides detailed output for each attempt, which is useful for understanding how Hydra is progressing and which passwords it is trying. The successful login line clearly shows the credentials that worked.
This step demonstrates how the -e nsr option helps in quickly identifying common weak password scenarios, such as null passwords, which are often overlooked in standard password lists.
Compare with -e ns Checks
In this step, we will run Hydra again, but this time we will use the -e ns option instead of -e nsr. This will tell Hydra to try null passwords and the username as the password, but it will not try the reversed username. By comparing the output of this command with the previous one, you can see the difference in the checks performed.
Open your terminal in the ~/project directory and execute the following command:
hydra -l testuser -P ~/project/unix_passwords.txt -vV -e ns telnet://localhost
This command is almost identical to the previous one, with the only difference being the -e ns option.
-e ns: This option tells Hydra to perform the following additional checks:n: Try a null password.s: Try the username (testuser) as the password.
Execute the command. Hydra will again attempt to log in to the Telnet service, trying passwords from the list, the null password, and the username as the password.
Observe the output. You will see attempts for the null password and the username as the password, similar to the previous run. However, you will not see an attempt for the reversed username (resutest).
Hydra vX.Y (c) 2020 by van Hauser/THC - use allowed only for legal purposes.

Hydra is starting...

[DATA] 1 task, 1 server, XXXX service(s)
[DATA] attacking service telnet on port 23
[DATA] attacking target localhost
[ATTEMPT] target localhost - login: 'testuser' - pass: ''
[23][telnet] host: localhost   login: testuser   password:
[ATTEMPT] target localhost - login: 'testuser' - pass: 'testuser'
...
By comparing the output of this command with the output from Step 2, you can clearly see that the -e nsr option includes the reversed username check, while the -e ns option does not. This highlights how different options in Hydra allow you to customize the password cracking process and include specific types of checks that might be relevant in certain scenarios.
Summary
In this lab, you learned how to use additional password checks in Hydra by setting up a Telnet service on the LabEx VM and using the -e nsr option. You installed the telnetd package and configured the Telnet service to allow null passwords for demonstration purposes by creating a test user with a null password, modifying the /etc/inetd.conf file, and configuring PAM to allow null passwords.
You then used Hydra with the -e nsr option to perform password cracking attempts, which included trying null passwords, the username as the password, and the reversed username as the password. You observed the output and identified the successful login using the null password. Finally, you compared the results with using the -e ns option to understand the difference in the checks performed. This lab demonstrated how Hydra's additional password checks can be used to quickly identify common weak credentials.