Introduction
In this lab, you will learn how to customize the FTP port number on a target system and then use Hydra to perform a brute-force attack against the FTP service on that custom port. This is a valuable skill for penetration testers and security professionals who need to assess the security of systems that have been configured with non-standard FTP ports.
The lab involves configuring the FTP server on the LabEx VM to listen on a non-standard port by modifying the vsftpd.conf file and restarting the FTP service. You'll then use the netstat command to verify that the FTP server is listening on the new port. Finally, you'll use Hydra with the -s option to specify the custom port and execute an FTP attack, validating that Hydra can successfully connect to the FTP service on the configured port.
Configure FTP on a Non-Standard Port
In this step, we will configure the FTP server on the LabEx VM to listen on a non-standard port. By default, FTP uses port 21. Changing the FTP port can help reduce the risk of automated attacks that target the default port.
First, let's edit the FTP configuration file. We'll use the nano editor, which is pre-installed on the LabEx VM.
sudo nano /etc/vsftpd.conf
This command opens the vsftpd.conf file in the nano editor.
Add the following line to the file:
listen_port=2121
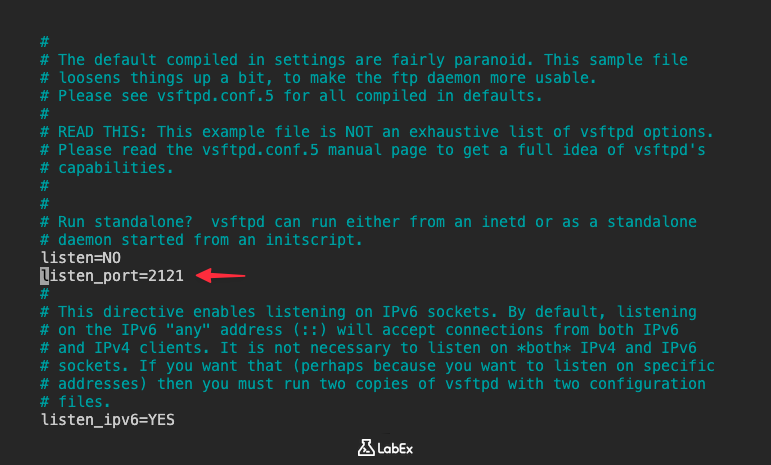
If the listen_port line doesn't exist, add it to the file. It's good practice to add it near the top of the file.
After making the changes, save the file by pressing Ctrl+X, then Y to confirm, and then Enter to save with the same filename.
Next, we need to restart the FTP service for the changes to take effect.
sudo service vsftpd restart
This command restarts the FTP service. You should see an output indicating that the service has been restarted.
Finally, let's verify that the FTP server is now listening on the new port. We can use the netstat command to check the listening ports.
sudo netstat -tulnp | grep vsftpd
This command shows all TCP, UDP, listening, and process information, and then filters the output to show only lines containing "vsftpd". You should see a line that indicates vsftpd is listening on port 2121 (or the port you chose).
Example output:
tcp6 0 0 :::2121 :::* LISTEN 1027/vsftpd
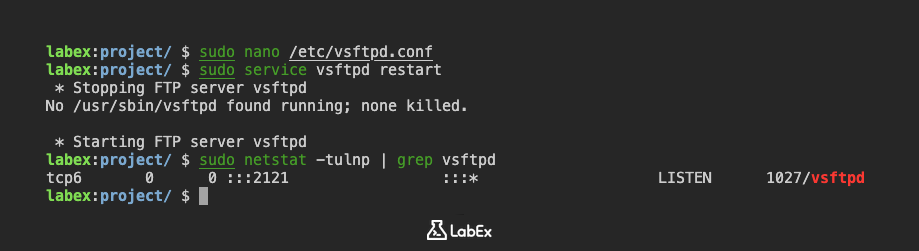
If you see the new port number in the output, it means the FTP server is now listening on the new port.
Specify Port with -s Option
In this step, we will learn how to specify a non-standard port when using the ftp command. This is crucial because in the previous step, we changed the FTP server's listening port from the default 21 to a custom port (e.g., 2121). Now, when connecting to the server, we need to tell the ftp client which port to use.
For the ftp command, you can specify a non-standard port by providing HOST PORT, such as ftp localhost 2121. However, Hydra uses the -s option for specifying the port. It's important to understand this difference as we prepare for the Hydra attack in the next step.
Let's try connecting to the FTP server using the host-and-port form of the ftp command to verify the connection. Replace localhost with the IP address of the LabEx VM. If you are running this lab on the same VM, you can use localhost or 127.0.0.1.
ftp localhost 2121
You will be prompted for the username and password. Ctrl+C to exit.
Now, let's simulate how Hydra will specify the port. While we won't actually use Hydra yet, this step is important for understanding the syntax. Hydra uses the -s option to specify the port.
Hydra's syntax for specifying the port is different from the standard ftp command. Hydra uses -s followed by the port number. For example, if we were using Hydra to attack the FTP service on port 2121, we would include -s 2121 in the Hydra command.
To demonstrate this, let's create a dummy Hydra command. We won't execute it, but it will illustrate the correct syntax.
hydra -l ftpuser -P ~/project/password.txt localhost ftp -s 2121
The key takeaway here is the -s 2121 part. This tells Hydra to connect to the FTP service on port 2121.
In summary, the standard ftp command can use HOST PORT to specify the target port, while Hydra uses -s. Understanding this difference is crucial for the next step, where we will execute an FTP attack using Hydra.
Execute FTP Attack on Custom Port
In this step, we will use Hydra to perform a brute-force attack against the FTP service running on the non-standard port we configured in the first step. We'll use the password list that was created during the setup phase.
Now we are ready to launch the Hydra attack. Replace localhost with the IP address of the LabEx VM. If you are running this lab on the same VM, you can use localhost or 127.0.0.1.
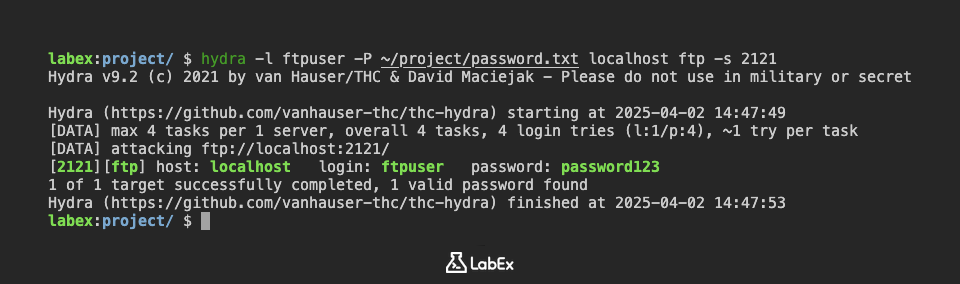
hydra -l ftpuser -P ~/project/password.txt localhost ftp -s 2121 -vV
Let's break down this command:
hydra: The command to execute the Hydra tool.-l ftpuser: Specifies the username to attack.-P ~/project/password.txt: Specifies the path to the password list file that was created during setup.localhost: Specifies the target IP address. Replacelocalhostwith the actual IP address.ftp: Specifies the service to attack (FTP in this case).-s 2121: Specifies the port number. This is crucial because we changed the FTP port to 2121 in the first step.-vV: Enables verbose mode, which shows the login attempts in real-time.
Execute the command. Hydra will start trying different passwords from the ~/project/password.txt file against the FTP service on the specified port.
If Hydra finds the correct password, it will display the successful login information. For example:
[ATTACKER] attacking ftp://localhost:2121/
[2121][ftp] host: localhost   login: ftpuser   password: password123
If Hydra doesn't find the correct password, it will try all the passwords in the list and then exit without displaying a successful login.
Important Security Note: This lab is for educational purposes only. Do not use Hydra to attack systems without explicit permission. Unauthorized access to computer systems is illegal and unethical.
Validate Connection to Correct Port
In this final step, we will validate that we can still connect to the FTP server on the custom port after the attempted Hydra attack. This confirms that the FTP service is running as expected and that we can access it using the specified port.
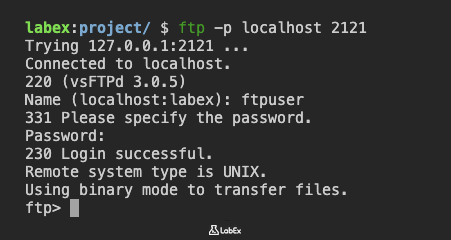
Use the ftp command with host and port to connect to the FTP server on the custom port. Replace localhost with the IP address of the LabEx VM. If you are running this lab on the same VM, you can use localhost or 127.0.0.1.
ftp localhost 2121
You will be prompted for the username and password. Use the credentials we created in the setup:
- Username:
ftpuser - Password:
password123
If the connection is successful, you will be logged into the FTP server.
If you are unable to connect, double-check the following:
- Ensure that the FTP service is still running. You can check this using the
netstat -tulnp | grep vsftpdcommand, as we did in the first step. - Verify that the FTP port is still set to 2121 (or the port you chose) in the
/etc/vsftpd.conffile. - Make sure that there are no firewall rules blocking connections to the custom port. (Note: The LabEx VM environment typically doesn't have a firewall enabled by default, but it's good to keep this in mind for real-world scenarios.)
- Confirm that you are using the correct username and password.
A successful connection confirms that the FTP server is running on the custom port and that you can connect to it with ftp localhost 2121. This also validates that the Hydra attack, even if unsuccessful, did not disrupt the FTP service.
This completes the lab. You have successfully configured FTP on a non-standard port, learned how to specify the port using the -s option with Hydra, executed a basic Hydra attack, and validated the connection to the correct port.
Summary
In this lab, we configured the FTP server on the LabEx VM to listen on a non-standard port, specifically port 2121, instead of the default port 21. This involved editing the /etc/vsftpd.conf file using nano to modify or add the listen_port directive, followed by restarting the FTP service using sudo service vsftpd restart.
Finally, we verified that the FTP server was indeed listening on the new port by using the netstat -tulnp | grep vsftpd command to check the listening ports and confirm that vsftpd was associated with port 2121.